Features of metal structures
Metal barbecues can be either stationary for a summer residence, or mobile or folding. The first option is easier to assemble, as it only requires attaching legs concreted (or simply dug) into the ground. In this case, 2 supports submerged to a depth of 50-70 cm are sufficient.
Mobile structures are installed on more stable supports in the form of a sled or 4 legs. The wheels are attached to the bottom of the supports. Sometimes they install all 4, less often - 2 wheels so that the grill does not move when any pressure is applied to the side.
A folding metal barbecue is a box for coals, the legs of which are either completely detachable or mounted on fixed supports. This design option is convenient for those who like to go out into nature, have picnics, and hikes.
How to make a grill on a stand with a cutting table
The roasting pan, installed on a movable stand with a cutting table, provides almost everything:
- the ability to prepare food, supply dishes, spices;
- conveniently, “at hand”, place accessories by hanging them on hooks;
- store fuel supplies and kitchen utensils;
- transport the kebab maker within the site.
In case of rain, the unused roasting pan can be turned upside down to prevent it from rusting and placed in the same location.
Grill drawing:
The technology for manufacturing the fryer is similar to the previous version:
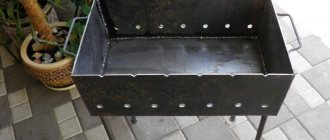
- We cut out the body blanks from a sheet 4 mm thick.
- We weld the body.
- We weld handles from a 25x25 mm corner with a length of 100 mm.
The drawings schematically show the holes in the grill for air intake and the distance between them, as well as grooves for skewers. Why you don’t have to read them in the article “Ideal dimensions of a barbecue.”
How to make a brazier with your own hands, watch the 11-minute video.
Stand for barbecue: drawings with dimensions.
Making a frame from a 20x20 mm pipe:
- We cut the pipe to the dimensions specified in the drawing specifications, taking into account the angles of connection of the parts.
- We weld the three-dimensional frame frame. In the corners from the inside we strengthen the upper structure, grabbing it with 4 plates. We weld the handle. Install 2 wheels.
- We weld a cutting table from 4 pieces of pipe, and grab 4 plates from the inside at the corners. We weld 2 parts to it for attaching to the stand and hooks.
- We cut out the wooden parts of the tabletop and lower base.
- We assemble the structure:
- install the fryer,
- we install wooden elements.
Dimensions and typical diagrams
When making a barbecue yourself, you can focus on the following parameters and features of their calculation.
Width
Determined by the size of the skewers. The length of typical products is 45-50 cm, of which the useful or working length is only 30-35 cm.
Consequently, the maximum permissible width of a typical barbecue is 40 cm. Then the meat will occupy maximum space above the coals, and the heat will not be wasted.
Length
It must be calculated based on the average number of kebabs. The recommended distance between two skewers is 5-10 cm. For 6 skewers, it is better to make a grill 60 cm long.
For a large company, when meat is fried on 10 skewers at the same time, a meter-long grill is suitable. And for barbecue grills, a 40 cm long roasting pan is optimal.
Dutch oven depth
The ideal value is from 15 to 20 cm. For frying meat, a layer of coals 5-10 cm high is enough, and the recommended distance between the skewers and the fuel is 8 cm.
For wood-burning grills, the depth is increased, but then more coals will be required for good roasting.
Grill height
This parameter is selected individually for the chef. It is believed that the brazier should be at the level of a person’s waist, then it will be convenient to work with the barbecue.
Depending on the height of the cook, the height of the grill can vary from 80 to 120 cm.
Frypan wall thickness
For stationary barbecues, the rule works: the thicker the walls of the firebox (broiler) of the barbecue, the better. It is advisable to use metal sheets with a thickness of 5-10 mm. Such a grill will retain heat better and last longer.
If you want to weld a portable structure, sheets 3-4 mm thick are suitable. Then the structure will weigh less.
Useful tips
The durability of the barbecue depends on the type of metal you choose. Therefore, experts recommend using heat-resistant steel. Cast iron meets all requirements in terms of durability, reliability, and ability to retain heat, but working with it requires professional skills. There is no clear opinion regarding galvanized steel. Some believe that it is dangerous, since at high temperatures it can release harmful substances. Others believe that it is impossible to heat a brazier with wood to such an extent. Everyone agrees that stainless steel is the best material. A brazier made from it will last for several decades.
You need to remove dry grass, branches and other flammable debris from the place where the grill is installed, and place a box of sand nearby. If wooden parts are used in the design, they must be located at a distance of at least 20 cm from the body. To prevent smoke from interfering with your rest, it is recommended to install a hood with a short pipe. It is equal in area to the barbecue and is attached to its body.
When caring for the grill, you must follow the following rules:
- Do not fill the coals with water, as this will lead to deformation of the metal,
- grease drips are removed with a rag and sand,
- To protect against adverse weather influences, the grill should be regularly lubricated with vegetable oil.
To make a metal barbecue, the highest qualifications and scarce materials are not required. It is possible that the first copy will turn out lopsided, but don’t give up. The next grill will turn out no worse than the factory one.
Advantages and disadvantages of a metal barbecue
Advantages:
- simplicity and a large number of design options;
- high assembly speed;
- possibility of self-production;
- relatively low cost when made by hand;
- high maintainability.
Flaws:
- The material is prone to corrosion, so it must be periodically tinted. At the same time, applying a protective coating to the outside of the coal box is useless; strong heat causes the protection to burn off;
- For manufacturing, you must have the appropriate skills and ability to work with tools.
Metal barbecues are popular and convenient; mobile models can be put away for the winter. However, the design itself is not very attractive; the box is covered with soot and does not decorate the area.
Beautiful barbecues with forged elements
Forged elements give the product originality, lightness and individual style. Even a simple cover or curled handle on a brazier makes it different from other kebab makers.
Forged elements are not only decorative, but also add strength to the structure. For advice from a master on how to properly weld a barbecue using ready-made forged elements, watch this dynamic 7-minute video:
How to make a barbecue without welding with your own hands, read the article “Dismountable barbecue”.
Instructions for self-production
Let's consider the process of assembling a barbecue made of metal. To make a simple model you need a minimum of materials and tools.
Tools and materials
Metal sheets 5 mm thick for the bottom and 3 mm for the walls
Steel pipes for making supports
Metal corner 20 mm for decorating the sides (you can also strengthen the connection between the bottom and the sides)
Grinder with cutting wheel
Welding inverter with a set of electrodes
Shovel or drill for making sockets for supports
Ruberoid, bitumen mastic for lining nests and applying a protective coating to supports
Protective paint for application on the grill
Expert opinion
Valery Garmash
Chef of the Grill House restaurant, griller
As a rule, heat-resistant black paint is used for painting so that the burnt edges do not stand out and create a contrast with the main coating.
Step-by-step instruction
We will show you how to assemble a simple grill yourself. Its design is so simple that any novice craftsman can make it.
For this purpose, a sheet of metal 2 mm thick was purchased from a metal warehouse. We recommend using metal with a thickness of at least 3 mm for the barbecue.
Since this grill (in our example) will not be used very often, 2 mm thick metal will be enough for us. Before starting work, for convenience, we made a small cutting diagram.
To obtain an even cut, you can use a regular iron strip as a guide bar.
When working, remember to use appropriate protective equipment.
Due to their design, homemade clamps are very helpful in work.
Once all the panels are cut, it's time to start drilling the holes. We decided to order a set of step drills for testing.
The optimal height of the grill sides is 150 mm. A row of holes is located at a height of 50 mm from the base. Hole pitch 60 mm. Diameter 12.4 mm.
The first impression of these drills is so far positive. The chips, as expected, come out of the hole in whole ribbons. I use a countersink to remove burrs.
We also place the recess for the skewers in increments of 60 mm.
It is best to process the sidewalls with a bag, pre-compressed with clamps.
When all the parts are ready, you can proceed to welding.
It is very convenient to use magnetic corners to secure parts.
We assemble the box using tacks.
Now you can scald.
It is not necessary to completely weld all the seams. We just wanted to practice welding one more time. We knock down the slag and clean the welds.
From 10 squares we make handles for easy carrying.
We will make the legs of the barbecue from 15 profile pipes, their length will be 80 cm. We trim the blanks using a cordless circular saw.
It will not be easy to get such an even cut with a regular grinder.
The legs will be attached using M6 bolts.
If necessary, this will allow you to store and transport the grill when folded.
To attach the legs, it is most convenient to use a wing nut.
When preparing barbecue, an additional work surface is never superfluous. A small shelf was quickly welded from 10 squares of reinforcement. It is installed in one movement in two sections of 15 professional pipes.
When all the work is completed, we clean all the parts and cover them with heat-resistant enamel. We wait for the paint to dry completely and you can assemble the grill.
The grill turned out to be very durable and quite stable. Its dimensions are as follows: height 80 cm, length 50 cm, width 30 cm, depth 15 cm.
When first ignited, the paint is fired within 15 minutes and it gains full mechanical strength.
The grill turned out to be very successful. Its design is so simple that even a novice welder can make such a grill.
Sometimes an awning or canopy is installed over the barbecue to protect the brazier from rain. The grill can also be painted with heat-resistant paint to protect against corrosion.
The technological process of creating a barbecue using welding
Here it is important to decide what kind of structure you are planning - stationary or portable. The first can be installed in a specific place and for a long time. The second one can be transported without problems.
Typically, the use of welding equipment is necessary when producing a stationary version. Before the work process itself, be sure to watch the video tutorials and decide how you will decorate the future device.
The work algorithm here is as follows:
Stage 1. Initially create cuttings. Lines must be marked on metal sheets. The guideline in this process is a previously made or copied drawing.
Stage 2. All the main components of the intended design need to be cut out of the working material. The work proceeds in accordance with the existing markings on the sheets. A bottom should form. This is the largest component. It is formed by four lateral parts. Two of them are short, and the other two are long.
Stage 3. Be sure to make holes in the long side components. They can simply be drilled in one line. They guarantee the penetration of oxygen into the firebox to the coals. And then the heat required for normal working process will be maintained in your device. The distance between the holes should be approximately 5.5 cm. Make sure that there is at least 2.5 cm left to the edge.
Advanced version
A metal grill created independently can always be improved and supplemented with useful components. One of these is a canopy. Example:
In this design, both a table top and a frame for placing skewers will not hurt. The top of the roasting pan can be reinforced with a profile pipe. You need to cook it so that there is room for possible additions.
Example:
It is not necessary to cook a barbecue of this format. There are other design variations.