Glassblowing workshop equipment. Increasing the receiver capacity of a factory compressor
Continuing the theme of equipping a glassblowing workplace in a workshop, one of the main elements for glassblowing work is a special burner. It has certain requirements, among the first is a stable flame. The burner is powered by a mixture of combustible gas, and its components most often include air. It is clear that an even, constant flow over time is required.
In the old clay times, air was compressed to supply it to the burner using bellows. Surely today, “When spaceships plow the Bolshoi Theater,” you can find small gasoline burners, like jewelry or dental ones, with bellows. This makes sense for portable devices - light weight, non-volatile. Sometimes, in laboratory conditions, a water jet pump is used to obtain air compressed to low pressure.
For tabletop burners, in particular those used by glassblowers, electric blowers - compressors - are now used. Operational requirements for blowers by master glassblowers - near the burner, the compressed air must be under pressure that is 100...150 mmHg above atmospheric pressure. Air must be supplied evenly and without interruption - stopping the air supply at a critical moment of operation can lead to the destruction of a valuable product. If you work with a carburetor, there is a risk of flame leaking into the carburetor and a fire is possible.
At first, to experiment with a glass-blowing burner using gasoline vapor, I used a homemade compressor from a refrigerator. It turned out, however, that it has to be turned on quite often, ideally working almost continuously. In this case, the pressure will be most stable. In this mode, a dehumidifier in the form of a box-can with silica gel should be installed on the air intake. Otherwise, moisture from the air will accumulate inside the compressor in the oil. One of the design features of refrigerator compressors is that the open electric motor floats in oil. The accumulating water will sink to the bottom and can easily cause a short circuit in the windings.
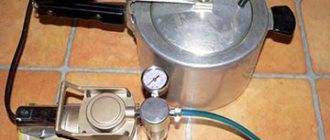
Significantly more compressor. Its 24-liter receiver ensures fairly long operation between starts, making it more convenient to work. In addition, the compressor has a classic layout - a separate piston group, a separate motor - like nuts and cutlets in the saying, and there are no worries with drying the incoming air. Factory settings of the pressure switch allow the compressor to automatically pump up the capacity to 7 atmospheres, then the consumer disassembles it through an adjustable reducer. The very small pressure required for the burner to operate allows the compressor to turn on quite rarely - once every few tens of minutes, depending on the power of the burner. However, each start-up adds a few gray hairs to an unbalanced person - the compressor is quite noisy. You sit in silence - only the flame of the burner slightly hisses, in your hands there are shaped pieces of glass - a kind of frozen music, trembling in your soul... And suddenly behind your back - DRRRRRRRRRRRR. Oh my mother-soviet-woman. Here even a Zen master will jump, that same one and a half meters.
Of course, the most radical way would be to remove the noisy unit into a separate room; in fact, this is what they do in large workshops. What would you order grandfather Mazai to do in his own space, which represents a single space? Of course, you can also think in this direction, but for now, as a compromise option, you can in a simple way reduce the number of compressor operations by increasing its receiver.
Generally speaking, compressors of this type (piston, “construction”), with the same compressor but different receiver capacities, can differ significantly in cost. This is apparently connected not so much with the cost of steel used for the cylinder, but with the weight and dimensions of the device and, accordingly, the cost of transportation and storage.
During operation, a compressor with a small receiver is good for relatively mobile use, where its modest dimensions allow for convenient movement, this can be powering a pneumatic tool in a farmstead or painting, when the length of the existing hoses may not be enough and it is more convenient to move, transport the unit to the place of use . For stationary use, for similar tasks, it would be better to have a larger receiver capacity. However, in the mentioned subsidiary farming, both types of tasks may arise. Let's say, in the cold season - stationary use in the workshop, with the onset of the warm, “construction and field” season, relatively mobile. For example, if the outside temperature is sufficient, it is more convenient to paint outside, and so on. In this case, it would be convenient to have a variable volume of the receiver - increased at a permanent place, even if it would be more cumbersome, "in the field" - a standard one. A solution suggests itself with a detachable connection to the original cylinder, another container.
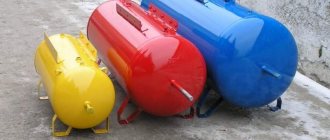
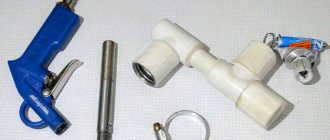
This is exactly what was done. As an additional receiver, a household gas cylinder for propane with a capacity of 27 liters was chosen. After some reorganization of its gas industry, it remained “on the siding”. It was decided, if possible, not to make changes to its design so that, if necessary, it could be used for its main purpose. For this purpose, standard connecting parts from failed gas appliances were used. Also, it would be convenient to use standard spiral plastic hoses with quick-release connectors that automatically lock the channel. This will allow you to flexibly change the equipment configuration. For example, you can use a longer hose, connect several of them, install a cylinder of a different capacity, several pieces through standard “tees”, and so on. By the way, if necessary, you can pump compressed air into the cylinder, for example, to use it in a place where there is no electricity.
So. What was used in the work.
Tools, equipment.
Structural soldering was used - you need a small gas torch with the appropriate solder and flux. Something for drilling, a set of ordinary metalwork tools.
Materials.
In addition to the most experimental compressor and a gas cylinder, we needed standard pneumatic connectors, FUM tape, solder No. 3 and a paste-like flux for it - from a copper water supply. Standard connection fitting to a gas cylinder.
After some deliberation, the plug on the tee was chosen as the location for connecting the additional container. A standard quick-locking pneumatic “mother” will be installed on it. Among other things, this will allow you to disconnect and connect an additional receiver at any time, including under pressure, without loss of compressed air.
A set of standard fittings was purchased on AliExpress. “Mother” with internal thread. You cannot solder it directly - you can damage the rubber seals inside, and disassembling it is not so easy. It was decided to use one of several “dads” (Swedish family?) with the same thread as a transitional part. It doesn't have any rubber bands - you can safely solder it.
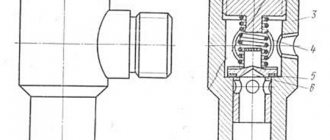
After unscrewing the plug on the compressor, it turned out that this was not a tee, but, naturally, a check valve. However, this does not change the matter, you just need to make sure that the soldered “male” does not stick out too much inward and does not interfere with the normal operation of the valve. The silicone gasket and the attached spring with an elastic band were removed from the plug. The center was found, a small hole was punched and drilled and bored out with a needle file and then a file to the required diameter. The “male” was shortened with a hacksaw, the soldering points were cleaned. Flux, soldering, washing off flux residues with warm water, reassembly. Installation of the “mother” on the FUM tape, testing with operating pressure.
To connect a gas cylinder to the system without modifications, you will have to use standard connecting parts. They were obtained from a failed household gas reducer. The fitting was modified to fit tightly with the “male” from the kit. A small file. Well, as usual - clean the soldering areas, flux, solder, wash off the residue. Yes, do not forget to put on the union nut before soldering - it cannot be removed from the finished soldered adapter - the turnkey edges get in the way, this is not bad, it will not get lost during operation.
Then it’s a matter of fantasy
Anyone who once rode “for power” on a moped or motorcycle without an air filter knows what deep scratches this seemingly “clean air” leaves on the piston skirts and cylinder walls.
Therefore, when thinking about how to make a compressor with your own hands, you inevitably have to think about the inlet air filter. It is enough to make the inlet pipe to match the inner diameter of the car air filter.
It must be done in the shape of the same inverted letter “G” to avoid splashing the oil outward. Of course, it is also necessary to make a seal to prevent air leaks from below. Surely there is something suitable for this in the corner of your garage?
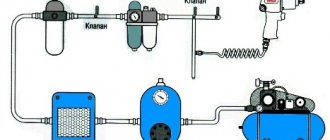
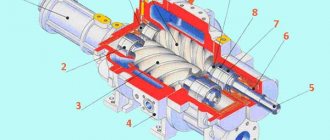
...So, let's trace the path of air through the compressor we are creating. Through the air filter from the car and the inlet pipe, air enters the “pump”.
Coming out through another pipe under pressure, the air gets rid of oil dust in the oil separator and oil filter. Then the air enters the receiver.
It should be noted that the air must pass through the receiver in order to dampen pressure surges. Therefore, if you simply screw a tee into the neck of your fire extinguisher - at the inlet, at the outlet and at the pressure gauge - this will not give any result.
Ideally, this diagram looks like this. Air enters almost to the bottom of your fire extinguisher through one of the two, longer tubes - and exits through the second, shorter one. Between the inlet and outlet holes there is a third one, into which a pressure gauge is screwed in, indicating the air pressure in your fire extinguisher.
A bypass valve or relay is connected in parallel with the pressure gauge. There are also pressure gauges that combine a relay option. Next, from the outlet pipe of the receiver, air enters a hose capable of withstanding a pressure of 6 - 8 atmospheres for use.
If you frequently change the tool connected to the compressor, it is reasonable to install a special pneumatic lock-connector at the end of the hose. It allows you to connect and disconnect the tool with one simple movement of your fingers.
Interesting!
If you only work with one thing each time, then you can get by with a regular ball valve in front of the hose. In the same way - convenient, useful, but not included in the “necessary package” - is a second pressure gauge showing the pressure in the hose.
As already said, this is the required level of equipment. These are the tasks that must be solved if you decide to build a compressor for your workshop yourself. Then it’s just a matter of the master’s imagination.
You can, for example, install a cooler for cooling. It’s no secret that air heats up when compressed. Instead of a car air filter at the inlet, you can install a water filter, similar to a hookah.
You can install two in series - instead of one receiver. Or make a salt filter, dry the exhaust air... For each purpose there are different means.
Design
The air intake consists of many elements, the main ones include the following:
- pressure gauge that controls the pressure level;
- sealed container for compressed air;
- pipes connecting the device to the pneumatic system and compressor;
- a safety valve that allows the media to be released at elevated pressure;
- faucet for removing moisture.
Selection of a receiver for a compressor is necessary only for piston units. Plate or screw based devices do not require the use of such additions. Under the influence of pressure, the working medium is delivered into the container using a pipe and reaches the required pressure level. In this case, condensation forms and the overall air humidity decreases. Compressed gas is supplied to a pneumatic tool or pneumatic system through the outlet pipe.
Manufacturing of high pressure apparatus
In such homemade products, high-power automobile pumps are used as an air blower to inflate wheels. Models designed for trucks are well suited - they are capable of delivering up to 12 atmospheres into a container designed for this purpose (a compressor from a Zilov engine is suitable).
For a high-pressure apparatus and receiver you need an appropriate one: a durable gas or freon cylinder or a container from an old powerful compressor, if it is in good condition.
Important! The manufacture and use of such units at home must be approached with great caution - pressure from an explosion or inaccurately directed air flow can be dangerous to health and even life.
Purpose of air receivers
A high-quality air collector literally allows you to create a laminar flow of forced air by accumulating excess air in a reserve tank. But due to their design features, compressed air receivers also perform many side functions:
- Partially clean the air mixture from oil and excess moisture;
- They create a reserve of compressed air in the circuit in case of interruptions in the operation of the complex or in the event of a sharp increase in the needs of the system;
- By ensuring uniform operation of the industrial compressor, the air collector also helps reduce the number of engine starts of the installation.
- Reduces the load on the compressor inlet valve by reducing suction cycles.
Thus, air collectors for the compressor stabilize the working process, extend the service life of the complex, save resources, and also eliminate the occurrence of emergency situations.
Functions
The compressor receiver is designed to prevent the formation of corrosion in the system by removing excess moisture. It is also capable of storing compressed air and ensuring continuous operation during increased loads. Therefore, it becomes indispensable when the productivity of the units is insufficient and the functioning of a large number of consumers.
Equipment operating in automated mode is switched on when the pressure drops to a given level and switched off when it rises. The receiver reduces the number of cycles, which increases the period of uninterrupted operation and reduces wear. The supply of compressed air is uneven due to the specific functioning of piston systems. This problem is eliminated by a special air accumulator that prevents pulsation.
How to choose the optimal receiver parameters
The selection of the most suitable receiver is carried out according to the main parameters. The most important is the volume, which depends on the following points:
- Installation performance. In this case, a gas cylinder with a capacity of 25 liters is sufficient.
- Cyclicity of compressed air consumption. This indicator is characterized by how many times the installation has to be turned on and off.
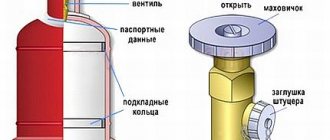
Before using the gas cylinder directly, you should pay attention to its integrity. The presence of even minor defects determines that the device cannot be used. The test is carried out by filling the container with water. In addition, water allows you to free it from gas residues that should not enter the system.
If you find an error, please select a piece of text and press Ctrl+Enter.
After the last attempt to paint with the cheapest Chinese gun ( Painting the hood
) a thought came to mind like “let it float” and a more expensive Chinese pistol was bought)))
Well, as always - “The woman has a lot of trouble - she bought a pig.”))) The new gun consumes many times more air, the compressor is catastrophically unable to cope. This is so Slavic - create a problem for yourself and then proudly solve it)) Buying another 220v compressor means blushing with shame every time you pass by three-phase sockets in the garage. And since there is a plan to build a 3-phase compressor, and there is even a ready-made electric motor with pulleys, I decided for now to extract everything that it can give from the old single-cylinder baby - to cut a ball valve into its receiver to take air into the entire hole:
The welding work was carried out by a friend and part-time neighbor, the guy professionally welds heating and plumbing, so if anyone needs it, I’ll get in touch.
A 100-liter propane cylinder from HBO was purchased as heavy artillery. I got it for $18 and was still half full of gas))) During descent into the atmosphere, the cylinder froze and stopped descending; you could see how much gas was left by the frost waterline)))
The container was ventilated for a couple of days, then they filled it with water and began to cook. I made legs from 4.5 mm steel to hang vertically on the wall...
... condensate drain from below, air intake from above...
The air inlet is made at the place where the float is installed so that the flow hits the inner wall of the receiver and loses as much moisture as possible:
Testing at 8 atmospheres showed that Vanya is really a specialist in welding))) To temporarily protect the welds, the same epoxy primer in a cylinder
. Everything was cleaned and primed:
I will not paint the part of the supply tube that will be in the receiver; let the humid environment be a test for this primer:
The system now has 150 liter receivers, all connections are herringbone, the only quick release is in front of the gun. The compressor is shocked =)))
Strange as it may seem, a receiver made from a gas cylinder is a sought-after and important thing for many people. The receiver itself should be a specific container, which was originally created to store gases or liquids under pressure. The receiver cannot be made from plastic containers! An excellent and only correct option, and also completely safe, is a receiver made from a 50 liter gas cylinder, since the container itself can withstand heavy loads.
Read also: St 101e operating principle
Power
There are several fundamental parameters that must be taken into account when creating a compressor from a gas cylinder. The most important can be called power, since it reflects the functionality of the device, which consists in compressing gases. Among the features of the power indicator are the following:
- To measure the indicator in question, bars, atmospheres or Pascals are used. To translate values, various tables are used, which significantly simplify the task.
- When creating a compressor, one should take into account the fact that the pressure decreases from the source to the direct actuator. In this case, a drop in pressure occurs throughout the entire pipeline or at critical elements.
- Power largely determines how much pressure can be created in the system. It depends on the installed electric motor and many other factors.
Manufacturers of industrial equipment always indicate power in the specification. In the case of work to create a home-made structure, it is necessary to perform calculations and select the appropriate elements.
The classification of compressors is carried out directly according to the power indicator, which is reflected in the pressure. It looks like this:
- Vacuum.
- Group with low and average indicators.
- High and extra high.
Most homemade structures belong to the second group. This can be due to the fact that too high an indicator becomes the reason for complicating the task.
Receiver for compressor: varieties
There are two main types of devices: horizontal and vertical. The latter have become most widespread due to their advantages, including small dimensions, which save space in production facilities. In this case, two types of devices can be combined into a common network; their arrangement can be serial or parallel. The choice of installation method is selected individually depending on the existing conditions.
The serial connection ensures better purification of the working environment from oil impurities and moisture. Cleaning is carried out as the working medium passes through the reservoirs of the integrated network. The disadvantage of such a system is the reduction in the throughput of the receivers due to their overall resistance.
The main advantage of a parallel connection is the ability to quickly carry out repair work without having to shut down the entire system. It is enough to disconnect the failed additional receiver for the compressor, replace it or repair it. In addition, the connection does not increase resistance and the throughput remains the same.
Do-it-yourself additional receiver for a compressor
Some work in a workshop or at home may require increased consumption of compressed air, which household compressors are not capable of providing. One possible solution would be to place an additional receiver for the compressor. The cost of such a device, based on volume, will be 12-15 thousand rubles if you buy it in a store, but nothing prevents you from saving money and making the receiver yourself. An additional advantage in favor of the second solution is that most of the models offered in the store are designed for standard compressors, which is why their price is so high!
The connection of the additional receiver is usually carried out in series with the main one, and therefore, depending on the required volume, a regular fire extinguisher body or a cylinder left over from liquefied gas may be suitable for operation.
As in the case of assembling a barbecue from a gas cylinder, making a homemade receiver begins with thoroughly cleaning the cylinder from gas residues. For this purpose, the first step is to remove the input valve. It is important to note that you cannot remove the valve using a power tool , as there may be gas residues inside!
Performance
Another important parameter is performance. This indicator determines how much of a substance can be transported per unit of time. Among the features of this moment we note the following:
- Usually the indicator used for measurement is l/min, m3/hour and some others. Indicators can be converted into certain units of measurement to significantly simplify calculations.
- Performance is determined under standard conditions, which are defined by a temperature of 20 degrees Celsius and normal atmospheric pressure. Recalculation of productivity can be carried out depending on what the ambient temperature is.
- All compressors are divided into several main groups. An example would be small, medium and large productivity. This indicator largely depends on design aspects.
The performance is also indicated in the operating instructions. This indicator is determined by conducting tests under certain conditions. As for the homemade construction from gas cylinders, it is quite difficult to control and measure performance.
How to choose
There are several basic parameters that are decisive when purchasing:
- Bandwidth. This criterion reflects the volume of air passing through the compressor receiver within one minute. Here the required amount of compressed gas for the operation of the equipment should be taken into account.
- Pressure. Devices that operate with air under pressure within 10 bar are the best option for household tools. For small commercial enterprises, it is recommended to use devices with a maximum pressure of at least 16 bar.
- The volume, depending on the model, can range from 5-1000 liters. It should be taken into account that the dimensions of the receiver must correspond to the power of the compressor itself. The volume of the device should be at least 30-40% of the total productivity. For household devices with low power, 5-20 liters is sufficient.
To calculate a receiver for a compressor, it is necessary to determine the minimum and standard operating pressure, the total volume of the system, productivity and the time allotted to achieve the set pressure level.
Testing and setting up a homemade product
Any test of a homemade compressor should be done at idle, especially with sandblasting. You need to start with low pressure, gradually increasing it to the required value. While pumping the cylinder, stop periodically and watch the pressure gauges to see if there is a loss of pressure at the joints. If it is leaking somewhere, then the connection must be made again, because with increased pressure the joints may burst.
Important! To monitor pressure, an emergency air release sensor is installed in the structure. This will help prevent over-inflating the balloon. But it is better to install a pressure control module instead of such a sensor, which will independently monitor the degree of air compression in real time and cut off its supply when the desired indicator is reached.
The most optimal choice for the operation of the system will be to select the receiver and supercharger so that their boundary pressure and performance correspond to each other. This will help to realize the full potential of the compressor installation, while avoiding the danger of over-pumping.
So, we have given several examples of self-manufacturing of the most popular types of compressor units. In general, homemade compressors are widely used not only in everyday life, but also in industry, allowing for constant modernization by replacing main parts. But the more complex the equipment, the more knowledge, skills in electrical and plumbing work, as well as materials and tools will be required. In most cases, visual aids can be found on videos on the Internet.
What are receivers (air collectors)
In industrial production, receivers (air collectors) are capacitive devices (vessels) that are designed to collect, store under pressure, transmit, and distribute various gases (for example, air receiver, nitrogen, ammonia, gas, oxygen, etc.). They can be used in various systems - for storing and transmitting gases to consumer devices, for smoothing pressure drops in engineering systems and generation systems (compressors). Receivers differ in internal pressure, volume, operating temperature ranges, and in their technical purpose in the engineering system (for example, in refrigeration units, ammonia receivers are used, which can be linear, drain, or circulation). In addition, different gases require different materials, designs, anti-corrosion and other protections.
Thus, the design and internal processing of a metal vessel for storing such an aggressive gas as oxygen will obviously differ from a receiver for storing neutral helium. And receivers for ammonia refrigeration units must be designed to operate in a wide temperature range, including extremely low temperatures, down to minus 50 degrees or more.
Receiver for compressor.
I'm assembling a compressor. I welded a receiver from a pipe (4mm iron) and 2 plugs at the edges (2mm iron). The problem is that there is no way to achieve a tight seal along the weld. It turned out to be about 5-6 holes on each side. the pressure drops quite quickly, but I would like there to always be a couple of atmospheres in the receiver. As I understand it, welding alone is not enough for complete tightness. The idea is to pour half a glass into the pipe on each side of something liquid and hardening to get the effect of a sealant. I’m thinking about using this, so far liquid mastic is in first place, but there are also disadvantages here. What can you recommend? I would also be grateful for another solution to the tightness problem. Or tell me the technology of hermetic welding.
Try pouring epoxy with aluminum powder filler. I wonder how many atm are plastic 3-liter bottles? are they holding?
I can’t say anything about welding technology. The question arises - why cook a receiver for the sake of 2-3 atmospheres? For a receiver with such pressure, a spare tire from a car would be quite suitable. For a larger receiver - a truck wheel. In the center of the compressor there is a receiver around the perimeter and you can roll it over. If you still want to use a pipe, then maybe look towards the rubber membranes from the expansion tanks? Or maybe cut off a piece of a car inner tube with a nipple, cap it on both sides and push it into the pipe?
2. Using a grinder, it is advisable to clean out all the deposited metal (where it etches) and boil it again. The maximum possible current. As a last resort, caulk it, but it won’t stop etching until the end. As for mastic, etc., I don’t know, I haven’t heard about it.
2andrey_o, I did that, it doesn’t help. The problem is that the pipe was cut off with gas, so the surface to the plug is not dense, and it’s precisely in those places where the gaps were large (3-4 mm) that it leaks. However, I cut the other end (with a grinder), evenly, but still, it poisons from it. The receiver should hold a maximum of 10-15 atm. As a sealant, you need to use some soft material so that it does not crack due to pressure or temperature changes.
Today I will try to digest one plug with a new one (in the sense of a new plug in a new place).
An excellent receiver is made from an old gas cylinder.
Holes can be found with soapy water - apply it to the seam, there will be bubbles on the holes.
You can try pouring ANTI-PUNCH inside, pumping up the receiver, and rolling it around a little so that the liquid gets onto all the seams. Then drain the remainder and dry the container in the open state.
2Zheka Hermetic welding = ordinary high-quality welding, no special technologies. With 15 atm and 2mm plugs, aren’t you afraid of getting hit in some place by this same plug? Maybe it’s easier to find a Zilov or KAMAZ receiver at a landfill or car depot? PS In car dealerships they sell a product for repairing punctures, you unscrew the nipple and inject it into the wheel.
Zheka wrote: where the gaps were large (3-4 mm).
Apply it with a heavy hammer or a sledgehammer.
I sprayed about 200 grams of liquid polymer-bitumen mastic (diluted with solvent), heated the bottom with a burner (+ the receiver was warm, heated it with a colorizer), and slowly rotated it at an angle of 45 degrees. Cooled under pressure. I blew out the receiver with a compressor. Then I pumped it up to 2.5 atm - it doesn’t let through. In general, the experiment seemed to be a success. We can only hope that this will last for a long time.
Viktorovich, I completely agree. that is why the plugs are welded with 50mm corners (crosswise), and these corners are welded through amplifiers (the same corners) to the pipe. I don’t know what kind of stupidity you have to have to disrupt all this! They also scared me with scary stories, but I myself hold 9-10 atm with my thumb, through a 9mm hole! Or is the pressure area still of decisive importance? In any case, I want to check the receiver with a critical pressure of 20-25 atm (the compressor is industrial, it pumps more than 50 atm), after which it will be set to automatically pump at about 10 atm. The outlet is through a pressure reducing valve. I would like to hear opinions about the dangers of storing the receiver under high pressure. So that it would be safe to go into the garage.
Carpenter versus joiner
“The viper with wheels is here!” KF "Kin-dza-dza"
The second stage of assembly is carpentry. I took ready-made chipboard plates “from stock” and screwed furniture wheels onto them with self-tapping screws, having previously drilled the seats for them with a thin drill (this way they are screwed exactly in place and much easier)
Be sure to ride the newly made product around the apartment (you need to check it out! =) ) - you will be guaranteed the attention and interested reaction of your family (from the category of bad advice, it would be worth leaving a note “never repeat this yourself”). Since I was making a two-level stand, the next step was to mark and drill holes for the studs
I screwed the nuts approximately to the middle of each stud, measured out the perforated tape with a reserve (so that it would be a “bed” for the fire extinguisher) and hoisted the latter to the place intended for it. Attention!!! Be sure to cover all bitten off areas of the punched paper tape with electrical tape or other soft material to avoid the possibility of injury, or treat it so that there are no sharp edges or burrs left. After positioning the fire extinguisher, I placed two more perforated tapes on top and secured them with nuts. If you use a prepared hydraulic accumulator as a receiver, then most small (5, 6, 8 liters) “horizontal” type models have wonderful claw brackets at the bottom and top. The lower ones can be screwed to the base, and a compressor can be placed on the upper ones. In my case, which I use as an example, the structure consists of two levels. The “second floor” of the structure must be prepared before installation. We find suitable holes on the legs of the compressor (there are many of them), and, maintaining the geometry, mark and drill them on the “second floor”. It’s okay if the holes are slightly larger than the diameter of the bolts (I used M8), wherever needed I used wide washers. We mount the “second floor” plate, looking at the diagram that we talked about in the first part. We install the compressor. In order to reduce vibration, it is necessary to provide some damping elements. I used ordinary plumbing silicone gaskets as them, making a kind of shock absorber out of them. We fix the compressor, do not forget to put washers. We try on the air distribution module to the receiver. If something sticks out, or is simply poorly positioned, the design can be changed. After fitting, we screw it on. Using a flexible hose, fum tape and clamps, we connect the outlet of the compressor and the inlet of the air preparation unit. The clamps must be tightened well, ensuring a tight fit of the hose - otherwise oil may leak and splash on the compressor side, and air may leak from the air distribution module side.
How to make a compressor from a gas cylinder with your own hands
Dear visitors to the site “ Samodelkin Friend ”, today we will look at step-by-step instructions on how to make a compressor from a gas cylinder with your own hands. Every master in our time is simply obliged to have a compressor in his workshop, because you can connect a spray gun to it, as well as pneumatic tools which works by supplying compressed air from the compressor reservoir, and it is simply convenient to use a gun to remove dust and blow through parts.
This compressor is made from a gas cylinder and a motor from an old air conditioner; you can also use a motor from a refrigerator. That is, the cylinder plays the role of a reservoir for storing compressed air, and the motor from the air conditioner pumps it there; at the outlet there is a reducer with a pressure gauge to determine the pressure inside the cylinder. A reinforced flexible hose with a blow gun is connected to the fitting; it can also be replaced with any other pneumatic tool or spray gun.
The first step is to neutralize the cylinder and drain the remaining gas from it and rinse it with water; how to do this correctly, read our article How to safely cut a gas cylinder, cut off the protruding parts with a grinder, and unscrew a standard valve. Next, you should remove the motor from the air conditioner. After which they are connected to each other; see how to do this below.
Materials
- gas cylinder 25 l
- motor from an air conditioner or refrigerator
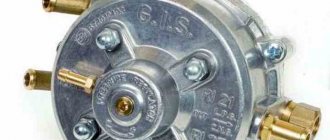
- gearbox with pressure gauge
- reinforced hose
- blow gun
- wheel 2 pcs
- fittings
Tools
- welding machine
- Bulgarian
- drill
- set of wrenches
- screwdriver
Step-by-step instructions for assembling a compressor from a gas cylinder with your own hands.
To understand how a compressor works, it is necessary to study its circuit diagram.
Then you need to safely drain the remaining gas from the cylinder and unscrew the valve using a wrench or gas wrench, see how to do this correctly here. We remove the motor from the old air conditioner. We unscrew the valve. Fill the bottle with water from a hose. We drill holes for the gearbox and valves. We saw off the protruding parts. We are welding a new squeegee. And also for ease of movement, be sure to put the compressor on wheels. We make a shelf and install a motor from an air conditioner or refrigerator. We paint using a can of paint. We connect the electrical wiring and connections. This is such a simple and budget compressor made from junk. If you have any questions, ask them in the comments. Thank you all very much for your attention!
Recommendations
We recommend that you read these tips:
- The tank must be cleaned inside and out, otherwise progressive corrosion will create a hole. Sandblasting is one of the most effective and simplest cleaning methods. You can create a sandblasting chamber with your own hands with relative ease.
- Before work begins, the body elements are straightened. You can go the standard route and use a hammer, hoods, spotter and then paint the body, but the developed PDR technology helps eliminate damage without painting.
- Be sure to paint with a spray gun after applying the primer. Acid primer for cars is extremely effective, but has features of operation and compatibility with other materials.
- Before painting, all adjacent elements are either dismantled or covered, especially glass. If paint gets on glass, there is a risk of damage to the material during the removal process. A car glass repair kit will help restore glass from most damage. Car roof rails are difficult to dismantle; it is better to cover them with film and wrap them with tape.
Purpose and design features of the receiver
The purpose of the air container is directly related to the physical properties of compressed gases. The faster they lose pressure in the event of a flow, the smaller the volume they occupy. A receiver is needed in a compressor to perform the following functions:
- creating the necessary supply of air to supply the consumer without turning on the engine or in case of its unexpected stop;
- smoothing out pressure fluctuations, especially characteristic of piston machines;
- ensuring the convenience of regulating the output parameters of the gas coming from the compressor unit;
- reducing vibration, noise, peak load levels;
- collecting moisture and small mechanical inclusions contained in the gas.
Important! Often, the use of large air collectors saves energy consumption due to the rational operation of the electric motor.
The compressor tank is traditionally made of corrosion-resistant steel. It is also possible to use certain types of plastic and high-strength rubber for small volumes and pressures. Receivers for mobile installations can reach 100 liters. The dimensions of stationary equipment are not limited by anything and are often measured in several cubic meters.
To fill the cylinder and flow air from it, one fitting is enough, but models with a separate gas inlet and outlet work better. In order to control pressure, some manufacturers additionally provide for the installation of a pressure gauge. For large containers this requirement is mandatory. For their inspection and cleaning, hatches are welded in.
The spatial arrangement of the receiver, depending on the convenience of the equipment layout, is selected horizontal or vertical. The first option gives greater stability to mobile units. The second provides better condensate separation and requires less installation space.
Making an apparatus from elements of a refrigerator with a fire extinguisher
Homemade compressors are often used for airbrushes (devices for painting cars and other surfaces), so let’s consider making just such a device. The parts needed to assemble the structure can be borrowed from an old refrigerator and a regular fire extinguisher .
Tools and materials
To get started, you will need the following tools and units:
- fire extinguisher - OHP-10 or similar;
- pressure switch - RM-5 or with similar characteristics;
- moisture separating filter - 2 pcs;
- fuel filter - 1 piece;
- PVC hose with reinforcement;
- gearbox - preferably with a pressure gauge;
- separate pressure gauge for monitoring pressure in the receiver;
- Teflon tape (FUM);
- pliers, wrenches of different sizes.
Depending on the parts used, other tools may be required. Drawings of the fire extinguisher may also be useful to understand how to disassemble it.
Engine
For an average airbrush, a compressor motor from an ordinary household refrigerator is perfect.
Advice! It is advisable to use a fresher or well-maintained electric motor - without cracks or rust.
Air chamber
The container for collecting air will be made from an empty fire extinguisher. Its body has a relatively compact size, and the shape and material used for manufacturing are optimally suited to withstand significant air pressure for a long time.
To begin with, the fire extinguisher is emptied of its original contents in an open area, and then disassembled. Of all the parts, only the body itself and the lid, which is put on top, are left. In this form, the cylinder is fixed to the base of the future unit in any convenient way.
Assembly
Having all the necessary components available, the compressor unit is assembled directly.
- A ¼-inch pipe thread is cut into the hole in the fire extinguisher cover, and a quarter-inch to half-inch adapter is screwed into it through sealing with FUM tape.
A half-inch expander with 4 holes is screwed into the adapter itself (also through a tape). A pressure switch is screwed into this tee from above, and into one of the sides there is a half-inch to half-inch adapter into which the tee is inserted.
A gearbox with a quarter-inch pressure gauge is inserted on top. On the other side of the cross-shaped expander, a valve is installed to manually relieve pressure from the cylinder.
A water separating filter is installed on the gearbox (and the hole for removing moisture must be at the correct angle). The second moisture separating filter will be located on the inlet side.
A half-inch fitting is screwed onto the hole, where the filter is inserted. A quarter-inch to half-inch adapter is inserted into the other hole in the filter, into which a tee is screwed.
- The tee is plugged from above, and another half-inch fitting is inserted on the opposite side.
- The reinforced hose is screwed onto the hole entering the cylinder itself and secured with a clamp.
On the other hand, the hose is connected through a clamp to the structure described above. On the other filter side, another piece of hose is screwed on, which connects to the refrigeration compressor. - A fitting is screwed through the outlet of the cylinder, onto which a silicone tube is placed. This tube is immediately connected to the airbrush.
To maintain a refrigeration compressor, it is necessary to periodically change the oil in it. Automotive 10W40 or similar is perfect for this purpose. .
Receiver selection
The technical requirements for compressor receivers are quite stringent. As high-pressure equipment, they may pose a potential hazard . The most important characteristics that determine the permitted parameters for using the tank are:
- operating pressure;
- temperature range;
- indicators of relative air humidity.
The rules for the design and safe operation of pressure vessels regulate the volume, frequency and method of their control tests for density and strength. They must be sealed, without visible defects and traces of external or internal corrosion.
From a technological point of view, an air compressor with a receiver is needed to ensure the operation of certain pneumatic equipment. What is important here is the required gas flow with the required pressure. This takes into account the operating mode with probable peak loads. All these indicators determine the minimum volume of the receiver capable of ensuring a stable supply of air.
How to choose a receiver for a compressor that you already have? Use special tables or calculation calculators.
On a note! Simplified methods are based on averaged experimental data. It is believed that the cylinder for a compressor cannot be less than the volume of gas produced by it in 8 seconds of operation at normal loads.
An alternative option for selecting capacitive equipment is based on compressor power. It gives the simplest dependency:
- 5 kW – up to 100 l;
- 10 kW – up to 300 l;
- 20 kW – up to 550 l.
All other values are obtained by interpolation.
Making and connecting an additional receiver with your own hands
It is not uncommon for a small workshop to need to accommodate new pneumatic equipment that the old air blower can no longer handle. You can try to solve this problem yourself by connecting an additional receiver to the compressor. At the same time, it is not at all necessary to incur unjustified expenses when purchasing a standard container. Experienced craftsmen try to make do with improvised means.
In almost any household, old equipment designed to work under pressure often lies idle. You can make a receiver for a compressor with your own hands from a gas cylinder, a fire extinguisher or a piece of large-diameter seamless thick-walled pipe.
The most reliable is a homemade receiver made from a liquefied petroleum gas cylinder. To do this, the inlet valve is dismantled, after which the internal space is intensively washed or steamed. It is advisable to fill the container with water and allow the bottom sediments to dissolve in it for 24 hours. Only after this can gas cutting and welding be carried out on the body if necessary.
Fittings for connecting a pressure gauge, air inlet and outlet, and a drain valve for condensate removal are welded into the cylinder.
The connection to the compressor is made using metal pipes or hoses designed for high pressure. The assembled installation must be tested at maximum load, after which the optimal mode for various situations is selected.
Should I buy a unit or assemble it myself?
Therefore, it makes sense to make a compressor for painting a car yourself. To do this, it is worth studying in detail the structure and operating principle of a real, factory compressor. And it is the same for all samples. High pressure is created in the cylinder. The method of air injection is not important - it can be mechanical or by hand. In the case of manual supply, we save a lot of money, but where can we find a slave capable of pumping air continuously? The automatic process will eliminate many disadvantages and problems. An exception is changing the oil in the compressor. Only the mechanism is capable of continuously supplying a stream of air into the cylinder! The theory is simple; making a personal compressor station with your own hands is quick and easy.