In order to make a device with your own hands, with which you can straighten dents on a car body, it is not at all necessary to thoroughly know electrical engineering and purchase expensive components. For these purposes, you can make a spotter from parts taken from a microwave oven that has expired, as well as from other equally accessible structural elements.
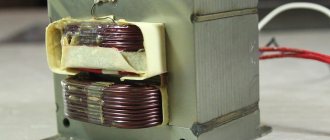
Homemade spotter assembly
Design Features
A spotter is a device for one-sided spot welding used in body repair. The design of the device is quite simple, so it is not necessary to buy it for a lot of money.
The spotter is used to straighten dents in metal
To make a spotter, you can take both an electrical transformer and a metal case from an old microwave oven. But it is necessary to take into account some features of a homemade design:
- A do-it-yourself spotter will be inferior in power to the factory unit. It can be used in a home garage, but if we are talking about professional repairs, it is better to purchase the tool for money.
- A homemade spotter made from a microwave oven requires greater effort when straightening the body and does not allow work to be carried out at high speed. True, for beginners this becomes more of a plus; with careful and leisurely alignment of the dent, there is less risk of making a mistake.
Important! Before you start assembling a homemade spotter, you must take into account that in any case you will need to purchase additional elements for it - variable resistors, thyristors, diodes.
Manufacturing of electrodes
Spot welding from an old microwave will only work effectively if you use high-quality electrodes. You can make your own electrodes from a copper rod. The electrodes are connected to the contact wire through a tip, which must be properly soldered to the copper conductor.
The working side of the electrode must be sharpened into a cone shape to obtain a better welded joint.
Spot welding electrode
If you don’t want to make electrodes yourself, you can purchase ready-made ones, but the cost of factory-made products will be at least 500 rubles per 1 piece.
Drawings, diagrams with decoding of microwave spotters
A spotter for body repair from a microwave can only be made with minimal knowledge of electrical engineering. Before carrying out work, you must carefully study the drawings of the device and understand how the parts should be located in a homemade device.
The device, assembled with your own hands from a microwave oven according to the standard scheme, works as follows:
- when the device is connected to the network, the voltage passes to the first of the converters, decreases, and then reaches the diode bridge and turns into alternating voltage;
- after this the capacitor is charged;
- the device, started in welding mode, disconnects the capacitor from the bridge and connects it to the thyristor;
- the latter starts the second converter;
- the capacitor discharges, after which the thyristor closes.
Welding stops at this point, and to continue it, you need to repeat the entire procedure again.
A homemade spotter with an “Impulse” button works according to a system of multiple repeating cycles
The classic design of a DIY spotter involves the use of two transformers from a microwave oven. But if you wish, you can also take one element or three at once.
Regardless of the number of transformers, the spotter can be connected to a 220 V outlet
The number of converters mainly affects the performance of the device. The more elements in the system, the more powerful the DIY spotter.
What tools and materials will be needed
To make a spotter from a microwave oven with your own hands, you will need to prepare several basic spare parts. Among them:
- housing - you can also take it from an old microwave oven;
- electrical transformer - it will become the main element of the device;
- reverse hammer, you can assemble it yourself or buy it ready-made;
- welding cable with a terminal for connecting to power and thread for a gun;
- control circuit, in the basic version it consists of a button on the gun, a wire and a power supply that powers the system, and an input voltage relay;
- welding gun with the ability to connect electrodes;
- a ground cable having a terminal and a contact pad;
- electrodes for studs and washers.
To assemble the spotter, you will also need to prepare a tape measure and a multimeter.
How it works: nuances
First of all, let's look at the spotter function.
It is needed for only one operation: repairing a crumpled body surface without a general disassembly of the entire body. It is most valuable when repairing hard-to-reach parts that need to be straightened during the repair. The spotter can be made from an inverter, or from a battery or transformer - there are several possible electrical circuits. The principle of operation of the device is a reverse action hammer, working in a point manner.
Most often, the spotter has the following operating modes:
- Short-term mode, in which the guide is attached to the required local location using special rings.
- Welding mode is the main one, which is carried out at minimum power and using carbon electrodes.
How to make a spotter from a microwave transformer with your own hands
Videos about a DIY microwave spotter demonstrate that converting a high-voltage converter for a home welding machine is quite simple. The detailed algorithm looks like this:
- Remove the cover from an old but working microwave oven by unscrewing the screws holding it in place and dismantle the required element. To do this, you must first disconnect the terminals connecting the part to the remaining parts of the microwave and remove the fastening screws.
Before starting work, disconnect the microwave oven from the network. - The transformer is removed from the microwave oven body. Since assembly of the spotter requires a voltage-reducing element, the secondary high-voltage winding will have to be removed. To do this, the electric transformer from the microwave oven is securely fixed in a vice and unnecessary coils of copper wire are cut off on both sides using a hacksaw. The remains of the secondary winding inside the body of the part are first drilled out with a drill, and then knocked out using a pin and a hammer.
When removing old transformer windings from a microwave oven, it is important not to damage the primary turns. - The prepared element needs to be rewound in accordance with the new goals. To do this, take a copper wire with a diameter of at least 16 mm and make 2-3 turns, this is quite enough to obtain a current of sufficient power.
When rewinding a transformer from a microwave, the turns are placed closer to each other - The transformer and controls must be placed in a reliable housing. The easiest way is to take a metal box from a microwave oven. The converted element is placed in the center to balance the structure; according to the diagram, a resistor, thyristor and diode bridge are installed nearby, converting the current from direct to alternating.
The spotter components must be secured to a dielectric material that prevents interference.
Finally, terminals for connecting cables and the main elements for welding are displayed on the front control panel of a homemade spotter. It is necessary to connect power wires, a return hammer and a working gun to the unit.
Important! A spotter based on a microwave oven transformer is mobile and quite lightweight. Therefore, it makes sense to attach handles to its body for convenient carrying of the device.
Manufacturing of controls
In order for spot welding to be simple and convenient to operate, it is necessary to manufacture a device body with which it will be possible to easily weld metals.
The first thing you need to do is fix the transformer. For this purpose, you can use a thick plywood sheet, in which holes are made with a drill to mount the transformer. The spot welding process can be controlled as on a remote machine, when the transformer is located separately from the body and from it voltage is supplied through wires to the pincer contacts. Such a device will allow you to perform welding work in hard-to-reach places and on large objects.
A significant disadvantage of the remote apparatus is the need to use a sufficiently long cable, when passing through which the electric current will be significantly reduced due to heating of the conductor at the time of welding the metal. Also, the disadvantages of the remote device include the inability to use pliers with a long lever, so the contact force will be insignificant, which cannot but affect the quality of welding.
You can make pliers yourself if you have an inverter welding machine. To make pliers, you will need to find 2 large spacer washers with a thickness of at least 8 mm and a diameter of 50 mm. If suitable parts are not available, you can make them yourself on a lathe. If you make the washers yourself, then in the middle of each of them you will need to make a hole with a diameter of 20 mm.
The next step in making pliers yourself is cutting out insulation from a thick ebonite rod.
Ebony rods
It is advisable to select the rod in such a way that its diameter coincides with the outer diameter of the metal washers. The middle insulation is made as follows.
- A piece 30 mm long is cut from the ebonite rod.
- The ebonite washer is securely fixed in the drilling machine and a through hole with a diameter of 8 mm is made exactly in the middle.
- On a lathe, material up to a diameter of 20 mm is removed from both sides of the ebonite washer. Removal of material should be carried out at a distance equal to the thickness of the metal washer.
This will create a reliable insulator that will prevent a short circuit between the arms of the pliers.
At the next stage of making homemade pliers, handles about 40 cm long are welded to metal washers on one side, and the contact part of the device on the other, to which the power cable and clamp for electrodes will be attached. The handles and contact part of the device can be made of a metal rod, which should be straight on the operator’s side and L-shaped on the contact part. The bending of the pliers on the side of the working part is necessary so that the contacts make contact only at the place where the parts are welded. After completing the welding work, the metal washers to which the handles and contact parts were welded are cleaned with a file or emery so that after assembling the pliers, the parts slide freely over the ebonite insulation.
Assembly of homemade pliers is carried out as follows:
- A metal washer is put on a bolt 50 mm long and 8 mm in diameter, then a washer made of any insulating material with an outer diameter of at least 30 mm.
- One half of the pliers is installed.
- A separating ebonite insulator is installed.
- The second half of the pliers is installed.
- An insulating washer is placed, then a metal one, after which the M8 nut is screwed on.
Homemade pliers
In addition to a significant loss of power on the conductor, when using pliers it is not always possible to make contacts with the required force. This drawback is especially noticeable when resistance welding of metal parts with a thickness of 0.5 mm and above. To ensure sufficient force, do-it-yourself contact welding from an old microwave is made in the form of a stationary machine.
Stationary welding machine
Spring for lever
All the main parts of this type of resistance welding are manufactured according to the principle described above, but with the only difference that the movement of the working part is carried out only in the vertical plane, and the contacts, due to the presence of a longer lever, are closed under a significantly greater force.
In a stationary device, only the upper lever is movable, which, as in the manufacture of pliers, must be reliably isolated from the main body using an ebonite insert.
The use of one lever greatly simplifies the control of the welding machine, and also makes it possible to produce a mechanism that automatically turns on the device when the lever is moved down.
You will also need to equip the lever with a spring, which will return the upper contact immediately after the pressure is released.
There is no need to equip a stationary structure with scissor-type levers, so it is enough to make one movable upper lever on which a clamp for connecting the wire from the transformer and a mechanism for fixing the electrode will be installed.
The lower part is made in the form of a fixed platform with an element protruding upward, on which the power cable and the lower working electrode are also fixed.
Spot welding with a homemade device
The advantage of a stationary device is that this device easily welds metal up to 1 mm thick. Higher power is achieved due to the fact that the transformer is installed
on the same platform as the working part. This arrangement minimizes electrical current losses by using a shorter cable between the secondary winding and the electrodes.
How to make a spotter from two transformers from a microwave with your own hands
One transformer from a microwave oven allows you to assemble a working spotter with your own hands, but the power of the device will be insignificant. Therefore, two current converters are often used at once. Both can be taken from old microwave ovens, if you have them on hand.
A DIY microwave spotter step by step with two electrical transformers is not much more complicated in terms of assembly:
- Current converters for a homemade welding machine are being redesigned for new purposes. The secondary winding on both elements taken from the microwave oven is completely removed and several turns of a conductive wire with a cross-section of 50 mm2 are wound.
When rewinding transformers, it is important not to forget to lay insulation between the primary and secondary turns - According to the circuit diagram of a do-it-yourself spotter, electrical transformers removed from the microwave oven are installed in a housing or on an open panel next to each other.
Space is left between the transformers so that they do not touch and do not overheat. - A diode bridge and a variable resistor are placed in the housing or on the platform. The latter has to pass through itself a current with minimal values, so its power does not play a special role. Also, in accordance with the selected circuit, an electrolytic capacitor with an operating voltage of 25V is connected to the system.
You need to provide holes in the walls of the case for cooling or leave the lid open
Terminals for connecting the electrode and ground cable are placed in the front part of the assembled unit. You can also install additional elements - an ammeter for monitoring welding current, network indicators and regulators.
Important! When assembling a spotter with two transformers, it is necessary to connect their secondary windings in parallel. This is what will allow you to double the output power while leaving the voltage the same.
How to make a spotter from 3 transformers from a microwave with your own hands at home
The best performance is demonstrated by a homemade spotter made from a microwave, made using three converters at once. The only difficulty in assembling it is to get the parts in the required quantity; households do not always have them stocked. The instructions for creating the unit themselves remain standard:
- From three electrical transformers from the microwave oven, carefully remove the secondary winding without damaging the primary. New conductive cores are wound in place of the removed copper cable. The secondary winding is connected in parallel for all three elements.
The cross-section of the secondary winding for three transformers can be taken from 60 mm2 - Microwave oven transformers are installed on sheet material that does not conduct electricity. Additional system elements, a control unit, a capacitor and a resistor are installed in the device body. The conductive cables are brought out, and terminals and regulators are mounted on the front panel.
A welding unit consisting of three transformers is not much weaker in power than the factory one
A working gun and a reverse hammer are connected to a self-assembled spotter based on a microwave oven. The device remains to be checked and made sure that it provides sufficient performance.
Application
During the straightening process, the electrode is welded pointwise to the dent and, with the help of an inoppuller used as a return striker, is pulled out. In this case, the tack breaks, the electrode is displaced and the straightening process is repeated again. Gradually, point by point, the dent is leveled out.
The spotter is used for straightening metal bodies . The dent should be cleaned from paint to bare metal. The clamp of the second pole is attached to the area of the body being leveled next to the area being treated. The main condition is the occurrence of a short arc between the part and the electrode.
Recommendations
When assembling a spotter with your own hands, you need to take into account several important nuances:
- The new secondary winding for converters must be covered with a layer of reliable insulation.
- The control unit for a homemade spotter based on a microwave oven can be made independently using the appropriate diagrams or purchased ready-made. In the latter case, the process of creating a welding unit will be reduced to searching for current converters and installing the device elements into the housing.
- When working with a spotter, do not press the pulse button for long. The welding effect should be short but powerful. It is to ensure the latter condition that the unit is made using two or three electrical transformers simultaneously.
Advice! If the units of the welding machine are located in a metal casing, then ordinary cardboard can be laid between them and the walls.
Accessories for straightening
In addition to a properly manufactured spotter, you need to select consumables for it in advance and make the optimal configuration for the spot welding machine. Their independent production is not recommended - poor quality will affect the straightening and appearance of the body.
Consumables and components:
- Reverse hammer. Combines the functions of an electrode holder and a mechanical leveler. Cost – from 5800 rubles.
- Washers of various shapes. Necessary for fixing the straightening tool.
- Electrodes. With their help, the active part of the reverse hammer and washers are welded.
The last two items can be purchased as a set, the average price is 4,750 rubles
When choosing, you need to pay attention to the quality of workmanship
We suggest that you familiarize yourself with the detailed instructions for making a spot welding machine using components from a microwave oven: