Which tin should you choose?
How to make a pipe out of tin? What kind of tin is best suited for this type of work?
Thin tin is an excellent material for homemade bathhouses and smokehouses. Tin is a thin sheet of steel that is susceptible to corrosion. To make beautiful drainpipes, as well as weather vanes, canopies over chimney pipes, do-it-yourself covers over chimneys, or original filigree lace, galvanized roofing iron is used.
Tip: tin pipes can also be used as samovars; they increase draft well and also remove smoke.
What tools are needed?
Before you start making a tin pipe with your own hands, you need to take care of the tools and materials that you will need.
Making tin pipes with your own hands involves using the following:
- sheet of thin galvanized iron roofing (thickness 0.5-0.7 mm);
- scissors for cutting metal;
- metal strip;
- wooden hammer (mallet);
- simple hammer;
- pliers.
Metal cutting scissors
Advice: in order for a tin pipe to turn out beautiful and even, it is necessary to take a sheet of iron with a smooth and even surface, and also so that the corners are straight, and not torn or unevenly cut.
Instructions for making a tin pipe
How to make a pipe out of tin? Where to begin?
- Making pipes from tin begins with drawing up a drawing. Draw an unfolded pattern of the future pipe on an iron sheet.
Tip: the pipe pattern can be drawn with chalk or any sharp object.
- When marking a pattern, the following points must be taken into account:
- the width of the workpiece should be equal to the diameter of the pipe plus an additional one and a half centimeters;
- the length of the workpiece is slightly longer than the straight section of the pipe.
Scheme of blank for pipe seam
- Using metal scissors, cut off the drawn pipe blank.
- Place the workpiece on the edge of the workbench.
- Along the length of the iron sheet, draw a fold line on one side; it should be half a centimeter.
- Align the line drawn with the edge of the corner on the layout.
- Using a mallet, bend the edge of the sheet of iron down.
- Turn the sheet over and, with light blows of a mallet, bend the edge to the sheet.
- Turn the workpiece over and on the other side bend the edge 1 centimeter wide, but in the other direction.
- Fold the edge again, so in profile this bend will look like the letter L.
- Insert the workpiece into the mandrel, carefully bend the edges of the pipe towards each other.
Tip: you can use a mandrel - this is a sector or template of a pipe of the required diameter, but you can do without it.
- Connect the edges into a lock so that the smaller edge hooks onto the larger edge.
- Seal the edge using pliers.
- Using a hammer and an iron bar, lay the edge on the sheet and tap it well.
Bend the fold on the pipe
The edges of a tin pipe can also be fastened using steel, aluminum or tin rivets.
- Drill holes for the rivets at a distance of three centimeters.
- Bend the edges at right angles towards each other.
- Bend the sheet of tin blank in the opposite direction so that the edges are located on the outside of the pipe.
- secure the edges with rivets.
Tip: a DIY tin pipe fastened in this way is not very convenient to use. The result is a not very attractive external seam, which has to be hidden when installing the pipe.
Tin work DIY tin products
The joining of the edges of thin sheet metal is most often done in a lock - by clamping one edge to the other, but occasionally other methods are used, which may be needed more often in the work of a young master. These are the methods.
Connection methods
The edges of the sheets can simply be soldered. It is clear that this will be the most fragile method, especially if the metal sheets are thin. This will be a butt connection (1). Such a connection can be used where strength is not required, but an inconspicuous connection is required.
In thicker sheets, the butt joint is made with teeth (2). This is actually done not by tinsmiths, but by coppersmiths - craftsmen who make copper utensils, tanks, pipes, caps, etc. A butt joint can be made more durable by soldering a plate (3) on the inside.
This will be a butt with an overlay. A more durable connection is an overlap (4). One edge is overlapped with the other, the seam is soldered or fastened with rivets. But this connection already has a protruding edge, which is not always convenient.
You can bend the edges at one edge and at the other, hook them and compress them with blows of a mallet. This will already be a simple lock (5).
The most common connection method is a double lock (6). It's done like this.
One piece's edge is bent at a right angle, the second's edge is also bent, but in the other direction, and pressed against the piece, and then this edge is bent at a right angle in the opposite direction.
Both bent edges are connected to each other, bent towards the first edge, and the seam is pierced with a mallet. On the reverse side it will be smoother, which must be taken into account when connecting in this way.
How to make gutters and roofing elements from sheet metal with your own hands
The sequential progress of work is schematically depicted in the following figure:
Double lock (diagram)
All kinds of tin products are most often connected with a double lock.
Occasionally, tinsmiths use connections using rivets. However, this method is more often used when it is necessary to rivet a handle, eyelet, strip, etc. Occasionally, rivets are used to strengthen the seams into an overlay and a simple lock. They are usually riveted with small rivets, preferably with wide flat heads, using a cold method.
For rough work, tinsmiths prefer rivets rolled from a piece of tin. To make them, you need to have a piece of iron with holes of different diameters, or a riveter. A diamond-shaped piece of tin is rolled up into a pound using a hammer or pliers, inserted into a riveter, into a hole of a suitable diameter, and the head is riveted.
These rivets are soft, but, of course, do not have the neat appearance of solid rivets.
Tin rivet
Almost all work with thin metal is based on the plasticity of the metal, its ability to bend and flatten. But the master must skillfully use his tool, otherwise these same properties will be detrimental to the work. How and why will be seen later.
The main and very first job of the master is the ability to bend the fold, in other words, to bend the edge of the sheet. The work is simple, but also very responsible, since further processes depend on it.
It is necessary to bend the fold for a variety of needs: for seam connections, for edges, for inserting bottoms, and others. It is necessary to ensure that the metal only bends, but does not flatten in any way. If the metal is flattened in the bend, it will expand.
The edge of the fold will come out curved and the surface of the sheet will warp.
In rough work, where the fold is bent wide, this has almost no significance. But where greater precision and grace are required, it will be very noticeable. Let us explain with an example what we can achieve.
Suppose we want to make a tube out of tin and connect it with a double lock.
They bent the folds with an iron hammer, began to roll up the tube and connect the seam, but it turns out that the seam is very difficult to connect; the folds turned out to be bent due to riveting the metal with a hammer.
Riveted seam
Therefore, folds should always be bent with a wooden mallet on the sharp iron edge of a crowbar, iron strip or corner of a scraper.
The work happens in this order. First of all, draw a fold line with a thicknesser. The thicker the metal and the rougher the work, the wider the fold can be taken (10-20 mm, on thin sheet metal the fold is 3-5 mm). Place the sheet on the edge of the scraper (or devices replacing it) along the fold line, and with quick and precise blows with a mallet, beat off this line, first at the ends, and then along the entire length of the fold.
Rebate
Then they bend the edge of the fold at a right angle, place it with the outer side on the anvil and straighten it with the inner side with blows of the mallet.
Let's assume that you need to bend the fold of a tin cylinder.
Making a fold on a cylinder
It is clear that the diameter of the outer edge of the folded fold will be larger than the diameter of its inner circumference. Consequently, the metal must be riveted along the entire fold, stronger at the outer edge and weaker towards the cylinder.
The fold must be bent with an iron hammer. The cylinder is taken in the left hand, the width of the bend is marked from the inside with a thicknesser and applied to the edge of the support or crowbar at an obtuse angle, after which it is struck on the future fold with the toe of a hammer, beating the fold line and riveting the edge. Light blows of the hammer are directed so as to rivet the outer edge more strongly.
Having gone around the full circle, reduce the angle of inclination of the cylinder, placing it steeper towards the anvil, and continue working in the same order. It is repeated again and again, decreasing the angle of inclination to a straight line. With such gradual knocking out, the fold will be bent at a right angle, and it will not burst anywhere. The bent fold is placed on the slab and straightened with blows of a mallet.
To such a cylinder with a rebate, you can already attach the bottom with a double lock, only at the circle for the bottom you need to bend the rebate or solder the bottom with solder.
Rebate fold on mug
Just as the fold on a cylinder is bent, this is also done when the edge of a tin product needs to be strengthened and made thicker by rolling wire into it. The work is carried out in the same order, but with a mallet and without beating off the sharp edge of the fold. The bend should come out smooth, you need to make a flap on the metal, calculating the width of this flap based on the thickness of the wire that will fit there.
https://www.youtube.com/watch?v=90S6cMb7H50u0026list=PLL_d19CnB7lWHraCvrOIJby9noeJ9dqeT
Rolling up the edge
The width should be approximately three times the diameter of the wire, adding a little for the thickness of the metal. When the fold is bent at a right angle, it is bent back with a mallet, turning the cylinder on a round anvil. Then they place it on the stove, insert the wire and secure it with a few blows of the mallet on the lapel.
Using a mallet on a round anvil and a plate, the lapel is finally pressed and smoothed. Turning the product over with the edge up, straighten the rolled edge on top. If the lapel turns out to be not wide enough, it is now very easy to fix it by piercing it from above with a mallet and pulling the blow outward.
On products with straight edges, rolling the wire into the edge is, of course, even easier.
Among the techniques for processing thin metal, based on riveting and pulling out metal, a young master should definitely become familiar with hammering.
By hammering out a flat piece of metal, it is given a variety of convex shapes.
In this way, you can knock out the bottoms and covers of boilers, hoods and a variety of streamlined parts for model airplanes, skins for model ships, etc. Above we already had a similar job - this knocking out a bucket.
Tapping is a job that requires patience. You can't hit it once or twice with a hammer and get a good draw. It is necessary to slowly tap with a hammer, constantly moving the product, gradually increasing the depth of drawing and finally straightening and smoothing the surface of the product with light blows.
There are basically two ways to pull. The first method is when the metal is flattened on a convex anvil, starting from the middle to the edges. The middle will be thinnest, but the product will be convex. The work is carried out with an iron hammer. According to the second method, they are beaten out with a mallet or a hammer with a round end on a mandrel (matrix) having the appropriate shape.
Punching out on a mandrel
As an example, let’s take the beating out of the same bucket. On a wooden stick or thick board, you need to make several round notches of varying depths. They are cut with a semicircular chisel and then smoothed with blows of a round hammer.
A round piece of metal is placed over the first recess and hammered out with a hammer or round mallet until a properly rounded surface without wrinkles is obtained. The same technique is repeated in subsequent, deeper matrices. In conclusion, we will obtain a bucket according to the profile of the matrix.
With a different profile and a different cutting we could get a different shape.
Sometimes the young master will have to knock out longitudinal grooves on thin metal plates. The cross section of such a plate will be shaped, and the plate will acquire rigidity.
Plate with longitudinal recess
As in any other business, marking and cutting the material, starting work, is a very important operation on which further success depends. It is clear from this that this work requires special care and accuracy. The simplest job is to cut and make a simple open rectangular box with straight or radiating sides, with or without a toe.
Making a rectangular box
A rectangle of appropriate dimensions is cut out from a sheet of tin (a). When cutting, you need to take into account the bottom area and the height of the walls. Using a thicknesser, draw a line of folds. One corner is cut off if you need to make a sock in the box.
Turning the sheet over onto the board, use the toe of a hammer to cut off the bisectors of the corners at the corners approximately to the border of the future folds of the walls (b).
Turning the sheet over again, bend the sides (c) onto the edge of the anvil (piece of iron), but not completely. They are trimmed at the rectangular end of the anvil and bent with a mallet close to the wall (d).
The cut corner for the toe remains unbent; it is slightly flattened, making a groove out of it. The box is ready (d).
The work, as you can see, is not at all difficult, but it must be done carefully.
Cutting out and making cylindrical shapes will not present any particular difficulties.
For the cylinder, you need to cut out a rectangle with a height equal to the future pipe, and a length of 3.14 times the diameter of this pipe, with an increase for rolling the seam.
https://www.youtube.com/watch?v=BYckHlEbbTcu0026list=PLL_d19CnB7lWHraCvrOIJby9noeJ9dqeT
Cutting diagram for the seam of a cylinder or rectangular box
When making conical products (bucket, funnel and others), all working techniques will remain the same, only when cutting you will have to remember the geometry. All conical objects must be correctly depicted in the scan, and this is the most important thing.
Let's take the simplest cutting method. Let's try to make a conical bucket. First of all, you need to draw its middle section along the axis. It will appear in the form of a trapezoid; continue the sides of the trapezoid until they intersect.
The intersection point is the center from which two arcs are drawn - from the long base of the trapezoid and from the short one. You will get a ring, part of which will be used to make the surface of the conical bucket. The width of this ring is the height of the bucket.
You just need to remember to add more to roll up the top edge and fold the bottom.
Cutting a truncated cone
The length of the part of this ring we need is determined by the diameter of the bucket. Approximately three diameters with an increase for a double lock - this is what you need to take from the ring. Setting aside 3.14 times the diameter of the outer hole or bottom of the bucket along the upper or lower arc, draw a line along the radius.
The increases for the double lock are made parallel to these radial lines. This will result in cutting out the surface of the bucket. They also accurately draw any conical shape, be it a whole or a truncated cone: the height of the figure is plotted along the radius, and the length of the scan along the circumference.
P.V. Leontyev
Features of working with tin
- To give the sheet metal material the required pipe shape, you need to bend it using pliers or a hammer around an object of the appropriate cylindrical shape. You can make your own tin pipes using a metal or wooden cylinder.
Advice: the bend of the sheet metal should be even along its entire length; this can be achieved by lightly tapping with a hammer, and the blows should be as close to each other as possible.
- Making tin pipes is impossible without using metal shears. It will be much easier to work with such a tool if you attach a leather loop to its handle. The metal is cut with one hand, putting a leather loop on the fingers.
- The edge of a sheet of iron after cutting with scissors can be cleaned with a plow made from a small old piece of hacksaw blade.
- A drainpipe made of tin, which is already ready for installation, in some cases needs to be cut (for example, when it is necessary to make a curved edge of the pipe for drainage). To do this, it will be convenient to cut the pipe with a knife, which is intended for opening canned food.
Read also: What is the difference between ph and pz bits
Tin drain pipe
Advice: in order for the pipe to be cut well with a knife, you first need to cut it with a hacksaw, and only then use the knife.
Tin pipe cutting process
- When working with tin, you sometimes have to use a file. Very often it becomes clogged with metal filings and quickly fails. In order to clean it, you can use a copper spatula or a soft metal tube, while flattening its end.
It is not very difficult to make tin pipes with your own hands, the main thing is to follow these recommendations and be extremely careful, as you can get injured by the sharp edges of the tin sheet cut off.
Home builders try to select the most budget-friendly options to solve problems. Therefore, the question of how to make a pipe from tin with your own hands is relevant for many amateur craftsmen. After all, a homemade pipe product made from tin can be compared with gutters or casings that are on the shelves in specialized stores.
Therefore, you need to learn in more detail the process of manufacturing a tin pipe that has characteristics similar to factory products.
Do-it-yourself tinsmithing - Metalworker's Guide
When working with tin, two main tools are used. Metal shears and sheet bending machine.
Of course, when making a gutter for the roof of a barn, you can use the old-fashioned method - tap a galvanized sheet with a mallet on the edge of a workbench, or using a metal corner.
Examples of such work can be seen on roofing in the private sector. However, the quality of the product leaves much to be desired, and the metal is damaged at the point of impact.
In addition, artisanal bending of metal is suitable only for simple structures. If the bending profile has several multidirectional edges, you cannot do without a professional tool.
For example, the correct ridge for a roof “on the knee” cannot be bent, and its appearance will always remind you of the owner’s negligence.
Buying an industrial sheet bending machine is an unforgivable luxury. The craftsman is afraid of the work - we will tell you how to make such a useful device in a private household with your own hands.
Roller
The second name is three-roll.
The machine is used to create smooth bent surfaces - large-diameter pipes, semicircular drains and other structures without sharp corners.
It works on the principle of a rolling machine. The sheet is profiled between two support rollers and one thrust roller, the movement of which sets the bending radius of the workpiece.
Press brake
The workpiece is placed between two punches (templates), under great pressure they close, giving the required shape to the sheet of metal. Typically used for working with thick workpieces. Useless for household use.
Traverse mechanism
The principle of operation of the design is that the workpiece is clamped with a clamping ruler, and a movable traverse bends the edge to the desired angle. Perhaps the most popular type of sheet bending machine.
There are both industrial stationary machines and manual tabletop devices. In fact, it has no restrictions on the bend angle - from 0 to 180 degrees. The width of the processed sheet is determined by the length of the traverse.
This is the only design flaw. It will be problematic to bend a single rolled strip several meters long at home. But you can quickly make a composite structure of any length with bends for merging the ends.
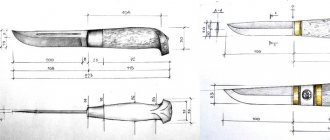
Popular: The sharpening angle of a knife is its most important characteristic
With traverse structures, a bending knife is often used, which is included in the delivery package.
Roller-type end knives are designed for high-quality alignment of the edge of the workpiece.
Roller bending machine
It would be more correct to call it a manual end bender. Although, using a roller mechanism, you can bend workpieces far from the edge. The process is simply too inconvenient. Mainly used as an auxiliary device.
How to make a homemade sheet bender
The simplest design is to clamp the edge of the sheet between a steel corner and a rule (or two corners) using a clamp, and bend the workpiece by hand. This is how the simplest roofing elements are usually created.
However, it is quite possible to make a traverse sheet bending machine yourself. Precision markings and patience are required.
The design and operating principle are visible in the drawings.
Let's look at the assembly step by step.
To make a traverse sheet bender we will need:
- 4 meters of steel angle, side – 50 mm;
- Ball joint for car, with mounting bracket;
- The stabilizer rod is from the same, with a diameter of 10 mm;
- Grinder, drill, electric welding.
We cut the corner with a grinder into 1 meter pieces.
If there is a need to work with metal of a larger width, the length of the corners increases. At least 100 mm must be added to the width of the working surface. Using an angle grinder, we cut out two eyes from the ball joint bracket. These will be the working loops of the movable traverse.
From the stabilizer strut we make an axis on which the hinges will rest.
We carefully measure and mark a sample on the corner for attaching the axle.
We grind the flats strictly to size to install the axle shafts. This must be done as accurately as possible so as not to waste time and material on subsequent adjustments.
We apply the markings exactly in the center of the axis, and combine it with the top of the corner - the traverse. This point is important. because if the alignment is incorrect, the quality of the workpiece bending on the machine will deteriorate, or the sheet bender will be unsuitable for work.
Popular: Let's look at several ways to sharpen a ceramic knife at home
We weld the axle shafts to the samples, maintaining parallelism to the top of the angle. To increase accuracy, you should use a jig when welding. For example, a vice and a clamp. The length of the protruding part of the axis does not exceed 1 cm.
The result should be a structure with perfect alignment at the ends.
Place the corners next to each other.
We mark the sample on the second corner strictly opposite the axes of the first corner.
The angles relative to each other should be located as follows:
We fold both traverses, keeping them flat, and fix them for welding. We weld the loops onto the second corner on both sides.
The corners should rotate freely relative to each other on their hinges. When turning 180 degrees there should be no snags or wedging. In this case, the gap between the traverses should be minimal.
The clamping angle will be positioned as follows:
Having previously marked, we use a grinder to cut out a sample around the axis on the clamping angle.
The lower side of the clamping angle is ground at an angle of 45 degrees.
Opposite the axes, mark and drill holes for 10 mm bolts. We weld the bolts with the threads up to the lower fixed cross-beam.
We also make a hole in the center of the traverse, but do not weld the bolt. This will be a removable element, so we weld the short axle to it in a T-shape.
Bolts are needed to press the workpiece to the crossbeam when bending. The central bolt is used when the workpiece has a width that is half that of the traverse. When working with wide workpieces, the bolt is removed.
From a 15-20 mm circle we cut two handles 30 cm long. A thinner rod will not work, since the force on the handles can be significant, and you can simply bend them.
We weld the handles from the bottom of the turning angle (traverse).
Next, we make a bed for the sheet bending machine. We weld the fourth corner to the lower fixed cross-beam on both sides for strength. We drill holes in the frame. The entire structure must be fixed on a stable surface, for example, on a steel workbench.
We screw the sheet bender to the workbench and check the free movement of the movable traverse.
The design allows you to work with iron sheets up to 2 mm thick and 92 cm wide. Bend angles can be selected to any size; the workpiece can be bent either in one direction or in steps. When working with a thick workpiece, the handle is extended with a metal pipe; the strength of the angle is always sufficient.
Working with standard galvanized sheeting is not difficult; the device bends it with the ease of cardboard.
Additional accessories
For ease of operation, the clamping angle can be spring-loaded, and wing nuts can be used instead of conventional nuts. It is convenient to work with such a device with a roller knife, using the upper clamp as a guide.
Temporary structure according to a simplified scheme
The considered version of the sheet bender is made for regular work, and is actually a stationary device. If you urgently need to do one-time work on making tin products, you can create a simpler device.
For production you will need:
- Three corners 40-50 mm, width according to your needs;
- A pair of door hinges;
- Two powerful clamps;
- Two rods (circles) as handles.
The two corners are fastened together with loops as tightly as possible.
The third, shorter corner, using clamps, presses the workpiece and the lower crossbeam to the workbench. This machine is not very convenient, but this is compensated by its ease of manufacture. The manufacturing option is up to you to choose.
instructions for making a homemade sheet bender
An interesting article on the topic of how to assemble a pipe bender with your own hands. Available diagrams and drawings, as well as a video and a detailed description of the assembly.
Tin pipe - making it yourself in 3 steps
Despite the many different tin blanks that are sold in construction supermarkets, sometimes when installing drains, ventilation or other similar engineering systems, it becomes necessary to install parts of a non-standard configuration or size. That’s why many home craftsmen are interested in how to make a pipe from tin with their own hands.
Features of the source material
Before you start making a pipe from a sheet of metal, you should become more familiar with the material from which the pipe will be made and its features. To begin with, it is worth saying that this is a rolling type product, in other words, tin is a sheet of steel that has passed through the rollers of a rolling mill and has a thickness of 0.1-0.7 mm.
In addition to rolling operations, the technology for producing tin plates involves processing the finished rolled products to prevent the formation of corrosive processes. To do this, a layer of material is applied to the steel after rolling, which is not susceptible to corrosion.
The result of the performed actions is a steel sheet, the width of which can vary from 512 to 1000 mm, with a chrome or zinc coating. The finished product is flexible, so tin can be easily processed by hand. At the same time, rolled stiffeners can be compared in strength to steel products. This allows the use of tin in the manufacture of products of complex designs.
Seam joining technology
In addition to the fact that there are several ways to make a body, there are also 2 relevant and effective methods for obtaining a seam. This is welding and soldering. Let's take a closer look at each of them, where and when it is best to use them.
Before starting work, the workpiece passes through a special calibrating ring, the main purpose of which is to create an overlap at the edges of the workpiece, as well as prepare it directly for welding. After the seam is obtained, the workpiece is transported through the production line to a special installation, where varnish is applied to the seams and then dried.
Of course, the tin packaging is then flanged and connected to the bottom, and then rolled up with a double seam. After the jar has been formed, it must be checked for leaks. If air passes through, the product is rejected; if not, it goes directly to sale. Soldering is used less frequently as it is a more expensive method that has not been well developed.
Required Tools
The list of tools and devices necessary for making a galvanized chimney pipe with your own hands is determined by the properties of tin, in particular softness and ductility. Processing this type of material does not require the special efforts required to work with sheet materials.
Therefore, when producing tin chimney pipes, the following set of tools is required:
- Scissors for cutting metal. This tool helps to cut sheet material into the required pieces without much difficulty, since the largest thickness of the sheet reaches 0.7 mm.
- Hammer with a soft striker. You can also use a wooden hammer, mallet, or a steel tool with a soft rubber grip. However, the latter option is used very carefully or not at all, since it can cause deformation of a thin sheet of tin and ruin the entire work.
- Pliers. With the help of this tool they solve the problem of how to bend a pipe made of tin, because it is steel, although thin, therefore it is impossible to bend it with your hands.
- Crafting table. This device is necessary when cutting material and when applying markings.
- Calibrating element. This can be a pipe product with a diameter of more than 10 centimeters, as well as a corner with edges of 7.5 centimeters. These elements must be well secured, since the joining seam will be riveted on their surface.
In addition to these tools, you should prepare a ruler or tape measure and a marker, which is a steel rod with a sharp sharpening.
What material will you need?
As you can see, the production of tin cans is a rather labor-intensive and expensive process. This and the high cost of the production line also complicate the technology and the large number of stages during manufacturing. But this is not all, because it also requires high-quality material that will be used in the production process. White cold-rolled tin can be considered the most optimal. It can be either roll or sheet. Brand: EZhK, GZhK, EZhK-D.
You can also use white cold-rolled tinned or varnished sheet metal. Recently, white lithographed sheet and chrome-plated lacquered tin of the KHLZhK brand have been actively used. In production you will need sealing pastes (sealants), paint and varnish material and solder. These materials are quite enough to set up the production of tin packaging.
Preparatory stage
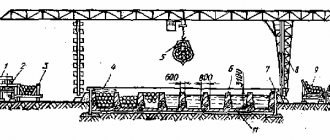
First, markings are applied to the sheet of tin, according to which the semi-finished product will be cut. In other words, the necessary part is cut from a certain sheet of tin, from which the contour of the future pipe will be formed. The marking process is carried out as follows: the sheet metal is laid out on a workbench and a segment equal to the length of the pipe is measured from the top edge. A mark is placed here with a marker.
Then, using a square, draw a line along this mark perpendicular to the side edge. Now along this line the circumference of the pipe, the same is done along the upper edge. In this case, about 1.5 cm is added on both edges to form the joining edges. The upper and lower marks are connected and the workpiece is cut out.
To determine the circumference, you can use a tape measure, or you can remember your school geometry course.
Necessary equipment
The set of equipment, namely the produced tape, depends on the type of cans produced in the workshop. The price for it also depends on the production capacity, the raw materials used and the country of the machine manufacturer.
For example, a can production line with a capacity of up to 10,000 units per shift, produced in Novosibirsk, costs 80,000 rubles. If the line includes additional machines, such as casting drums and presses, then the line can cost up to 500,000 rubles. A line assembled in Shanghai can cost between $5,000 and $360,000. The range of machines available is simply wide.
How to make a pipe body from tin
The purpose of this stage is to form the pipe profile. A line is drawn along the length of the workpiece at the bottom and top along which the folds will be folded. In this case, 5 mm are measured on one side, and 10 mm on the other. The folds must be bent at an angle of 90 0. To do this, the workpiece is laid on a steel corner, aligning the fold line with the edge of the corner. Hitting the edge with a mallet, bend it to the perpendicular side of the corner.
Read also: Weight of gas cylinders empty and full
It is recommended to bend the product gradually, passing the hammer along the entire length. In this case, you can start bending using pliers.
Now, on the fold, the size of which is 10 mm, another fold of the fold is made to form a kind of letter G. In the process of bending the fold, you need to ensure that the upper bend is parallel to the workpiece, and its length is 5 millimeters. Therefore, when drawing a fold line, measure 0.5 cm once on one side, and 0.5 cm twice on the other side.
Having completed the molding of the folds, you can proceed to the formation of the pipe body. To do this, the workpiece sheet is placed on the calibrating element and begins to be tapped with a mallet or other suitable tool to obtain a profile of a certain shape. The workpiece first takes on a U-shape and then becomes round. In this case, the folds should join together.
Production technology
The can production technology includes mandatory steps that are taken into account when designing the line:
- Reception of raw materials, which are ingots, sheets, and strips of metal.
- Molding of blanks.
- Application of varnish and lithography, which gives the jars a marketable appearance.
- Welding the edges of the workpieces.
- Packaging and sending finished products to the warehouse.
There are production belts that include a number of technological operations, but they already belong to top-end production and are supplied depending on the customer’s technical specifications.
Can production line
Processing the seam joint
The final stage involves processing the joining seam, that is, crimping it. To do this, the upper part of the L-shaped fold is folded down, wrapping the edge of the other fold. The result should be a kind of sandwich located perpendicular to the pipe. To obtain a joining seam, you need to press the sandwich to the product.
For greater reliability, the joining seam is strengthened using rivets. However, do-it-yourself tin pipes using this joining method do not require additional reinforcement.
We manufacture and install products of any complexity from tin and other sheet materials (copper, titanium, aluminum, tin with polymer coatings pural, polyester, etc.). We produce drainage systems, chimneys from stainless steel. steel, ventilation systems, caps (vanes) for brick chimneys and pillars, exhaust hoods, additional elements (ebblets, cornices, junctions, transitions, wind strips, drips, etc.), chimney sections, various ducts, ventilation outlets and any other non-standard products made of tin in combination with welded structures. All parts are usually assembled on a fold - a guarantor of the mechanical density and waterproofness of the product. Products assembled with rivets are a sign of low quality.
We manufacture and install the following sheet metal products:
- Additional elements;
- Non-standard elements (according to the Customer’s sizes);
- Window sills;
- Vanes for chimneys and ventilation shafts;
- Caps for fence posts and parapets;
- Gutters;
- Drainpipes;
- Elbows for drainpipes;
- Fastening for a gutter;
- Fastening for drainpipes;
- Ventilation ducts
- and etc.
Drainage systems
We offer two types of drainage systems:
- semicircular drainage system (prices and e-catalog here)
- profiled drainage system
We make drainage systems from galvanized sheet metal, sheet metal with polymer coatings polyester (PE) and pural (colors according to the RR catalogue), and it is also possible to make it from copper and titanium zinc. Material thickness 0.5mm. We manufacture and assemble drainage systems to order according to your data, and we calculate the necessary equipment according to your drawings.
Profiled drainage system
The advantages of a profiled drainage system are relatively easy and quick installation, good price. We make gutters to order according to your dimensions (lengths, maximum length is 5 m), thereby reducing the number of scraps to a minimum, resulting in improved installation quality and increased service life, because the number of connections is reduced to a minimum.
Prices. Profiled drainage system
Semicircular drainage system
We manufacture and install round drainage systems - a classic, time-tested option. To order, we can produce various non-standard bends, transitions from circle to square, etc.
We make drainage systems from galvanized sheet metal, sheet metal with polymer coatings polyester (PE) and pural (colors according to the RR catalogue), and it is also possible to make it from copper and titanium zinc. Material thickness 0.5mm. We manufacture and assemble drainage systems to order according to your data, and we calculate the necessary equipment according to your drawings.
Prices. Round drainage system
How to open your own production of tin products
Tinplate packaging is still in great demand, despite the growing popularity of other materials (mainly aluminum and its alloys and coated steel sheets). Tin has several undeniable advantages: resistance to corrosion, weldability, elasticity and strength.
Several years ago, Russian manufacturers began producing decorative gift tin packaging. It is possible to perform offset multicolor lithography on tin material, which allows you to convey almost all color shades. Depending on the customer’s requirements, such packaging can be equipped with additional fittings (polymer handles, locks, metal hinges) or decorated with relief images.
Voronezh Packaging Company is considered one of the largest Russian manufacturers of tin packaging. A certain portion of its products are made to order and imported to the USA, Canada and European countries. It is a highly specialized manufacturer that produces only tin containers.
In addition to such enterprises, there are companies on the domestic market that produce canned food and packaging for it (East-West Invest, Gavan). These enterprises also produce tin containers (about 100 million cans per year before the crisis) and cut and varnish tin. In 2008-2009, manufacturers of cans for canned food faced difficult times.
The decline in the canning industry also affected packaging production volumes. However, now experts note a gradual recovery of the market. In 2012, the volume of production of tin cans for food canning increased, as predicted, by 6% (last year the increase was only 4%).
In our country, tinplate is produced at only one enterprise - the Magnitogorsk Iron and Steel Works. Competition in this segment of packaging production is relatively high. Experts advise new companies to strive to occupy a narrower niche in the market - by region or by type of product (for example, only souvenir gift wrapping). Only a few companies operate in this segment, although the demand for beautiful and practical gift containers for tea, coffee, sweets, etc. is only increasing every year.
To organize your own production of tin products, you will need premises for workshops, as well as a technological line for the production of this type of packaging. Machines for the production of such products belong to the class of technological equipment, so large areas are required for their installation.
Conventional tin containers, which have a small number of variants of shapes and sizes (tin cans, simple containers for tea and coffee, lids, barrels, etc.), are produced on automatic lines. Souvenir cans are produced on semi-automatic lines. This is due to special requirements for the form. Such packaging can be of completely different types and sizes; the equipment must be quickly reconfigured, so a large amount of work in production is carried out manually. To prepare raw materials and print on finished packaging, experts recommend using English Grabtree equipment. For the manufacture of the cans themselves, the German Krupp or Karges-Hammer lines are suitable.
To produce packaging products from sheet metal you will need: a roller welding machine, an eccentric press, a spot welding machine, guillotine and disk shears, an edge bending machine, a sealing machine, a forming machine, a machine for giving a cylindrical workpiece a shape other than round, a conical machine, leveling and bending machines.
Typically, cans are welded using copper wire. This is considered the most modern and environmentally friendly welding method. The thickness of the sheet metal can be from 0.15 to 0.4 mm. For certain types of packaging, the following maximum deviations of net weight are allowed: 3% in one direction or another for containers with a net weight of up to 1 kg, 2% for containers with a net weight of more than 1 kg and 1% for transport containers. The requirements for the quality of the tin itself from which the products are made are relatively small.
Good equipment can work with almost any raw material. You can purchase the entire production line or individual machines. High-performance equipment is considered to be equipment that produces up to 400 cans per minute. The productivity of a semi-automatic line is much lower - about 10 units per minute.
You will also need a tinplate printing machine or flexographic equipment to print labels. In addition, large factories use dosing and packaging equipment for bulk and liquid products. The minimum cost of equipment is about three million rubles (semi-automatic line and machine for printing on tin).
Good equipment is only one of the conditions for the high quality of products produced on it. But it will not work without the help and control of the production line adjusters. There is a shortage of such specialists in our country.
The demand for qualified personnel has arisen relatively recently, and their preparation takes a lot of time: after training, the graduate must undergo a four-year internship under the guidance of an experienced service technician. Insufficient qualifications and errors in the work of such a specialist (and, consequently, downtime in the operation of the line) are too expensive. Technological equipment often breaks down, and only a professional can identify and fix the problem as soon as possible.
The production itself usually employs female fabricators. The training period for a new employee is up to three months. The production process consists of several stages (up to ten), which are carried out using a conveyor type. In Chinese factories, on the contrary, the production process consists of several dozen operations. On the one hand, this significantly increases production time, and on the other hand, it allows the production of products of the most complex shapes.
Due to high transport costs, Chinese tinplate products in the low and medium price segment cannot compete with Russian packaging. However, if we are talking about a complex order, then domestic manufacturers are inferior to Chinese ones. Strict quality control is another condition for the success of a new enterprise. Cans with holes, cracks, black spots, with violations of the integrity of the seams, with sharp bends in the tin, dented folds, rust on the outer surface, with an incorrectly designed sealing seam are considered defective and are not allowed for sale.
Factors such as high demand for products and the narrowness of the tin packaging market allow manufacturers to do without regular advertising in publications. Nevertheless, companies actively take part in industry exhibitions, where they find new clients and partners.
The wholesale cost of one tin can is about 50-60 rubles per unit (depending on volume, shape, availability of additional accessories, etc.). Average production volumes are about 600-700 thousand cans per year. The expected payback period for a project of this scale is two years.
Sysoeva Liliya (c) www.openbusiness.ru - portal of business plans and manuals
Caps (vanes, caps, chimneys) for a brick chimney
Prices. Caps for a brick chimney
We make chimney caps to order according to your sizes. All connections are assembled on a fold, the legs of the cap are made from a 4 mm metal strip. This cap will reliably protect the brick chimney from precipitation.
Read also: How to make a gas burner from a cutter
Smoke vanes are called smoke boxes, or caps, which are installed on pipes, ventilation outlets, flues, in a word - on any air outlets from the house through the roof to prevent precipitation from entering them.
The materials from which weather vanes are made are copper or polymer-coated metal (for example, polyester). There are weather vanes made of galvanized iron or stainless steel - also very reliable materials that do not require special care or painting.
The weathercocks must be securely attached to the pipe. To do this, drill holes in the weathervane skirt and inter-brickwork and insert dowels into the holes and secure them with special roofing screws. To ensure reliability, the dowels are dipped in cement mortar immediately before inserting them into the holes. The second mounting option is with anchors, intended for very heavy weather vanes. This method is possible if the brick on the pipe is not hollow
The customer can choose a hat with straight or curved legs (see photo). To order, we make non-standard hats according to your drawings. We produce simpler and cheaper models designed for installation in large quantities on multi-apartment residential buildings, shopping centers, and large industrial facilities.
Caps (caps) for poles
Prices. Caps for poles
To protect and decorate the fence, the cap is a very constructive solution. If the fence is not protected, over time, cracking and destruction of the masonry will appear on it. Fence caps used for posts are not only a magnificent decorative element, but also provide excellent protection from all kinds of precipitation. For greater use of the fence, fence strips are used together with fence caps . This combination provides protection for the fence and preserves it from mechanical damage.
The material and color of the caps on the posts and on the fence are chosen similar to the roofing material of the main building. It is absolutely unacceptable to use horizontal flat elements to cover the fence. This is necessary to prevent water leakage in the overlaps, thereby preventing corrosion and preventing water from stagnating.
We make custom caps for posts and fence slats.
Cutting a brick chimney
Prices. Cutting a brick chimney
With the relative ease of installation of modern roofing materials, the most difficult place is the correct cutting of a brick chimney. As a rule, a non-professional roofer finds it difficult to properly cut a chimney. In this case, you can resort to our services and order the “chimney cutting” part from us. To order, you need to know the angle of the roof, the dimensions of the chimney, the material (color) of the roof.
The chimney section ordered from us consists of two parts and is easy to install.
Several reasons to choose Dilyaver to purchase beautiful packaging
Our competitive advantages:
- a large selection of goods: from the economy segment to the premium class;
- high aesthetic appeal of products;
- Wholesale customers are provided with individual discounts, the size of which depends on the types and price category of the ordered products;
- Well-thought-out logistics, large warehouse areas.
You can order tin packaging from the manufacturer while in Moscow, Moscow Region and regions of the Russian Federation. Our prices are among the most attractive in Russia.