- 1 Purpose
- 2 Varieties 2.1 HIT-RE 500
- 2.2 HFX
- 2.3 HIT-ICE
Hilti chemical anchors are fastening elements for all structures in construction; they are dowels. Today, their use is popular for many consumers, because they are quite effective fasteners. But until recently, anchors were considered a luxury and an easily replaceable exotic item.
Scope of application of chemical anchor
Chemical anchors for concrete are used when connecting critical structural elements at all stages of construction, building construction, laying subway lines, fastening mine arches in the mining industry and in everyday life during the construction of houses, cottages with porous concrete, fastening doors, windows, and furniture to walls.
- When constructing foundations of buildings and structures at high humidity and low temperatures,
- Construction of high-rise buildings, skyscrapers, exhibition centers, production workshops,
- Connecting bridge spans, arches, beams, trusses,
- Fastening metal parts to concrete bases,
- An auxiliary element for tying reinforcement under the foundation,
- When laying subway tunnels, strengthening mines in the mining industry,
- Installation and installation of high-voltage power lines, especially in areas of rivers, lakes, swamps, permafrost areas,
- Repair and construction of roads, highways, runways, construction of ports, shipyards, underground bunkers,
- Entertainment industry, installation of prefabricated foundations, industrial buildings, shopping centers, water parks, ski lifts,
Installation of equipment, machines, transformers, conveyors, loading equipment,
The use of chemical anchors is advisable in the construction of any facility, from the infrastructure of pipelines, stations and ending with the arrangement of plots, cottages, houses and living rooms.
Fastener design
There are two types of anchorage depending on the location and method of applying the adhesive:
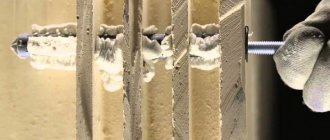
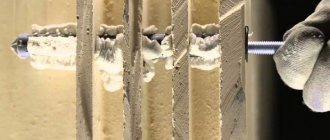
- The himanker is attached using an injection glue gun, which is loaded with two capsules of resin and hardener. Using piston pressure, their contents are squeezed out of the containers and mixed into a homogeneous mass in the nozzle of the gun using a spiral. The adhesive composition is fed into a drilled hole with an anchor rod fixed in it. The solution fills the entire volume of voids around the fasteners, including voids in brick or foam block.
- The glass capsule contains the active component of glue and hardener, separated by a partition. The mounting hole is drilled along the diameter of the capsule. The container is inserted into the prepared recess and a pin is inserted using a drill or hammer, which breaks the wall of the capsule. The adhesive and hardener are mixed to firmly secure the stud into the wall. Glass shards additionally reinforce the fastening.
Important! The capsule anchor is not used for vertical fastening in ceilings. The glue may leak and the connection will not form.
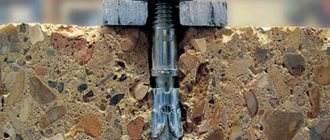
A chemical anchor consists of several parts that form a connection:
- Adhesive based on phenol-formaldehyde, polyurethane or polystyrene resin,
- The hardener accelerates the drying process of the adhesive composition,
- Fillers increase the strength and reliability of the connection, usually quartz sand or cement is used,
- A metal rod in the form of a bolt, pin, nail or piece of reinforcement.
Technological process for installing Hilti HIT chemical anchors
Transcript
1 Technological process for installing Hilti HIT chemical anchors 1. Scope of application of chemical anchors. Chemical anchors are designed for installing columns, various building structures, fastening products and equipment to various types of base materials (Concrete, natural stone, wet concrete, brickwork, foam concrete masonry). Gluing of reinforcement. 2. Product Characteristics Chemical anchoring consists of two components: a metal rod and a chemical composition. The chemical composition penetrates the pores of the base material, and after hardening, reliably connects the metal rod to the base material. A. Chemical composition. The composition comes in several types: HIT-RE 500, HIT-RE 500SD, HIT-HY 200 (HIT-HY 150) Its choice depends on three factors: the applied load (the nature of the connection), the base material, the temperature of the base material. The choice of chemical composition, for all factors, is described in the Hilti product catalog and in the Hilti Anchor Guide. B. Pasted part. The glued part is selected depending on the nature of the connection. It can be: a pin a bushing (with internal thread) a fitting The insertion depth for standard loads is described in the Hilti catalog and manual. Reinforcement Capsule with chemical composition (330ml, 500ml, 1400ml)
2 3. Preparation for installation. Before starting work on the installation of chemical anchors, it is necessary to check the compliance of the markings indicated on the anchor with the markings in the project documentation. The anchor marking is indicated on the chemical anchor capsule. It is also necessary to check the expiration date of the composition. Installation of anchors must be carried out in accordance with Table 1 and with the table for the time of complete hardening of chemical anchors (see Table 2). In case of installation at the temperature indicated in the table below, after cleaning the hole, it is necessary to warm it up using a hair dryer or propane torch, avoiding soot deposit on the walls of the hole. Tables of temperature setting and complete hardening of the chemical anchor table 1 Hit Re 500 HIT-RR 500-SD HIT-HIT hours of 72 hours 0 3 hours 50 hours 5 2 hours 24 hours 20 30mures 30 20min 40 12min 4 hours TGEL-TCUR setting time-full hardening time recommended pace. during transportation C 5 2.5 hours 72 hours 10 2 hours 48 hours 15 1.5 hours 24 hours 20 30 min 12 hours 30 20 min 8 hours 40 12 min 4 hours min 720 min -5 40 min 240 min 0 20 min 120 min 5 8 min 60 min 20 5 min 30 min 30 3min 30min 40 2min 30min 4. Installation 4.1 Drilling a hole Drilling a hole can be done in two ways: Diamond drilling (DD EC-1) This method is most preferred when installing mechanical anchors. The hole turns out to be perfectly smooth and round; when it hits the reinforcement, the bit does not deviate from the planned trajectory; if necessary, the reinforcement can be easily re-drilled; drilling is done using a shockless method (the reinforcement does not peel off). Drilling with a hammer drill (TE-2, TE-6, TE-30, TE-40, TE-50, TE-60, TE-70) This method is preferable when installing chemical anchors. When making holes with a hammer drill, you must use only calibrated drills. It is not recommended to use hammer drills when making holes in densely reinforced concrete. If the drill gets into the reinforcement, you must stop drilling and make a hole in another place. When drilling again, the nearest hole must be at a distance not less than the depth of the hole and not less than 5 nominal diameters of the drill used. There should be no shells or open cracks at the drilling site. Drilling holes must be done perpendicular to the plane of the supporting base.
3 After drilling, the slurry from the hole must be removed by blowing with a hand pump or compressor. 4.2 Installation of the anchor Scheme of step-by-step installation of the anchor Installation should be carried out only with the help of specialized equipment: Hole preparation (cleaning) systems. Hit Premium Rebar Kit Item # You can use compressed air to clean the holes by lowering the nozzle to the bottom of the hole.
4 Dosing system Cordless dispenser HDE 500-A22 for capsules 330, 500 ml. Article # P 8000 D dispenser for 1400 ml capsules. Article # Installation of fittings The fitting outlet is installed in the design position by immersing it in a hole with an initiated chemical composition; for this it is enough to apply a relatively small force. The depth of installation of the anchor should be controlled by the stop of the glued element in the base, provided that a hole is drilled with a depth limiter. After installing the glued part into the hole, it is prohibited to change the position of the anchor during hardening (t cure) as indicated above. (See Table 1) During the installation of the stud, a small amount of chemical anchor should protrude from the hole onto the concrete surface, which must be removed before hardening. When working with a chemical anchor, you must use safety glasses and construction gloves. In case of installation in the ceiling, it is necessary to additionally use a special plastic cup to prevent the solution from leaking out of the hole. Also, after installing the reinforcement outlet in the design position, it is necessary to wedge it while the chemical anchor is completely hardened, in order to avoid the anchor being pulled out of the hole under its own weight.
5 5. Quality control of anchor installation The anchor is installed correctly if, after hardening, there is no further rotation at the base. The reliability of the installation is determined by: Compliance with the grade of concrete. Compliance with the depth and diameter of the hole according to the calculation data. Absence of external damage to the anchor fastening. Acceptance of a typical installation site of anchor fastening is carried out by selective inspection of 5-10% of the anchors to achieve the calculated force to pull out the anchors using the DPG-100 device. And 3-4 anchors to achieve critical pullout force (it is prohibited to use anchors for further installation that have been tested for critical load). Design forces for concrete B20 (C 20/25) are given in the Anchor Guide. 6. When installing Hilti HIT chemical anchors, the following work regulations must be observed: — Clean the hole from sludge and dust. — Dry the hole (not necessary when using HIT RE-500). — In case of installation at subzero temperatures, it is necessary to ensure heating of the base material (warming up with a construction hair dryer or propane torch is allowed without the formation of soot inside the hole.) and the construction of a hothouse. — Prepare the stud (reinforcement, bushing): — Clean from rust — Cut to size — Make a mark for its correct positioning in the hole — Pump the chemical composition in the required volume through the open hole. — Press, slightly rotating, the pin (reinforcement, bushing) until the mark. — Wait the required time until the chemical composition completely hardens. Hilti specialists are always ready to calculate the depth of gluing of reinforcement outlets, calculate the amount of chemicals. composition, train your staff in our technologies at your facility.
Himanker for aerated concrete
The porosity of aerated concrete blocks used for the construction of building walls ranges from 40 to 85%. This material is not suitable for attaching heavy hanging structures, furniture elements, suspended ceilings, cabinets to it using nails, dowels or expansion anchors. It uses a chemical anchor for aerated concrete.
Types of fastening depending on the adhesive composition:
- In addition to strong, reliable fixation, epoxy-acrylic adhesive is fire-resistant, frost-resistant, and has a hardening time of 15 to 180 minutes.
- Polyester or polyester reagent is used at room temperature, curing time is from 25 minutes.
- Based on vinylester resin. The reagent is safe for metal, does not cause corrosion, is used in conditions of high humidity, hardening time is up to 24 hours.
- Epoxy adhesive is used when working with all types of concrete. Used for interior and exterior work, moisture-resistant, non-corrosive, used when using smooth fittings and studs without threads.
Liquid nail for hollow bricks
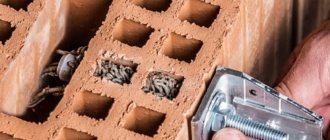
A chemical anchor for hollow bricks reliably fixes the stud in the hole, filling all nearby voids with adhesive. A strong connection is obtained due to the large area of adhesive, which seeps through the pores, cracks and voids in the base of the material.
For these purposes, injection formulations are used, which are loaded into an injection gun. Use the cartridges until they run out of substance. Tubes have a volume of up to 400 ml. Polyurethane, acrylic, phenol-formaldehyde and other types of glue are used as fillers.
Varieties
On the building materials market, Hilti dowels are presented in two samples; these are compositions that obtain the characteristics described above only after injection and ampoules. And also such types of anchors as: HILTI HVU, HILTI HIT-HY, HILTI HIT-MM PLUS, HILTI HFX, HILTI HIT-RE 500, HILTI HIT-ICE.
Return to contents
HIT-RE 500
This type of chemical dowels has all the advantages of a conventional anchor. It differs from the others in its scope of application. It is used in holes with moisture, in water-saturated concrete, when gluing outlets of working reinforcement, fastening load-bearing and auxiliary structures, and reconstructing bridges. If you choose this type of dowel, it will be easy to control due to its color, it does not emit an unpleasant odor and is easy to use.
Return to contents
HFX
This anchor is well suited for renovating living spaces, installing mounts for household appliances, various shelves, and plumbing fixtures. It is easy to use and hardens quickly. You also don’t need to buy a special dispenser, and you can take a break from work when the capsule is opened.
Return to contents
HIT-ICE
The main advantage of this chemical dowel for concrete is the ability to install even at minus twenty-three degrees Celsius. Simple and quick dosing is possible even at sub-zero temperatures. And also you will not lose time, because you will be able to work in the winter.
Return to contents
Technology of use
Do-it-yourself installation of chemical anchors does not require special equipment or training. It is easy to do it yourself if you have a tool that every owner has.
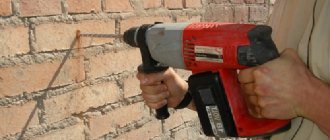
Mark the intended location for fastening. Using a hammer drill with a diamond tip drill, drill holes that should be 2 mm larger than the diameter of the anchor pin or bolt.
Carefully remove dust from the middle.
- Insert an ampoule of glue into the hole, tighten the bolt or pin with an electric drill or hammer it in.
- If a cartridge is used, squeeze out the adhesive until the hole is completely filled, and insert the pin.
- Wait until the components specified in the attached instructions are completely dry and proceed with further installation.
Each type of anchorage is supplied with detailed instructions by the manufacturer, which explain in detail all stages of the work. The instructions must be strictly followed.
Chemical anchor VM-PY
Chemical anchor VM-PY
More details
Chemical anchor VM-PY
Chemical anchor VM-PY from the German manufacturer MKT, which includes an adhesive base made of vinyl ester..
More details
