DIY car tipper
All car owners who have ever handled the underbody of a car or repaired it know that preparatory actions related to a car rollover are possible only with the presence of several physically strong men.
And if there is a special device made of inexpensive materials, then the process of tipping the machine can be carried out on your own, without the help of outsiders. In this article, we will figure out together whether or not it’s worth making a lift yourself. Content:
Points for and against
Owning your own car lift is not only quite convenient, but also somewhat economical. The benefits cannot be felt immediately, but they will make themselves known. The device can be purchased, but many car owners recommend making a car tipper with your own hands. This will help you not only save money, but also free space in the garage, which is sometimes far from enough. To be honest, assembling this device on your own will not cost much less than purchasing a ready-made system from scratch or even a used one.
What types of lifts are there?
Lifts come in various designs, differing in the method of lifting the car and the type of drive. For vehicle repairs, three types of drives are mainly used:
- chain mechanisms;
- screw;
- hydraulic systems.
Read also: Three-phase panel connection diagram
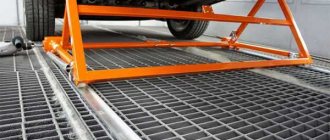
The method of lifting the car plays an important role in the design; a garage lift can be a fork, scissor, or platform design. The most popular are fork screw units, the basis of which is a long threaded shaft made of tool steel. The parts of the unit are able to withstand the load of an average car; it is almost impossible to make the mechanism with your own hands, due to the complex design of the forks.
Types of lifts for car repairs
The easiest way to make a platform lift with your own hands is using a screw mechanism.
Parallel beams attached to the mechanism are capable of lifting a car weighing up to 3 tons.
Types of lifts, their cost
A screw electromechanical system made in China will cost from one hundred to one hundred and twenty thousand rubles. Self-assembly of such an analogue will require expenses for the engine, screws, gearbox and load-bearing frame, which in total will amount to no less. The effect of a self-assembled tipper is possible if we create a fairly simple structure from those materials that have not been used for a long time . All we have to do is develop the drawings according to which the assembly will be carried out.
Lifting devices are divided into the following types:
- fork screw;
- scissor;
- tipper;
- platform;
- plunger
For ordinary car enthusiasts with standard-sized garages, such systems are of little interest. They are too bulky and take up a lot of free space:
Area
To create it you need sheet metal 3-4 mm thick. It should be 350x150 mm in size with curved sides. You can also weld a 20 mm wide strip onto the tacks with drilled holes to secure the inserted board. We fix a rubber strip on the board. We weld stiffening ribs and guides under the lower part of the platform, not forgetting about the jumper. The dimensions of the site are not critical. It is necessary to adhere to the size between the guides, placing the platform on the upper beam, along which it can move freely.
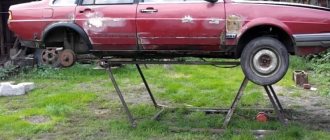
Tipper assembly
This design is considered not only simple, but also universal. With its use, you can perform a lot of work related to car repairs. The whole system is so simple that it does not require detailed comments. You just need to determine the dimensions of the profiles and their optimal length. For such systems, it is best to use square profiles with a cross-section of twenty by twenty. And if the car weighs about two tons, the profile size should be twice as large. For example, it shows what starting materials should be prepared:
The entire tipper system is placed on a rigid structure with a triangular shape. The main goal is to change the length of one of the sides of the triangle so that the car rises to the desired angle. You can work with a jack or a simple winch, lifting the car, as shown in the photo:
The adjustable rack has markings and drilled holes, with the help of which it is possible to fix the vehicle at the desired angle. But remember that such systems are made taking into account the size and weight of your machine:
Rack
We make it from a 32 mm corner with a length of 1540 mm (you will need 4 pieces in total). You will also need 4 36 mm corners of the same length. We assemble the corner into a square using welding seams 30-40 mm long. When assembling we use clamps. After connecting the corners, you need to drill holes in the lower part of 26 mm in diameter, retreating 31 mm from the edge. This will leave you with 5mm left for welding the metal rod inside the structure. Next, drill 13mm holes:
- one at a distance of 100 mm;
- the next after 80 mm;
- the third and all subsequent ones after 190 mm.
Tipper in action
The holes are needed for the metal pins that are needed to secure the shoe and the top beam. After assembling the square profile and drilling, it must be connected with pieces of corners, also assembled into a square profile.
When assembling, you need to insert spacers of the same size between the profiles, that is, 36 m each or a finished upper beam. After welding, you need to allow the part to cool without removing the spacers. Check that the top beam fits easily between the square profiles.
How to properly prepare a garage
If you are planning to assemble a car tipper yourself, make sure that your garage will meet the necessary conditions. Otherwise, you won’t be able to use your structure indoors – there won’t be enough free space. Then you will have to work outdoors, which is not very pleasant in cold weather, and not always safe. But more on that later. In a word, if the height of the garage does not exceed the height of the car by one and a half, or better yet two meters, it is better not to build a serious tipper. And there must be free space around the perimeter of the lifting device so that there is an opportunity for normal maintenance of the machine. And if you are planning to make your work easier and create a tipper that runs on electric current, then the voltage in the garage should have three phases. So, site preparation should depend on the following factors:
Top beam
Tippers
For this we will need:
- two 32 mm corners 171 cm long;
- sheet metal strip 64 mm wide;
- several bushings.
We assemble the corner into a U-shaped profile, that is, a channel. On one side in the middle we weld a metal insert 3-4 mm thick and 16 cm long, which is needed for using different jacks. We weld the plate on top with tacks, sew everything together and get a rectangular profile.
We weld the insert to the plate, and on the reverse side we jam the profile with a metal plate 4-5 mm thick, scalding around the perimeter and cleaning it. We weld a sleeve of the following dimensions to the end in the middle:
- length 35 mm;
- internal diameter 20 mm;
- external 35 mm.
In front of the upper beam we weld two guides for the jack with holes for the jack stopper. You need to insert an M8 bolt with a nut into them. We also weld a bushing with rollers and a safety pin on the top part.
Security measures
It is very important that when the tipper is operating, the site is protected on all sides from wind gusts. The fact is that an overturned car creates a lot of windage, and a moderate wind is enough to turn it over. Before starting work, do not forget to prepare the car - empty the interior and luggage compartment, remove the battery, and eliminate the possibility of leakage of fuel from the fuel tank, oil and brake fluid. An overturned vehicle must be secured with additional supports.
Choosing a design
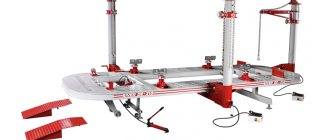
To make a vehicle lifting unit with your own hands, it is important to familiarize yourself with the designs on the market. The cost of finished equipment can be equal to the price of a car. In auto repair shops you can find the most common option - a screw two-post jack; the design can be made with a hydraulic or electric drive. The structure can be made using additional beams, depending on the expected loads. A scissor lift has a platform and is driven by a scissor-like mechanism. A homemade lift of this type is driven by mechanical force and is lifted by a hydraulic drive connected to an electric motor. Before making such structures, it is important not to forget about safety precautions. During operation, parts may spontaneously fall, which will lead to irreversible consequences. A homemade car lift must be made with a reserve of aggregate power; when using it, it is important to know the mass of the element being lifted.
How to make a car tipper with your own hands
Hi all! Sorry I haven't written anything for a long time, I was busy organizing the garage =)
And now on topic - I once created a topic about a tipper. And everything seemed to be going great, the calculations seemed correct, I had no doubts about the drawings, and I was determined to overturn my car. BUT the fluffy animal crept up unnoticed...
After some time, I took the plates for fastening the hub from the water cutting machine. I brought it to the garage and welded it.
It's time to test the tipper in action. To do this, jack up one side, remove the wheels and install them on racks. Then, using the same jack, we raise each hub to the level of the holes for the bolts and attach them to the nuts.
Then we raise the car with a jack until we can remove the racks. Then we remove the jack itself and voila - the car is hanging on one side on the tippers. I invited a neighbor so that the two of us could knock over the car. They grabbed it, tensed up, UHHHHH! FUCK THERE (((The second side didn’t even rise. And then a vague doubt came to me that something was wrong here... When I got home, I started looking through the photos, and came across a photo of how it should be.
The insight came by itself, my sick brain began to come up with options one better than the other. Arriving at the garage, I got to work. To begin with, I sawed off the levers from the platform.
Then everything is sawn into molecules, welded according to a new scheme, without even having to use extra metal.
Reattached it to the hubs. The front hub fits perfectly, the height is just right. Nothing catches or interferes anywhere.
But there was a mistake with the rear one - despite the fact that I tried it on in every possible way and adjusted the height, the height of the inclined racks turned out to be too high. When trying to secure the plate, one of the levers bumped into the spar ((
It was 11 pm, I gave up on everything and went home angry.
And so, at the time of creating this entry, I’m getting ready to go to the garage, I hope to fix my jamb and finally overturn my Mazda. Wish me good luck))
Do-it-yourself car tipper: for a personal garage
Many enthusiastic car enthusiasts, as well as owners who have been using their cars for many years, still prefer not to contact service centers when it comes to repairs, but to do it themselves.
If the damage is minor, you can get rid of it in your personal garage, but the body and chassis require mandatory equipment, which includes a car tipper.
Of course, such a device is used extremely rarely, and the cost of factory-produced equipment is very high, however, if the need nevertheless arises, it is absolutely impossible to do without it. Therefore, many car owners try to make a tipper for a car with their own hands - it’s economical, and you can choose the most optimal version of the drawing, of which there are quite a few on the Internet.
The virtual space offers many original ideas, the main thing is that before you start making a car tipper with your own hands, the drawings on which all the work will be based must be tested to satisfy the basic requirements that this equipment must have:
- safety;
- load capacity;
- the magnitude of the elevation angle.
Knowledge 147 stunned
Do you want to sell swedes? Be aware, yak
Tipper Atlant
Motorcycle parts and accessories » Motorcycle parts
3,500 UAH.
Kiev, Darnytskyi Today 18:47
Universal tipper for cars
Auto parts and accessories » Auto accessories
Guaranteed to withdraw the goods, or the money back to the card. More details.
2,200 UAH.
Car tipper
Auto parts and accessories » Auto accessories
Guaranteed to withdraw the goods, or the money back to the card. More details.
400 UAH
Universal tipper for VAZ/MOSKVICH
Auto parts and accessories » Auto accessories
Guaranteed to withdraw the goods, or the money back to the card. More details.
950 UAH
Tipper GUAR 15.
Spare parts for transport » Other spare parts
30,000 UAH.
Universal tipper
Auto parts and accessories » Auto parts
Guaranteed to withdraw the goods, or the money back to the card. More details.
1,300 UAH.
Zhytomyr, Putyatinka Today 13:40
Tippers
Auto parts and accessories » Auto accessories
1,000 UAH
USSR tipper for passenger cars
Auto parts and accessories » Auto accessories
2,717 UAH.
dumper car VAZ MOSKVICH
Auto parts and accessories » Auto accessories
Guaranteed to withdraw the goods, or the money back to the card. More details.
750 UAH
Screw tipper for car
Tools » Hand tools
3,900 UAH.
Car tippers (VAZ, Moskvich)
Auto parts and accessories » Auto accessories
1,000 UAH
Auto tippers – 2 pcs.
Auto parts and accessories » Auto accessories
Guaranteed to withdraw the goods, or the money back to the card. More details.
1,200 UAH.
Tippers
Auto parts and accessories » Auto parts
Guaranteed to withdraw the goods, or the money back to the card. More details.
1 100 UAH
car transfers, tipper lift, universal for cars
Auto parts and accessories » Auto accessories