From the editor:
The article was inspired by a short comment by comrade sergey_esp. We have studied the topic, tested it practically, expanded it, deepened it, added all the explanatory photos and even the recipe itself. In total, the article was brought to the Datagorian canons.
It is difficult to remove ferric chloride from a sink or a kitchen towel. It's hard to explain the acid hole in my pants to my wife. I recently switched to the cheapest and cleanest method of etching printed circuit boards. Thanks to the unknown chemist who first described this method on the Internet. Unfortunately, I don’t remember where or who he is.
Later, I saw similar recipes many times on different sites on the Internet, and decided to add this cheat sheet to Datagor, so that it is always at hand and in the appropriate section. This method of etching boards is great for both beginning radio amateurs and elders.
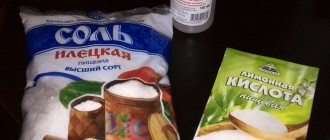
To chemicalize the etching solution we need safe and affordable potions
| Ingredient | Quantity | Note |
| 1. Citric acid | 30-50 g. | powder in a bag from a grocery store |
| 2. Hydrogen peroxide 3% | 100 ml | solution in a bottle from a pharmacy without a prescription |
| 3. Table salt | 5-7 g. | 1 teaspoon, non-iodized |
☂️ Please note that there is no water in the recipe! ⚖️ This amount of solution is enough to etch ≈100 cm² of copper foil with a standard thickness of 35 microns.
What is etching used for?
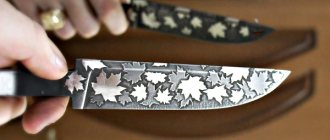
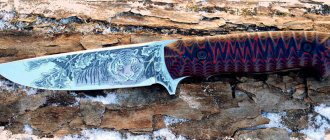
Etching as a method of metal processing allows the master to perform technical actions. However, if we talk about etching at home, it is most often used to create ornaments and decorative patterns on blades and other metal products.
Today, many people are engaged in the production of all kinds of edged weapons and tools at home. At the same time, such designer items are decorated with ornaments. Etching a knife or ax allows the craftsman to quickly create a unique decorative decoration for the blade.
When starting work, the etcher first prepares a sketch of the future ornament or design. Today this can be easily done using special programs that allow you to create images. If the pattern is planned to be applied to both sides of the blade, then two sketches are printed. After the image is prepared, it is transferred to the blade using a pen, and then scratched using a scrubber.
Moreover, even before applying the design, the metal surface must be thoroughly cleaned and free from rust. Next, the iron in the places where the pattern is applied is treated with a special compound and degreased. You should also take care of the ends of the future knife, protecting them from the effects of salt solution or acid.
Etching can be done in two different ways. The first involves completely immersing the metal in a container with electrolysis. The second option is to apply the acid composition to specific areas of the surface using a cotton swab. Under normal conditions, the product is immersed in the solution for ten to fifteen minutes. However, this parameter is highly dependent on the type of electrolysis chosen.
After the etching is completed, the blade is washed with water and the result is checked. If everything turned out as it should, then all that remains is to grind the knife, thus removing any remaining corrosion and giving it the appropriate appearance.
The method allows you to create truly wonderful and beautiful products.
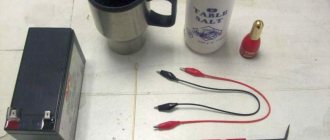
What equipment is needed for successful etching at home?
Metal etching at home is a fairly simple procedure that does not require special skills from a person. But in order to carry out successful etching, you need to prepare some items and equipment.
- Container made of glass or plastic. Only such materials can withstand the chemical reaction that accompanies the procedure, and are also able to withstand an acidic environment.
- Table salt. This substance is most often used to create electrolysis.
- Copper plate. They act as a terminal that distributes current inside the container.
- Source of energy. It can be used as a phone charger.
- Wires for connecting terminals and charger.
Etching using a phone charger, as practice shows, allows you to effectively process even surfaces made of high-resistant steel.
↑ How to use the recipe?
All this must be mixed before use in glass or plastic containers. The amount of ingredients can be changed proportionally, and more citric acid can be used
.
Etching time about 20 minutes
at room temperature, depends on the area of the board. Increasing the temperature does not lead to a significant increase in activity, so I believe that heating is not necessary. It is important to stir the etching solution to access fresh solution and wash away reaction products.
The solution according to this recipe does not corrode hands and clothes
and does not stain the sink. Initially, the solution is transparent, but as it is used, it acquires a “sea wave”, greenish-bluish color.
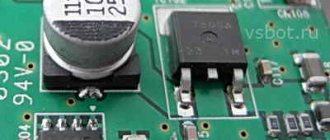
Photo in progress, sent to Datagor Beso
(Minsk): “Indeed, it poisons quickly, poisons cleanly, and, most importantly, poisons cheaper than with ferric chloride.”
To correct LUT imperfections, a permanent marker, paint marker or nail polish is suitable.
The solution is not stored; it is always better to etch in a freshly prepared mixture
.
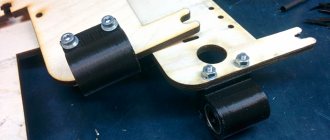
My version of pickling in a bucket of some kind of food. The solution is used very economically.
They also offer an option on the Internet that involves replacing citric acid with 70% acetic acid. I believe that this can only be done as a last resort, because we end up with a stink and working in a more dangerous environment.
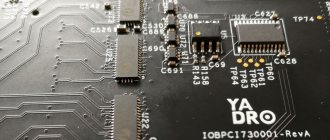
Etching printed circuit boards with citric acid and hydrogen peroxide
The author of this video tutorial offers radio amateurs a new, economical method for etching printed circuit boards.
Take a bottle of 3% pharmaceutical hydrogen peroxide 50 ml.
Also take a sachet of food grade citric acid in the amount of 10 grams.
Put a teaspoon of table salt. Together, these 3 ingredients will allow you to etch a printed circuit board in 40 minutes.
We prepare the printed circuit board, apply the design using a marker or LUT technology. Pour citric acid into the etching container, based on 10 grams of citric acid per board 40x50 mm. Add a teaspoon of salt, mix, pour in 50 ml of hydrogen peroxide, wait for it to dissolve. No need to add water. The water used is the one that is already in the purchased hydrogen peroxide solution. No need to reheat. The board should be submerged 5 mm in the solution. Pickling time is 40 - 50 minutes. The solution is safe for hand skin. The video shows an example of a simple etched board, drawn in 15 minutes with a marker, already tinned.
discussion
arm strong etching the boards in a solution of 1 tbsp. L. Cuprumceo - 4 + 2 tablespoons sodium chlorine per 400 ml of water (preheated in a water bath to 70 Celsius before etching. Then I restore the solution after the first etching with iron and use it 2 more times. And the citric acid + perhydrol + nacl method, of course cleaner but not as cost-effective as mine. True, I don’t pour the spent solution into the sewer, due to its chemical reactivity to iron and cast iron, this is the only disadvantage of the vitriol method. So I will always use it, and the quality of the boards is high.
Denis zhuravlev yesterday went to a radio parts store to ask about etching with peroxide. They looked at me strangely and said that they did not know such a method. I asked for ferric chloride - they said that everything was sold out, it would be available in a couple of weeks. Well, I think I'll try to etch it with peroxide. I bought 100 ml at the pharmacy (now it costs 6-7 rubles per jar), took citric acid at the store, and salt at home. I had a 100x100 textolite board. More than enough for my needs, so in the free areas I decided to experiment with various “painting” elements. An ordinary black permanent marker - the area painted with it is not etched. An ordinary white corrector (putty) has the same effect, ordinary adhesive tape has the same effect. The most convenient of these three materials is a permanent marker. Then: heat 100 ml of hydrogen peroxide in a water bath until hot (I didn’t measure the temperature), pour it into a plastic container (or somewhere else), 2.5-3 teaspoons of citric acid, 1-2 teaspoons of salt. Stir all this until dissolved. We lower the textolite board with the copper layer down, but so that it does not touch the bottom. For this I used tape. Set the timer for 10 minutes. After 10 minutes I took it out, and all the excess was erased, everything that was painted over remained. The solution turned blue-green as a result of this operation. I poured it into the toilet, there were no traces left. In my opinion, this method is much better than ferric chloride or electrolysis in salt water. Moreover, all materials are cheap and accessible.
Stepping in the 80s there was a lot of nitric acid, they etched with a 50/50 solution with water, etching for almost a second, but the boards were painted (there were no laser printers in those years) with furniture varnish, and pre-tinted with paste from a ballpoint pen! Nitrogen simply ate up other paints! At the moment, something has awakened in amateur radio, I want to put together some circuitry (the device is on sale, but from 6 to 10 thousand rubles, assemble it yourself = 0 rubles, everything is there), but I’m looking for what and how to set it up! I’ll probably try this method that the author suggested, I honestly learned about it for the first time.
Anton ivanov 200ml. Perikisi, 2 teaspoons salt, 50g. Citric acid. I stirred everything, heated the solution in the microwave (I didn’t measure the degrees), while etching I shook the bath, the board was 100mm x 150mm. Etched in 10 minutes. Thanks for the recipe. )
Ruselectronic is possible in ferric chloride and will be faster, I etch all my boards with lemon and peroxide. For comparison, what will be the cost of anhydrous ferric chloride? 60 -100 rubles for etching, if you do not drain and leave the solution for subsequent etchings. Here, when etching using this method, the cost of etching, depending on the size of the board, is from 6 rubles per etching, a 40 x 50 mm board is easily etched for the cost of 3 rubles peroxide bottle, 3 rubles citric acid). Without heating, etching takes 40 minutes, versus 10 minutes, as written above, with ferric chloride. The time difference, I would not say, is very significant, taking into account the time for preparing the board, loot, washing off after etching, and so on. Let everyone choose for themselves what they like, overpay or wait a little.
Thepzkl is fucked. 4 hours baiting with heating, 80% only. 40 minutes. Storyteller
ruselectronic choose the concentration correctly before writing such posts. Half the Internet is poisoned in this way. People even lose their marker drawings if they overdo the concentration, but you have 4 hours of heating. This is where I find it hard to believe. I have never done heating during etching.
Ruselectronic + Vyacheslav Novikov is a thread tied to the mounting hole. From time to time, the board must be completely removed from the solution, by the attached thread, in order to inspect for undercuts and remove gas bubbles that accumulate on the board and interfere with etching.
Ruselectronic permanent alcohol marker holds up, but you need to draw with a fresh, rich marker and in several layers. And all the same, if you make the solution very concentrated, or heat it up, there will be small undercuts. But this method allows you to draw a simple scarf in literally 15 minutes. There are special markers for printed circuit boards, r-teck, perhaps they are more resistant to acidic environments, I have not used them.
Ruselectronic any, as long as the board does not sag or deform under the weight of installed massive parts, such as transformers, or cooling of transistors, amplifier chips, diode assemblies, etc. Usually 1 mm is enough.
Ruselectronic increase the proportions by the required number of times, in accordance with those indicated, for the dimensions of my board in the video. Your board should be hidden by at least a centimeter and a half, if you are worried that there will not be enough reagents for etching and the reaction will stop, make the volume of all reagents with a small margin, the reagents are cheap, and I don’t think there will be problems with cost. If gas bubbles form on the board, remove the board from the solution from time to time to remove gas bubbles.
Ruselectronic + Vladislav Chaika, it’s probably possible if the board was very small, and a lot of solution was made and it didn’t react all. But it’s easier to try etching a couple of times, experimentally establish the minimum volume of solution required for one etching, and do only that, than to bother, drain, etc. The cost of one etching is very low.
Dmitry Sychev is a good method, I’ve been using it since the very beginning of making boards, this solution has one minus, when it gets on clothes it leaves light stains, i.e. it eats up the paint, so you need to be careful. Well, as they already wrote here, heating speeds up the process, I read that it is necessary in a water bath, but without bothering, I put it in the microwave, and everything seems to be normal, but I don’t recommend doing this, because after all, the food is cooked there, and I don’t know how may influence.
Ruselectronic did not understand the question a little. Do you want to remove the solder layer and traces from the board? When etching by electrolysis in salt water, you will have to reconnect the electrode each time to new areas of the board as the etching progresses. In the case of etching with lemon and peroxide, this is not required. If the question was about whether this solution will take solder, I think yes, it is active for metals, and if so, then most likely the solution will be active for solder containing lead and tin.
Ruselectronic solution after etching is toxic due to the content of dissolved copper in it. It is better to pour it somewhere on the street, not into the sewer, because even the reacted solution can still be active towards metals.
Vlad volf tried everything. Both ferric chloride and the above recipe. It is best to poison with sulfuric acid. 5 tablespoons of acid, 5 tablespoons of water, 5-6 hydrogen peroxide tablets crushed into powder, dissolve in the same place. Only the acid must be poured into the water, and not vice versa! The board is etched in a matter of minutes right before your eyes.
Ruselectronic + Dima Trofimchuk and regular table salt. These three seemingly simple household ingredients listed in the video, when combined, form a very copper-active solution.
Ruselectronic just etched the board the day before yesterday, it etched perfectly. You just need to strictly follow the recipe. Many who have tried this method don’t even want to hear about ferric chloride now. At least it’s 6-8 times cheaper for sure. Any board is etched in 40 minutes.
Ruselectronic + Maxim Rotenko you need to select the concentration of the solution so that the solution does not boil, which is what happens if you make a supersaturated solution. Then there will be no undercuts. In general, I advise you to try again, it’s not about the method, everything has been tested many times. And when ironing, you need to iron it so that the toner cannot be torn off from the board with a fingernail, I iron the board for 5 minutes, and vigorously along the edges. I understand if the undergrasses were under the drawing drawn with a marker, but this shouldn’t happen with loot. Is the print color selected black? Is toner save disabled? Here is my latest board at the link: http://s50. Radical. Ru/i127/1502/27/1da7b7df79bf. Jpg if you have any specific questions about the etching method, it is better to go to our group in contact https: //vk for discussion. Com/radio_beginner
apioskin everything is correct and clear, thank you, but don’t neglect people like jewelers;) ™ thank you, it was very helpful. Good luck, man!
Don koks What marker do you use to draw path designs? I tried it with a regular black marker, which cannot be washed off with water - the solution eats up the paths under the drawing. I didn’t try it with Lutom, because I need a printer with perfect printing, without printing extra stripes and dots. Of all the things I've tried, I use edding 792 and edding 791 markers.
Ruselectronic +don koks I tried different ones, but a set of cd-pen markers worked best. They are double-sided, on one side there is a rod of regular thickness, on the other side there is a rod that draws as wide as a ballpoint pen. The marker should write richly, so a few hours in advance we place the marker vertically with the tip down. The marker must be fresh. You need to draw in several layers, let the drawing dry and draw again. When drawing in 3 layers, there will definitely be no undergrasses. When looting, there are no undercuts at all. I only use a marker to touch up the drawing when looting. I have an old laser printer, hp laserjet 1000, it prints fine for loot. There is simply no need to make large polygons; if there are small stripes and dashes on the tracks, this will all be hidden when tinning the board. There are also markers produced specifically for drawing printed circuit boards, r-teck, which cost 80 rubles, but I have not used them. During etching, from time to time we take the board out by the tied thread from the etching container. Bubbles from the surface of the board will disappear. Thus, we do not allow the solution to boil. If the solution boils, its temperature will rise, and there will definitely be marks on the board, bubbles will tear off the protective pattern. There is no need to make a supersaturated solution; the reaction will proceed faster and there is a greater risk of undercuts. Here is my latest board, after transferring the drawing with loot, I corrected the drawing with a marker, in the end it turned out without undercuts, the paths are of course very wide. Http://s012. Radical. Ru/i320/1412/77/e154b4eab159. Jpg
ruselectronic in Soviet times, those who did not have access to ferric chloride were poisoned by electrolysis in a saline solution. The result was not impressive, since the contact connected to the board had to be reconnected many times to new areas of the board as it was etched, and still there were unetched areas. You can try it, perhaps as an experiment, if there is a large supply of PCB.
Realrubyx Then I want to try one option using electrolysis: water, citric acid and power supply 5-6V 500mA. With a minus, which nail should you attach and into the solution, and with a plus, grab the board and do the same. This is an experiment!
Realrubyx took 25 minutes to etch, the effect is much better than with x. G. A third of a bottle of peroxide, a teaspoon (without a pea) of salt, 2 teaspoons of citric acid. Mix everything together for a board measuring 8cm by 3cm. I drew with a marker that doesn’t erase so easily, although you have to be careful so that this stale peroxide doesn’t “eat up” those places where the marker is, if you overexpose it, it’s a mess)
I haven’t tried the heated ruselectronic. If you correct the board or draw with a marker, I think there will be undercuts, because the more intense the etching, the greater the risk that it will be undercut under the tracks. With loot, it’s possible that when heated it will work fine.
Ruselectronic + Chingachgook Mohican I myself did not try to replace it, but people on the forum tried replacing citric acid with acetic acid, but according to reviews, the results seemed to be worse, or there was a smell, I don’t remember exactly now. But for some reason I didn’t try this replacement then. There were some disadvantages.
Ruselectronic good evening. I pour it on the street, just in a ditch. I don’t recommend putting it into the sewer, since even the reacted solution is still very active towards metals.
Ruselectronic I don’t know what kind of gases it is, perhaps chlorine, given the formula of table salt nacl, but it is released in very small quantities. You can smell it only if you lean over the container in which you are poisoning and inhale. I always poison in the bathroom, it has a vent and that's enough for me.
Ruselectronic etching time depends on the concentration of the solution. If it boils during etching, there may be undercuts under the drawing drawn with a marker. The pattern transferred with toner is more reliable.
Alexey just today etched a board in a similar solution, only the proportions were slightly different. The 50x70mm board was etched in 20 minutes with the following proportions: hydrogen peroxide - 100 ml citric acid - 30 g (weighed on a scale) table salt - 5 g (also weighed on a scale) I liked it. Faster than ammonium persulfate. I can’t compare it with ferric chloride; I haven’t used it.
We prepare the product for the etching procedure
Preparing a steel or iron product for the etching procedure at home includes a number of necessary steps. First, the surface must be thoroughly cleaned of any contaminants; this is the only way to guarantee that etching will proceed quickly and the depth of the removed layers will be the same.
Popular detergents and ordinary water are quite suitable for cleaning metal. After the metal is washed, it must be allowed to dry. Next, the surface must be wiped using fiber, which is previously moistened in a solvent. Thus, you can not only remove residual moisture, but also degrease the surface.
It should also be noted that the quality of the treated surface can be improved by polishing it. This can be done on a special machine. If this is not possible, then the metal must be treated with sandpaper. Thus, you can create a very interesting optical effect with your own hands.
Now you need to apply the future design to the metal surface. Nowadays, many techniques are used for this. The main thing to remember is that areas that should not be etched must be treated with protective agents.
Today, nail polish is often used as such protection. But this method has certain disadvantages, namely:
- The varnish has a thick structure, which makes it difficult to apply when it comes to complex ornaments or designs.
- A master needs to be able to draw well.
- If a mistake occurs when applying the varnish, it will not be easy to correct.
A layer of varnish or primer is applied to the surface of the product. When this composition dries, you need to apply the image using a thin tool or pen. Next you should find a thin needle, an awl or a special tool with which the image is scratched onto the metal. This must be done extremely carefully so as not to damage the polished surface outside the contours of the design.
When the sketch is ready, all that remains is to close the parts that should not be treated with protection and begin the procedure itself. It must be remembered that the protection can only be applied to a dry surface, since otherwise the acid or saline solution may get on the metal and damage the surface. It will be very difficult to correct such an error in the future.
How to clean copper from oxide and dark deposits using vinegar?
One way to clean copper is to use vinegar.
Instructions:
- Apply a little vinegar to the dishes and leave for a few minutes. After this, wipe with an old toothbrush and rinse off the vinegar with water.
- The acid will corrode the copper oxide that has formed on the surface of the cookware.
- You can remove plaque from copper products using a mixture of vinegar, salt, and flour.
- Mix fine salt, flour in equal proportions and add a few tablespoons of vinegar
- It is necessary for it to turn out to be a slurry. Apply this paste to copper products
- Leave for a few minutes, then use the hard side of a sponge or brush to wipe the products with force.
IMPORTANT: We do not recommend using large salt crystals, as this may cause scratches on copper cookware.
- If these methods do not help you, we recommend using a more aggressive method.
- It is necessary to place the dishes in vinegar and add two tablespoons of salt to it. Heat the mixture to a boil and immerse the copper items in it. You can boil them in this solution for a few minutes
- After this, rinse with cool water and rub until shiny with a soft cloth.
IMPORTANT: Before carrying out all manipulations, we recommend conducting a test. To do this, you need to apply whatever cleanser you are going to use to inconspicuous places and try to rub. If the item does get clean, you can continue cleaning and apply the product to the entire surface of the item.
Cleaning copper spoons
How to clean copper?
Cleaning of copper coins is preceded by soaking in a soap solution. If after this procedure the oxides and dirt on the surface of the copper do not disappear, you should resort to radical action. For the procedure you will need:
- cotton buds;
- toothpicks;
- "lemon";
- water;
- dishes;
- wooden spoon or tongs.
The procedure begins by preparing a solution: citric acid crystals are dissolved in warm water, stirring them with a spoon. There should be about 50 ml of water in the container, the solution is prepared in the ratio: 3 parts water and 1 part acid.
The coin is immersed in water and dirt is removed from its surface using a cotton swab and toothpicks. You can remove the product from the water and try to remove oxides and dirt with a cotton swab dipped in the solution.
If the contamination does not respond, then you can repeat the procedure, but after some time. As a rule, copper is easy to clean, oxides and impurities are removed from the surface, but if this does not happen and green spots remain on the metal, you can try to remove them using a cotton pad or swab soaked in a solution.
But here it is important to know when to stop: acid can cause pink spots to appear on the coin, which will have to be removed in another way.
That is why masters advise not to be zealous and to clean only inexpensive exhibits of the collection with acid.
Copper oxidizes upon contact with moisture, so this metal should be protected from water. After cleaning is completed, you need to rinse the coin under a stream of cold water and wipe it with a suede napkin.
Two more secrets:
- Acid removes green oxides better.
- The solution can be changed during processing.
After cleaning, you need to wipe the product dry, which will help determine the effectiveness of the procedure.
Cleaning coins with citric acid
Oxides are easily removed from the surface of copper, but lemon peeling can remove or damage the patina. To restore it, you need to keep the copper on the kitchen grate for several days after cleaning. As a result of the procedure, the patina will look natural. This recovery method is considered the most effective.
Cleaning copper, coins, antiques with a special metal cleaner
™ metal cleaner copes remarkably well with copper deposits and will carefully remove dull and thermal stains from unpolished copper surfaces using chemicals and a gentle abrasive .
To clean copper coins or other copper surfaces, apply a small amount of AMWAY HOME™ LOC™ to the surface to be cleaned and lightly rub the surface using a buffing motion using a sponge or cloth. After cleaning, rinse off the paste with warm water and wipe the product dry.
The product will shine with purity and newness.
Cleaning copper products is quite simple. It is necessary to test the chosen method in a small area in advance to ensure its safety and effectiveness.