Any carpentry workshop starts with a workbench. And the workbench, in turn, turns into a full-fledged workplace only when a comfortable and functional vice is installed on it. They help to fix parts in the required spatial positions and perform various woodworking (and not only) operations with maximum convenience.
Carpenter's vices can be purchased ready-made. In this case, all that remains is to make wooden covers for the jaws and install the mechanism itself on the workbench. Those who want to save money, or simply don’t need a bulky cast iron vice, can make them themselves - in this article we offer one of such projects.
Learn how to assemble a professional carpentry workbench with your own hands. Bonus – a review of three “folk” models of bench vices.
This is a lightweight bench vise designed for moderate loads. They are easy to make at home - it does not require a lot of time and a large number of purchased consumables. The capabilities of this vice in its original version will be quite sufficient for amateur carpentry. Additionally, we will offer design alternatives with which the mechanism can withstand more severe loads.
DIY hand vise for small parts
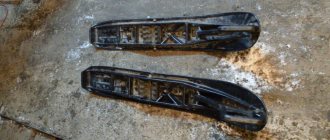
When processing small parts using an engraver, drill, or even a file, holding the part simply with your fingers is often very inconvenient and can even ruin the work. For such work, a hand vice is used, which reliably holds the part during processing.
LabaKraba channel made these handmade vices, useful for home crafts, from an old broken hanger. He tried to make them at a professional level and believes that they are better than store-bought ones. Teak has a smooth adjustment of the force with screws; the jaws have soft pads so as not to damage delicate parts.
Video of the process of making a hand vice:
Making a carpenter's vice: step-by-step process with photos
Lead screw assembly
The screw itself with full threads is easiest to buy ready-made. The load capacity of the vice and its clamping force largely depend on its diameter. Considering the fact that this vise is not designed for heavy loads, a relatively small version of the guide was chosen, with a diameter of 12 mm.
- The required screw length is 350 mm. Thus, we trim the original part to the specified dimensions.
- Let's move on to making the handle. From timber 40x40 mm we make a blank 70 mm long. We mark the center at the end and drill through it a blind longitudinal hole (Ø12 mm) into which the main screw will be inserted. After this, we make a through hole for the knob. The result should be a part as in the photo.
- Now our task is to fix the metal rod in the handle. To do this, insert the screw into the part all the way and drill it with a 3 mm drill so that a through hole remains in the steel rod.
- Having accurately aligned both holes, we fix the rod in the handle. This can be done using a self-tapping screw (the clumsy version) or by first cutting a thread in the part and tightening the screw.
The lead screw is securely fixed in the wooden handle. At the same time, the assembly itself is collapsible, which we will use in the future.
Making the pressure jaw and guides
Let's move on to the clamping part. There is nothing complicated about it - it is a rectangular part with the following dimensions:
- length – 350 mm;
- height – 100 mm;
- thickness – 40 mm.
- Stepping back 25 mm from the bottom edge, in the center of the workpiece we make a through hole Ø13 mm for the lead screw. Perpendicularity is important here, so to avoid skew, hold the drill strictly at right angles to the part or use a jig. Now we move on to the holes for the remaining two guides. They must line up exactly with the holes on the side of the workbench, otherwise the vice will not move freely. To achieve perfect alignment, first make holes in the frame and through them mark the drilling locations on the pressure jaw.
- Based on the dimensions in the drawing, we apply markings and carefully drill holes in the frame Ø13 mm. Perpendicularity is also important here, so it is better to drill through a guide.
- We install the sponge in the position as shown in the photo so that the top edge is flush with the workbench lid. We drill the frame through the central hole - now the threaded screw can be passed through two parts.
- On the back side of the drawer, through the existing holes, we make two blind holes Ø12 mm in the pressure jaw. Now we have marked as accurately as possible the places for the holes into which two guide rods will be glued.
Installing a Threaded Flange
- On the back side of the drawer we screw a threaded flange (in our case it’s just a nut welded to a square base). To ensure the most accurate alignment of the thread and the hole, we screw the part onto the screw and in this position fix the flange with self-tapping screws.
Installing the Lock Nut
Let's return to the pressure jaw. It already has a through hole for the lead screw and two (non-through) seats for rods. Now you need to make a lock nut that will fix the jaw on the screw and prevent it from moving forward.
- To do this, on the inside we countersink the central hole to the diameter of the washer and lock nut. Now the fastening unit will be hidden flush with the working plane of the jaw.
To prevent the nut from unwinding due to constant rotation of the screw, you need to make a locking pin in it. To do this, we pre-drill a side hole Ø 3 mm for it or select a nut with a ready-made radial hole.
- We assemble the structure. Use electrical tape to mark where the edge of the nut ends in the tightened position.
- Now we need to remove the metal pin without disturbing the integrity of our duct tape marker. To do this, we disassemble the rod from the reverse side, through the wooden handle.
- Our next task is to lock the nut on the lead screw. To do this, drill a rod through an existing hole in the nut and screw in a screw. We cut the hat with a hacksaw.
Now our nut is truly locking - we can put the structure back together. The handle together with the lead screw should rotate freely in the pressure jaw.
Making two guides
- In the original version of a homemade vice, two round sticks, 350 mm long, are used as guides.
This is the simplest solution, which will be quite sufficient for an amateur-level vice. In structures designed for light loads, the rods perform more of a stabilizing function, preventing the sponge from rotating around its axis. If we are talking about full-length carpentry vices with serious loads, it is better to provide metal guides. With them there is more hassle in terms of installation, but the load capacity of the vice immediately increases significantly.
Option for installing metal guides using threaded flanges
Let's return to our design. We prepare two wooden guides 350 mm long for the diameter of the mounting holes (Ø12 mm).
You can read in this material how to make perfectly even round sticks yourself using one of three methods.
- We glue the wooden guides into the mounting holes, making sure that the rods are strictly perpendicular (it is better to check this with a square).
- We complete the process by sanding and, if desired, applying a finish (oil or wax) to the visible surfaces of the wood elements.
Now all that remains is to install the knob, insert the clamping structure into the mounting holes - and get to work.
This is one of the simplest and most versatile home workshop vices you can make yourself. The design itself is as adaptable as possible: it can be made in a full-size version, as in the original drawing, or reduced to the required size if you need a small vice.
How to make a wooden vice built into a workbench
On his channel, Alexander Soldatenko demonstrates the process of making a vice with his own hands for a previously made workbench. He makes his vices using wood as much as possible. The only steel elements are the stud and nuts.
Video of the manufacturing process of a wooden vice:
General structure and drawing of a homemade vice
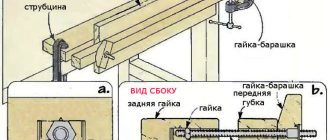
This carpenter's vice is a simple design with one front jaw. There is no second clamping part here - its functions are performed by the side of the workbench itself. Taking this feature into account, in the original version the vice is installed on a work table, the lid of which is installed flush with the drawer. Otherwise, you will have to act according to the situation and make minor design changes. As a rule, in such cases, the installation option is used using an additional rear strip (see diagram).
Drawing of a carpenter's vice with dimensions in mm
- A. _ Front lip
- B. _ Pen
- C. _ Lead screw
- D. _ Guide rods
- F. _ Vorotok
- G. _ Threaded flange
- H. _ Lock nut
Moxon Mini Vise
For ready-made work tables, it is very convenient to make a Moxon mini-vise . To get started you will need the following materials and tools:
- Wood blanks;
- Screws, nuts and washer;
- Leather for vice;
- Table saw and router;
- Sandpaper;
- Chisel and glue.
After the workpiece has been cut, it is necessary to sand the edges using sandpaper. We round the edges of the wheels with a drill and the same sandpaper. To make screws, you need to purchase a long threaded rod and cut metal blanks into two parts.
After this, you need to insert the nuts into the holes. Glue the skin onto the clips and remove all excess. Surface protection is provided by tung oil. It, unlike other wood impregnation agents, polymerizes inside and outside the tree with rapid penetration into the lower layers. After the oil has dried, all that remains is to connect all the resulting parts together - and the vice will be ready for use.
Wooden structure
It is a copy of a regular vice , only made of wood. Of the metal parts, only a screw 45 cm long and 8 cm thick should be used here. Massive pine plywood, well dried, is suitable.
The vise jaws are made from separate blocks, which are subsequently glued together. To give them their final shape, sand their edges with sandpaper. In this case, for one block it is worth choosing a thicker tree. This compensates for the space between the moving and fixed parts. The handle should fit through the head into the hole freely, then add the knob and anvil. When finished, remove the mounting screws, coat the vise elements with two coats of oil-based polyurethane and leave to dry overnight. Bolt the vise to the workbench.
Oak vice
The design of this structure is based on ancient drawings , the body is made of oak sleepers. The jaws can be cut by hand or with a saw. Grooves are punched down on both sides of the base. The brackets add strength to the rear jaw and secure it well to the base.
The top of the tee is on top of the clamping bolt. You will also need a large bolt and a square head that fits into the housing groove at the base of the vise. A steel strip should be added to each side of the base at the bottom to protect the side brackets from wear.
Making a homemade vice , as we see, turns out to be not so difficult. There are many sites and articles on the Internet that talk in detail about the manufacture of devices for various workbenches and desktops. Making oak vices is very interesting, since solid pine plywood is ideal for them. A steel strip is a good addition as it prevents wear and tear on the brackets and vice in general. Happy work and making homemade workbenches!