The principle of operation of the sawmill
It is necessary to secure the log on the sawmill so that it remains motionless. At this time, the mobile cart is activated and cuts the log. The saw must be in a horizontal position.
To obtain boards of a given size, immediately before cutting, the operator must set the required parameters. The saw blade must be well tensioned so that it acts as a saw.
The most common types of sawmills:
- Chain.
- Disk.
- Tape.
- Angular.
Equipment for work and assembly algorithm
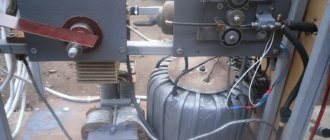
It’s no secret that when building a homemade sawmill you can’t do without good welding equipment. Bolted connections are useless in this case. It is better not to take risks, because after some time such a fastening will lose its former strength, become loose and make the structure dangerous for use. But tightening bolts and monitoring their condition every day is not the best prospect.
As for the equipment assembly algorithm, it remains very simple and understandable. The main difficulties lie in adjusting the size of the components.
First of all, you must install a support platform on which the cart with lumber will move. In addition, you need to attach a frame to the rails where the working tool will be installed. Key requirements include reliability and horizontal alignment. Where and how to attach it is up to you. It is possible to use a specially equipped foundation, for example, a columnar one, or an option with racks that are dug into the ground.
The purpose of the mobile unit (trolley) has already been mentioned several times. To ensure reliable fixation of the log during sawing, the mobile element is equipped with a “clamp” , which securely clamps the wood to the frame and prevents any risk of displacement. The cart should also have wheels that will provide mobility.
As for the saw frame, it should be equipped with a good adjustment mechanism. Otherwise, it will be difficult to ensure the ability to change the position of the cutting units.
There are a number of engineering solutions currently in use, so which one to choose is up to you. There is no point in giving specific examples without first studying existing modifications.
Disc type of sawmill
Considered the best view. This sawmill is easy to use and does not require much effort when making it yourself. The basis of this design will be a circular saw. It should be installed on an electric motor or on the machine spindle.
Today it is not difficult to find ready-made drawings of such a sawmill on the Internet or in books in order to make it yourself. The simplest type is considered to be “circular”. To do this, you will need a shaft with a circular saw, a table and a motor that will drive the saw.
General characteristics
It's no secret that wood is one of the most popular materials in private construction. Despite the rapid expansion of the range of such products and the emergence of cheap alternatives, wood is still in demand and has no analogues. And although purchasing good material in a hypermarket is not considered difficult, because solutions in the form of boards, timber or slats are available in every building materials shopping center, the opportunity to make similar products at home looks much more attractive.
This is not strange, because in this case you deprive yourself of many costs, and the only thing you need to buy is commercial timber. But cut lumber is very expensive. Naturally, it is unwise to buy your own sawmill to touch up a renovation or repair a roof. If you intend to build some kind of structure on a clean site, then a sawmill can be a very useful solution. And if you also try to make it yourself, this will reduce the costs to a minimum.
Today, several key modifications of such equipment are used. However, if you intend to make a homemade sawmill, then most likely you will need to choose between two main types:
- option with fixed saw placement,
- option with a trolley where the workpiece is fixed.
It is she who moves along the rails during operation. Any other varieties are modernized versions that significantly simplify the task and ensure maximum quality of work. For example, you can take a mobile saw.
The dimensions of the structure depend on the location. It is no secret that all areas (adjoining houses, country houses, etc.) have their own characteristic layout, so the selection of the optimal dimensions of the machine must be approached with special care. Any drawings available on the network (relevant literature, Internet resources and other sources of information) serve as “guidelines” - in terms of individual components, parameters and other properties. A homemade sawmill is made in such a way that it is convenient to work in a specific place under specific conditions. In most cases, such solutions are used for dissolving logs and cutting boards .
Band sawmill
Has more advantages than disk. This sawmill can work with wood of any species. It doesn’t matter to her whether the wood is highly resinous or deciduous.
- The range of wood produced is also wide - from edged and unedged boards to gun carriages, veneer and more. The sawmill is a high-risk facility and when working on it, you must remember to use protective covers. This will prevent the operator from getting caught under the cutting belt.
- In order to make a band sawmill with your own hands, you need to at least briefly familiarize yourself with the drawings. A simple option involves a basic band sawmill, which has a manual feed of the workpiece. The complex option already implies the presence of sensors and automation. Considered to be a high performance product.
The basis will be a frame that has guides. It is assembled with welded soles in which movable rollers will be placed. The U-shaped frame can be assembled by welding two channels.
On one side of the frame it will be necessary to secure the drive pulley, and on the other end (movable) - another one will be secured. The guides should be mounted in the middle of the frame - this will be a collapsible structure. If the structure needs to be subsequently transported, this will be relevant.
Other types of construction
Homemade sawmill made of wood
In general, making a chainsaw sawmill from wood is no fundamentally different from installing a device from a metal profile or pipes. The difference is that wood is used instead. The main advantages of this design are simplicity and speed of assembly, lower cost of materials, and no need for a welding machine.
As for the service life of a wooden sawmill, it is quite high provided that it is protected from rain and other precipitation.
Mobile
To make a mobile sawmill, only a rectangular attachment-limiter is assembled from a metal profile. It is fixed to the chainsaw plate where the chain is attached. The attachment is lowered onto a firmly fixed log and the saw is passed along it. As a result, the board is cut off.
Expert opinion
Kulikov Vladimir Sergeevich
If you decide to assemble a mobile sawmill, it is better to weld a handle at the top of the limiter attachment. This will make using the device much easier and more efficient.
The main advantage of a mobile chainsaw sawmill is that it can be taken anywhere and can be quickly assembled and disassembled.
But it also has one very significant drawback - since it must be constantly held in your hands while working, it is very easy to make a mistake and end up with an uneven board with different thicknesses in different places.
Sawmill from a grinder or circular saw
To make a sawmill, you can use not only a chainsaw, but also a grinder. The device is assembled in exactly the same way. The only difference is that at the end of the base, a grinder with an appropriate attachment or a hand-held circular saw is attached in the center.
It should be remembered that due to the design of the grinder and the circular saw, the sawmill trolley must be mounted differently.
Corner or disc sawmill
Since the corner sawmill is multifunctional, it is most often used for large volumes of work. The design is quite easy to make with your own hands. It is much cheaper than purchasing a ready-made structure.
- To assemble this type of sawmill, you must first prepare drawings, and immediately before starting work, make sure that you have all the necessary components and components on hand.
- The first step is to assemble the frame. To do this, you will need metal pipes and guides (rails may be ideal). The joints must be secured by welding.
- The next stage is assembling the carriage. Be especially careful at this stage - the dimensions of the parts indicated in the drawings are important down to the smallest detail.
The engine can be used with high power. The engine is mounted directly on the structure frame. Through special holes, the working elements are attached to the engine. Do not install a chain drive on such a sawmill if you do not want the drive itself to overheat.
Important: Do not neglect safety precautions. Compliance with safety rules when working with a sawmill will eliminate all possible risks during operation.
Important Features
A homemade band sawmill has many advantages. Among them is the possibility of constant improvement and modifications, which makes it possible to more accurately “tailor” its characteristics to the growing requirements of the owner. For example, if you initially planned to cut logs into planks, you may soon need to start making your own lumber.
This design is assembled using a block-modular method. If you do not have practical experience and skills in constructing complex mechanisms and assemblies, start working with simple drawings. The mechanical drive version can easily be equipped with additional automation parts. Among them:
- Cut thickness regulator.
- Saw feed regulator.
- Programmer and many others.
Therefore, you need to understand the basic drawing and assembly instructions.
As mentioned above, a large number of modifications to sawmills are used today. When choosing a suitable solution, you must ask yourself in what plane you plan to make the cut. It is this aspect that indicates the placement of the working structure. The next question is to choose a single type or universal type of sawmill. For example, if you have to trim logs into separate segments, and not just the basic cutting of timber into boards, then it makes sense to choose universal equipment. It is very good if the working frame supports reinstallation.
It is no secret that logs processed by a band sawmill are characterized by large dimensions and impressive weight. In addition, when processing, the frame is subject to intense loads, so you must pay special attention to the stability of the band saw equipment. In this case, you don’t have to worry about the quality of the cut and the safety of workers.
Making a sawmill at home with your own hands is not as difficult as it initially seems. Many difficulties arise for people already at the next stage - preparation for operation . The biggest problem is setting up and sharpening the saw.
Which sawmill is better
It's up to you to decide. Only you can determine what kind of design of the future installation you will need. To do this, you need to determine the available area where the sawmill will be located, and also understand the specifics of the work that you plan to carry out on this structure.
If you plan to work with small-sized boards that are used for containers and pallets, pay attention to a sawmill with a simplified design.
- If you need to get boards with clear geometric parameters, put in a little effort and make a stationary installation, with a frame on a concrete foundation.
- In order to make a portable homemade sawmill, you can use a gasoline saw made in the USSR. Models of that time are famous for the special strength of the body, which is made of aluminum alloys.
- The most popular series “Friendship” or “Ural” are equipped with engines with a power of up to 5 hp. This is enough to cut a log up to 6 meters long.
To cut logs into pieces, you can use a gasoline sawmill, which is equipped with a disk or belt mechanism. The disadvantages of such a sawmill include a large amount of sawdust that scatters around. The internal combustion engine has forced ignition.
Recommendation: Install an emergency switch in the operator's area. This will allow you to stop the motor in the event of a dangerous situation with just the press of a button.
Selection of materials and components
If you are seriously thinking about making a homemade band sawmill, be prepared to pay due attention to the selection of all parts and materials.
- The first step is to select an engine . In most cases, gasoline or electric units with appropriate power ratings are used. If you look at the situation from a practical point of view, then asynchronous (electric) models are the most optimal. This is due to the fact that they have no problems connecting to the home electrical network, and besides, their service life is quite long. And the stability of the speed ensures maximum quality of cutting logs at the sawmill.
- Materials . It is no secret that when processing huge wood, you should use high-quality products made of durable metal. For example, it is customary to install a workpiece made of a profiled (thick-walled) pipe of square or rectangular cross-section on the moving part of the “trolley”. But the supporting frame is made of channel bars, which is associated with cumulative loads. Based on this, the rails are mounted from a dimensional angle (at least 45), although a channel is also effective here, but with less linear characteristics.
Photo of a homemade sawmill
Conclusion
Sometimes you need a sawmill on your personal plot, but you don’t want to spend money on the services of woodworking companies. This usually happens during large-scale construction. In this case, you can make a sawmill yourself from a chainsaw. For the base of the structure, metal profiles or thick pipes are used.
There is also a simpler assembly option - made of wood. In addition, you can make a mobile sawmill that you can take with you into the forest. The main advantages of the device are its low cost and ease of assembly. But there are also disadvantages - a high risk of injury and a high probability of saw breakdown. But despite this, in many situations, a DIY chainsaw sawmill is the only way out.
Decorative coating and its components
How to dilute acrylic paint - this question may arise for any master
Another pressing question is how to dilute dried acrylic paint. Here everything is as follows: before using this or that composition, you need to understand what specific substances are included in the paint. After this, choosing is much easier; a number of questions will simply disappear.
So, all acrylic paint mixtures have three basic components, as any master knows:
- There is a coloring pigment here;
- Water;
- Binders.
It all depends on the specific composition and its components
Acrylic paint also contains a polymer emulsion - it is the acrylic itself that is part of it. The decorative material in question got its name precisely because of this component.
Should acrylic paints be thinned? Yes, this needs to be done. Moreover, in certain cases you cannot do without dilution at all - the result simply will not be of high quality.
Acrylic compositions are used everywhere today:
It is very convenient to use for facade work; Perfect for painting inside; What kind of material is painted is not so important; Among the important features of the coloring composition, which contains acrylic, the following can be noted: the material is very resistant to exposure to UV rays; Since ultraviolet radiation is not harmful, the surface remains attractive and bright for a very long time, which is what any owner wants; Another important advantage: reasonable cost. Acrylic paint on the market is one of the most affordable - even for budget-conscious people
Using this material is also very simple; any beginner can do it. This aspect is important if you plan to carry out repairs yourself, rather than attracting a hired team of specialists.
Types of PVC panels for bathroom finishing
The classification of products is conditional, depending on the intended purpose and strength characteristics:
- Plastic panels for walls with increased strength of the front wall, reinforced stiffeners, a total thickness of 8-12 mm.
- Lightweight panels for finishing the bathroom ceiling with a thickness of 5-8 mm. They are inferior to wall varieties in strength, but gain in weight and choice of sizes.
Types of panels for the bathroom
Depending on the shape and geometric dimensions, all PVC panels for finishing the bathroom are:
- Slatted (plastic lining) with a width ranging from 10-30 cm, a standard length from 0.9 to 3 m for wall types, up to 6-12 m for ceiling types. When decorating the walls with plastic lining in the bathroom, you can visually expand or narrow the space by changing the direction of the stripes, but in general this type is better for covering ceilings.
- Standard PVC panels with widths from 15 to 50 cm, lengths up to 2.7 and 3 m. These dimensions are considered optimal for installing panels on walls.
- Large-sized sheet panels with a width from 50 to 203 cm, a length from 1 to 4 m. This group is represented by both single-color and decorated with photo printing products, mounted end-to-end, the advantages of which include the ability to cover the entire wall or ceiling at once. Unlike standard PVC panels, sheet varieties have a continuous structure with a thickness of no more than 5 mm.
- Tile varieties with side sizes ranging from 30-98 cm.
Types of PVC panels for bathroom
Many PVC panels for bathroom finishing have a tongue-and-groove edge joining system. But the appearance of the coatings after joining can be different:
- Panels that form smooth, seamless coverings due to their tight fit to each other and a special profile of the grooves. Seamless plastic panels are often used to cover ceilings and areas of active moisture exposure.
- Products with a relief surface, forming complex unified patterns after joining. With the help of such panels, decorative finishing of walls is carried out; in terms of their performance characteristics and installation method, they are similar to lining.
- Rustic panels with chamfered joints, allowing to obtain beautiful continuous coatings and are equally successfully used for cladding walls and ceilings.
Types of PVC panels for the bathroom
A separate classification concerns the structure of PVC panels for the bathroom. In addition to hollow materials reinforced with stiffeners and solid sheets when finishing a bathroom with plastic, multilayer sandwich panels with an insulating layer of compacted polystyrene can be used. This type of plastic panels is recommended for quick construction of thin internal partitions or laying insulated slopes.
Depending on the method of coloring the plastic and the decorative properties of the materials, they are divided into:
- Plain panels painted throughout the entire structure
- Laminated, with increased strength, resistance to wear and fading
- Decorative types obtained by offset photo printing. There are matte and glossy depending on the type of protective varnish used.
Choosing a color for painting panels
These methods of painting and decorating are used with equal success for smooth, mosaic, textured types of PVC tiles for walls and ceilings; the choice of their colors and textures is practically unlimited.
Do-it-yourself sawmill from a chainsaw: video instructions and drawings
Chainsaw sawmill - option No. 1
To make the structure, in addition to a chainsaw, you will need:
- two channels 8 meters long and 140-180 millimeters high;
- two rails;
- corners 50x100 mm and 40x40 mm;
- 25 cm sections of water pipe as ties;
- steel plate 4-6 cm thick and 60 cm long;
- movable hoses;
- pipes with a diameter of 35-40 mm.
Making your own sawmill should begin with assembling the base from rails and 50x100 mm corners turned upside down. They must be installed strictly parallel to the floor, so you need to use a building level.
Next, the following work is performed:
- Along the length of the base, according to the drawing, holes are drilled in increments of 1-1.5 meters and with a diameter of 14-16 mm.
- Then, according to the number of holes, ties are taken and connected with bolts.
- Stands are made from metal squares and the base is placed on them. The distance between the outer posts and the base should be about 100 cm.
- To make the structure more rigid, braces between the posts can be welded.
a corner is welded to the bottom of the steel plate
At the last stage of the work on making a homemade sawmill, it is necessary to make a structure for fixing the logs. To do this, movable hoses and pipes should be positioned at the required height and secured.
The first version of a homemade sawmill using a chainsaw is ready. There is another way to make a wood processing unit with your own hands. The tools and drawing for it will need the same, however, the design itself is more refined.
Do-it-yourself sawmill from a chainsaw - option No. 2
- Driven saws.
- A mechanism for regulating the thickness of the board being produced.
- A mechanism for moving the saw part of the structure.
- Devices for fixing logs.
Since a chainsaw with a working engine and cutting teeth is already available, you will only need to make both mechanisms and a device for fixing logs with your own hands.
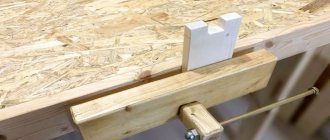
Mechanism for adjusting the thickness of the boards.
Logs are sawed by raising or lowering the base, which must be welded to the plate using four nuts with bent edges. At the top of this device, it is necessary to install lock nuts, which must be tightened after the unit is adjusted to the desired thickness of the material being processed.
Mechanism for moving the saw.
The saw in the structure moves along the frame along guide angles, the distance between which should be 50 cm. Two 20 mm rollers or bearings must be welded to the posts. The lower roller should keep the sawmill from lifting, and the upper one should rest on the guide angle.
Device for fixing logs.
On such a unit, logs are fastened using two ridges - a stationary one and one moving by means of a screw. After the material to be processed has been installed, the moving comb is secured with screws in a stationary state. Now you can safely begin to operate a homemade sawmill made from a chainsaw.
Types and models
Mini-sawmills are produced by manufacturers with both electric and gasoline drives.
In addition, the design is distinguished by the presence of auxiliary equipment, as well as by the type of movement.
There are several types of mini-sawmill models.
Tape. These are ideal designs for home projects. They can be vertical, horizontal and angular. The cutting width of such models is quite small - up to 2.5 mm. That is why the working process does not leave behind a large amount of sawdust and dust. The machine requires some adjustment each time it is used. Among the advantages of mini-band sawmills are good performance, efficiency, the ability to process logs with a diameter of up to 70 cm, the availability of the option to customize the parameters of the produced lumber, economical energy consumption, comfort during operation, relatively low cost, as well as the excellent quality of the resulting lumber.
All of the above types of mini-sawmills have their own advantages and design features. When choosing a model, it is better to be guided by some important criteria.
How to make
Let's take a closer look at how to make your own sawmill from a regular chainsaw using the example of a stationary structure.
What you need
For work you will need the following materials:
- Chainsaw.
- Welding machine.
- Square metal pipes.
- Metal squares.
- Rollers.
Expert opinion Kulikov Vladimir Sergeevich
If square metal pipes are not available, you can use regular water pipes instead. Only in this case it is necessary to select pipes of sufficient strength. But it is best to use metal channels, if possible. It is more convenient to work with them during installation, and they can be fixed more reliably.
Manufacturing process
To manufacture the device you will have to perform the following steps:
- Assemble the base of the future sawmill from pipes and angles. There is no need to install the structure immediately. First you need to fold it and check how smoothly all the elements are connected. They do this using a level. Only after this the pipes are connected to each other by welding.
- When the base rectangle is assembled, for greater structural strength it must be strengthened with at least two ties. They can be made from the same metal pipes. The ties are fastened transversely at an equal distance from each other. The best mounting option is bolted.
- Then thinner pipes or metal profiles are welded on top of the pipes from which the base of the structure is assembled. They will serve as guides for the logs being cut and will not allow them to fall off the sawmill. Transverse guides are also welded. Ideally, they should rotate - this will ensure smoother movement of the log and minimize the effort that needs to be applied during operation of the device.
You can do without transverse guides if you used round pipe ties. The log will also move along them quite easily. But you need to remember that its movement will not be as easy as in the case of rotating transverse guides.
- After the base is completely ready, it is installed on racks. Steel squares are best suited for their role. They are welded in the corners of the base. For greater structural strength, braces can be welded between the posts.
- Afterwards, the trolley for the cutting part is assembled. It is a rectangle of metal pipes supported by two longitudinal steel strips. Between these strips and the walls of the rectangle, two slopes are installed so that the structure is stable. Rollers are placed under the strips, which will ensure the movement of the cutting part along the base. Then another pipe is welded to one of the strips, connecting it to the rectangle on top. This is the attachment point for the saw.
- When the cart is ready, secure the saw. This can be done in a variety of ways. The most common method is to secure the saw body using clamps or metal ties. It is quite reliable and does not cause irreversible damage to the device. If necessary, additional transverse strips are welded to the trolley from the same pipes from which the remaining parts of the structure were made.
There is another way to fix the saw - by the blade on which the chain is attached. It is less reliable, requires drilling out the blade and holds the chainsaw worse. However, with this installation method, the saw chain vibrates less (most of the vibration is transferred to the base of the sawmill) and makes smoother cuts.
What needs to be provided?
Before making, you need to pay attention to the following things:
- The diameter of the logs being cut, if there are large diameters, then you need a more powerful saw, a longer bar with chain;
- Loading heavy logs for sawing, for this it is necessary to provide some kind of mechanism, or they can be rolled up either by additional jacks or, ideally, by a loader;
- The log must be fixed so that it does not play during sawing and the boards are even;
- The chainsaw guide and sled should not play, so they need to be strengthened;
- The more powerful the saw, the easier production will be. Therefore, when purchasing a saw, you need to take the most powerful one;
- Using electricity as an energy source allows you to save a lot;
- Do not forget that the chain must be for longitudinal sawing, this will significantly increase the speed of the process. Experts recommend using a 3*8 chain.
- It is advisable to buy a carbide chain. This is what he is doing today. Conventional circuits fail quite quickly;
- The length of the logs to be cut must take into account the maximum and minimum. So that the longest ones fit in, and the shortest ones don’t fall between the guides;
- Calculate in such a way that the saw does not vibrate or play on the guides during operation;
- The power of the saw, in some cases you want it to be both more powerful and more economical. In this case, folk craftsmen do the following. Instead of a chainsaw, an electric motor is installed, and the tire is left for sawing, see photo below;
- The height of the sawmill. It is necessary to provide in such a way that the back does not hurt to bend over and the logs do not need to be lifted high. If the wood is not heavy, it is better to make it higher. If the forest is heavy, you can go lower.
- Sawing of wood can be carried out either by the upper part of the tire or by the lower part. When sawing with the lower part, sawdust flies towards the chainsaw and clogs it. The upper part throws out sawdust from the chainsaw, this allows you to increase both the service life of the saw and the downtime during sawing;
- During the sawing process, the chain very often stretches on the saw and needs tensioning. Therefore, when installing the saw, it is necessary to provide access to the chain tension and secure the saw with access to the mechanism;
- When sawing, it is better to fix the position of the chainsaw handle, this simplifies the process;
- The cable, clothesline or lace should not drag, since the sawing process should be uniform over time.