Woodworking vice for workbench.
I'm moving my workshop from the basement to the garage to have more space. I built my own workbench and what is still missing is a woodworking vise. There are several sets of vises online, but I want to make my own. In this tutorial you can follow all my steps and hopefully be able to create your own. Please leave all your questions and comments in the comments below.
Installation procedure
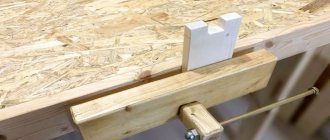
When all the preliminary work is completed and the parts are prepared, you can begin directly installing the vice. We fasten the slides coming out from the rear edge of the frame with nuts, having previously cut the threads. The nut should also be screwed onto the screw. To ensure its fixation, a corresponding groove is made on the surface of the frame, in accordance with the dimensions of the nut.
Mounting a carpenter's vice
After installing the fixed frame, screw and slides, a movable jaw is installed. A nut and locknut are screwed onto the edge of the threaded screw, extending beyond the front surface of the moving jaw, with an inserted washer, to ensure fastening.
After all the elements are secured, the knob is installed.
The carpenter's vice is ready for use. When turning the knob, the screw enters the nut on the stationary frame and attracts the movable jaw.
Making a wooden vice yourself is quite simple. In addition, they can be made according to the dimensions of the parts being processed. The location of the scenes and the length of the lead screw depend on this. The jaws can be extended and two clamping screws can be made to allow longer parts to be clamped. Here everyone must independently determine the required dimensions, depending on what work the vice will be used for.
Project and drawings
When developing the design of a carpentry workbench, the most important criteria are height, configuration and equipment. In addition, it is necessary to take into account who will use the desktop - left-handed or right-handed.
Considering that you will have to work at a carpentry bench for a long time, the closest attention should be paid to the height of the future structure. For people of average height, experts recommend making a table no higher than 90 cm
Drawing of a carpentry workbench
When determining the distance from the floor to the tabletop, it is best to focus not on average parameters, but on the features of your own anatomy. It is optimal if the upper cut of the legs is at the same level as the hands. If you calculate this parameter taking into account the thickness of the tabletop, then you will be able to work tirelessly at such a workbench for several hours.
The machine cover can be made of boards, solid wood or plywood and is a composite structure. It is not recommended to use chipboard or OSB for these purposes. Professional carpenters have long determined the optimal size of the tabletop - a maximum of 2 m in length and 0.7 m in width. On such a workbench, you can make both a prefabricated wooden door and a small window with equal convenience.
When designing a structure, do not forget about the strength of the supporting frame. For supporting elements of the structure, timber with a cross-section of at least 100x100 mm is used. As longitudinal and transverse reinforcing elements, it is allowed to use slats and beams with a smaller cross-section - from 50 - 60 mm or more. The joints of the parts are mounted on tenons or dowels; furniture corners and other fittings are used for strength, and all connections are made using bolts and self-tapping screws. Nails will not be able to provide the required stability and fundamentality of the structure.
Carpentry workbench. View from above
Next, let's look at a project for a carpentry table made from plywood, or more precisely from two plywood sheets 1.8 mm thick glued together. The dimensions of the lid are 150x60 cm. The edges of the tabletop are reinforced with plywood strips, which increases its thickness to 72 mm. By the way, the presented dimensions are not a dogma and can, if necessary, be adjusted in accordance with the needs and characteristics of the specific room used as a workshop.
Vise with pressed nut
This type of workbench vice is simpler in design than the one above. The device is distinguished by the vertical arrangement of movable and fixed jaws.
The movable jaw is attached at the bottom to the stationary installation by means of a steel bracket. A threaded screw is placed in the middle of the parts. For fixation, the nut into which it is screwed is pressed into a steel U-shaped profile, attached with self-tapping screws to the rear surface of the stationary jaw.
To prevent the nut from popping out, pressing is done using a hot method - with pre-heating of the profile, which will make it easier to clamp the nut. The collar is attached similarly to the previous model. Steel angles are mounted on the clamping surfaces of the jaws. These vices are not intended for massive products, but are quite compact and easy to use.
Classic homemade vice: step-by-step instructions
The standard version in this case is made of steel.
Their design is painfully simple. It includes:
- steel plate (not less than 3 mm);
- external and internal channel (120 and 100 mm);
- steel ears;
- two turning cutters;
- section from reinforcement;
- a pair of nuts;
- screw of suitable diameter;
- two washers of the same caliber, with a lead screw;
- screw trapezoidal pair 335 mm;
- thick plate.
Build process:
- On opposite sides of the plate, separate the lead screw with washers.
- We weld the screw thread to the washer.
- Next, secure it with a locking ring.
- We weld a nut to the handle on one side.
- At the same level, weld a nut to the plate, with a channel from the screws.
- We process the channel with a file to make the movement easier.
- We weld the lips to the ears made from incisors.
- We install the jaws in their place after the lead screw is screwed in.
Tools and materials
To process steel elements of a carpentry vice you will need:
- Bulgarian.
- Brush attachment.
- Metal disc.
- Welding inverter.
- Electrodes.
- Drill and drill bits.
To make wooden parts you need a power saw, a plane and a sander.
Select two round or square steel pipes so that one pipe fits snugly into the other. Use a threaded rod with a diameter of 12–18 mm as a lead screw. Prepare corners for the ties, the walls of which should be 2 times wider than the hole drilled for the screw.
Vise for a carpenter's workbench - drawing.
Red dots mark lubrication points.
A table of significant details and dimensions of the metal part of the carpentry vice that explains the drawing.
| № | Detail | Explanation |
| 1 | fixed guide | pipe 25x25x2 mm |
| 2 | auxiliary hole | |
| 3 | screed support | corner 24x24 mm |
| 4 | lead screw nut | |
| 5 | mounting hole | |
| 6 | lead screw | 300 mm long |
| 7 | movable guide | pipe 20x20x2 mm |
| 8 | thrust washer | |
| 9 | rack | corner 24x24 mm |
| 10 | screed | corner 32x32 mm |
| 11 | knob | pipe or rod |
| 12 | jaw mounting holes | |
| 13 | movable sleeve | |
| 14 | collar sleeve | |
| 15 | fixed bushing |
Using old mechanisms and scrap metal at hand
A high-quality new channel, angle, plates are not the only suitable material for making your own vice.
An old jack will work as a basic mechanism. For ease of work, a support plate is made (or pipes with a rectangular profile, as shown in the illustration) and clamping jaws are welded - also from a pipe or channel, angle. Do-it-yourself jack vices are no less convenient than industrial ones.
Another budget option is a rail vice. Considering the load capacity of this rolled metal, the model turns out to be very powerful. It can also be used as an anvil, the main thing is to securely fasten the product to the workbench.
For those who work primarily with wood, a wooden vice would be a good solution; making them with your own hands is easier and faster - no welding is needed, the parts can be sawed off by hand. The main thing in this model is to select suitable threaded elements.
The option shown in the photo is designed to be permanently attached to a workbench. To make a quick-release version, it is better to make the base part with a plate that is bolted to the workbench.
For milling and carving, models with double-sided clamping are convenient - this design allows you to center the workpiece and/or move it during operation without removing it from the vice.
If the clamping force required is not very large, but you often need to change the position of the parts or the parts themselves in the jaws, you can look for a cam mechanism and make a quick-clamping vice. In this version, the screw clamp is replaced with a small cam; the clamp can be loosened or strengthened by slightly turning the lever.
Cast iron and steel
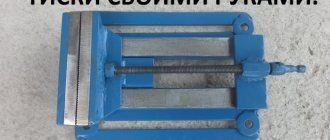
The parts of the frame and the clamp of a bench vice should be made of structural cast iron - it rusts very poorly, is hard and tough, has a low TEC (thermal expansion coefficient), but most importantly, it is practically not subject to metal fatigue. Cast iron vices last not decades but centuries. Since “the strength of the entire chain is determined by its weakest link,” the jaws of the vice and the lead screw-nut pair are made from tool steel of various grades. A simple structural one is too plastic, it has a strong tendency during welding, and it rusts easily. Therefore, leave homemade vices like those in Fig. below, it is not recommended to spend the winter at the dacha - they can become completely unusable over the winter.
Homemade bench vise
But this is not the essence of the problem. The problem is that now the jaw jaws of vices bought at a reasonable price often break during the first clamping; At best, with regular use, the vice will last six months to a year. When examining the fracture, it turns out that they are made of simple gray cast iron. The legs do not break, this is how the running pair wears out - the thread there is the usual triangular profile (see below), and the steel, it seems, is no better than St44. And the prices for certified vices with full specifications and a guarantee... let’s not talk about sad things, let’s rather remember something good from the past. As a result, the question arises: isn’t it worth making a vice yourself at home? Not to mention the case when you need to clamp a workpiece, but there are no vices within reach. They won't turn out better, but at least they'll cost less. Or for free, if there are suitable scraps of metal profiles in the trash, see, for example, the plot:
Machine tools
As stated above, it is most profitable to make a machine vice with your own hands. They greatly simplify drilling work, and the material for the machine vice is suitable for almost any available material: from a channel, see video:
to plywood, see story:
And again sponges
The strength and stability of the jaws for a machine vice is even more important than for a bench vice: if a drill (cone, cutter) turns a part out of them, this can lead to serious injury. And so, we return to the question above: what are the vice jaws made of? From a corner from 40x40x4. In this case, the entire sponge will work not for shear, but for bending, to which the metal resists much more strongly. This is the case when less iron turns out to be stronger.
But not every corner of the same size is suitable. A drawn and cold-rolled corner (pos. A and B in the figure below) is unsuitable - the metal is rather weak. The jaws of both homemade and metalworking and machine vices must be made from hot-rolled angle (pos. B). Firstly, it is much stronger. Secondly, the range of its standard sizes is wider: if the thickness of the flange of a cold-rolled general-purpose angle is up to 0.1 of the width of the smaller one, then for a hot-rolled angle it is up to 0.2b. That is, you can find a hot-rolled angle, say, 60x60x12 - the vise jaws from it will be quite reliable.
Types of steel angle
A hot-rolled angle is easy to recognize by the type of cut: the entire edge of the outer corner is always sharp (shown by the arrow on the left in the next figure), and inside it there is a fillet larger than that of a cold-rolled angle. If the vice is assembled by welding, both equal and unequal angle angles will do. If you assemble them with bolts, it is better to use an unequal shelf with a shelf width ratio of (1.5-2)/1 (a/b = 1.5...2/1). In this case, the large shelf is laid horizontally!
Angle steel machine vice
The design diagram of a homemade machine vice from a corner with bolts is given in the center in Fig. on the right are drawings of their general appearance. The slider and bracket for the clamping screw are bent from a steel strip with a thickness of 1.5 mm. The screw in it can be fixed with a groove, because its fixation works only when the movable jaw is retracted and is loaded negligibly. On the clamp, the tail of the screw rests directly on the sponge; the screw itself is M16-M20. For more information about homemade machine vices from a corner, see the video: