Sharpening a knife correctly by hand is quite difficult. It will take some time to develop the habit of maintaining a constant sharpening angle, which is not at all easy. A knife sharpening device can make the task easier. There are factory options. But for good copies you have to pay a couple of hundred dollars, and this is clearly a lot. The good news is that these devices are easy to make yourself. Moreover, many homemade knife sharpeners are no worse in functionality than those from famous manufacturers, but they are many times cheaper.
What to do with dull knives?
If there are no problems with knives with replaceable blades (naturally, if these same blades are present), then a knife with a sharpened blade must be periodically sharpened. Typically, a special knife sharpening device is used for this.
Buying this now is not difficult. But not everyone prefers this solution to the problem. And the point here is not only the considerable cost of such devices. High-quality sharpeners cost a lot of money.
Many craftsmen will get great pleasure from a machine designed for sharpening knives, made by themselves. Although, even using an ordinary “bare” block, of course, you can sharpen knives with your own hands, but in order to sharpen a knife efficiently using only a whetstone, also known as a “block”, you need to have a certain skill and “steady” hands, because you will need to maintain the sharpening angle identical along the entire cutting edge, and this is not the easiest task. A special sharpener for knives is designed to make it easier, be it factory-made or made with your own hands.
But just to speed up sharpening, any sharpener, both factory-made and home-made, will help.
Sharpening machine from mounting angles
There is another way to make a knife sharpener. Here is the second master class.
What will you need?
- metal plates measuring 4x11cm
- aluminum corners
- metal rods at least 15 cm in length
- fasteners
- device for marking when cutting threads
- machine for sharpening metal (can be replaced with a file)
- fixing device (for example, a vice)
- small file (needed when working on smaller parts)
Detailed manufacturing instructions
Step one: You need to make marks to drill the holes.
Step two: You need to make a thread in the holes of the taps.
Step three: For the convenience and safety of using the sharpener, you need to smooth out all the irregularities, blunt the corners, and straighten the edges.
Step four: Next you need to drill grooves in the corners
Step Five: Tapping the Holes
Step six: You need to place the metal rods in the outer holes and secure with nuts
Step seven: Support the entire product - there is a hole in the groove of the base. You need to screw a bolt 14 cm long and 8 cm in diameter into it. You must first strengthen the bolt with one wing nut and two simple ones.
Step Nine: Place nuts in the other holes as well. They hold the part of the knife that needs to be sharpened.
Step ten: Thread nuts onto metal rods and install the corner.
Step eleven: The moment of fixing the abrasive. This is done using a metal rod, which should be in the shape of the letter “L”, a pair of clamps, and a wing nut.
Now it’s time to try out the resulting device.
It will be much easier and more convenient if, while working on the sharpener, you have the opportunity to simultaneously watch a video on the topic and work on the process. The convenience is that if something becomes unclear, you can always stop, slow down or watch the video again.
There are still enough options for making a knife sharpener with your own hands: an angle, a rotary sharpener, a double sharpener, with a vertical mechanism, etc.
What are the differences between abrasive stones?
Sharpening stones come in a variety of shapes, bar sizes, and grain sizes. The optimal size of the bar is considered to be one in which its length exceeds the length of the blade of the knife being sharpened by at least one and a half times. This allows you to work with such a bar much more comfortably than with a bar that does not meet this simple requirement.
As mentioned earlier, sharpening stones can have not only different sizes, but also very different grain sizes. There are five main levels of grain size for such bars:
- Grain size 200-300 Extra coarse. In English called Extra coarse. Such bars are not used for sharpening tool blades and knives in particular;
- Grain size 300-350 Coarse grain. In English called Coarse. With the help of such bars, damaged or very dull blades are sharpened;
- Grain size 400-500 Medium grain. In English called Medium. You can do without such a block in the household;
- Grain size 600-700 Fine grain. Called Fine in English, these whetstones are the most popular for sharpening tool blades in the home workshop.
- Grain size 1000-1200 Very fine. In English called Ultra fine. These bars are used for final processing of blades that need to be brought to a shine. Such bars can be used as a tool for a homemade knife sharpener.
Basic materials and tools
The principle of operation of a homemade device
In order to construct a homemade emery, you need an electric motor left over from using old household appliances.
It is the electric motor that puts the product into operation, as a result of which the attachments, pre-sharpened on lathe equipment and installed on the motor shaft, sufficiently clamp the emery wheel.
How to choose an electric motor
Most often, craftsmen choose as a motor an electrical device left over from an old-made washing machine, for example “Volga”, “Sibir” or “Vyatka”. As you know, the equipment made during the Soviet era was of high quality, so the engines were also quite powerful, with high reverse performance. From such a washing machine, you will also need a switch with a manual starter mechanism.
The main difficulty encountered is the precise placement of the whetstone directly on the engine shaft. The shaft does not always have a thread; the size of the hole in the stone may also not correspond to the size of the shaft. A specially machined part that will smooth out the dimensional discrepancy will allow you to cope with this task.
The maximum speed limit used in emery is 3000 revolutions per minute. This nuance cannot be ignored, because a high rotation frequency can cause the sharpening stone to rupture. It is preferable to use a product at home with an engine speed of 1000 to 1500 rpm.
Why do knives get dull?
In order to ensure long and comfortable work with a knife after sharpening, first of all try to answer the question, “Why do knives become dull?” Why is it necessary to sharpen the knife again some time after sharpening, and sometimes to completely sharpen the knife again?
The reason for the loss of sharpness by the cutting edge of any tool is this: when working, the cutting edge of a knife or any other tool is exposed to the smallest abrasive particles of the material being cut.
Such particles are found in any material, be it stone, wood, or food.
Even soft vegetables and fruits contain such particles. There may just be more or less of them, but they will definitely be there. Their size, sharpness and quantity only determine the speed at which the instrument will become dull.
Backlight for sharpening machine step 2
For illumination, I used an unnecessary LED table lamp from IKEA, bought for home, but not useful anywhere, the lamp is powered from the mains through an adapter, which I ripped out and hid its board in a box on the motor.
Next, I made a protective casing from 1 mm steel.
Sharpening angle, what is it?
So, since it is impossible to stop the process of dulling the cutting edge, then at least try to slow it down, and for this you need to sharpen your tool very well. Earlier in this article you have already come across such a concept as the sharpening angle of the cutting edge. And now more about it.
Blade sharpening angles can vary greatly. From an angle of about 10 degrees for razors and scalpels, to an angle of about 50 degrees for various Machete-type knives.
Sharpening angle control
When adjusting the sharpening angle, the mechanic performs the following actions:
Throw a large washer onto the pin, which is located in the block of the machine base, and tighten the nut.
The rod does not rotate in the foot; the block for adjusting the sharpening angle is made from a small carbolite block, the dimensions of which are 20x40x80 mm.
15 mm from the block edge, drill a 20 mm end on both sides, widen the gap to 9 mm, then make a thread inside;
He steps back 50 mm from the axis of the new slot and drills another one in the flat part of the workpiece - 90 degrees to the previous one. Such a slot has a diameter of 14 mm. In such a situation, the mechanic strongly flares the hole using a round rasp;
Screws the block onto the stud - sets the desired height of the eye without using fixing screws;
Secures the block on both sides with M10 hex nuts.
What could cause such a significant difference?
The fact is that the sharpening angle depends on what materials the blade is supposed to cut. The smaller the angle, the softer the materials should be and vice versa.
The fact is that a blade with a small sharpening angle will not only be easier to cut, but will also become dull more easily. That is why there is not and cannot be a single universal sharpening angle.
Note!
- Do-it-yourself compressor: selection of materials and tools for assembly at home + step-by-step instructions for making and assembling yourself
- Homemade products for the garage with your own hands: options for products for arranging a garage, detailed diagrams and drawings for creating with your own hands
- Do-it-yourself press - design features, choice of manufacturing materials. Step-by-step instructions for making it yourself + simple diagrams and drawings
After reading this article, you will not only learn how to properly sharpen a knife so that it can serve you for a long time until the next sharpening, but also answer your question about how to make such sharpening easier.
To facilitate the correct sharpening of knives, a lot of different tools have been invented, from the simplest devices to the most exotic ones, at a quick glance at which it is not only unclear how to work with them, but it is also difficult to figure out what it is in general.
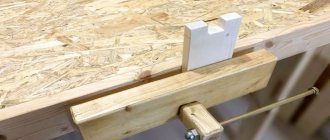
Device for sharpening from wooden blocks
A simple device for sharpening knives is a tool consisting of a pair of wooden slats and a pair of abrasive bars with the same geometric dimensions.
Wooden slats should be thoroughly sanded with abrasive sandpaper. Then, after applying auxiliary markings, depending on the sharpening angle of the knife, make cuts to a depth of 15 mm. Insert sanding blocks into the resulting holes so that each groove matches, then secure them with bolts. To give the sharpening device greater stability, the lower part of the surface can be padded with a piece of rubber.
The types of devices for sharpening cutting tools are different and each master will be able to choose the manual machine that will fully satisfy his needs.
What knives can be sharpened?
Not all blades can be sharpened at home, but only blades made from not very hard materials. So, if the hardness of the material from which the blade is made exceeds 55 units on the Rockwell scale (55HRC), then it will not be possible to sharpen it with any tool available to most people. But most of the knives produced now are made of fairly soft materials and such knives are not at all difficult to sharpen.
True, their service life between sharpenings is not long at all.
But no matter what metal the knife is made of, sooner or later it will still have to be sharpened. The only exceptions to this rule are knives with replaceable blades and ceramic knives that cannot be sharpened at all. Thus, a knife sharpening device must be universal, that is, it must be able to sharpen various blades with different sharpening angles.
Note!
Do-it-yourself winch: classification, manufacturing materials, description of work stages + instructions for DIY construction- Do-it-yourself clamp - step-by-step production and description of options for using a clamp
- DIY knife | A step-by-step description of how and from what materials to make a homemade knife
Therefore, when creating a device for sharpening knives, it is necessary to provide for the possibility of sharpening blades with different angles, and this is the most difficult task both at the design stage and during the manufacture of such a device.
Sharpening theory: profile and type
The blade profile (geometry) refers to the contour formed by sharpening. The profile outlines the part of the blade that will be in contact with the material while using the knife. Different tools have different blades and their own characteristic profile.
Its shape is related to the properties of the material used and the purpose of the tool. Using blade processing, the following types of profiles are formed:
- A simple blunt wedge. The blade is durable, but rough. It creates significant cutting resistance, and cutting rather viscous materials leaves a ragged mark.
- Sharp wedge. It is poorly suited for cutting, quickly becomes dull, and may chip. When cutting tough or fibrous materials, the result may be worse than with a dull blade due to high friction and cutting resistance.
- Ogival (bullet-shaped). The slopes (the sides of the cut line) have a characteristic convex shape. Such a blade is expensive and difficult to make even in production conditions. Tools with a bullet-shaped sharpening are made for special equipment (for example, medical equipment, when studying the thinnest tissue sections).
Model of a desktop sharpener with the ability to change the sharpening angle Source ytimg.com
- Faceted. Faceted geometry is used for disposable safety razor blades. The cutting part ends with edges (straight segments). Hex sharpening is considered universal. A profile with 3-4 edges is suitable for coarse hair, with eight – for the finest hair.
The most common is traditional double-sided sharpening; its variety is lens sharpening. It has high cutting efficiency and is considered the best choice of blade options. However, it is quite difficult to implement, which increases the cost of finished products, regardless of whether it is a kitchen tool, hunting, folding or tourist. There are knives with other, more specific blade shapes that determine the functionality and ease of use of the tool.
What properties should a sharpener have?
So, before you make a device for sharpening knives with your own hands, you need to think about its design. And to do this, you need to answer the question: what properties should a knife sharpener have:
First, any device for sharpening knives must securely fix the knife, preventing it from falling out, but without damaging the blade material.
Secondly, a homemade knife sharpener must ensure that the block is held at a strictly defined angle, which is necessary for sharpening the entire cutting edge at a constant angle.
Third, the most difficult and perhaps the most important, a sharpening machine for knives, both self-made and factory-made, should allow changing the angle of installation of the sharpening stone; this is necessary to ensure sharpening of various tools and will even allow sharpening of stepped knives.
Note!
DIY vices: simple and reliable homemade vices from A to Z (190 photos)Do-it-yourself vibrating table - selection of materials, components and assemblies for a vibrating table with a step-by-step manufacturing description
- Do-it-yourself grain crusher - operating principle, types and features of creating a device for processing grain crops
Sharpener made from glass cutter rollers
Surely, many people have old glass cutters lying around idle in their home workshop (perhaps even from the distant Soviet past).
So, from them you can make a quite suitable sharpener for sharpening knives.
In addition to glass cutters, to make homemade products you will also need brass bushings, at one end of which there is a hole with an M3 thread, and at the other - a threaded rod with a similar thread.
As for the number of parts, to make one homemade knife you will need 10 rollers from a glass cutter (they are made of tungsten carbide) and four brass bushings.
Holes will need to be drilled in each bushing. But not through, but about half the wall thickness.
Next you will need an aluminum plate. We drill holes in the workpiece along the edges, cut the threads, and screw in brass bushings - two pieces on each side.
We cut two pieces of steel rod 1 mm thick, and put the rollers from the glass cutter and nuts on it. We insert the rods into the holes in the brass bushings. For reliability, we fix the ends of the rods with tin solder.
We screw the aluminum plate to the handle of one of the glass cutters, having previously drilled the necessary mounting holes.
The operating principle of this device is incredibly simple. We insert the knife blade between the rollers, and by moving back and forth we sharpen the cutting edge at the required angle.
The step-by-step process of making this sharpening device with comments from the master is shown in the video below. The idea for this homemade product belongs to the author of A Craft.
What to make from a GLASS CUTTER!? Mega tool - sharpener
In general, the design turned out to be quite compact and easy to manufacture.
Instead of an aluminum plate, you can use a steel plate or even a piece of plywood of suitable dimensions.
The only problem is finding so many videos. But at a flea market, you can probably find more than a dozen glass cutters, so the problem can be solved.
By the way, in a similar way you can make your own knife sharpener from a lighter. In this case, instead of rollers from a glass cutter, wheels from a lighter are used.
What will we make it from?
The next question to consider is.
The materials from which you will make it.
To create such a device you will need the following materials:
- A sheet of thick plywood (can be replaced with a sheet of chipboard) 16 mm thick;
- Self-tapping screws 50-70 mm long; (it is better to use furniture format);
- A drill corresponding in diameter and length to your self-tapping screws or conformation;
- M8 hairpin of appropriate length (approximately 70 cm);
- Aluminum plate (at least 5 mm thick);
- M8 bolts with nuts (it is advisable to use wing nuts, although you can also use regular nuts, but keep in mind that then, with each sharpening, you will have to use a wrench, and this, you will agree, is not very convenient);
- You will also need a small block of textolite or ebonite to create a movable connection between the stud and the frame, which can be adjusted in height (if necessary, it can be replaced with a block made of hard wood, for example, it could be oak, beech or hornbeam);
- Of course, you will also need abrasive stones of various grain sizes;
- You will also need a powerful neodymium magnet (“you can get” such a magnet from an old computer hard drive that has become unnecessary).
Locking blade machines
Knife sharpening machines with locking blades will attract the attention of those people who want to sharpen a knife not only efficiently, but also quickly. The design, which rigidly fixes the knife blade relative to the sharpening stone moving at a set angle, allows you to accurately set the angle of inclination.
To create such a homemade machine with your own hands you will need:
- The base is a rectangular wooden plate with dimensions 440*92 mm and a thickness of 18 mm.
- Wooden die 92*45*45 mm (for fixing the vertical threaded rod).
- A wooden block 245*92 mm and 18 mm thick (the plate to which the knife will be attached).
- Iron plate 200*65 mm and metal thickness 4 mm.
- Piano hinge, 92 mm long.
- M8 hairpin 325 mm long.
- Nuts and bolts with M8 thread.
- Drill 6.5 mm.
- M8 tap.
- Self-tapping screws 50 mm, 4 pcs.
The die intended for fixing the vertical threaded rod must be drilled through with a 6.5 mm drill. The hole should be located at a distance of 15 mm from the edge of the die, approximately in the center.
Layout of the hole in a wooden die
Next, in the resulting hole you need to cut a thread for an M8 stud. The wooden block prepared in this way must be screwed to the base at a distance of 265 mm from the edge using ordinary self-tapping screws 50 mm long, screwed into the back of the base.
Determining the location of the bar attachment
Screw location diagram
After the block and the base are securely fastened, you need to insert an M8 pin into the hole in the block. The pin should run across the entire cross-section of the beam and the base; thus the risk of changing its position is minimized. The pin at the base of the block must be firmly fixed with an M8 nut, slightly recessed when twisting it into the wood of the block.
The second part of the work involves assembling a clamping device to fix the position of the knife. To do this, a piano loop is attached to a block of wood 245*92 mm with three self-tapping screws from the end of the wooden plate, with the help of which it will be attached to the base of the device.
Attaching the fixing bar to the base using a piano loop
After securing the wooden part of the holding device, you can begin to attach the iron plate. In the center of the 200*65 mm plate, you need to drill an oblong groove, 90 mm long and about 1 cm wide. The groove should be located from the edge of the clamping plate at a distance of 60 mm. Additionally, you need to drill a hole at a distance of 20 mm from the opposite edge and cut a thread in it for an M8 bolt. Then you need to attach the clamping plate to the previously prepared wooden base using this bolt. Using another bolt and a suitable washer, you need to fix the clamping plate in the center of the cut groove. The fixation should be clear, but at the same time neat, so as not to damage the surface of the blade.
Attaching the Iron Clamp Plate
The most difficult part of assembling this device is preparing the control device that will set the sharpening angle of the knife. For this you will need:
- metal square profile 40×40 mm;
- furniture bracket, 40 mm wide;
- a pair of rivets;
- a piece of plywood 42×25 and 18 mm thick;
- bolt and nut M5;
- a pair of M8 wing nuts;
- whetstone;
- steel bar with a diameter of 0.8 cm and a length of 40 cm.
It is necessary to drill a couple of holes on a piece of plywood: a through hole with a diameter of 8 mm along a cross-section of 42×18 mm (the distance from the edge on the 42 mm side should be set at 15 mm) and a through hole with a diameter of 5 mm along the side with a cross-section of 42×25 mm (the distance from edges 10 mm). The square pipe should be cut in half so that you get a “U”-shaped bracket with a width of 40 * 15 mm and ears of 20 mm. You need to drill 8 mm holes in the ears, into which an M8 pin will later be inserted. Connect the resulting bracket to a furniture hinge using rivets. Using the second part of the furniture bracket, attach a block of plywood to the resulting structure with an M5 bolt.
Location on the spoke of the guide mechanism
Connect the touchstone to a guide rod, which is a steel rod with a cross-section of 8 mm. When connecting the keystone and the guide rod, you should strictly ensure that their center lines coincide. If desired, for ease of use of the sharpener, a handle-holder can be attached to the whetstone on the reverse side. All that remains is to secure the whetstone in the guide mechanism, secure it with a thumb and the homemade device for sharpening knives is ready.
Sharpener assembly
What are we going to do?
The tools you will need are: a drill, a drill of a suitable length and diameter, a screwdriver with bits suitable for your screws or format. Instead of a screwdriver with suitable bits, you can also use a screwdriver (but this will be more difficult).
Any tool for cutting metal (a hacksaw or an angle grinder equipped with a cutting wheel).
How will we do it?
Having asked the question “how to make a knife sharpener?” First of all, let’s find drawings for our future knife sharpener, which we will make with our own hands, and to do this, enter the following query into the search bar: “device for sharpening knives drawings.”
In response to such a request, any search engine will return a large number of suitable search results. Choose the one you like.
Having cut the plywood in any convenient way into parts for our future frame, we drill them at the points of attachment to each other, and then fasten them with self-tapping screws or conformat to each other.
On the frame we fix, using a bolt, an aluminum plate pre-processed according to the drawing (it will serve as a clamp for the knife being sharpened).
Next, we attach a vertical section of the pin to the frame and firmly fix a “cracker” on it. It consists of two parts made of an ebonite block (the Cracker is a very important part, it determines the angle at which the abrasive bar and the blade being sharpened will come into contact).
Now let's create a mount for the abrasive stone: for it we use the remaining section of the pin. Two blocks of ebonite or other similar material and two nuts.
Making a sharpener step by step
Step one: It is necessary to correctly measure and cut the metal corners. You can complete this step with a grinder and then clean it with a file and sandpaper.
Step two: You need to drill small holes in the fastening areas and process the edges of the guide rail.
Step Three: The bolt and nut will serve as the stand. The improvised stand must be secured between a vice or on any other convenient unit.
Step Four: Now it’s time to assemble the sharpener. Next, you need to attach a sample for the first sharpening test and the sharpening stone itself.
Step five: Test the device.
It should be noted that many of the parameters here are individual and the dimensions of the sharpener are often set by the manufacturer himself.
What did we get?
Having assembled the design according to the drawing, you will receive the simplest device for sharpening knives, however, despite its simplicity, this device will allow you to sharpen knives and any other blades quite efficiently.
In order to understand how to use such a device, just enter “video knife” in any search engine.
Did you manage to sharpen the knife? Hooray! You have successfully made a DIY sharpening machine.
We should not forget that any sharpening machine, even if it is made by hand, requires strict adherence to the rules and safety requirements!!!
Sharpening devices, practical at home
The list of sharpening devices used in everyday life includes hand-held devices. A popular option is musat. Professional chefs use it to quickly sharpen (sharpen) a knife that has become slightly dull. Musat looks like a long rod with a round cross-section and a handle. It is convenient for beginners to use, but only if a minor correction is needed. If the blade is completely dull, more radical action will be required.
A mechanical sharpener is designed to improve the blades of kitchen knives; it sets the optimal sharpening angle. The design consists of a plastic case in which the sharpening discs are hidden. The device can be equipped with several holes, and they are used for both sharpening and straightening.
There are models designed for sharpening scissors and bread knives with a saw-tooth edge (serrated). Mechanical devices are easy to use, affordable in price, and the result is achieved without much effort. A significant disadvantage is the low quality; the blade quickly becomes dull and the process has to be repeated.
Musat is a professional editing tool Source stockfood.com
Electric sharpeners (machines) are found in home kitchens much less frequently than their mechanical counterparts. The devices are designed for household and professional use and do not require special skills. They are a universal and effective tool for owners who prefer simplicity and speed of the process (it only takes a couple of minutes).