We wear clothes and use other textile products, but sometimes we don’t think about the process of creating them. They are made from materials for the production of which a weaving machine is used. This device has been used for several thousand years and has its own history and characteristics.
What is a loom?
It represents the equipment needed in the textile industry. A weaving loom is a device on which fabrics of different textures and compositions are produced - cotton, wool, silk, linen and other fabrics. These can be woven, smooth, pile materials used for the manufacture of clothing, household textiles, carpets and other products. Another name for such a device is krosna.
Weaving loom device
The design has a number of features due to its functionality. The weaving mill has the following design:
- Its main parts are healds - the working part in the form of moving frames.
- These elements are fixed using wire pins.
- The device is equipped with a holder for attaching threads.
- The parting hook is responsible for threading the loops with the device.
- With the help of embedded strips, the smoothness and evenness of the woven bases are maintained.
How does a loom work?
The principle of its operation is simple. Whether a home loom or an industrial one is used, the algorithm for its operation is as follows:
- Threads are threaded through the eyes of the healds.
- When the first frame is raised, the even threads are raised, and the odd ones are at the bottom.
- Between their rows a shuttle is thrown, in which there is a bobbin with a transverse thread (weft). It unwinds and then lies between the threads of a woven base consisting of longitudinal threads.
- After moving the shuttle, the first raised bar returns to its place.
- When a transverse thread is woven into a warp consisting of longitudinal threads, it is tightly fixed to the latter by means of a metal comb. This is how a loom equipped with a reed works.
- The next step is to raise the second heddle to move the odd threads over the even ones. The transverse fibers are laid on the longitudinal ones by throwing the shuttle in the opposite direction.
- Odd warp threads are covered by even ones due to the fact that the heald is lowered.
- The fiber is nailed with a metal comb.
Weaving technique
The operation of the machine is based on the fact that even warp threads are passed into the holes of the vertical frame. First, with the movement of the foot, this part is lowered down. As a result, a gap is formed between the warp threads, into which the shuttle is passed.
The next row is performed by moving the frame up. As a result, even-numbered threads rise, again forming a lumen. The weft thread passes through, and the material produces a “basket”, checkerboard weave.
Using reeds, the master compacts the rows, knocking them into a canvas. Some machines have mechanized devices for performing this action, which greatly facilitates the work.
Loom - history
People learned to weave mats from reeds and tree branches, after which they mastered a similar technique using fibers. Important points in the history of the development of the device:
- The first loom was a vertical one, and it was invented in 1550 BC. e. It was a primitive device on which longitudinal threads hung on one side and transverse threads on the other. Weaving took a lot of time and effort.
- In 1733, John Kane, an English clothier, invented a mechanical shuttle. The weaving machine was equipped with it for throwing threads. Thanks to this invention, labor and time costs for the production of canvases were reduced, and it became possible to produce them in large quantities.
- In 1785, Edmund Cartwright patented a foot-operated machine tool. The device was refined by other inventors and was improved by the 30s of the 19th century.
- In 1879, Werner von Siemens created an electrical device.
- In 1896, the automatic loom was introduced. Modern devices are descendants of this device.
Types of looms
There are several classifications of the device. In accordance with the principle of operation of the mechanism, it is divided into the following types:
- handloom;
- mechanical;
- semi-mechanical;
- automated.
Depending on the method of laying the thread, the device can be:
- pneumatic;
- hydraulic;
- foil
Air loom
This type of device is used for the production of materials from yarn and chemical complex fibers. A modern pneumatic weaving loom has the following feature - the transverse thread is pulled into the shed using the pressure force of compressed air, which is supplied through pipelines from the compressor. This type of device is used for the production of simple weave fabrics with a surface density of maximum 200 g/sq.m.
Hydraulic loom
This type of device is used for the manufacture of synthetic materials that are not wetted by water. This weaving machine has a design that involves drawing the thread through a drip jet of water. The latter is ejected from the nozzle under pressure. The speed of laying the transverse thread on such a device can reach 35 m/sec.
Rapier loom
This type of device is used for the production of both synthetic and natural fabrics. With its help, technically filtered and mixed gray fabrics are produced. You can use a rapier loom for rugs and other items with a rough texture. On this device, the transverse thread is pulled into the shed by means of grippers that are fixed at the ends of rapiers (flexible metal strips) that perform reciprocating movements.
How to choose a loom?
What criteria should you pay attention to when purchasing:
- Table loom or floor loom. The first option has less weight and size compared to the second. Due to its compactness, it takes up less space and is more convenient to transport. It is easier to work with a floor-standing type of device. Using such a weaving loom, you can use different accessories for this activity.
- If you plan to create carpets or tapestries, it is better to choose a vertical model of the device. For the production of ordinary materials, a horizontal weaving loom is suitable.
- For ease of use, you should choose an automatic device, because in the mechanical version you will have to manually load the bobbin into the shuttle periodically.
- Reed density. It is measured by the number of threads per 10 cm of fabric base. The more there are, the finer the fiber can be used for weaving. For example, a reed with a density of 20/10 is used for processing thick woolen threads, and 40/10 for thin fibers. Density 30/10 is considered universal - it can be used to weave materials from threads of medium thickness and thick threads.
- Machine width. It is selected depending on the width of the fabrics produced. The optimal figure is 50-70 cm, but if the device is purchased for a child, it will be more convenient for him to work with a device 20-40 cm wide.
DIY loom
To create your own device you will need:
- twine (you can use cotton thread);
- scissors;
- wooden slats;
- a picture frame made of wood, the width of which will be the width of the loom.
How to make a loom with your own hands?
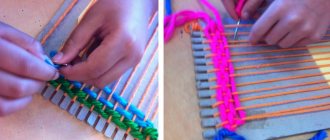
- Using a double knot, secure the thread or twine to the lower left corner of the frame, after which you need to pass the ball through it and throw the thread through the top bar. Bring the thread down to the bottom bar. The movements are performed as "8". Make sure that the thread is tensioned evenly and does not sag.
- Using such a home weaving loom, you set the width of the product by the width of the base of threads or twine. When you have finished stretching, secure the second edge with a double knot.
- Divide the threads into 2 parts by placing a wooden strip between them where they cross.
- Move the bar to the top of the frame.
- The device is ready and you can use it.
How to weave fabric at home?
It is recommended for a beginning weaver to start creating with small and easy-to-make items. First, you can make a napkin. You can see what things created in this way look like in the photo above. The pattern on the canvas is obtained by alternating threads of different colors. The process of working on the machine includes the following manipulations:
- Distribute the warp threads.
- Thread the yarn under the first warp thread and secure it in the cut. There are no strict restrictions on which side to start weaving from. This can be done both on the left and on the right.
- Thread the remaining part with a snake through the warp threads.
- Having reached the end of the fabric, turn the thread so that the thread on the machine is wrapped in it. Subsequent rows must be woven so that the thread is at the bottom in those areas where it was at the top in the previous row.
- Upon completion of work, bend the cuts on the cardboard. Carefully remove the loops, cut them and tie knots.
How to use a loom?
If this activity is new, consider these recommendations:
- For the first items you produce, it is better to use medium-thick wool threads or mixed threads. They are springy and have an optimal level of stretch, which compensates for the shortcomings of filling.
- If you have not previously used looms for home crafts, do not start working with thin fibers - flax, cotton options, silk.
- For the base you need to use durable raw materials. If it is fluffy, slippery, and breaks easily, it can only be used for transverse rows.
- When winding the warp onto the shaft, you need to lay strips of cardboard at intervals of 3-5 cm between the rows of threads to distribute them evenly.
- When changing warp fibers, check the binding knot for strength.
- When changing the ends of the transverse threads, do not tie them together. They are fixed by overlapping each other (3-4 cm).
Threading the loom
It means winding the warp onto a beam. A mechanical loom is threaded like this:
- Secure a strong thread to the far bar of the reed. The length of the first should exceed the length of the second by 15 cm. Attach its second end to a thin hook.
- Insert the nose of the hook into the first tooth of the reed, which is located closer to the bar to which the thread is tied.
- Untie the threads that secure the pharynx, thread them onto the middle, index and thumb of your left hand.
- With your right hand, separate the first pair of threads from the warp, maintaining the crisscross weave. Place it on your ring and little fingers. Pick up the loop with your hook, pull it through the reed, and throw it onto the thread that was fixed first. Continue these steps until you reach the desired width of the future canvas. Pull the warp threads into the reed at intervals of 1 tooth.
- Straighten the loops on the thread, lift it and insert them into the stick, which should be parallel to it.
- Untie the threads that secure the cross shed and pull it through the reed. Transfer the resulting design to the loom by placing a stick in the groove of the beam and tying it to it.
- For further actions you will need the help of two people. One, standing near the beam, winds the warp with the help of a brace, rotating the shaft. The other two pull it and straighten it.
History of the Slavic woven rug
Among the Slavs, the production of floor mats, paths, and bedspreads was considered a “grassroots” technique. Initially, this craft was practiced only for the needs of ordinary people. These products did not require a high level of skill, as required by weaving lace and weaving thin fabrics. And the most primitive devices were used for their manufacture.
And most often, floor runners were woven from old fabric items that had served their purpose. Strong durable threads were used as a base, but strips of fabric were transverse. Homespun paths were popular among the Slavs in the 19th century.
Sometimes flax waste and straw were used to weave rugs. Such items were usually placed at the very entrance to the huts. For the manufacture of both, a village loom made of wood was most often used.
The scheme of work is quite simple. Transverse threads are pulled between the stretched warp threads by interlacing. From time to time they need to be compacted with special reeds that resemble combs. They were used to knead transverse rows into a continuous sheet.