Among the most useful and functional devices for the home workshop, a gasoline soldering torch occupies one of the leading places . Such a device is capable of qualitatively connecting all kinds of metal structures using liquid metal technology. The device operates on the basis of a gasoline-air combustible mixture, which is formed in the burner, and allows further smelting work to be carried out.
The rotary tap located on the handle acts as a regulator of the direction and power of the flame , which significantly simplifies the combustion process.
Today, metal smelting is carried out using two types of solders:
- Low-melting.
- Refractory.
If when working with low-melting metals almost all existing types of soldering irons are used, then in the case of refractory metals it is necessary to create maximum temperature indicators . In this case, you simply cannot do without using a burner. Currently, there are several varieties of such a universal device that can operate on the basis of different fuel mixtures, but at the same time heat the structure to the required temperature.
Among the most common and convenient torches are models for soldering and welding, which operate on gas or a gas-air mixture. You can purchase them at the appropriate store or try to create them yourself .
Advantages and disadvantages of a gasoline burner
Among the main advantages of BG are the following:
- Proper functioning of the burner at an altitude of 3-4 thousand above sea level.
- The burner can operate normally even at minus 40 degrees Celsius.
- Fuel such as gasoline costs much less, especially when compared with gas.
- Light weight burner and ease of use.
- You can take the burner anywhere, for example, fishing, hunting or just on a hike.
- This device is convenient to use during installation work.
- The high temperature at the outlet allows you to work with various types of metals and alloys.
- You can use other fuel: kerosene, alcohol or diesel fuel.
But a gasoline burner also has disadvantages:
- High fire hazard, especially during fuel filling.
- Most often, the fuel torch is uneven.
- Soot may appear during operation.
- It is important to use pure high-octane gasoline, otherwise the throttle hole will quickly become clogged.
Blower device
Inflate with oxygen. Either with pure oxygen (usually from an oxygen cylinder, there is an alternative - an oxygen concentrator, which lampworkers use, but for some reason jewelers do not use, but I think a concentrator will do), or with air (oxygen is one of the components of air). There are different devices for blowing: - bellows (frog)
A device such as a foot pump for inflating tires for a bicycle. Or for inflating an air mattress. There are craftsmen who have and are adapting the above-mentioned devices to burners; some improvements are needed, but the essence is the same. There are ready-made leather ones with a receiver - optimal. A torch with bellows for soldering is ideal! in this case, you can always adjust the composition of the mixture with your foot (correctly - “quality of the mixture”) - pump more intensely - more oxygen, in the case of other methods of blowing - as the flame was set before soldering - this is what it will be along the way, you can only adjust it by “closer” - the burner is further away from the product.” At the exit, it all comes down to adjusting the temperature of the flame and its properties (oxidation-reduction). This type of blowing occurs in both gasoline and gas burners.
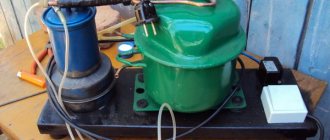
A certain thing runs on electricity. Everyone has seen this - the thing that blows bubbles in an aquarium with fish is it, the compressor. With skill, you can blow up the burner with an aquarium compressor (put a couple in parallel), or you can take a compressor from an old refrigerator (that’s how we lived under the scoop). Naturally, you can buy it now, but homemade compressors are still in use. This type of blowing occurs in both gasoline and gas burners.
-injection
Jewelry burners only happen on gas burners, but in life it also happens on gasoline burners - a typical example is a primus stove, if anyone has seen it. The burner inflates itself due to the speed of gas flow and holes for air suction around the nozzle. In practice, the terrible term “injection” boils down to the following essence: if a train is rushing quickly past you, do you feel a draft? - This is due to the fact that a rapidly moving body carries air particles with it. And in an injection burner it’s the same thing - a stream of gas under pressure escapes from the nozzle, there are holes around the nozzle, air is sucked through them and the flame is blown. These small burners with piezo ignition, which many people use here, are of the injection type. Lampwork HodHead is a typical injection burner.
Read also: Wood carving with nichrome string
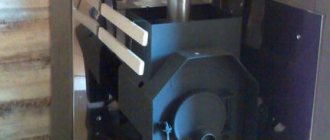
Do-it-yourself gasoline torch for soldering
First of all, it is important to say that gasoline burners made independently are no worse than factory ones. BG made by hand is just as productive and safe.
It is important to note that the temperature at the flame can exceed 1000 °C. Therefore, such a burner will easily melt refractory solders, perform heat treatment of small tools, melt various metals and even glass.
You will need:
- Frame.
- Fittings.
- Cotton wool (cotton and basalt).
- 2 valves for regulating the supply of the air-fuel mixture.
- Silicone pipes.
- Flexible plastic ties.
- Copper tube.
- Emphasis.
- Sealed metal can.
- O-rings.
- Pen.
- Rubber bulb.
- Filler.
The process of creating a gasoline burner with a compressor with your own hands:
- The body is created on a lathe; the workpiece can be a steel alloy of any grade. One end of the tube should be closed with a stopper, and the other will be open. It is necessary to drill a hole in the plug 0.2 mm larger than the supply tube. Then the housing will move successfully along the tube, while the tightness will be maintained.
- Several pieces of steel mesh and basalt wool should be inserted into the housing. This is done so that if the flame breaks out, the fire does not reach the fuel container.
- After this, it is important to make a sleeve with a hook and a resting element. It can be made from a sheet of steel 2-3 millimeters thick.
- The handle can be cut from ash or oak.
- Two through holes are drilled carefully. In this case, the projections of the drilled channels must be equidistant. Then the handle is sanded with sandpaper, then you need to apply 2-3 layers of colorless varnish.
- After this, the copper tubes are passed through the handle, after which they are sealed with refractory solder. Next, holes are drilled into them using a 0.3 mm drill.
- At the outlet of the tubes from the handles, 2 valves are installed, then there is a transition to silicone hoses. They are connected through fittings to a metal can, it is important to embed one fitting in the upper part of the can, and the second in the lower part, this is done so that concentrated gasoline vapors flow through one tube, and less saturated ones through the second. Don't forget to install O-rings on the fittings to prevent the mixture from leaking. The bottom of the jar is tightly packed with cotton wool. A bulb for pumping air is also connected to it.
- This completes the assembly, now you can fill the cotton wool with gasoline, seal the jar hermetically and test the device. To do this, air is pumped into the system with a blower, and then the combustible mixture supply screws are opened and set on fire.
Even such homemade gasoline burners will function properly, especially if you made the device according to our instructions.
Remember! If you do not have knowledge of the operation of burners and experience in using burners of this type, then it is better to buy a production version of the device.
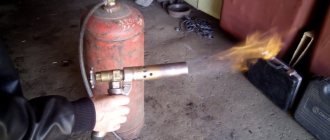
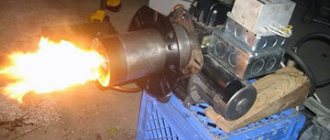
Below you can see a photo of a DIY gasoline burner.
Making a gas burner from scrap materials: step by step
List of materials and tools:
• drill; • Bulgarian; • hammer; • sandpaper; • brass blanks for the divider nozzle; • thin brass tube with a diameter of 15 mm; • wooden blocks; • vice; • silicone seal or FUM tape; • hoses for connection; • valve for adjustment.
How to make a nozzle and handle
First of all, we take a brass tube and attach a handle to it - for example, from an old burner, or from a wooden block, having processed it beforehand. We drill a hole in the block for a brass tube with the appropriate diameter. Having inserted the tube into the timber, we secure it with silicone or epoxy resin.
Next, we proceed to a more labor-intensive and time-consuming stage of work - manufacturing the nozzle. The hole size should preferably be 0.1 mm.
You can use a drill to make a slightly larger hole, and then adjust the edges to 0.1 mm. The hole must have the correct shape so that the flame is even.
Preventing clogging
During use, the channels or nozzles for supplying the combustible mixture may become clogged.
To prevent this from happening, it is important to follow these recommendations:
- Use gasoline with the lowest octane number.
- Each use of the burner must be completed by thoroughly cleaning the device.
- Once a month, add high-quality injector additives to gasoline.
- Systematically clean the system with carburetor cleaner. Such products fight very well against various deposits in fuel channels and jets.
Fuel container.
In the case of gas burners, gas is supplied from a cylinder. Possible options:
Large gas cylinder
This is purchased at gas stations. An empty cylinder is either refilled or exchanged at the same gas stations. It’s better to ask lamp workers about these cylinders - the cylinders are absolutely the same, for jewelry - a 5 liter cylinder will last for a very long time, definitely enough for a year. The gas in such cylinders is under pressure; to regulate the pressure at the outlet, a gas reducer is usually installed - this also applies to lampworkers, where this has all been discussed many times.
Small replaceable gas can (gas cartridge).
Sold on construction markets, as a rule, it is liter. When it runs out, they throw it away and put in a new one. It does not require a gearbox. You can connect to such a can via a hose (which is more convenient to use) or simply screw the burner onto the can itself without a hose. Tourists use something similar in the field.
Small refillable can.
Many people have encountered this - most of the accomplices have burners with small refillable cans. The can and the burner are mounted together; hoses are not needed in this case. They are refilled with gas for lighters from a tobacco stall, they say that it is better to look for a special gas for such burners - it can be found in household markets, and in radio electronics stores, and in jewelry equipment stores - it seems that it is cleaner and more satisfying (more calorie-rich, that is - gives more heat when burned).
Gasoline tank
Highly purified gasoline of a certain oil fraction (“nefras”) is poured into the tank; at the household level it is called “galosh”; it is sold in hardware stores and at household markets in departments with all sorts of solvent-varnishes in containers from 0.5 to 5 liters. They usually pour about a glass - this is a day you can work.
Buy or make a burner yourself
Buying a gasoline burner in a store is the easiest option. Understanding which model is best for you is quite a difficult task, because everything depends on the design features.
Sometimes burners are heavy, so you won’t be able to take them with you, especially if you don’t have a vehicle.
Factory-made burners are extremely expensive, and for their stable operation you need to buy only high-quality fuel.
- Creating a BG yourself has certain advantages.
- Firstly, you can refuel such burners with the most affordable fuel, and secondly, you can create a drawing of a gasoline burner and make exactly the device you wanted.
- And thirdly, you can install accessible consumables that you can quickly change while using the burners.
We are confident that this article will help you create a homemade gasoline burner. We wish you good luck!
Features of jewelry
Gasoline burners for repairing and making jewelry are separate from other devices. They are used for smelting precious metals. The devices are characterized by their miniature size and large heating area .
Currently, most factories use high-precision laser systems, which improve the quality of the finished product. Despite the fact that jewelry burners are practically not produced, their use is relevant for jewelry repair. That is why modern goldsmiths very often ask the question: “How to make jewelry burners with your own hands?” On specialized forums you can always find descriptions and drawings of high-quality models.
Photo of a homemade gasoline burner
Hoses.
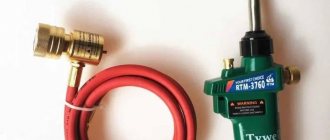
Hoses are needed to connect fuel containers, blower devices and burners. In the case of gasoline burners, ordinary rubber or plastic “guts” will do. Large pressurized gas cylinders require special, durable threaded gas hoses. For liter gas cans, good gas hoses are also desirable, but “guts” with clamps will also do - the main thing is that nothing is “poisoned” (there is no gas leakage). To connect gas hoses, you may need adapters - the diameter of the threaded connections varies in different countries. Usually the adapters are turned by a turner. You can also ask lampworkers about adapters - they have imported burners that do not strictly fit our hoses and cylinders, however, the issue can be resolved.
Schematically, the burner with the kit looks like this:
Gasoline blow torch
What are blowtorches made of?
Mostly steel materials are used to make a blowtorch. The nozzle of a blowtorch is subject to high temperature loads, so mainly reliable materials are used for its manufacture - cast iron, welded steel, and brass.
The lamp handle is made of steel, while more expensive models have a plastic or rubber coating. The regulator is made of plastic, for which a fire-resistant type of plastic is used. The presence of plastic or rubber on the handle makes it easier to operate the tool, so when choosing, it is recommended to pay special attention to this point.
This is interesting! If you plan to rarely use a blowtorch, then it makes no sense to choose the most expensive and sophisticated models, since their potential will not be used to the fullest.