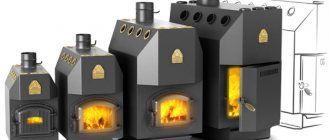
The use of gas fuel is ineffective without the use of special burners. Today the market offers a considerable selection of designs, from professional ones that create temperatures of up to 1500 degrees and above, to household devices that are needed for heating and cooking.
Nevertheless, it is common for home craftsmen to make these devices themselves. The reason is simple - a do-it-yourself gas burner, adapted to a specific task and working conditions, is more convenient, even if it costs more than a factory one.
Burner classification
The device of a gas burner is quite simple. Modern gas burners are divided as follows:
- Pre-mix. A gas mixture is formed immediately before entering the outlet.
- Injection burners. The air required for combustion is spontaneously sucked in (as they say, injected) by the gas jet itself.
- Regenerative. The essence of their work lies in the preheating of gas and air. This happens before mixing. The heating itself is carried out by a special device - a recuperator.
- Regenerative. Preheating in burners of this type is carried out in a regenerator.
- Pressurized (supercharged gas burners). In them, air is forced into the firebox by a special fan. This happens after mixing the combustible mixture.
- Diffusion. By design, these are the simplest burners. They consist of a regular tube with holes drilled in it. Gas is supplied through these holes. To ensure constant and reliable combustion, the necessary air comes from the environment.
- Gas atmospheric burners for boilers. The principle of their operation is very similar to the principle of injection burners. The main difference is that oxygen enrichment is not carried out completely, but partially.
- Gas burners for stoves, fireplaces, heating systems.
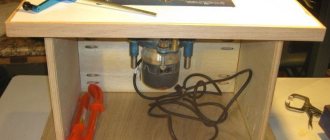
Homemade gas burner at work
The power of any gas burner is determined by the volume of gas consumed per unit of time. It can differ quite significantly for different burners.
Which one should I do?
Low-power gas burners for everyday life and small private production are classified according to performance indicators as follows. way:
- High-temperature – for precision soldering and welding, jewelry and glassblowing. Efficiency is not important, you need to achieve the maximum flame temperature for a given fuel.
- Technological – for metalworking and forging work. The flame temperature is highly desirable not lower than 1200 degrees, and subject to this condition the burner is brought to maximum efficiency.
- Heating and roofing systems achieve the best efficiency. The flame temperature is usually up to 1100 degrees or lower.
Regarding the method of burning fuel, a gas burner can be made according to one of the following. schemes:
- Free-atmospheric.
- Atmospheric ejection.
- Supercharged.
Atmospheric
In free-atmospheric burners, gas burns in free space; air flow is ensured by free convection. Such burners are uneconomical; the flame is red, smoky, dancing and beating. They are of interest, firstly, because with an excess supply of gas or insufficient air, any other burner can be switched to free-atmospheric mode. It is here that the burners are ignited - at a minimum fuel supply and even less air flow. Secondly, the free flow of secondary air can be very useful in the so-called. one-and-a-half-circuit burners for heating, because greatly simplifies their design without sacrificing safety, see below.
Ejection
In ejection burners, at least 40% of the air required for fuel combustion is sucked in by the gas flow from the injector. Ejection burners are structurally simple and make it possible to obtain a flame with a temperature of up to 1500 degrees with an efficiency of over 95%, therefore they are used most widely, but cannot be made modulated, see below. According to the use of air, ejection burners are divided into:
- Single-circuit - all the necessary air is sucked in at once. With a properly profiled gas channel at a power of more than 10 kW they show an efficiency of over 99%. Can't be repeated with your own hands.
- Double circuit - approx. 50% of the air is sucked in by the injector, the rest into the combustion chamber and/or afterburner. They allow you to get either a flame of 1300-1500 degrees, or a CPL of over 95% and a flame of up to 1200 degrees. Used in any of the ways listed above. Structurally they are quite complex, but repeatable on their own.
- One-and-a-half-circuit, often also called double-circuit - the primary air is sucked in by the flow from the injector, and the secondary air freely enters a limited volume (for example, the furnace firebox), in which the fuel burns out. Only single-mode (see below), but structurally simple, therefore they are widely used for temporarily starting heating stoves and gas boilers.
Supercharged
In pressurized burners, all air, both primary and secondary, is forced into the fuel combustion zone. The simplest supercharged microburner for benchtop soldering, jewelry and glass work can be made independently (see below), but the manufacture of a supercharged heating burner requires a solid production base. But it is the supercharged burners that allow you to realize all the possibilities of controlling the combustion mode; according to the terms of use they are divided into:
- Single-mode;
- Dual mode;
- Modulated.
Combustion control
In single-mode burners, the fuel combustion mode is either determined once and for all by design (for example, in industrial burners for annealing furnaces), or is set manually, for which the burner must either be extinguished or the technological cycle with its use must be interrupted. Dual-mode burners usually operate at full or half power. The transition from mode to mode is carried out during work or use. Heating (winter - spring/autumn) or roofing burners are made with two modes.
In modulating burners, the supply of fuel and air is smoothly and continuously regulated by automation, working according to a set of critical initial parameters. For example, for a heating burner - according to the ratio of temperatures in the room, outside and coolant in the return. There can be one output parameter (minimum gas flow, highest flame temperature) or there can also be several of them, for example, when the flame temperature is at the upper limit, fuel consumption is minimized, and when it drops, the temperature for a given technical process is optimized.
Manufacturing Features
The design features are that it is very easy to operate; there are no traces of soot or repulsive odors when using the gas burner. This device is compact and can be used virtually anywhere. The main component of the burner is the industrial valve. You can purchase a new part, however, and used ones that are in working order are quite suitable. The process of making a burner with your own hands begins with the handle, then the body and nozzle are made.
A homemade device can be made using propane, butane, or a propane-butane mixture. That is, the device can only operate safely on gas-like saturated hydrocarbons and air.
In order to obtain a burner that is safe to operate and does not waste fuel, you need to make it a rule to avoid scaling and adjusting the example circuits.
To be fair, it is worth noting that not all gas appliances are calculated according to the laws of gas dynamics. But if the manufacturer changes the dimensions of the design parts, then the Reynolds number of the fuel (or intake air) will go beyond the limits indicated in the original product. The burner with such “improvisation”, if we give an optimistic forecast, will begin to smoke and will be “gluttonous”, or even be completely dangerous in operation.
And one more important note regarding the manufacturing features of the burners: it is impossible to increase its power above 10 kW. And that's why. With a burner efficiency of 95% (which is an excellent indicator for an amateur invention), with a device power of 1 kW, it will take 50 W to self-heat. It is theoretically possible to get burned on the structure, but it is not fraught with explosion. But if you build a burner with a capacity of 20 kW, 1 kW will be superfluous. Threshold manifestation is expressed by the structure being hot or bursting into flames. Therefore, those burner drawings that are oriented at 7-8 kW should not be considered.
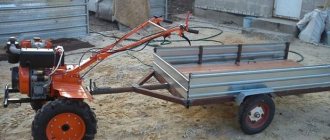
Waste oil furnace
Considering that petroleum products are expensive, it is beneficial to use a forge using waste oil. To make the forge during mining, parts that have served their useful life are used. After processing the furnaces, a significant drawback emerged - the spent mixture did not ignite well. To eliminate this problem, an additional compartment was built into the mining forge. Here the oil is preheated with coal or wood. To improve combustion, waste fuel passes through filters and diesel fuel or gasoline is added to it.
As a result, the mining forge has the advantages of a yellow flame and stable temperature.
You can make it yourself:
- It is made from fireclay bricks, dimensions: 85×48×40 cm.
- The vault is made in the form of an arch to maintain temperature.
- The body is completely covered with sheets of iron. A thickness of 1.5 mm is used on the sides, and the top and bottom are lined with 2 mm sheets.
- The supports are made from angles based on the weight of the structure.
Air is pumped into the chamber by a fan. A waste tank is installed on a hill. From it, the oil enters the chamber through a pipeline, where it is picked up by air, which moves under a pressure of 2 atm. The waste is broken up and fed into the nozzle.
Scheme of the furnace during development:
Burner design
A standard homemade burner functions this way. Gas is supplied under pressure through a special hose from the cylinder. Most often, propane is used as such gas. The volume of gas supplied is changed by a regulating operating valve located on the cylinder. Therefore, installation of an additional reduction gearbox is not required.
The shut-off valve is located behind the main valve and is mounted on the gas cylinder. It is used to open or close the gas supply. All other adjustments (length and intensity of the flame) of the burner itself are carried out using the so-called working tap. The gas supply hose through which gas is supplied is connected to a special nozzle. It ends with a nipple. It allows you to set the size (length) and intensity (speed) of the flame. The nipple together with the tube is placed in a special liner (metal cup). It is in it that the creation of a combustible mixture occurs, that is, the enrichment of propane with atmospheric oxygen. The created combustible mixture under pressure flows through the nozzle into the combustion area. To ensure a continuous combustion process, special holes are structurally provided in the nozzle. They perform the function of additional ventilation.
The design of such gas devices is developed taking into account ease of operation, prevention, and repair. Therefore, they must be easily disassembled. This simplifies the maintenance and repair process.
Based on this standard design, you can develop your own design. It will consist of the following elements:
- housing (usually made of metal);
- a reducer, which is attached to the cylinder (use a ready-made device);
- nozzles (made independently);
- fuel supply regulator (optional);
- head (the shape is selected based on the tasks being solved).
The burner body is made in the shape of a glass. The material used is ordinary steel. This shape allows for reliable protection against possible blowing out of the working flame. A handle is attached to the body. It can be made of various materials. The most important thing is that it provides convenience when working. Previous experience shows that the most optimal length of such a handle is in the range from 70 to 80 centimeters.
Gas burner device
A wooden holder is attached to the top. A gas supply hose is placed in its body. This allows you to give the structure a certain strength. The flame length can be adjusted in two ways. Using a reducer located on the gas cylinder and a valve installed on the tube. The gas mixture is ignited using a special nozzle.
Liquid devices
It is possible to equip a forge with liquid fuel, using mining, diesel fuel or fuel oil as the latter.
The difficulty lies in supplying the required amount of fuel to the combustion chamber.
When assembling such a stove, they install a fuel tank and a system for supplying it to the fireplace - a nozzle. The main problem is to ensure that the fuel is sprayed into a fine dust for the system to be effective.
Some experts recommend using a tractor fuel pump for this.
For higher temperatures, you will need to arrange an air supply. It is best to use an electric fan.
However, a liquid fuel forging furnace is quite complex to maintain and assemble. It is much easier to assemble a gas analogue, and the fuel will cost much less, and less of it will be required. But some craftsmen assemble such furnaces and use them for their forge.
Making a gas burner
When starting to make your own device, you need to prepare the tools for the job and select the required material. First of all, choose the material for the handle. There are no strict requirements, so everyone can use their imagination and capabilities. The main requirements for the handle are: its ease of use, so that it does not overheat during operation. Experience shows that it is advisable to use a ready-made handle. For example, a handle from a broken soldering iron, boiler or other household appliance.
Steel is used to make the supply tube. Choose a steel tube with a diameter of no more than 1 cm and a wall thickness of 2.5 mm. The prepared cutting is inserted into the prepared handle. It needs to be securely fastened there. The mounting method is selected in accordance with your capabilities.
The burner body is made of steel. The divider is made of brass rod. Several holes (usually more than four) are drilled into the divider body. This will create good oxygen circulation at the burner outlet.
After this, the divider is securely fixed in the housing. A small clearance should be provided for the inner flange. The recommended gap should be approximately 5mm. This gap will provide the necessary slowdown in the speed of gas flow that flows to the igniter. Slowing down will allow you to ignite the burner more reliably.
We recommend: Boiler for the garage: making efficient heating yourself
The nozzle is made of a metal rod. It will provide gas supply to the combustion area. It is made as follows. Using a drill with a diameter of 2 mm, carefully make a blind hole in the nozzle body. Then drill a hole with a 4mm drill. It is necessary to create a jumper. They are carefully riveted and polished.
Gas burner drawing
The end of the manufactured tube is connected to the outlet of the gearbox. A flexible hose is used for connection. The material is selected from the list of approved materials for household gas systems. This may be special rubber or special fabric material. To ensure reliability and fire safety, it is more advisable to use certified material. The hose is put on the tube and secured with a standard clamp.
After completing the assembly of the entire device, you need to set the optimal pressure in the cylinder. Before igniting the burner, you should carefully check the entire gas supply system mixing with air for possible leaks. If they appear, they must be eliminated. Only after all checks can the burner be lit. The burner must provide a burning jet length of up to 50 mm.
A properly assembled burner will serve as a reliable assistant in business for a long time. It will be a tool that will help solve many everyday problems without resorting to the use of expensive tools.
Replacing the divider
Without this part, the stove will not be able to work correctly, although the consequences from a damaged divider are not as terrible as from a bad jet. To replace a part you need to know the following.
- Dividers come in different shapes, but round ones are most common.
- Each slab model has its own divider. It is not recommended to use a part from Indesit on a Bosch stove.
- To make it easier for customers to choose, manufacturers put special markings on parts.
As a rule, non-original dividers may simply not be suitable in size or shape, but if you manage to stuff a part, for example, from Indesit into Bosch, this can lead to breakage of the entire slab, and then it will need to be repaired.
Divider for gas stove Indesit and Ariston D 85 032226
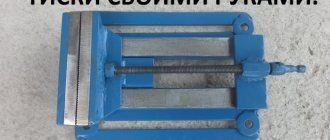
What is necessary?
Working tools and material for the future design - this is what needs to be prepared before creating the device itself.
- Handle material. There are no strict criteria for its selection, so everything depends on the ingenuity and capabilities of the manufacturer. The handle should be comfortable and not warm up during operation. It is most reasonable to take a ready-made handle - a handle from a broken boiler or soldering station will do.
- Conducting tube. It must be steel, so the manufacturer chooses a steel tube with a diameter of no more than 1 cm and a wall thickness of 2.5 cm.
- Burner body. And it must be steel, and the divider is made of a brass rod.
- Nozzle. It is made from a metal rod.
The standard design of a gas burner will include a metal body, a nozzle, a reducer, a fuel supply regulator, a head and a unit for fixing the gas cylinder.
Tools you will need: grinder, semi-automatic welding machine, file, drill press or drill, tap, drill bit, blade, hammer, pliers, stripping and cutting wheels, metal brush, protective equipment. You don't always need everything from the list, but it is included in the standard set.
A basic set of tools needed for metal forging
The method of imparting plastic properties to metal by heating has been known to mankind since time immemorial. Unlike the so-called “cold forging”, in which the metal is not heated, during “hot” (and, as is considered, “real”) forging, the metal is heated in a forge.
Due to its plasticity, heated metal can be given a wide variety of shapes, which is what masters of artistic forging use.
In addition to experience, which is accumulated over the years, forging requires the appropriate tool. These can be special pliers, mandrels, bending templates, etc., but the hammer and anvil remain the most important “assistants” of a blacksmith for many centuries.
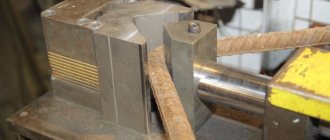
Any person who is thinking about taking up blacksmithing is faced with the need to purchase the appropriate tools. A high-quality and heavy anvil weighing under 100 kg is not a cheap pleasure.
I bought my anvil by weight at a secondary metal shop. From work experience, I can say: what I couldn’t flatten on a rail, I managed to do on a real anvil.
Vtorchermet may be a “gold mine,” but a lot depends on luck. Our price for a used anvil is approaching the cost of a new one. Although I managed to acquire a powerful vice and anvil weighing about 30 kg in this way. Her “face” is, however, dented, but it can be fixed.
So, what to do if you want to forge, but the family budget does not allow such expenses? Moreover, if it is unknown whether the business will be to your liking, or in a few months all the expensive equipment will begin to gather dust in the garage.
In this case, you should take advantage of the experience of FORUMHOUSE participants and acquire a mini-forge made from materials that are at hand. Moreover, even with this “dacha” option, you can make a lot of different things that are needed on the farm, and which you cannot buy in a store or on the construction market.
There are few good blacksmiths and, as a rule, they are loaded with orders, and the farm often needs specific products, for example, a forged nail or some kind of “tricky” rivet. In order not to rack your brains with finding a specialist and ordering, and also to save money, it’s easier to do everything yourself. After all, you can’t just buy nails like the ones in the photo below.
Scheme
A homemade soldering torch is extremely simple. Its body is a tube with a nozzle at the end. At the other end there will be a tap with a pipe for connecting the gas supply hose.
To make it easier to adjust the power of the torch, we will equip the nozzle with a divider.
Gas burner diagram
A few words about the air supply itself
Of course, something must force delicious oxygen into this pipe, which will heat the coals in the chamber to hellish temperatures. You can use blacksmith bellows. The kind our ancestors used in their forges. But this is not the best option, you need at least a couple of bellows to get the required temperature, and it would be nice to have an assistant who will tirelessly press the bellows. It is much more productive to use electric leaf blowers. For example, a turbine for inflating mattresses. I used an old Soviet vacuum cleaner. You can even twist the hose from blowing in to blowing out, but it broke. I had to tape the bag on the side where the air is blown out.
Open forges
An open forge gas forge consists of vertical stands on both sides of a metal container, which is installed on a fire-resistant base. The role of the base can be performed by:
- concrete floor (platform);
- several refractory bricks laid in a row, etc.
A gas burner is installed on the racks, with the nozzle pointing down. In most cases, forges are installed on a metal stand, which has a tray at the bottom for placing the workpieces to be processed.
Rules for safe operation of equipment
If used incorrectly, gas cylinder equipment can become a source of a strong explosion or fire.
When performing welding work, you should definitely use personal protective equipment: glasses, gloves, special shoes.
Before starting work, you need to thoroughly inspect the equipment for damage. If the equipment gets dirty, be sure to remove the dirt
You can work with propane cylinders only in well-ventilated areas, and the air temperature should not be below 0 °C.
Absolutely forbidden:
- Work near open flames.
- Keep the cylinder tilted when working.
- Place the vessels in the sun.
- Carry out work without a gearbox.
- Heat the gearbox over an open fire.
In addition, if you smell gas, you must immediately stop working and turn off the valve on the cylinder. We also recommend that you familiarize yourself with the main reasons for the explosion of gas cylinders.
When working without personal protective equipment, you can get burned, not only from an open flame, but also from accidentally touching hot parts.
If the considered homemade burners are not suitable for you, we recommend that you familiarize yourself with other options for making useful homemade products discussed in our articles - a burner made from a blowtorch and a burner for a sauna stove.
Purpose of the forge
Processing metal products requires heating them until they change color and acquire a light orange hue. Such changes in steel correspond to temperatures of 1000-1200°C. The metal brought to this state is easily subject to deformation under the influence of impact tools.
The workpiece loses its plasticity as it cools, and accordingly, forging and giving it the desired shape becomes more difficult. Applying more force leads to deformation of the metal and increases its fragility. Maintaining the forging temperature avoids material destruction.
A conventional oven is not capable of producing temperatures above 1000°C. For such purposes, ovens with forced air flow are used.
A forge is used to heat metal blanks and maintain the required temperature. Such equipment is used not only for forging, but also for melting and then pouring metal into a mold, hardening tools, and soldering using copper and brass.
Nuances and operating instructions
A propane burner is a dangerous device, and therefore, when working with it, you must follow the operating and fire safety rules
Roofing propane burner, instructions for use:
Carefully and tightly screw the nozzle onto the nozzle. Connect a hose to the cutter fitting, securing it with a special clamp. They are usually not included in the kit and will need to be purchased separately. Attach the second end of the hose to the gas vessel. Check the tightness and reliability of the connections with the flame regulator closed. Using soapy water, check the tightness of the connection and gas-air leaks, and with the gas valve on the cylinder open. Smoothly turn the gas regulator counterclockwise and light the burner.
It is prohibited to point the torch at flammable materials. After completing the work, close your gas valve on the vessel. When the burner flame goes out, close the torch torch regulator and allow it to cool.
Dangerous and harmful production factors when working on the roof with a propane torch:
- The occurrence of a fire hazard;
- explosion of a gas container;
- burns from open fire;
- thermal burn from heated cutter surfaces.
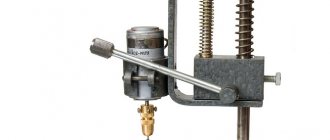
Divider, cover, jet
Dividers and jets
An incorrectly installed jet will cause an explosion. The part is replaced by a specialist. The need arises when switching to a new type of gas. The cylinder pressure is much higher than the network pressure, the nozzle opening is smaller. Conscientious manufacturers include two sets of injectors with your purchase:
- Bottled gas.
- Main gas.
The instructions include: replacement procedure; a special key is included with the kit. Will you ignore the replacement? Through the enlarged hole of the home nozzle, bottled gas will flow in an intensified stream at the dacha. The gearbox is often powerless to properly regulate the system. The gas will partially burn, producing orange flames, and a characteristic pungent odor will appear. Disasters are not far away. A crookedly installed jet leaks gas. The result is the same - an explosion. The opposite situation of installing a dacha kit at home will not lead to good things.
Recommendations
The principle of operation of the device is what you should understand before making the device. You can consider it using the example of a burner for roofing work. How does the burner work?
- The device is connected to the reducers of oxygen and propane cylinders by a system of supply hoses.
- Reducers are placed on the cylinders to create working welding pressure.
- A diagram for gas and oxygen is assembled, the tightness of the connections is checked, the nodes are secured, after which the gas can be opened with valves.
- The gas pressure is set to the operating value and the valve opens.
- The fuel is supplied through hoses to the propane appliance.
- The injector carries out the mixing process to form a gas-air environment.
- A working flame with a temperature reading above 2000 degrees comes out of the device.
Making a burner is one thing, using it correctly is another. A simple burner can cause an explosion or fire.
When performing any welding work, you must wear personal protective equipment: gloves and goggles, special shoes. You can work with propane cylinders only in a well-ventilated area, and at sub-zero temperatures, any actions with the burner are excluded.
What you should absolutely not do:
- work near open fire;
- keep the cylinder tilted;
- place vessels under the sun;
- carry out work without a gearbox;
- Warm up the gearbox over an open fire.
If you can clearly smell the gas, work with the burner should be stopped by closing the valve on the cylinder. Homemade burners, depending on the purpose of use, can be different: burners with a VK-74 valve, devices converted from an acetylene gas cutter and mini gas burners. It is realistic, profitable, and useful to build every homemade device. Only initially you need to decide on the type of structure and its parameters. The gas burner is also used in private households and for commercial purposes. In plumbing, a metal workpiece is heated with a torch, which ultimately comes out quite hardened.
Overview of different types of flame diffusers
WEBBER brand stainless steel flame spreader with wooden handle is made in China. The accessory is attractive for its price (around 150 rubles) and is ideal for those who plan to use it infrequently for its intended purpose.
The Metaltex divider is made of stainless steel with mineral fiber. The design ensures uniform heat distribution along the bottom and prevents burning. Ideal for preparing porridges, mousses, jelly. Can be used as a hot stand.
A large round divider for glass pans and ceramic roasting pans from a Chinese manufacturer costs around 100 rubles. Radial grooves speed up the cooking process and additionally help protect the bottom by reducing contact with hot metal.
The fire spreader is made in Italy and is made of durable stainless steel. The lower part is mesh, the upper plate is embossed. Steel handle. The handle is convenient for quickly removing the device from the stove. Suitable for large diameter pans.
You need to use a flame divider for a gas stove correctly. You shouldn’t turn the gas all the way up, plunging the circle into a strong fire. Place the device on the burner and light the gas at medium or low power. You cannot create a strong flame; it will not produce the desired effect, and a glass or ceramic pan may crack.
The handle is used to remove the empty divider . Under no circumstances try to lift it together with the pan. The only exception can be something very light.
The diffuser needs to be cleaned periodically; especially thorough cleaning is required if peppers or eggplants were baked directly on the flame diffuser without foil. It is better to have several cooking utensils and an adapter.
Source: vidy-posudy.ru
Divider cover
This is the final detail of the gas burner, which looks like a circle with drooping edges. It is used to distribute the gas flow to the sides. It has a removable mechanism, which makes cleaning the divider and burner easier.
When choosing a material, it is better to choose stainless steel. Despite the fact that ferrous metal is not inferior in durability, it quickly loses its appearance and gets dirty easily.
How to use?
A factory-made slab divider usually consists of two plates: lower and upper. The plate at the bottom is a support plate, and at the top is an adjustment plate. Both of them have holes for distributing the flame, and the top one also has a handle for easier movement.
An adjustment disk is installed on the support disk and the structure is placed on top of the gas stove grate. After which the burner is turned on and the minimum flame level is set. To ensure even cooking, you can turn the handle of the top plate of the divider during cooking, thereby opening or closing the holes. The existing gap between the lower and upper plates can significantly reduce the thermal effect of the divider discs on the dishes. In order for the stove to function normally and be easy to use, care should be taken to select additional parts for it from the same company. These include a divider for a gas stove. At first glance it may seem that the detail is not particularly important, but it is not!
Dividers perform an important function - they evenly distribute the gas flow, and, therefore, the flame from the burner. Thanks to this, the food will be perfectly cooked, without burning or remaining raw.
Source: kuhniclub.ru