Anyone familiar with the rules of electrical installation can easily make a simple welding machine on their own. But before getting down to business, it is necessary to calculate all the components of the device. The efficiency of the device when operating from a regular household single-phase network will depend on this.
Therefore, the main task in the design and assembly of welding machines is to provide the required current while reducing power consumption. This is only possible when performing welding work with reduced voltage on the electrodes.
The simplest welding machine has the following design:
- A step-down transformer that reduces the voltage to the limits of 55 - 70 V and at the same time increases the current strength to the required parameters. Thanks to this, it is possible to reduce energy consumption to reasonable limits.
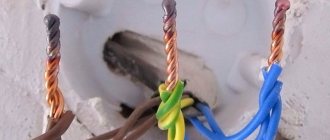
- Current is supplied from the transformer to the electrode and the workpiece using special welding cables. They are distinguished by a larger cross-section and reinforced insulation, allowing them to work with high currents.
- For welding, you will need electrodes installed in the holder. Thanks to the coating used, they simplify the ignition and maintenance of the electric arc, which becomes the source of thermal energy necessary for melting the metal.
There are no complex devices in the design of such welding machines. But during design, it is necessary to calculate the basic parameters, otherwise connecting inappropriate equipment to the network will lead to its failure, short circuits on the line, or it will simply be impossible for them to cook.
Expert opinion
It-Technology, Electrical power and electronics specialist
Ask questions to the “Specialist for modernization of energy generation systems”
Capacitor welding: do-it-yourself diagram and description, contact welding for batteries, spot welding - Contact welding on There is information on the Internet about how to do spot welding with your own hands using a regular 12 V car battery. Ask, I’m in touch!
Types of Welding Machines
The modern market is filled with a fairly wide variety of welding machines, but not everything is advisable to assemble with your own hands.
Depending on the operating parameters of the devices, the following types of devices are distinguished:
- on alternating current - delivering alternating voltage from the power transformer directly to the welding electrodes;
- on direct current - producing constant voltage at the output of the welding transformer;
- three-phase – connected to a three-phase network;
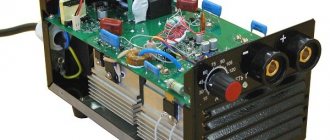
- inverter devices - delivering pulsed current to the work area.
The first version of the welding unit is the simplest; for the second, you will need to modify the classic transformer device with a rectifier unit and a smoothing filter. Three-phase welding machines are used in industry, so we will not consider the manufacture of such devices for domestic needs. An inverter or pulse transformer is a rather complex device, so to assemble a homemade inverter you must be able to read schematics and have basic skills in assembling electronic boards. Since the basis for creating welding equipment is a step-down transformer, we will consider the manufacturing order from the simplest to the more complex.
AC
Classic welding machines operate on this principle: the voltage from the primary winding of 220 V is reduced to 50 - 60 V on the secondary winding and is supplied to the welding electrode with the workpiece.
Before you start making, select all the necessary elements:
- Magnetic core - stacked cores with a sheet thickness of 0.35 - 0.5 mm are considered more profitable, since they provide the least losses in the iron of the welding machine. It is better to use a ready-made core made of transformer steel, since the tightness of the plates plays a fundamental role in the operation of the magnetic circuit.
- Wire for winding coils - the cross-section of the wires is selected depending on the magnitude of the currents flowing in them.
- Insulating materials - the main requirement for both sheet dielectrics and the native coating of wires is resistance to high temperatures. Otherwise, the insulation of the semi-automatic welding machine or transformer will melt and a short circuit will occur, which will lead to breakdown of the device.
The most profitable option is to assemble the unit from a factory transformer, in which both the magnetic core and the primary winding are suitable for you. But, if a suitable device is not at hand, you will have to make it yourself. You can familiarize yourself with the manufacturing principle, determination of the cross-section and other parameters of a homemade transformer in the corresponding article: https://www.asutpp.ru/transformator-svoimi-rukami.html.
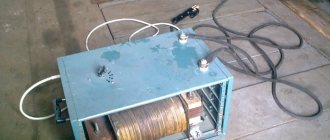
In this example, we will consider the option of making a welding machine from a microwave power supply. It should be noted that transformer welding must have sufficient power; for our purposes, a welding machine with at least 4 - 5 kW is suitable. And since one transformer for a microwave oven has only 1 - 1.2 kW, we will use two transformers to create the device.
To do this you will need to perform the following sequence of actions:
- Take two transformers and check the integrity of the windings powered from a 220V electrical network.
- Saw the magnetic core and remove the high-voltage winding,
Rice. 1: saw the core
Rice.
2: remove the high-voltage winding, leaving only the low-voltage winding, in this case there is no need to wind the primary coil, since you are using the factory one.
- Remove current shunts from the coil circuit on each transformer, this will increase the power of each winding.
Rice. 3: Remove current shunts - For the secondary coil, take a copper busbar with a cross-section of 10mm 2 and wind it on a pre-made frame from any available materials. The main thing is that the shape of the frame follows the dimensions of the core.
Rice. 4: Wind the secondary winding onto the frame - Make a dielectric gasket for the primary winding; any non-flammable material will do. Its length should be enough for both halves after connecting the magnetic circuit.
Rice. 5: Make a dielectric pad - Place the power coil in the magnetic circuit. To fix both halves of the core, you can use glue or tighten them together with any dielectric material.
Rice. 6: Place the coil in the magnetic circuit - Connect the primary terminals to the power cord, and the secondary terminals to the welding cables.
Rice. 7: Connect the power cord and cables
Install a holder and an electrode with a diameter of 4 - 5 mm on the cable. The diameter of the electrodes is selected depending on the strength of the electric current in the secondary winding of the welding machine; in our example, it is 140 - 200A. With other operating parameters, the characteristics of the electrodes change accordingly.
What cannot be repaired
The first thing I want to say is, of course, that you cannot use it when repairing dishes or any other items that come into contact with food. The composition of cold welding includes toxic elements that can be dangerous if ingested. For the same reason, you should not repair children's toys for infants, who may subsequently put them in their mouths.
Do not repair drinking water pipelines (can be used as a short-term solution as a last resort)
You should not use heating when repairing pipelines, because the temperature in them changes, and accordingly the metal from which they are made either contracts when cooled or expands when heated. The compositions from which cold welding is made have a different coefficient of linear expansion, which will lead to cracking and leaks. Can be used to eliminate leaks, but only for a short time.
Do not use when repairing gas pipes and gas equipment in general. There is a high risk of gas leakage, which in turn can lead to a fire or explosion.
Where is resistance spot welding used?
The technology involves connecting workpieces or welding individual parts to metal structures without creating an electric arc.
The method is applied under the following conditions:
- At manufacturing plants. Spot welding is used in the manufacture and repair of cars, aircraft, and complex technical equipment. The method helps to create strong, durable connections that have no signs of deformation or other defects.
- At home. A self-made machine is suitable for performing simple welding operations. It will help you weld elements of a fence or pipeline, or repair a car or motorcycle.
Types of materials suitable for welding
The use of cold welding is limited by the physical properties of materials and is suitable for various metals and their alloys that are sufficiently ductile at room temperature:
- aluminum
- copper
- cadmium
- nickel
- lead
- tin
- zinc
- titanium
- silver
- indium
- gold
- platinum, etc.
The plasticity of the materials being joined can be increased by heating to the appropriate temperature. For example, high-strength aluminum alloys at temperatures of 300-350°C are welded due to appropriately directed plastic deformation, similar to pure aluminum at room temperature.
If hard films are applied to the metal electrolytically, for example a film of solid nickel on copper, or measures are taken to prevent contamination by performing cold welding immediately after mechanical brushing, then in these cases the bond occurs with significantly less deformation.
Weldability with this method can be assessed by the maximum remaining thickness of the metal at the joint, expressed as a percentage relative to the original thickness of the part before welding.
Device design and necessary parts
Any contact type welding unit consists of 2 units:
- power supply (transformer);
- clamping pliers.
The correct ratio of windings allows you to generate a current that is strong enough to melt the metal. The design of the pliers includes graphite or copper contacts installed on different levers that fix the mechanism.
The following types of clamps exist:
- Mechanical. Includes a powerful spring and lever. The welder's muscle force is used to compress metals. Clamps of this type are installed in household devices used for simple operations.
- Pneumatic. Installed in portable hand-held devices. Adjustable by changing the pressure in the air channel. The disadvantage is considered to be low productivity and the inability to adjust operating parameters during welding.
- Hydraulic. The clamps also have a low operating speed, but their range of settings is wider than the previous type.
- Electromagnetic. They are distinguished by the highest productivity and are installed in both manual and stationary units. Electromagnetic clamps allow you to adjust the compression force of parts during welding. This reduces the likelihood of lack of fusion and metal leaks.
Sometimes the design is complicated by adding liquid cooling systems, control of current parameters, and automatic movement of electrodes.
When assembling a homemade spot welding machine, the master will need the following parts and materials:
- a modified transformer from an old microwave oven or car battery;
- thick copper wire or cable harness of small cross-section;
- levers used to assemble clamps;
- base for installing unit blocks;
- clamps;
- wires;
- insulating materials;
- copper electrodes necessary for welding;
- control key.
How to use cold dry welding for metal: principle of operation and method of application
We offer instructions that contain standard steps. Please note that depending on the individual characteristics of the product being glued, additional factors may arise. Classic stages:
- Identifying the object and then the exact location of the damage. If a water pipe leaks due to wear and tear, as well as when the car body rusts, several spots may appear. You need to detect them immediately, otherwise it will take two to three times longer, since the procedure can be repeated only after complete drying.
- If there is liquid or other contents in the container, it must be disposed of. Wires – de-energize.
- Cleaning the surface to be treated, removing dirt, and then degreasing.
- If you purchased a product that comes in two different flasks, squeeze out a small amount of paste from both and then mix them until smooth. When packaging in a flask with two connecting vessels, this point can be skipped.
- If you have two different parts, place the mixture on the joint, and then quickly and firmly press the two parts.
- In the case of a small hole, take and knead a small piece with your fingers, and then apply it to the outside.
- To apply a metal patch, you need to do the same as in the fifth stage, and then attach the plate on top.
The technical characteristics of any cold welding for metal are written on the packaging. It's worth looking at the drying time there, as it varies among manufacturers. But we recommend waiting an hour. During this time, all processes will take place. After this, you can begin sanding and finishing, especially if decorative work is required, such as painting.
General operating principles
The algorithm for assembling the welding unit includes the following steps:
- Removing the transformer. The part is taken from an old microwave oven. It is not completely needed; to manufacture the device, a primary winding and a magnetic circuit will be required. The remaining parts are carefully removed as unnecessary.
- Formation of a new secondary winding. To do this, use a copper cable with a cross-section of at least 100 mm². Durable rubber insulation is replaced with textile insulation. To create a powerful welding machine, 2 transformers with a common winding are used.
- Installation of a control unit that ensures uninterrupted flow of the contact welding process.
- Manufacturing and connection of electrodes, the type and diameter of which are selected taking into account the properties of the metals being welded.
- Housing assembly. The main units of the device must be reliably protected from external influences. At this stage, you can use the housing from an old microwave oven or assemble the structure yourself from sheets of metal.
How to make electrodes
When manufacturing these elements, the following points are taken into account:
- The diameter of the electrode must correspond to the cross-section of the wire to which it is connected. Copper rods can be used as rods. Electrodes for low-power welding units are made from soldering iron tips.
- During the welding process, the electrodes wear out quickly. To restore their operating parameters, the ends are sharpened. Over time, the electrodes are replaced with new ones.
- The wire for connecting the welding rod should be short. Otherwise, part of the device's power will be lost. The current strength also decreases if there are a large number of connections in the electrode-transformer circuit.
- It is recommended to solder copper tips onto the wires to which the rods are connected. This increases the efficiency of the equipment. Since the electrodes are removable, the connection points with the tips are not soldered.
More about the connection method
It involves the use of special pastes that are applied to surfaces and harden, forming a seam identical to the natural one. In many cases this is only a temporary measure, but is often the only option, for example when working with two materials of different structures. Let's look at the important aspects of this method - where it is used, how to use it.
Cold Joining: What the Best Welding for Metal Looks and Works
The main process is chemical in nature. The two components come into contact and, under the influence of oxygen, instantly react and are firmly bonded. This predetermines the separate storage of the two mixtures and their connection only at the moment of application (or a few seconds before that). Therefore, in the construction department you can find two options for liquid glue:
- two flasks, which, when pressed on the syringe plunger, release two streams, they mix into one;
- separate containers that contain chemicals must be combined in a cup.
Professionals advise buying the second variety.
Cold (soft) metal welding: what it is, the principle of operation, how it can be used and correctly applied the adhesive composition
If you take universal glue, then its use is limited to your imagination. But for more specific categories, the to-do list is limited. Here are classic application examples:
- wires and other mechanisms and cables conducting electricity;
- eliminating holes in containers that hold liquids, such as a gas tank;
- plumbing work - installation of holes in the pipeline or small cracks in the mixer;
- car body and some other spare parts;
- plastic;
- carpet, linoleum and other floor coverings;
- ceramics, stone, glass.
Assembling a device from a microwave oven
The device manufactured in this way allows welding with alternating current with unregulated force.
List of required tools
To create a homemade device from a microwave oven, you will need the following equipment:
- Screwdriver Set;
- sandpaper;
- copper rods;
- hammer;
- chisel;
- knife.
Conversion of microwave parts
After removing the transformer from the furnace, perform the following steps:
- Remove the secondary winding using a hacksaw or chisel. Dismantling is carried out carefully, trying not to damage the underlying layer. It is advisable to fill the space between the windings with corrugated cardboard.
- Remove the metal shunts that limit the current.
- A secondary winding is formed. At this stage, you will need a KG 1x35 wire. It can withstand prolonged exposure to high voltage and current up to 1200 A. The outer rubber insulation is removed from the cable.
- The core is covered with tape, which facilitates the sliding of the wire during winding. The cable is laid in 3 tight turns. For winding, the use of stranded soft wire is allowed. The total diameter of the cores must be at least 1 cm.
After the alteration, the transformer must have an open circuit voltage of no more than 3V and a current of at least 800 A.
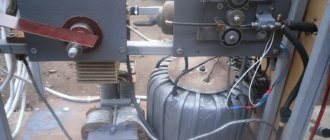
Homemade device diagram
Creating an electrical circuit for a welding machine is not difficult. The electrode is connected with a soft cable to the secondary winding of the transformer. The circuit includes thyristors and rectifier bridges. One end of the pressure gun is connected to the secondary winding, the other is securely fixed to the device.
High temperature adhesive composition
This type of connection can withstand extremely high temperatures (above 1000 degrees Celsius). This type of glue is used to repair or join parts that are exposed to high temperatures. It is very often used to repair exhaust manifolds, exhaust pipes and other parts of the car. The high-temperature composition has many advantages:
- Easy to use.
- The seams are not destroyed by corrosion. They are also not affected by various aggressive substances.
- Sets quickly.
- Can be used in moving mechanisms.
- Environmentally friendly
Adhesive for plastic
Adhesive for plastic
Glue for fastening plastic products is used quite often. It is used to repair plastic products, such as plumbing pipes, or housings made of plastic.
Contactor from a welding transformer
Such equipment can be turned into a full-fledged resistance welding tool. The only drawback is the inability to control the current strength.
Drawing development
The correct choice of circuit helps to produce a working welding machine. Preference is given to simple drawings that include a minimum number of parts and blocks. Such options do not allow you to create an overly powerful device, but the device is sufficient to perform minor repairs on a car, garden equipment, and fences.
List of parts and consumables
To convert a welding transformer into resistance welding equipment, you will need the following elements and materials:
- a transformer that converts electrical energy;
- thick cable;
- copper electrodes;
- bolts;
- tips;
- breaker;
- wooden blocks, plywood to create the body.
The process of creating a device
The homemade device is assembled as follows:
- The welding transformer is installed in a housing made of metal sheets. The electrical board is assembled on a textolite sheet more than 1 cm thick. The part is fixed in the body of the welding machine.
- A welding wire is bolted to the busbar and secondary winding. The remaining end of the cable is connected to the electrode.
- The power wire is connected to the contact block located on the electrical board.
Spot Welding Operation
A master using a contact transformer apparatus must stand on a rubber mat and use protective gloves and goggles. The grounding cable is connected to the part to which another workpiece will be welded. After this, press the power key, compare the elements to be connected, and clamp with the electrode of the welding gun.
5 seconds after the start of the impact, the rod is transferred to the next point.
Criterias of choice
There is no single answer to the question of which cold welding is best for metal, because there are no ideal compositions. When choosing, you need to pay attention to the following factors:
- First of all, you need to study the composition. In order for the seam between metal parts to be as strong as possible, the structure of the epoxy resin must be more uniform.
- When using gluing on high-temperature devices, you need to see what temperatures the product can withstand after hardening. The seam will lose its strength when heated above the permissible temperature.
- Freezing time. If you need to carry out quick repair work, it is important to buy quick-hardening glue.
Advantages of cold welding
Any method of connecting parts has both strengths and weaknesses. Advantages of cold welding:
- Reliability of connections.
- No electricity or gas costs.
- There is no additional training required to use cold welding.
- The application process takes place using improvised means.
- When used correctly and with a high-quality composition, the finished seam is stronger than the material being glued.
- Fast hardening. You can start using the glued part after 2-3 hours.
- No waste after use.
Unlike hot welding, cold welding does not expose the item to heat and subsequent destruction.
Manufacturers
Below are the most famous cold welding manufacturers:
- Poxipol;
- Penosil;
- Zollex;
- Diamond;
- Alteco;
- Nowax.
There are other companies that produce mixtures for gluing metal, however, the most popular ones were presented here.
DIY resistance welding pliers
To make such a device yourself, follow these steps:
- Form the basis. For this purpose, available materials are used - steel sheets up to 5 mm thick. Strips 2 cm wide are cut from them. The length depends on the design of the welding tongs. The strips can be replaced with metal rods. The ends of the two blanks are bent in the form of tongs.
- Place the parts on top of each other and join them together. A hole is drilled in the central part where the adjusting screw will be located. A dielectric layer is placed between the plates.
- A hole is drilled at one end of the rod or strip to secure the copper cable. The same actions are performed for the second workpiece. The holes should be opposite each other.
- The metal elements of the pliers are covered with a rubber pad and electrical tape. The materials will protect the welder from electric shock during work.
- Install the spring between the handles of the pliers. The part is necessary for fixing the elements to be welded.
At what temperature can it work?
The temperature at which you can work with cold welding differs from manufacturer to manufacturer, and also, of course, from the type of cold welding itself (liquid or dry). But the general rule here is to apply cold welding at a temperature no lower than + 3... +5 degrees Celsius and no higher than 35...40 degrees. Maintaining this temperature range is important because adhesion and hardening speed depend on it. The most optimal temperature for working with cold welding is +20 ... +24 degrees. At this temperature, good adhesion will be ensured and at the same time the composition will not harden too quickly.
When cold welding has already hardened, it can work in a temperature range from -50...-45 degrees Celsius to +120... +130 degrees.
Heat-resistant cold welding can withstand temperatures up to 900...1200 degrees. It can repair car muffler pipes, as well as stove elements.
Using spot welding on lithium batteries
Using a battery to weld a nickel plate to the battery is the easiest way. To assemble the mini-unit you will need a battery, a charging cable, a piece of single-core wire, and electrical tape. 2 electrodes are created from the core, the ends of which are stripped and secured. The distance between elements should be 3 mm.
A charging cable connected to the terminals of the lithium-ion battery is connected to the other ends of the electrodes. Place the nickel plate on the battery and press the energized electrodes against it. As a result of a short circuit, the metal melts.
Source