Electrician in the house
Encyclopedia about electricity from A to Z
Masters catalog
Find the best master or company in your city
Fiber optics help bring high-speed Internet to every home
High Internet speed is best achieved using optical communication lines. Now this technology has come to almost every apartment. The question of how to connect an optical cable is of interest not only to specialists, but also to ordinary users. Let's try to cover the topic in more detail.
We will consider connections using PON technology (passive optical networks) as the most modern and becoming increasingly widespread today, displacing conventional wire lines.
- A little theory How data transmission via optical fiber works
- How PON technology works
- PON network
- Connection as usual
- Installing optical connectors
FOCL welding technology
The length of the optical fiber is measured, it is produced in coils. Multi-kilometer long fiber-optic transmission lines are created by two types of connections:
- detachable;
- one-piece.
Detachable ones require additional costs; connectors and adapters significantly reduce the light transmission of the signal. More often, permanent connections are made by welding fibers with special devices.
Necessary tool
High-quality installation of fiber-optic lines is impossible without two devices:
- cleaver, an apparatus for optical fiber, allows you to cut the cleaned cable strictly at a right angle;
- reflectometer or tester, it determines the accuracy of the connection.
Tools are needed to strip the insulating sheath. A standard soldering kit will do the job. There is everything there: wire cutters, pliers, solvent or alcohol, special thick wipes for removing the waterproof layer. The reliability of the connection depends on the quality of surface cleaning.
Fiber optic cable tool
Preparatory work
The process of preparing the cable before refilling takes a lot of time. First, the optics are examined. Water destroys the light-conducting layer. If the end of the wire is wet, cut off at least a meter from it with a wire cutter. To remove the sheath, the cable is stripped down to a hydrophobic gel. Cutting with a stripper knife does not take much time: after a circular cut at a distance of at least 3 cm from the end, it is enough to pull the cable together. The waterproof layer is removed with a solvent and lint-free wipes. It is necessary to remove the insulation completely, this affects the quality of the chip.
Connection process
The cleaver produces a high-precision perpendicular cut. After this, the welding process begins. Main stages of work:
- the ends of the wire are placed in the device towards each other and fixed;
- the device adjusts the conductor and brings the ends together;
- then an electric discharge is passed through, dust particles are destroyed in the arc zone;
- the fibers are soldered together under the action of an arc, the silicon melts, and a diffuse connection is formed;
- after welding, the connection is tested: the device moves the soldered ends apart with a certain force;
- A heat-shrinkable tube is placed over the connection; in the oven, it forms a protective sheath on the wire;
- When the device completes the second part of the work, the timer gives a sound or light signal.
Mistakes made during compression
Incorrect sorting before crimping the core by color. Some unscrupulous manufacturers make the color of the braiding of each wire very dull, so many people in low light confuse the white-green pair with the white-blue pair. Be careful.
Each conductor in the connector must be fully inserted. Carefully check that all the tips are visible.
It is necessary that the protective sheath of the twisted pair inserts 0.5 mm - 0.7 mm into the connector. When crimping, it is also pressed, making it much more difficult to pull out the wires when pulling them out of the laptop socket.
Keep in mind that the crimper does not last forever, and over the years it begins to crimp more and more often with defects. Connectors are also divided into good quality and bad, so it is better to take proven ones and not skimp. Even an experienced installer who knows how to crimp a twisted pair cable will make a lot of mistakes with such a tool.
Cleaver and reflectometer
A cleaver is a high-precision mechanical device that provides a perpendicular cut of an optical fiber. The quality of the weld depends on the quality of the chip.
If the cleavage is bad, smart welding machines simply do not weld the optical fibers. Among cleavers, Japanese ones are also the best.
Some experts attach such great importance to it that, if there is a shortage of funds, they prefer to purchase a high-quality Japanese cleaver, and in addition to it they buy a relatively cheap Chinese welding machine.
Immediately after chopping the optical fiber, it is necessary to insert it into the welding machine and begin welding; there should be no intermediate actions, otherwise this will lead to contamination and poor welding quality.
The third device that you can’t do without is a reflectometer; it measures the quality of the line; its readings determine whether the fiber-optic splicing needs to be reworked or not.
A combination of precision welding equipment combined with operator experience will produce a reliable connection with optimal signal transmission characteristics.
Cable structure
The signal is transmitted through a thin silicon dioxide glass filament, the size of the conductor is calculated in microns. The cable can contain up to 38 cores, all of them are insulated. Silicon glass is a very fragile material and is susceptible to moisture, so it is covered with multilayer insulation. First, they are coated with a protective varnish, then placed in modular tubes filled with water-repellent gel, which protects the glass conductor from swelling. The tubes are additionally covered with flexible insulation, then with a layer of polyethylene.
Structure of a fiber optic cable
Insulation depends on the operating conditions of the cable. It is divided by type:
- external cable can be suspended or underground;
- internal for laying is rarely used; it can be found in business centers.
Overhead cables are used to make overhead communication lines; sometimes the cable is additionally equipped with a cable and clip holders. Some manufacturers produce underground ones for laying in the ground in corrugated armor.
FOCL welding procedure
FOCL - fiber-optic communication lines. Their welding is carried out in stages:
- The fiber optic cable is divided: the insulating coating is removed, individual modules consisting of a certain amount of optical fiber are separated. They are welded separately.
- The fibers are cleaned (the moisture-proof coating is removed from them).
- KDZS is put on the optical fiber - a special attachment made of heat-shrinkable tubes and reinforcing rods.
- The protective layer (gel, varnish) is removed from the fiber ends and treated with alcohol.
- Then the fibers are fixed with precision cleavers (the cleavage should form perpendicular to the fiber axis).
- The fibers to be welded are placed in V-shaped grooves (clamp).
- They are combined under a microscope. In modern models, this procedure is performed automatically.
- The fibers are heated by an electric welding arc to the required temperature.
- By means of mechanical deformation, the welding of the fiber optic cable is tested for strength, and the attenuation process carried out by the joints is evaluated.
- The welding equipment operator installs a protective kit on the welding area of the product, which is then placed in a special thermal chamber for temperature shrinkage.
Optical line repair
FOCL repair consists of the following steps:
- finding the location of the optical line break;
- organizing repairman access to damaged optical fibers;
- optical cable repair;
- re-checking the cable route.
As stated earlier, the break point is looked for using a reflectometer. Signal loss can occur either in one of the cross-connects or couplings, or in the middle of an entire cable section (for example, underground work at the cable laying site).
fiber-optic connection coupling
In the first case, the place of the poor-quality seam is broken and a new welding of the optics is done. In the second case, everything is much more complicated; repairing the optical fiber is impossible. If technical reserves and the particular location of the cable allow it, then an additional coupling is installed at the break point. Otherwise, the entire cable section is changed, welding work is carried out at both ends of the new cable. Repairing fiber-optic communication lines is a very expensive process, so it is better to carry out high-quality installation work in advance.
CONTENT:
- Design and location of the optical connector
- Installation of optical connectors using pigtails
- Installation of cable terminations using welded (Splice On) optical connectors
- Installation of reinforced Splice On connectors for installation on outdoor optical cable
- Installation of cable terminations using Fast connectors (FAOC, mechanical optical connectors) for fiber optics
- Comparative table of advantages and disadvantages of optical connector installation methods
- Recommendations for choosing optical connector mounting technology
Fiber optic cable: types and composition
Before looking at the cable welding instructions, let’s look at what an optical cable is. FOCL are fiber-optic communication lines that are divided into categories.
- Design features: can consist of a shell with pipe modules or a multi-layer connection and two-level protection.
- Place of application: external or internal. Considering the high cost of optical cable, internal laying of a fiber-optic communication line is used extremely rarely, only in cases where high-speed, integral and accurate data transmission is necessary.
- Cable laying conditions: overhead, ground, sewer, underwater, suspended from power poles. The most commonly used cables are overhead, underground and sewer cables. Patch cords with cables and corrugated armor are less commonly used.
TOP 5 best splicing models for fiber optics
Device for splicing fiber optics.
Let us describe the most attractive machines for splicing fiber optic material in terms of functionality, quality of welds and cost:
- The Fujikura 80S fiber optic splicing machine is fully automatic. It has built-in video instructions and a Russian-language menu, which greatly simplifies the process of mastering its capabilities. The unit is capable of aligning optical fibers along the core, has automatic arc power adjustment, and is reliably isolated from moisture, dust, and mechanical damage. It features the highest possible welding speed and supports all types of networks. Approximate cost – 425 thousand rubles.
- Jilong KL-280G is an economical machine that features fast welding - 9 seconds. The optimal welding program is selected automatically, after which the device independently controls the quality of the created joint. It has a 5.5” liquid crystal display, capable of determining and displaying the fiber chopping angle, as well as its core. Cost – 355 thousand rubles.
- The Furukawa S177A automatic unit has proven itself to be one of the most compact and lightweight devices capable of center-aligning fiber optics. The welding machine is equipped with a bright liquid crystal display, a built-in battery, and welds all types of fiber optic cables with high precision. Price 690 – thousand rubles.
- Inno Instrument IFS-15S is particularly compact and aligns optical fibers in the middle. The unit is equipped with universal replaceable holders and a 4.3” display. Cost – 400 thousand rubles.
- DVP 730 operates with all types of networks, the device is equipped with a Russian interface, and is capable of operating from built-in power supplies for a long time. The device must be configured manually, and calibration and testing of the ends is carried out automatically. Price – 150 thousand rubles.
Cable cutting and cleaning
A stripper knife is used to remove the outer shell. It has rotating blades that can be used to cut off the outer layer. If the cable is self-supporting, then the cable is removed with cable cutters.
The inner shell should be removed with a specially adjusted stripper knife.
Threads, film, hydrophobe and other elements are removed from the modules. D-Gel solvent is used to remove the hydrophobe. You need to wear gloves when working; the gel is difficult to remove from your hands. Then the modules are wiped with disposable lint-free wipes with solvent, then with alcohol.
At the required distance, the modules are cut with a stripper and removed, leaving the fibers bare. Fiber failure often occurs at this stage.
The welder must work with extreme caution
The length of the optical fiber without sheaths is usually 1.5-2 m; this is required by the instructions for installing the couplings; welding and installation make the work easier.
Fibers must be handled with care. Any damage at any stage of the work leads to the fact that everything has to be done all over again. Before welding, the optical fibers are wiped with 3-4 dry wipes, then a new wipe is moistened in alcohol and wiped clean.
A heat-shrinkable tube is put on the cable for subsequent sealing of the entry into the coupling. When the cable is welded and laid in the coupling, the tube is shrinked using a torch.
The cable is inserted into the coupling, secured, and you can begin measuring the required length of the optical fiber and stripping it. Then a KDZS heat-shrinkable tube is put on it, which will further protect the welding site.
The bare, cleaned end of the optical fiber is inserted into the cleaver. The device cuts the fiber so that the end should be at an angle of 90 ° to the central axis. The permissible error is no more than 1.5 °.
Distributing the fibers in the cassette
Standard cassettes are designed for 32 fibers. Therefore, if our cable consists of 4 modules of 8 fibers, everything is easily calculated:
- The fibers of the 1st and 2nd modules of one cable are welded with similar ones of the second cable and are placed in the upper cradle of the cassette. (16 fibers)
- The 3rd and 4th modules are in the lower cradle.
In simple cases, it is of course easy to achieve something like this:
It's more difficult when you have a 64 fiber cable . If they are both the same, each with 8 modules of 8 fibers, then you can still get out by dividing them into two cassettes:
- The first four modules of the first and second cable are welded in one cassette;
- The last four modules go to the second;
- It doesn’t matter which half goes to the top and which half goes to the bottom;
If you have two cables with different numbers of fibers in the modules, or 3-4 different cables are welded, then very careful planning of fiber routing is necessary.
Note that the fibers that go to another cassette (for example, excess fibers due to the difference in the number of fibers in the modules) between the cassettes should be placed in a hard plastic tube, which, if necessary, can be replaced with a dropper tube. You cannot use the empty shell of the modules for this, because it is brittle, and besides, you cannot really clean the hydrophobe inside it, much less just let the fibers in.
Cable cutting
Equipment for welding fiber-optic lines
The fiber optic cable is cut using the following tools:
Equipment for welding fiber-optic lines
- stripper;
- rope bite;
- screwdrivers;
- side cutters;
- a bottle of alcohol;
- lint-free wipes;
- insulating tape;
- numbers-markers on a self-adhesive basis and others.
If the fiber optic cable was stored in a damp warehouse, approximately a meter of cable should be cut off and discarded. If there is a cable, it must be cut with a cable cutter.
The outer sheath of the cable is removed using a stripper. This knife has a blade that rotates in all directions and can be adjusted according to the thickness of the cable. Using a stripper, a cut is made in a circle on the sheath, then two longitudinal cuts are made along the cable so that the outer covering breaks into two parts.
Removing the outer shell using a stripper
If the next layer is a Kevlar coating, then it is cut with a cable cutter. The metal corrugation is removed using a reinforced knife. The last thin shell is removed with a stripper.
Opened modules are treated with napkins using alcohol. To remove the hydrophobe, use a solvent. The module itself is bitten and removed using a special stripper. All that remains is to make sure that all the optical fibers are not broken.
Optical cable classification
Optical cables can be classified:
By structure:
- standard cables having a sheath with modular tubes;
- modern multilayer cables, which are endowed with two-level protection and other advantages.
By area of application:
- for outdoor use;
- for internal routing (this option is rarely used exclusively in data centers).
According to operating conditions:
- hanging;
- ground;
- for cable sewer systems;
- underwater;
- for power lines.
The most popular are overhead, ground cables, thin, paired patch cords. Cables with corrugated armor and cables are used a little less frequently. Other types of fiber optic cables are rare.
Tools used
As with soldering fiber optics, cutting a cable requires a special set of tools.
The standard set of tools for an assembler-soldier includes:
- set of strippers;
- screwdriver set;
- pliers;
- rope bites;
- set of knives;
- other additional tools for various work situations.
Today there are many tool sets from different manufacturers, with different configurations. They can be fully equipped with the necessary tools or contain only basic ones. Many manufacturers do not pay much attention to the strength of tool storage cases, but only to their appearance. They are made of fiberboard and covered with textured foil. Accordingly, such cases do not withstand long operating conditions under difficult operating conditions and require periodic repairs.
And some of the tools from the set may also be of poor quality, and some may not be needed at all. Expensive, high-quality branded consumables can be replaced with cheaper products.
Necessary tools for crimping twisted pair cables
Take an ethernet cable. You can make your choice by reading our article above.
We buy rzh 45 connectors at a computer store. Take them with a reserve, it’s not always possible to crimp them the first time.
Crimping pliers (Crimper), necessary for crimping contact connectors. There are crimpers that can only crimp certain connectors, but there are multifunctional ones. These pliers have several connectors, so you can crimp different plugs. You can purchase such a crimper, as well as all the necessary crimping tools, from LANart by following this link.
Protective caps for RJ 45 connectors. A useful thing, they will not allow the RG-45 connector to jump out when the temperature changes (for example, at night -8 degrees, and during the day +5) from the socket in the router, switch, or laptop.
Optical fiber connection methods
The fiber optic industry does not stand still: optical fiber splicing is constantly being improved, the methods of its implementation and the consumables used are changing.
Selecting the optimal fiber connection technology for each specific case is important from the point of view of reducing financial costs and increasing productivity.
Inexperienced welders do not always know exactly what needs to be taken into account when working with this material
When choosing a fiber splicing technology, it is important to consider the following aspects:
When choosing a fiber splicing technology, it is important to consider the following aspects:
- optimal speed of operations;
- the time period required to prepare the optical fiber for welding;
- amount of time for welding cables;
- cost of work;
- experience of specialists.
When laying fiber optic fabric, there is always a need to weld the optical cable into a single line.
Coupling for connecting fiber optics.
Today, the most common ways to perform this operation are:
- using mechanical connectors;
- directly on the optical cross-country;
- welding of optical fibers using special equipment.
The first method is used extremely rarely, because the gel in mechanical connectors dries out over time, which worsens the parameters of cable joints. The second is quick and easy to make, but the best fiber optic cable connections are made by welding.
This technology is characterized by the best indicators in terms of quality, durability, and reliability of the created connections.
First, you will need to cut an optical cable of 6-8 fibers connected in a module and covered with insulating material. The insulation is removed and the fibers are cleaned using special alcohol-based products.
After this, the fibers are placed in a welding machine for subsequent automatic welding
It is important to control the strength of the seams formed at the junctions of optical fibers. The welded elements will need to be placed in an optical coupling or cross cassette
On a note! The simplicity of this technology allows it to be performed even by an inexperienced welder who has personally observed this process being performed by a specialist. But the main thing is to have a special welding machine: conventional models will not cope with this task.
We measure the fibers for laying in the cassette
We marked them, thought about which modules should go into which cassette and secure them in the cassette with ties. It is advisable to wrap the module in the place of fastening with electrical tape, otherwise it will easily jump out of it. By the way, the insulating tape will not really stick to a surface that is poorly cleaned of hydrophobe.
Next, we measure the fibers for laying in the cassette. At the same time, we remember that the installation path is the simplest - without complex bends. Best of all - in a circle:
It is advisable to avoid such a curved loop in the middle:
- Firstly, the cassette is not designed for such an arrangement of fibers and they will have to be secured with electrical tape, which is incorrect and unreliable.
- Secondly, it complicates the soldering circuit in already complex cases and leads to errors.
Although sometimes, of course, you cannot do without this method.
Think in advance about how the fiber will fit into the cassette and cut it to the required length. Otherwise, it may not be enough in the end.
Difficulties in splicing fiber optics
A fiber optic network, according to modern experts, is the best medium for high-speed transmission of various types of information. The material used to create such an environment is lightweight and low susceptibility to interference and radiation.
It is not capable of causing any obstacles to the path of information from one point to another, and due to its low power it is characterized by absolute electrical safety.
Since fiber optic materials provide soldered connections with high functionality and impressive efficiency, their scope of application is growing every day.
Today, optical communication lines are widely used to transmit information over long distances, as well as for wiring in one specific building. But it is not possible to lay such lines without splicing fiber optics.
Welding of optical fiber is carried out using special welding machines that allow you to perform the entire range of current operations: from connection to protecting the welded area.
A conventional welding machine will not be suitable for such operations, since it will not be able to provide the master with minimal attenuation at the welding site.
The equipment needed to work with optical fiber operates on the same principle: the ends of the optical fibers are heated to a certain melting point using an electric arc, and then connected together.
It is difficult for an inexperienced welder to accurately adjust the edges of the cables being joined, since they lose functionality if there are errors during adjustment.
When working with fiber optic cables, it is extremely important to pay attention to their colors when welding. It is in addition to the marking and indicates the specific identity of the cable.
Thus, twelve different color claddings are used to identify optical fibers, allowing a specialist to quickly identify the type and purpose of the fiber, even if it is mixed with other cables in a large bundle.
On a note! The problematic issue is that today there is no single international standard for marking fiber optic cables. This situation provokes unpleasant mistakes that young professionals can make.
We put on KDZS sleeves
The abbreviation KDZS stands for “Weld Joint Protection Kit”. This is a three-part polymer sleeve: inside there is a layer of plastic that easily melts at elevated temperatures, then along the length of the sleeve there is wire for rigidity and an upper heat-shrinkable shell.
The main purpose of the KDZS is to protect the welding site from damage . It is put on the fiber before welding, then pushed onto the welding joint and sent to the oven for 30-40 seconds. During this time, the inner plastic melts and envelops the fiber, and the top layer tightly “seats” the entire structure, along with the wire for rigidity. Good cartridges are dense, do not fall apart into their component parts right in your hands and without large gaps between the layers.
Typically, each shareholder has his own method of working with sleeves. This is standard: put on one sleeve, weld the fibers, shrink the sleeve, take the next one, etc. You can suggest a slightly more advanced method: put all the sleeves on the fibers IMMEDIATELY and then cook. This way there is less risk of forgetting about them in the process.
| Do you have to work with an optical cable, strip it, weld the optical fiber? New generation of welding machines Signal Fire AI-7 |
The sleeves are available in different sizes, and ideally, of course, it is desirable to use an exact match between the sizes of the sleeve and the cassette, since:
- In a cassette designed for 60 mm KDZS, the forty-millimeter ones will dangle in the seats.
- In a cassette designed for 40 mm KDZS, 60 mm sleeves will hardly fit into these seats (since they are thicker), and they will have to be laid strictly in the center so as not to bend the fiber. As a last resort, you need to at least bite off the extra centimeters with side cutters.
Not recommended:
Seat the KDZS with a lighter. You can easily set fire to the varnish or burn out the optical fiber.
Place one sleeve on several fibers at once. If it is necessary to resolder the fibers, or when you need to pull the fibers through and see which modules they go to, you and your entire family will be remembered in very bad words.
Cable structure
The essence of welding technology is to connect the ends of an optical fiber and then heat them until they melt and join into a single whole.
For those who have worked with glass, this will seem elementary, but you need to keep in mind that the fiber through which data is transmitted has a diameter of 9 microns (10 times thinner than a human hair) and it is required that the signal attenuation does not exceed hundredths of a decibel.
To understand the essence of the welding process, you need to understand the structure of the optical cable. It is a complex structure, in the center of which there is a glass thread with a diameter of 125 microns. This is just a shell of a 9 micron thread made of ultra-pure glass, which is the information carrier.
The outer glass has a different refractive index than the inner glass. Thanks to this, the light spreads only along the inner thread, reflecting from the walls.
To protect the optical fiber from external influences, it is coated with varnish and placed in module tubes with a hydrophobic gel. In addition to this, the modules are covered with a protective film.
As additional protection from moisture, everything is covered with plastic film. Next comes armor made of Kevlar threads or steel wire, which is covered with a thick layer of polyethylene.
Types of optical connectors
Currently, the three most common types of optical connectors are FC , SC and LC .
F.C.
FC connectors are typically used for single-mode connections. The connector body is made of nickel-plated brass. Threaded fixation provides reliable protection against accidental disconnection.
An old, proven standard. Provides excellent connection quality , especially FC/UPC, FC/APC.
- spring-loaded connection, due to which “pressing” and tight contact are achieved;
- metal cap provides durable protection;
- the connector is screwed into the socket, which means it cannot jump out, even if accidentally pulled;
- Moving the cable does not affect the connection.
However, it is not suitable for dense placement of connectors - space is required for screwing in/unscrewing.
S.C.
Cheaper and more convenient, but less reliable analogue of FC. Easy to connect (latch), connectors can be placed tightly.
However, the plastic shell can break, and signal attenuation and back reflections are affected even by touching the connector.
This type of connector is most often used, but is not recommended on important routes.
The SC connector type is used for both multimode and single-mode fiber. The tip diameter is 2.5 mm, the material is ceramic. The connector body is made of plastic. The connector is fixed by a translational movement with a snap.
L.C.
A smaller version of the SC. Due to its small size, it is used for cross connections in offices, server rooms, etc. — indoors, where a high density of connectors is required.
The diameter of the connector tip is 1.25 mm, the material is ceramic. The connector is secured using a clamping mechanism - a latch, similar to an RJ-45 connector, which prevents unexpected disconnection.
When using duplex patch cords, it is possible to connect the connectors with a clip. Used for multimode and singlemode fibers.
The author of the development of this type of connector, a leading manufacturer of telecommunications equipment, Lucent Technologies (USA), initially predicted the fate of a market leader for his brainchild. In principle, this is how it is. Especially considering that this type of connector refers to connections with increased installation density.
ST
Currently, the ST connector is not widely used due to shortcomings and increased needs for installation density. The connector is fixed by rotating around an axis, similar to a BNC connector.
Welders
For welding optical fibers in Russia, devices most often used are from Japanese companies Fujikura, Sumitomo and Chinese Jilong. Japanese manufacturers initially showed themselves excellently in this area, their machines are the best, but the Chinese are stepping on their heels and producing decent welding machines at low prices.
To obtain high-quality welding of an optical fiber, you need a welding machine capable of aligning the fibers not only along the cladding, but also along the core.
They have several servomotors that can move the fiber in all planes. This allows you to achieve the greatest accuracy in connecting fiber optics. Most of the products from the above-mentioned companies can produce high-quality alignment.
Where the requirements are not as stringent as on trunk communication lines, welding machines with sheath adjustment can be used. The optical fiber in these devices is fed through V-shaped grooves.
If there is an eccentricity of the central core or a scratch on the groove, the welding quality will be lower, and accordingly the attenuation will be greater. Japanese devices are universal and work with almost all types of fiber.
Design and principle of operation of welding equipment
Welding of optical fibers is fully automated and occurs without operator participation. It is enough to correctly insert the ends of the wire into the device. The joining process occurs at high temperature, heating is provided by an electric arc. A fiber optic splicing machine is a complex device that includes the following elements:
- power unit;
- AC/DC converter;
- motherboard – mini-processor that regulates the soldering process;
- a mechanical unit that performs alignment - servomotors move the conductor in all directions, the fiber connection occurs with great precision;
- heater, it provides melting of the insulating sleeve made of heat-shrinkable material, which is put on the seam;
- display, welding parameters are set on it, the working contact area is visible.
Fiber optic cable cutting
The main task when cutting a fiber optic cable is to maintain the length of its components as indicated in the coupling instructions. Therefore, in some cases it is necessary to leave long power components designed to be secured in the coupling, and sometimes this is not necessary. In some cases, you need to make a “pigtail” out of Kevlar and secure it with a screw; it is better not to cut the Kevlar. These nuances depend on the design features of the coupling of each cable. So, the stages of completing the work:
The hydrophobic protective layer is first removed from the fibers. To do this, they are wiped with special wipes: first dry, then treated with alcohol.
It is quite important to follow this rule, since a large amount of hydrophobic material will remain on the first napkins. But when it is no longer possible to remove minor remnants of the protective layer with a dry cloth, alcohol will help
It will easily dissolve hydrophobic particles and instantly evaporate from the surface of the fiber.
It should be noted that the cleanliness of the fibers, especially their ends, is the key to high-quality optical fiber welding. When working with microns, even the slightest contamination is unacceptable! It is imperative to check the fibers for the integrity of the varnish coating and the absence of broken areas
If there is damage to the varnish coating, then it is recommended to redo such a cable (but it should not be broken)
It is imperative to check the fibers for the integrity of the varnish coating and the absence of broken areas. If there is damage to the varnish coating, then it is recommended to redo such a cable (but it should not be broken).
- The coupling kit includes a special heat shrink, which is put on an already cut cable (which beginners often forget about). If the cable will be clamped with rubber and sealant, then heat shrinkage is not needed. To ensure a tight connection between the cable and the coupling, it is recommended to use a hair dryer, a soldering iron, or a torch to shrink it. But the most practical is considered to be a small burner, mounted on a gas canister.
Before you start welding an optical cable, it is recommended to purchase additional coarse sandpaper. This will help ensure better adhesion to the adhesive.
What problems might an ordinary PON user encounter?
Our article, as we said above, is not intended for specialists; they already know very well how to connect a fiber optic cable and configure the equipment. When connecting to PON for the first time, providers also usually provide assistance (though more often for a fee, so you can save money by doing everything yourself) with setting up equipment and networks.
Connection as usual
- Contact the provider and write an application, make an advance payment if necessary.
- After some time, several network installers appear at your entrance. As a rule, these are not employees of the Internet provider company, but third-party contractors. They make a hole in the wall in your hallway, run a fiber-optic cable from the distribution panel in the entrance to the apartment, weld it and install an optical socket near the entrance.
Optical socket
- Next, the provider’s adjusters appear, who hang up the optical modem (usually it is provided for rent), connect it with a cable to the socket, and then configure it. The Internet is already in the house, all that remains is to distribute it.
The process is approximately the same in a private house, although the distribution panels will either be located on power line (telecommunication) supports, in wells, or will be absent altogether, and the subscriber cable will be connected from a separate splitter.
These three steps cannot be completed on your own unless you contract with a provider. In addition, according to contracts, networks up to the boundaries of the household or even up to the outlet are serviced by the Internet provider free of charge (if not damaged intentionally); after the boundaries of the separation, the lines are considered the property of the client and all costs of their operation are transferred to him.
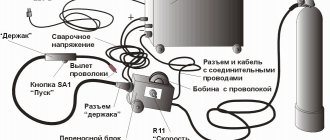
That is, you can then act on your own. Here is a typical diagram for distributing the Internet and other services in an apartment.
Connecting ONT in an apartment
The figure below shows a standard diagram for connecting devices to an optical terminal. We’ll immediately analyze its implementation with our own hands, then we’ll tell you how it can be adjusted depending on the capabilities of the equipment, and how to improve it.
Please note that you will have to deal least with optics; you just need to know how to connect a fiber optic cable to a modem, and all other networks are wired.
Standard service connection
Typical network wiring diagram from an optical modem
We will describe in detail all the components of the circuit, since not everything may be clear to a non-specialist.
Optical panel at the entrance
- The optical socket, as in most cases, is located near the entrance to the hallway. It is connected to the distribution panel with a welded optical cable, which was mounted during installation.
- The socket is also connected to the terminal with an optical cable, but it is connected to connectors. This is a patch cord (this is the name given to any fiber optic and wire connecting cables; we will continue to use this term) as a rule, purchased.
Optical patch cord
- A regular telephone cable is used to connect to the telephone. Instead of a telephone socket, it is plugged into an ONT connector, which corresponds to a standard telephone socket, and is routed throughout the apartment to the place where the device is located.
The phone connects directly to the modem
- To connect to a desktop computer, a twisted pair cable (LAN cable) is laid around the apartment, which is connected to the appropriate ONT and PC connectors. The connection is similar to connecting through a regular switch.
- In order to connect a laptop, Wi-Fi is used; for this, a router is placed next to the terminal. In the diagram it is designated as a PPPoE/Wi-Fi router. It is also connected to the ONT using a twisted pair cable.
Wi-Fi router
- The last connection is the TV, for this a digital television receiver is placed next to it (in the Set Top Box diagram, this is the English designation of the device). To connect the receiver to the ONT, twisted pair is again used, with the TV standard HDMI, SCART or Composite (bell) connectors that connect any video devices.
SCART cable
Now let's move on to how to implement this scheme:
- To connect to an outlet, it is best to use a ready-made optical patch cord. Such a short length of wire can be easily purchased at any store. You can make it yourself by purchasing a fiber-optic cable and connectors; we’ll talk about this below when we describe how to move the terminal further from the outlet.
- Next we connect the phone - for this you can also buy a ready-made wire of the required length with connectors. If it’s difficult to choose the length, but you don’t want to make extra, we make it ourselves.
For production we will need:
- a special crimper (crimper) for RJ11 – 14 connectors or a universal one (it will also help when crimping twisted pairs);
- cable of the required length;
- RJ 11 or 14 plugs (they cost a penny);
- tool for cleaning insulation (nipper knife).
Advice. Do not buy a four-core cable for the RJ14 standard; for standard devices, 2 cores are enough.
Then we begin to do the work:
- We remove the top insulation from the wire; for this you can use a knife or wire cutters or crimper blades (if you have them).
- We expose the top insulation by 6-8 millimeters, do not touch the insulation of individual conductors.
- We push them into the body until it stops. Moreover, if we use, as we have already said, a two-core wire, then the conductors should go into the sockets of the two central contacts. Which side will be red and which side will be green is not important, despite the fact that there is a wiring diagram for these connectors, it is not necessary to follow it, telephone sets are not polarity sensitive.
Installing wires into the plug
- Then we insert the connector into the crimper, it should fit correctly into the corresponding socket and squeeze its handles. The bar will slide in, the knives will cut through the insulation of the cores and securely connect the contacts.
Crimping the connector with a crimper
Advice. You can try to crimp the connector without a crimper. To do this, after installing the wires, use a screwdriver with a sharpened tip to press in the knives individually, and then the bar to secure the wire inside. The work must be done carefully, however, the plugs themselves cost a penny, so you can break a few pieces until you can achieve a normal result.
You can also connect your phone using standard short patch cords. To do this, we install sockets near the telephone and ONT.
The conductors in them are usually clamped with terminals. In this case, you need to connect pins 2 and 3 (the red and green wires go to them, just like in a telephone cable). This approach is even more convenient.
Location of contacts in a telephone socket
- We connect the computer using twisted pair. As with a telephone, you can try to find a ready-made cable of the required length or purchase a twisted pair cable and plugs. Crimping occurs in exactly the same way, but with one feature: before installing the conductors into the sockets, you need to develop the ends of the conductors and arrange them in the correct order, it is shown in the figure below.
The order of wires when crimping a twisted pair connector
When preparing a LAN line, do not forget one more feature - twisted pairs have different bandwidths; in order to fully realize the capabilities of optical connections, you need to choose cables of at least category 5, they provide gigabit speed.
Pin numbering on the connector
- Then we connect the television receiver and Wi-Fi router, everything is exactly the same as for a computer - we stretch a twisted pair cable, which we plug into the appropriate connectors. For the latter, if it is located as in the diagram, it is easier to use a ready-made short patch cord. The router will need to be configured, as this is described in its operating instructions.
Simplifying the circuit
The standard scheme is designed for the use of components with minimal functionality. But modern devices have advanced capabilities; we’ll tell you how to use them.
- As a rule, almost all ONT terminals can distribute Wi-Fi, so you can abandon the router.
- TVs with the “Smart TV” function also most often have a LAN input and do not require a receiver.
Modern TVs most often have a twisted pair connector (LAN)
- If you use a radiotelephone, then its base station can be placed next to the terminal and there is no need to run the telephone wire around the house. Moreover, many already have devices in the hallway where the digital socket is most often installed.
In general, using a Wi-Fi connection, you can do away with wires, except for the telephone one. Many TVs include a module for receiving wireless networks, and for a desktop computer you can buy a receiver that is plugged into either a USB connector or installed on the motherboard in PCI slots.
However, when connecting via Wi-Fi, you will not be able to achieve the high speeds that an Internet connection via a fiber optic cable provides. Wireless network capabilities are limited and depend on the distance to the router and the presence of obstacles (walls).
Schema Improvements
Now let's talk about the possibilities of improving the scheme. Much more can be offered. It’s difficult to systematically give the options and describe them all, but we’ll try.
Phone line
Let's start with the simplest thing - a telephone; in a house there may be not one device in the office, as in the diagram, but several, in the bedroom, in the kitchen, in the living room. An optical modem most often has only one RJ 11 (RJ 14) connector. Therefore, the line from it will have to be branched; this can be done in three ways.
- In the location required for branching, install a telephone splitter - a box with three outputs for RJ connectors. Another option is to install a double socket. This option may even be preferable, since later in case of breakdowns, by disconnecting sections, it will be possible to easily find the damaged line.
- Install any suitable terminal box at the splitting point and bifurcate the line using it.
- Connect another one to the telephone cable by soldering or twisting.
Router
A router installed in the hallway may not provide a clear signal (the weaker it is, the lower the data transfer speed) throughout the entire apartment or house, especially if the building area is large. It is advisable to move it closer to the center of housing. True, this option is impossible if the terminal itself distributes Wi-Fi. Alternatively, install a signal amplifier (repeater) closer to the center.
Wi-Fi amplifier (repeater)
LAN lines
Due to the location of the fiber optic terminal, the twisted pair lines are long. Although the signal in them does not attenuate much, it is still more convenient to lay them from the center, especially if there is a lot of equipment connected to the network in the house. The best option, of course, would be to move the ONT terminal itself to the center, but this may not be possible (more on this below).
But there is another possibility - we move the router to the center, as we said above, and do the rest of the wiring from there. Almost all models of these devices, in addition to distributing Wi-Fi, have at least four LAN ports per output and work as switches.
A Wi-Fi router can usually additionally work as a switch with at least four outputs
Also, in the standard scheme, connecting a laptop is assumed only via a wireless network. But we have already said that Wi-Fi does not fully realize the high-speed data transfer capabilities that an optical terminal provides. Therefore, it is advisable to also extend a twisted pair cable to connect it to those places (living room, bedroom, kitchen) where you most often use your laptop.
A television
As we have already said, modern TVs with the “smart” function have connectors for twisted pair cables (LAN) and a Wi-Fi receiver, which makes it possible to eliminate the need for a receiver altogether. It is correct to call such devices not even TVs, but all-in-one computers with the functionality of a TV.
If the TV supports high-definition video or even 3D, it is still better to connect via LAN (due to the possible reduction in speed over the wireless channel). Also, for such devices, if you still use a receiver, then it is better to connect it to the TV to ensure video quality not through the SCART or Composite connectors shown in the diagram, but through HDMI or at least DVI.
HDMI cable
Another feature today in the house is usually not one TV, but several. How to connect them?
If you need high quality, you will have to run a twisted pair cable to everyone, if not, then you can get by with Wi-Fi. Even if the TV receiver itself or its receiver does not support this technology, the wireless adapter costs less than $10.
Wi-Fi adapter
In this subsection of the article we will also answer a frequently asked question - how to connect the optical cable of the TV to the receiver?
In principle, there are receivers that connect directly to the optical network, but they are mainly used for broadcasting on cable networks, that is, for professional use. All home digital television receivers are connected as we described above.
TV receiver
Backup power
The disadvantage of modern high-tech communication lines and not only optical ones is that the terminal devices require connection to the electrical network.
If the old telephone could operate on voltage supplied from the telephone exchange via wires, then the device connected to the terminal is completely dependent on its power supply. That is, if the lights in your house go out, you will not be able to receive or receive calls. Therefore, consider a backup power source for the optical modem.
Uninterruptable power source
Considering that the power consumption of an ONT is usually within 15-20 watts, any uninterruptible power supply unit (the abbreviation UPS is an uninterruptible power supply) is suitable for this purpose.
For example, if an uninterruptible power supply has a battery with a capacity of 9 A/h, then it will be able to provide you with communication for 6-7 hours. During this time, the electrical networks usually repair the damage. For rural areas where power outages are longer, you can choose a unit with a larger battery.
It is advisable to connect a Wi-Fi router to the UPS in addition to the optical modem. Then, if there is a power outage, you will have not only telephone communication, but also the Internet, provided that the batteries of your laptop, tablet or smartphone are charged.
Transfer of ONT terminal
As we have already said, the location of the modem at the front door is not optimal; it is advisable to place it closer to the center of the apartment to improve Wi-Fi communication and reduce the length of wire lines.
Of course, transferring a device can be problematic:
- Perhaps the provider does not allow the modem to be moved independently;
- Subscriber optical cable is quite demanding in terms of installation conditions, it does not like bending under a small radius, it needs to be additionally protected.
But sometimes it is still advisable to rearrange the modem, especially in large apartments with several levels. Let's look at how this can be done, or more precisely, how to lengthen the optical cable.
There are several options:
- Use an optical cable with connectors that correspond to the corresponding connectors in the socket and modem (a kind of patch cord) of great length. The most acceptable option, however, such cables are not found on sale, but you can make them yourself. In addition, with this approach there are no problems with the provider.
- Extend the optical fiber using connecting elements. Below we will look at how this can be done. But note that the signal loss with this method will be greater than with the first option.
- Weld the cable fiber. In fact, it is not that difficult, and we will also look at how it is done. The only problem is that the welding machine costs several thousand dollars and is not worth buying for one or two joints. Although if you are going to continue building optical networks at a professional level...
You can also borrow equipment from a friend or rent it for the day.
By the way, sometimes they ask whether it is possible to install two ONTs in one apartment. In principle, it is possible, but unlike telephone sets, they cannot work in parallel; you will have to pay for two personal accounts. So this choice only makes sense if you need uninterrupted Internet and have the opportunity to connect to the Internet via fiber optic cable from different providers.
By the way, a similar circuit, although wired, was implemented at my home. I am connected via a DSL modem to the republican provider Beltelecom, from which I chose a tariff without a monthly fee. The second connection using a twisted pair cable to the server of a local provider (the director of the enterprise is a neighbor and friend), where the Internet is free. If someone has a breakdown, then I easily switch to reserve.
Next, let's move on to a description of manipulations with optical cables, which will be useful to us if we decide to move the terminal ourselves or simply decide to make a patch cord.
We also offer video connection of an optical cable to help:
Weld quality check
During the welding process, it is necessary to pay attention to the shape of the weld arc. Perfect welding is almost invisible to the naked eye
If the arc is crooked, it is recommended to chop off the weld and repeat the work again.
If the welding machine produces significant signal attenuation at the seam site (more than 0.1 dB), then it is better to digest the fibers. But even if the signal loss is insignificant, the total of several welds can still result in signal loss at the other end of the cable.
Reflectometer
The attenuation of the entire optical path, consisting of several couplings and cross-connects, is checked using a reflectometer. This is a measuring device that sends a pulse along an optical path and analyzes its scattering and reflection. With its help, you can see the total length of the path and the signal attenuation in a separate section. This way, it is possible to find out exactly where the fiber optic cable is causing a signal break or significant attenuation. The instrument saves measurements in an electronic file, allowing dispersion analysis to be carried out some time after testing.
We clean the varnish coating on the fibers
A stripper is used to remove varnish from fibers. This is an expensive tool designed specifically for nail polish removal - precise and high quality. If you use it for other purposes during your work, you will soon have to shell out money for a new one.
You need to strip about 3 centimeters. The main thing is not to break the optical fiber, since we have already measured its length and cut it off, there is no reserve.
So we have marked, cleaned optical fibers of the required length, with KDZS put on (on half of them). Now comes the fun part.
Nuances of fiber optic welding
If the cable is multicore, the optical fiber sheath is made in different colors to make it easier to weld individual conductors. After this, they are placed in a special coupling. In the process of chipping the conductor, glass particles are formed; they are collected immediately, because it is easy to be injured by the transparent fiber.
Be careful when cleaning the insulation - the wire core is very fragile. If there is any damage, you will have to start the process again
Before inserting the ends into the welding machine, they are thoroughly degreased and dried; the work area should not be dusty. Any extraneous inclusion increases the loss of power of the transmitted signal.
Wiring diagram
As you already understand, the wires in the plug need to be arranged in some order. This order is called “pinout”. We can distinguish two options for the arrangement of wires: the first is 568v (straight), the second is 568a (cross).
Direct compression is performed when it is necessary to connect a laptop to a router or switch. Cross-compression of twisted pair cables is done when you need to connect a PC to a PC, or a router to a router. Direct pinout (568v) is more common.
Direct connection method
We will show in the photo below how the wires should be positioned in the RG 45 plug with direct pinout. Why is this pinout diagram called straight? Yes, because the cable in the rj 45 plug is crimped on both sides in the same colors.
Cross connection method
The wiring diagram for cross pinout is shown below. Here we see that on the other side the twisted pair is crimped in an inverted manner.
Pinout for two-pair network cable
Another circuit for direct compression of two pairs (4 cores) twisted pair.
To facilitate the crimping process on most rj 45 connectors, there is a number next to each contact. With the help of our diagrams, which also have numbering, it will be easier for you to navigate where to insert this or that wire.
Fiber Splicing Equipment
Choosing a welding machine for fiber-optic lines comes down to determining the type of welding:
- manual;
- semi-automatic;
- automatic.
Manual devices do not allow high-quality and quick work on connecting cables. The labor-intensive mixing process is controlled under a microscope.
It was replaced by semi-automatic equipment. All work is done under a microscope, and the operator can evaluate the quality of the automatic connection of the welding site. This device significantly saves the technician’s time.
A negative characteristic of the device is that optical cords cannot be welded. This part of the work is done manually by the master.
A positive assessment of the device is its low cost compared to fully automatic welding machines.
A fully automated device has recently appeared on the market. It allows you to significantly save operator time. The built-in microscope allows the master to control the cooking process. The disadvantage of modern models is their high price.
Comparative table of advantages and disadvantages of optical connector installation technologies
So, let’s highlight the advantages and disadvantages of the technologies for installing optical connectors described above.
Comparative table of advantages and disadvantages of using various methods of installing optical connectors:
| Splice On Connector | Fast Connector | Pigtails | Adhesive connector | |
| Simplicity of installation technology | + | + | + | — |
| Installation speed | +/- | + | +/- | — |
| Maintaining acceptable insertion loss on the connection over a long period of time | + | — | + | + |
| Maintaining an acceptable level of signal reflection over a long period of time | + | — | + | + |
| Resistance to mechanical loads | + | +/- | +/- | +/- |
| Possibility of multiple installations | — | + | + | — |
| Convenient cable termination at the operator cross-connect | + | + | + | + |
| Convenient cable termination in outdoor distribution boxes | + | + | — | — |
| Convenient cable termination at the subscriber's premises | + | + | — | — |
| Price (cost of connectors and installation equipment) | — | +/- | +/- | + |