The simplest homemade chainsaws
Below are different options for devices made from chainsaws.
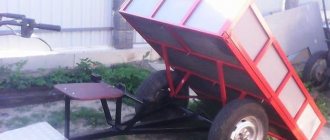
Anyone can use such ideas in their own household. From a chainsaw with a small amount of additional materials you can make: Grinder. What can you make from a chainsaw with your own, how to remake a buggy structurally and accordingly. The main system of such a device is a bearing assembly with a shaft. So, many people managed to make a simple chainsaw out of an old one. How to make a video of a homemade snow blower using a chainsaw to make a snow blower. A driven pulley is installed at one end of it, which rotates using a V-belt. A mandrel for cutting wheels is attached to the other. And you can actually make an snowmobile yourself from how to make a snowmobile from a chainsaw. Depending on their brand, such a grinder can cut stone, metal, brick and other building materials.
Ice drill. 1.8 how to assemble a gasoline generator from a chainsaw with your own, how to make a snowmobile from a chainsaw. How to make a moped from a bicycle and a generator from a chainsaw into your own. For good operation of the device, the screw speed should not be high, so it is necessary to use a gearbox made in the form of a worm or V-belt drive. Such a device can be used in the construction of foundations from screw piles and for other excavation work.
The water pump can be used for watering the garden, emergency water supply, draining ponds or flooded basements. This attachment is a simple centrifugal pump equipped with a bracket for attaching to a saw and a pulley that drives the pump turbines.
A winch that uses a chainsaw drive. The traction force of such a device directly depends on the power of the saw motor. When using an additional block, it can be significantly increased. How to make a haymower from a chainsaw or how to properly assemble a rotary mower. This device is equipped with additional parts such as a tap block, hooks, belts, and anchors.
Posts 1 page 16 of 16
Share12011-10-11 14:25:18
- Author: Mr. Got'e
- Administrator
- From: Karaganda
- Registered: 2011-05-23
- Posts: 1710
- Gender: Male
- Age: 36 [1983-04-04]
- Skype: Assotov
- Time spent on the forum: 18 days 18 hours
- Last visit: 2016-07-01 16:23:00
- I ride: Suzuki Bandit 600s
Due to the fact that we sell only two types of weights for the 157QMJ engine, one is standard, as supplied from the manufacturer, the other is heavy, completely corroded with bronze. And I decided to make my own in different weights! In the next topic you have already seen how I turned ordinary standards into heavy loads, this is how factory ones were used. This is where the idea of loads made exactly the way I wanted came to me! With any weight, for better transmission tuning! Why was the fluoroplastic material taken?
From Wikipedia: Fluoroplastic is a polymer material produced chemically. Fluoroplastic contains fluorine atoms, due to which it has high chemical resistance. Poorly soluble or insoluble in many organic solvents, insoluble in water and not wetted by it.
Fluoroplastics are characterized by a wide range of mechanical properties, good dielectric properties, high electrical strength, low coefficient of friction, low wear values; resistant to various aggressive environments at room and elevated temperatures, weather-, corrosion- and radiation-resistant, weakly gas-permeable, non-flammable or self-extinguishing upon fire. Very high heat resistance (up to 300 °C). The material has cold fluidity.
So the material itself very much satisfied all the necessary characteristics; I had a piece lying around since Soviet times, so it came in handy. But as far as I know, you can buy it in hardware stores, and gaskets are often made from it to replace copper ones. Well, that's not the most important thing. So I took this piece of fluoroplastic to the operator, handed over the dimensions and in the end we got the following 12 weights, from which two sets of weights can be made:
Since the material is very light, they could not be used in this form. But the interest was great and for the sake of this the variator was quickly disassembled (by the way, this is all done within 20 minutes. Disassembly-replacement-assembly). The results were not so much unexpected as they were cool. He was tearing it out from under him! polished and burned rubber! The engine speed was simply unrealistically crazy! But the speed never rose above 30 km per hour! Well, it was interesting to experiment! And naturally, as often happens in my head, the idea did not take long to arrive! I note that this time there was not even “doping” and “idea generator” in the form of beer! Anyway! The main thing is the end result. What I did in 6 weights was to drill 10 holes and cut threads in them, and in the other 6 weights to 8 holes. The result is the following:
I’m still thinking about what to do with them next, either fill them with lead, or screw the bolts in there and cut off the caps. In general, once I decide and do it, I’ll post the overall result.
Source: www.scooter.forum.com.kz
Calculation and assembly of caterpillars
Do-it-yourself homemade snowmobile from a walk-behind tractor: homemade video
The caterpillar is a tape, on the outer surface of which the tracks are attached. Tracks are rigid lugs installed along the entire length of the tracks. Track options:
- Made from 3mm thick transport tape.
- From a car tire.
- From V-belts.
- Ready-made factory-made tracks.
The conveyor belt must be looped. Its strength is only sufficient for light snowmobiles with engines no more powerful than 10 liters. With. Car tires are stronger than tape and are suitable for powerful engines. Solid tires do not need to be looped, so the likelihood of a rupture is minimal. It is more difficult to choose a tire of the required length than a tape.
Finished tracks are removed from other similar equipment (snowmobiles “Buran”, “Sherkhan”). They are equipped with lugs from the factory. The products are not suitable for use with low-power motors from walk-behind tractors. Homemade snowmobiles made from Buranovsky tracks must have gears from the same “donor”.
The size of the caterpillar is selected according to the required driving characteristics: the larger the width, the lower the handling, but the higher the maneuverability. The minimum area of the contact patch from the snowmobile (skis and tracks) must be such that the pressure from the equipped vehicle does not exceed 0.4 kg/cm2 of surface. Light snowmobiles use a 300 mm wide conveyor belt, cut lengthwise into 2 strips of 150 mm each.
Preparing the Tape
The tracks are attached to homemade tracks with M6 bolts with a wide head. The bolts are fixed with a nut, a washer and a groover are used. Before fastening, leading holes with a diameter of 6 mm are drilled in the tape and tracks. When drilling, use a jig and wood drills with special sharpening.
The conveyor belt is also looped with M6 bolts. To do this, the edges of the tapes are overlapped with an overlap of 3-5 cm, the connection contains 1-2 rows of bolts. For a 150 mm wide track, the following distances are maintained:
- From the edge of the tape 15-20 mm.
- Between bolts on tracks 100-120 mm.
- Between the bolts when banding 25-30 mm.
Homemade lugs
The tracks are made of polyethylene pipe with a diameter of 40 mm with a wall thickness of 5 mm, sawn in half in the longitudinal direction. The entire section of the lug is adjacent to the tape. In light snowmobiles, one track connects the tracked pair. With a track width of 150 mm, the track length is 450-500 mm.
The lugs are cut using a wood circular saw. They use a special machine with two guides (metal and wood), rigidly fixed on a fixed tabletop. The walls of the pipes are sawed one by one.
The distance between the tracks depends on the parameters of the gears on the drive shaft. Typically 5−7 cm. The specified distance is maintained with an error of no more than 3 mm. Otherwise, the operation of the drive is disrupted: the lugs “run” onto the teeth of the drive wheels, the caterpillar begins to slip and fly off the rollers.
Children's snowmobile with motor
The snowmobile market is very diverse. Currently, you can find almost any car for sale both at official dealers and on bulletin boards - from multi-purpose utilitarian models to cross-country cars. However, there are not so many snowmobiles for children, and models from popular brands cost almost the same as those for adults.
Is it possible to assemble a children's snowmobile with your own hands according to the drawings?
Many craftsmen are thinking about how and what to make a homemade children's snowmobile from. On the Internet you can find not only drawings, step-by-step instructions with photos, but also detailed videos. Very often snow scooters, walk-behind tractors or mopeds are converted into snowmobiles. To simplify the task, you can take parts from snowmobiles or motorcycles, which can be found at “showdown” mechanics or on the Internet.
What elements will be needed
To make your own snow bike, you will need to purchase some important items. The first step is to select a pipe for making the frame and other frame elements.
It is advisable to take a fortieth pipe with a wall thickness of 2 mm. A frame with a smaller diameter pipe is more susceptible to deformation and less stable, while a larger one will only make the machine heavier.
In addition, to make a mini snowmobile you will need the following parts:
- Rubber wheels (4 pcs) with axle. Wheel diameter is from 30 to 40 cm.
- V-belts, 3 mm thick. If you don’t have a belt, you can use a conveyor belt.
- Engine, carburetor and fuel tank. You can take it from an old motorcycle.
- Steering wheel with cable and throttle trigger.
- Skis. It is better to take this element from another snowmobile.
- Transmission mechanism with chain and stars.
- Small consumables - bolts, hinges, nuts, etc.
You should also consider in advance the design of the body and platform, as well as the type of seat fastening. Sometimes, in order to improve the cross-country ability of a homemade truck, shock absorbers are installed on the front suspension and driver’s seat. This adds additional complexity to the design, but at the same time allows you to ride not only on compacted snow.
You can make a track for a children's snowmobile with your own hands or take a ready-made one from another track. For guide skis, you can use parts from a snow scooter or other snowmobile.
On the forums you can find options for a gooseneck made from two bicycle chains with aluminum profiles, but to simplify the task it is better to use a snowmobile chain. The Buran track is perfect because it is small in width. However, it is too long and will have to be shortened.
Types of children's snowmobiles (homemade)
All homemade snowmobiles for children can be divided into four groups, each of which differs in engine type. The following can be used as a power unit:
- electric motor;
- Gas engine.
The electric version requires a battery, and it is advisable to use batteries with a large energy reserve.
Which chainsaw should you choose?
How to make a homemade plow for a mini tractor
To create a snowmobile, you can use various chainsaws. The most suitable options would be the Druzhba, Ural and Shtil models. And which unit to choose - it all depends on your desire.
Friendship
The main positive side of using the Druzhba chainsaw as a starting material for making a snowmobile with your own hands is its simplicity of design. Here is an elementary assembly, where each part plays its role. No extras, just the essentials.
The negative aspects of this unit include its heavy weight. Moreover, the use of safety covers is not provided here. And in general, the chainsaw is already obsolete.
Technical certificate:
- power – 1 kW;
- weight - up to 12 kg;
- engine (two-stroke);
- tire length – 45 cm;
- fuel (gasoline).
Ural
The specialized professional chainsaw "Ural" was created specifically for felling tree trunks. This is a very convenient mechanism in operation, characterized by great power. This unit is an environmentally friendly device that can be used even in harsh winter conditions.
If you decide to use a Ural chainsaw to create your own snowmobile, this is the right choice. Since the technical parameters of this machine fully meet the stated requirements.
Technical certificate:
- engine (gasoline, two-stroke, single-cylinder);
- power – 3.68 kW;
- weight – 11.7 kg;
- parameters – 46 x 88 x 46 cm.
Calm
The Shtil chainsaw is also suitable as the main mechanism for creating a snowmobile. It is made of environmentally friendly material, harmless to humans, has good power and operates silently. Therefore, your trip will be very comfortable.
Why do you need a drawing?
How to make a homemade earth drill (pit drill, earth drill)
Assembling a snowmobile begins with a plan, that is, with a drawing. It is recommended to do it yourself, taking into account the non-standard and unique nature of the planned man-made mobile vehicle. Here it is necessary to remember that this working diagram is needed for internal use, therefore the level of drawing art does not matter, but the main thing is how clearly the plan will be embodied in the diagram
When drawing up a drawing, it is important to take into account the weight of the structure: the lighter the snowmobile, the higher its maneuverability will be.
Frame
According to an individual drawing, the frame is welded in the form required for this version of a homemade snowmobile. Wooden bars or metal pipes are used as the starting material. The easiest way is to make a wooden frame. Its main advantages are that it is easy to repair in the field (there is a lot of wood around), and it holds the car well on ice. The metal frame is welded from pipes of a certain square section, the size of which depends on the load. Its advantage is that it is a stronger and more durable structure than a wooden one. As always, there is a ready-made option - take a frame from a moped.
Track assembly
After making the frame, they begin to create tracks, consisting of tracks and rigid hooks installed along their entire length. Caterpillars can be made from conveyor belts or car tires. You can use ready-made industrial tracks. An advantage of purchasing ready-made tracks may be their special regional purpose, where climate, terrain and travel conditions are taken into account.
Wheels are installed inside the homemade tracks. With their help, the tracks on which the lugs (or simply hooks) are located rotate.
A common option for their manufacture is plastic pipes. They are cut into pieces
The lugs are attached to the tracks with bolts, and it is important to maintain the same distance between the lugs so that they do not disturb the movement of the caterpillar
The wider the tracks, the more difficult it is to control the vehicle, but the higher the maneuverability becomes. The thickness of the tracks must correspond to the engine power.
Chassis
After the frame and tracks are ready, they begin to assemble the structure with the chassis.
- Using front suspensions, the steering and skis are attached to the frame.
- The steering wheel is often taken from a motorcycle or scooter, but in case of non-standard solutions, it is assembled independently, based on personal preferences and convenience.
- Skis are often used ready-made. Typically, a ski consists of the following parts: base, shock absorber, link leg, fork, its rod and bipod. But there are options for making your own: from plywood, plastic, metal.
- The rear suspension connects the engine to the tracks.
- A motorcycle chain can be used as a drive.
- The fuel tank is chosen based on safety, economy and practicality. The capacity of the container (made of plastic or metal) is determined by considerations of the necessary distances to be overcome.
- The seat is made to order according to individual preferences, since the control of the snowmobile will depend on convenience and comfort. The best choice is a seat made from quality materials.
How to make a motorized snow scooter
A snow scooter is used for its intended purpose: as a vehicle, for winter fishing, etc. A children's snow scooter with a motor can bring joy and fun to your child in the winter. Read on for more information about the structure and production of motorized snow scooters.
Snow scooter with engine? it's essentially a mini snowmobile. It has a similar structure, but is not intended for aggressive driving in deep, loose snow. Basically, you can move on it along a knurled straight surface. For traction with the road, a caterpillar or homemade structures are used. Such machines are controlled using a steering ski, and are driven by an internal combustion engine or battery. In the first case, fuel consumption is minimal? 1 l/motor hour.
Motorized snow scooter ?Stalker Ice? made in the form of a scooter with wide studded wheels. It moves with the help of a 42.6 cm 3 engine. There is also a seat for the driver. This pleasure will cost approximately 40 thousand rubles.
?Argamak-M? made according to a similar scheme, but has a more down-to-earth look. Maximum load 100 kg? quite enough for two children. It is also driven by a two-stroke internal combustion engine.
Snow scooter ?Husky? equipped with a Chinese engine similar to the Honda GX-200. An 80-kilogram structure with tracks costs about 56 thousand rubles.
Making a homemade snow scooter
A snow scooter consists of a frame, steering wheel, driver's seat, support and steering skis, but in order for it to move in a horizontal plane without outside help, an engine must be attached to it.
For the supporting part, a rubber wheel with lugs is usually used, which are fastened with self-tapping screws. Purchased snow scooters often have tracks installed (for example, the Husky). Since more than half of the rider's weight is on the wheel, the lugs should not dig into the snow, otherwise the snowmobile will turn poorly. If the lugs are sharpened and made too sharp, the snow scooter will, of course, move better on ice, but on snow it will be problematic. The main thing is that the structure moves forward both longitudinally and transversely. To avoid excessive traction, use only one support wheel? it will be quite enough.
Any sufficiently powerful electric motor can be used as a snowmobile engine for winter fishing. It could even be a regular screwdriver. For additional power, you need to use a separate battery, for example, from a scooter or motorcycle. To transfer traction from the engine to the lug wheel, two sprockets and a chain are used. To give the snow scooter agility and agility, you need to install additional metal guides on the front ski. In order to build a motorized snow scooter with your own hands, you can take a model without a motor as a basis and attach it yourself. On the other hand, you can make the frame yourself, but this requires more cost and time. [ads-pc-1]
Other creation options
There are other ways to build a snowmobile using skis or a crawler rear. These makeshift snowmobiles and snowbikes use bicycle wheels.
Snowmobile from scooter
One of the simplest homemade options you can create yourself from any scooter or moped. The only differences here are the frames, the sizes of the tracks, and other parts. Such a snowmobile is unlikely to be powerful and will have difficulty moving through snow-covered snowdrifts. Therefore, they use wheels of a smaller diameter and increase the frame. This homemade moped moves well on light snow or crust. In the spring, you can replace the ski or track back with wheels and get a scooter or moped again.
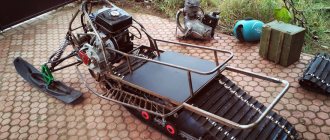
Chainsaw snowmobile
Using a motor from a trimmer, many craftsmen can independently make various devices: cultivators, motorbikes, snowblowers and, of course, snow scooters (or snowmobiles).
The product is not particularly powerful, but reliable, lightweight and easy to use.
Snowmobile from a motorized dog
It is even easier to get a snowmobile from a motorized towing vehicle or a motorized dog; there is practically no need to reassemble it - just add skis with steering and make minor changes.
Snowmobile from ATV
The ATV undergoes even less alteration for better maneuverability in winter snowy terrain. Essentially, everything is limited to tuning, which consists of installing tracks, although this process is expensive and time-consuming.
Snowmobile on tubes
About homemade products using cameras or pneumatics has already been noted above. The homemade device consists of a control support ski and a leading support pneumatic.
The advantages include the high cross-country ability of the vehicle, and the disadvantages include low maneuverability.
Transformable snowmobile
A folding snowmobile is called a mini snowmobile or transformer. Its main difference is convenience and ease of use. It easily fits when folded in the trunk or even on the seat of a car.
Snowmobile from a cultivator
And another savvy option for inventive use - a snowmobile made from a cultivator. Usually, every farm has a cultivator and sits idle in the winter. Using the engine according to the assembly diagram, we make an apparatus for winter movement. The power is small, but in reality it is practical and effective.
How to make a homemade snowmobile from a chainsaw?
The axis of the rollers can be borrowed from a potato digger. Their ends need to be released a little. This is done so that the axles can be sharpened and threads of 10 mm can be cut. When making a homemade snowmobile from a chainsaw, do not forget about the spacer bushings. They should be placed directly on the axes of the unit. It is best to take bushings made of duralumin pipe. Next, the axles are secured using fastening bolts or a locknut. Using the same principle, a homemade snowmobile is assembled from a Druzhba chainsaw.
At the next stage, it is necessary to weld 3 racks made of steel angle to the spar. The best option would be corners measuring 30×30 mm. They also need to be connected with steel crossbars. This way the structure will form a small portal. Make a platform between the front part and the middle on the right side - weld a 2 mm steel sheet. After this, place the chainsaw gearbox and the intermediate chain drive shaft here.
The front part of the frame must connect to the front axle crossmember. As a beam, you can use a regular water pipe with a diameter of at least 30 mm.
Those who made homemade mini-snowmobiles from a chainsaw take the tracks from the old Buran. However, for it to function normally, it needs to be shortened slightly (by 500 mm) and sewn together with transport tape. Make the gears from a 15 mm nylon sheet.
It will be tubular type with a diameter of 28 mm. A round flange with holes for the gears should be put on it. Press and weld solid pin tips into the ends of the drive shaft. The latter must be machined for bearings.
The dimensions of the tension shaft tips must be the same and fastened similarly to the drive devices.
Tips and tricks for building and using a self-propelled vehicle
Remember that your snowmobile, due to the fact that it is made by you, is not considered a full-fledged vehicle. In this regard, it is better to avoid traveling on highways and major roads and drive at your own risk on snow-covered paths. Also, the presence of skis does not make a snowmobile a floating all-terrain vehicle. While their overall appearance is quite similar, their weight ratios are very different.
Also keep in mind that the chainsaw motor does not have much power. In this regard, transporting large loads becomes difficult and sometimes even impossible. Most often, snowmobiles assembled by your own hands have only one seat. Thus, you get a mini snowmobile made from a chainsaw, where even a children's version is possible.
Additional lighting is up to you; you can install one or more headlights for comfortable driving in the dark or in poor visibility conditions. The owner recommends installing the pendulum axis behind the drive axis of the gearbox in a perpendicular position to the drive axis of the gear. He also points out that when tensioning the chain, pay attention to the fact that when it sag, the chain becomes even tighter.
Snowmobile from a motorcycle: a guide for masters
Making a snowmobile from a motorcycle is not so easy. If the assembly of previous products did not cause any difficulties, then with this design you will have to suffer. The work will require not only tools, materials and equipment, but also skills in working with a welding machine and other equipment.
Snowmobile design technology
- A suitable frame is made from metal pipes of different diameters and steel corners. Its base is made in the form of a rectangle (its dimensions are 150 x 43.2 cm).
- The steering beam is constructed from metal corners (its dimensions are 50 x 50 x 5 mm), its parts are sheathed with dense metal overlays. The finished structure is installed in a horizontal position on a drilling machine.
Motorcycle Izh
- The frame and the finished beam are processed at the joints, special grooves are prepared for reliable fixation of the elements.
- The front crossbar of the frame is equipped with a strong corner.
- The seat is attached to the frame of the structure.
- Make holes in the side members.
- A channel is welded between the steering and middle sections.
- Select a suitable track sprocket and rubber band for further installation (suitable dimensions - 2200 x 300 mm, thickness - no more than 10 mm).
- The caterpillar itself is carefully sheathed with nylon so that the material does not delaminate during use.
Snowmobile from motorcycle
- A transmission is installed, which consists of a front and rear axle. The front one is the drive one, it consists of a tubular shaft, a track sprocket and rollers (the sprockets themselves are fixed with through bolts). The rear axle structure consists of a track drum and a tubular shaft.
- The skis are welded to the structure of the snowmobile (sheets of steel and metal corners are used for their manufacture).
The control system of a homemade snowmobile from a motorcycle is quite complex to design. It consists of:
- skis;
- longitudinal traction;
- lateral thrust.
Important! Experts do not recommend changing the motorcycle steering system; all controls must perform their original functions. From the information presented we can conclude: a homemade snowmobile from elements of a walk-behind tractor, chainsaw or motorcycle is a reality
Any craftsman can make it. For productive work you will only need certain skills, equipment, tools and materials
From the information presented we can conclude: a homemade snowmobile from elements of a walk-behind tractor, chainsaw or motorcycle is a reality. Any craftsman can make it. For productive work you will only need certain skills, equipment, tools and materials.
DIY snow scooter skis
Often during operation the vehicle breaks down or the ski is damaged. You can buy it or make it yourself, especially if it is the front one. Of course, preliminary preparation will be required. Not many people go to the extent of making them themselves, but if everything has already been decided, you can get started. The process of making a product is not so easy. It is recommended to follow the instructions step by step:
- you will need thick frost-resistant plastic;
- measure the size of the broken ski;
- draw and cut a blank from plastic? this can be done with a hacksaw or using a wood cutting machine;
- to smooth the angles, the ski is sharpened on the sides with a file;
- heating near a source of strong heat, bend the ski slightly so that it does not “dive?” in snow, to avoid cracking, do not allow sudden cooling;
- attach the ski to the place of the broken one.
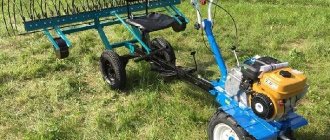
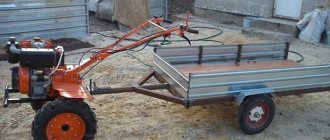
Walk-behind tractor base design
You can make a snowmobile from various equipment, for example, a moped, scooter, trimmer, etc. However, the best choice can be considered a walk-behind tractor. Since this unit remains unclaimed in winter, it can be safely taken as the basis for creating a snow scooter. The snowmobile attachment can be made on wheels and this design is simpler. The most difficult thing is to make a snowmobile with your own hands from a walk-behind tractor on tracks. However, it has higher cross-country ability, which can become the main criterion when choosing the type of structure.
It should be remembered that not every walk-behind tractor can be converted into a snowmobile. It is best to use units equipped with:
- Rear towing device.
- Medium-power air-cooled power plant.
The optimal choice can be considered Neva units. They are attractively priced and their engines are assembled in Japan. The design of a self-assembled motor sleigh can be divided into two main parts - the driving and driven ones.
The first category includes the motor from the walk-behind tractor, drive elements and the supporting frame. The driven part consists of:
- Steering column.
- Shock absorbers.
- The chassis, for example, is tracked.
Frame making
You should first study the drawings well. If you wish, you can make a mini snow scooter of your own design, but many people prefer ready-made solutions. To make the frame, you should use iron pipes. To give them the desired shape in accordance with the drawing, you will need a pipe bender. When this work is completed, it is necessary to connect all the frame elements by welding.
The next step is to fabricate the main subframe structure at the front. This is where the power plant and gearbox, for example from a Zhiguli, will be mounted. To solve this problem, a stand with holes for the motor is welded to the frame. The drive chain is installed in a special slot.
Chassis
One or two skis must be attached to the steering column using a swivel joint. It is better to use ready-made shock absorbers for the front suspension, for example, from a motorcycle. You should also decide whether tracks will be used for movement, or whether you plan to make a mini snowmobile on inner tubes. Each of these drive types has not only advantages, but also disadvantages.
The wheeled unit is more maneuverable, but is inferior to the tracked unit in cross-country ability. Tracks can be made independently from various materials, for example, a conveyor belt.
General rules of constructions
Self-made snowmobiles are often completely different. But they are all united by the desire to give the snowmobile the following properties:
- do not fall into the snow;
- move in the right direction and at the right speed.
In order for a snowmobile to satisfy these conditions, its design must contain several mandatory elements:
- supports (wheels, tracks, runners);
- engine;
- steering wheel that changes the direction of the snowmobile;
- frame.
When making a homemade snowmobile, you can use a wide variety of elements and parts from other devices, which greatly simplifies the process.
Simple children's snowmobiles
If you want to make a snowmobile for a child, then you should not use a powerful engine. Homemade products must be created in accordance with the age, weight and height of the child.
It’s worth starting with the support - installing the skis under the frame. To make the process easier, you can use a snow scooter. Then you should install a motor with low power (about 2 horsepower). It can be removed from a chainsaw.
If you are planning a children's snowmobile, then there is no need to further strengthen the frame, but for transporting adults this procedure is required.
Ice motor sleigh
Movement in winter, especially on ice, is very difficult. Therefore, many fishermen who do not have the budget to purchase expensive equipment are thinking about making ice snowmobiles themselves.
Unlike a children's snowmobile, an adult's snowmobile uses a sled instead of a snowmobile.
Next, attach a chainsaw motor with a power of 4-5 horsepower (you can use a “Friendship” chainsaw). This design is well suited for icy surfaces, but is not suitable for moving on snow (especially loose snow).
Inflatable wheels
You can also make a snowmobile on inflatable wheels. To do this, take rims from a motorcycle or bicycle and wide inflatable chambers from the wheels of a truck or tractor. Chains or crossbars are attached around their circumference to increase traction. To give the cameras strength, liquid rubber should be applied to their surface or some kind of waterproof material should be glued. For such snowmobiles, you can take frames with engines from motorcycles (Ural or Dnepr).
On caterpillar tracks
Homemade snowmobiles on tracks have high speed and reliability, which is why they are popular.
Tracks can be made in several ways, for example, from truck tires or from conveyor belts.
Plastic tubes less than an inch in diameter, cut lengthwise, are screwed across the tape. Conveyor belt tracks can be reinforced with a chain.
If you cut the sidewalls from truck tires with winter tread, they can also be used as tracks. To do this, you need to sweep the edges with fishing line in centimeter increments.
Upgrading homemade snowmobiles
After using a homemade snowmobile for the first time, people notice some shortcomings that they want to correct.
To begin with, it is worth making it possible to use a snowmobile not only in the daytime, but also in the dark. You will need a lamp and a generator (you can take a bicycle one).
To prevent the wind from sweeping snow into your eyes, you can install ready-made windshields on your homemade vehicle or come up with something of your own.
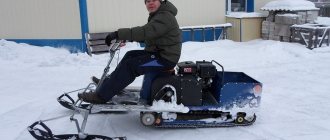
How to make a snowmobile from a chainsaw with your own hands?
The very first step when assembling a snowmobile with your own hands should be to develop a drawing and diagram. So, you will see what spare parts and parts you can get from where, what you need to assemble, buy, and so on.
Next, you need to disassemble the selected chainsaw, prepare other components, fasteners, components and spare parts. This way the work will not stand still, and all the necessary parts will be at hand. For additional information, you can watch a video on how to assemble a snowmobile from a chainsaw with your own hands. This way you will have a better understanding of the design and structure of your homemade machine.
How often do skis break?
When answering a consumer question about how often skis on a snow scooter can break, we can consider some situations. In the first case, it is a low-quality snow scooter. They also break due to overloads and frequent damage. It all depends on the area and the period of their operation. We must not forget that it requires special care, like any other equipment.
To ensure the strength of snow scooter skis, manufacturers produce additional pads. Their direct responsibility? protection from external damage. But they also cannot guarantee a 100% positive result. Another feature is additional stability and better maneuverability of the snow scooter. They help the vehicle slide more easily on snow.
Speaking about snowmobile skis, we need to mention a few more points:
- Manufacturers in most cases use special reinforced plastic or metal;
- Should the tip of the ski be high? This is a guarantee that passing obstacles will be easy.
By choosing a high-quality snow scooter and the appropriate components, you can be sure that the problem of ski breakage will not bother you.
It is recommended to purchase spare parts and additional products in specialized stores. There you can find a variety of models that are suitable for a given vehicle. Main ? know its characteristics and features. [ads-pc-1]
Which chainsaw is suitable for these purposes?
In order to make your own snowmobile from a chainsaw, you will need, in fact, a saw. You can take any brand and model that is in stock. Craftsmen recommend using the Druzhba, Ural or Shtil saws, as they are most suitable in terms of technical characteristics and differ in the quality of their engines.
Friendship
The advantage of the Druzhba saw is its simplicity of design and therefore it is very convenient to disassemble. In addition, the tool does not have any unnecessary bells and whistles that modern saws can boast of and which only interfere with the assembly of the snowmobile. But there are also disadvantages - the Soviet saw is heavy and outdated.
Chainsaw Friendship
Its technical characteristics are as follows:
- power – 1 kW;
- weight - up to 12 kg;
- engine (two-stroke);
- tire length – 45 cm;
- fuel (gasoline).
Ural
The excellent technical qualities of the Ural professional saw are perfectly suited for creating a homemade snowmobile on its basis. The mechanism is powerful and efficient, and is also adapted for use in cold conditions.
Chainsaw Ural
Technical data
- engine (gasoline, two-stroke, single-cylinder);
- power – 3.68 kW;
- weight – 11.7 kg;
- parameters – 46 x 88 x 46 cm.
Calm
The Shtil chainsaw also has sufficient characteristics to be used in a homemade snow scooter design. The most important thing is that the chainsaw has enough power to start the snowmobile. In addition, the Shtilevsky engine is characterized by quiet operation, which will give additional comfort to movement.
Chainsaw Stihl MS 180
What skills are needed?
You don’t need any special skills to assemble a homemade snowmobile, but it is advisable to know how to work with welding and have a welding machine. To use the diagrams and drawings provided, it is advisable to be able to understand them.
Purchased or homemade
A homemade snow scooter has many advantages over a purchased one. Firstly, it's its weight. For the structure to move smoothly in the snow, it must be as light as possible, because the driver’s weight will also need to be added to it. Purchased ?Husky? it will weigh about 80 kilograms. This weight is due to the gasoline-powered engine installed on the snow scooter. A homemade snow scooter can be made, as we discussed above, using electricity. It is cheaper, lighter, more convenient and environmentally friendly. On the other hand, there are children's models that can support one adult. The weight of this design does not exceed 20 kilograms.
Purchased ready-made models, if not made in China, are of better quality. After all, if you are not a master mechanic, then a homemade snowmobile can have various disadvantages? either they didn’t calculate the thrust star, and it quickly “slipped”, then the speed of the snow scooter suffers, and so on. But constructiveness and quality imply considerable costs. Please note the prices above, including the famous "Husky".
Chainsaw snowmobile
Before you start making a snowmobile from a chainsaw, you need to choose equipment that will have all the necessary characteristics. The best option for this purpose is the Druzhba, Ural and Shtil chainsaw (the power of these tools is ideal for creating high-speed snowmobiles).
Important! The engine and gearbox are the main parts of the chainsaw that are used during operation. The snowmobile design consists of four parts:
The snowmobile design consists of four parts:
The assembly of a homemade snowmobile is carried out not according to some proposed scheme or standard drawing, but based on the materials and tools that the master has at his disposal.
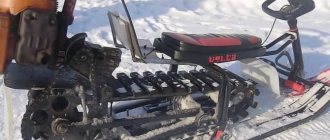
Instructions for assembling a snowmobile from a chainsaw
Assembling a product is quite an interesting job. It consists of several successive steps that must be performed carefully and responsibly.
The first stage is the assembly of the frame base of the future homemade snowmobile. For work you will need steel corners (size - 50 x 36 cm) or steel sheets (thickness - at least 2 mm). The middle part of the structure is made from the corners, and the front and back are made from sheets.
Carefully make two through holes to accommodate the track shaft and track wheel guides (tensioners are installed on both sides of the side members).
Important! The front device is specifically designed to tension the second stage of the idler gear, it also helps in adjusting the track itself
- Special brackets are carefully welded to the bottom of the side members (they are attached at the same distance from each other), support rollers are installed in their open grooves.
- The rollers (in rubber covers) are placed on five axes, each of which is attached to the underside of the open grooves.
- Between each of the elements special bushings made of duralumin are installed (they are made from a suitable pipe).
- The bracket axles themselves are secured using nuts and locknuts (they are designed to strengthen the snowmobile frame and hold the side members at a certain distance from each other).
- Three metal corners are used to make racks for attaching the prepared chainsaw gearbox, and install the intermediate shaft of the chain drive.
- A seat for the user is installed on the prepared frame (a suitable box or car seat is used for these purposes), it is fixed in the area between the middle and rear parts of the structure.
- A hole is made in the front section of the frame to accommodate the steering wheel; it is made from a pipe with welded control handles.
- Metal gussets are installed in the places where the snowmobile racks are attached (they strengthen the structure, make it stronger and more reliable).
Important! In order for the future homemade snowmobile to have good maneuverability in snowy terrain, it is equipped with a caterpillar mechanism
- A snowmobile drive shaft is made from a metal pipe, and a special round flange is inserted into it for attaching gears.
- To create the steering, equipment from old motorcycles or mopeds with three-lever control is used.
The finished snowmobile is light in weight and can easily be placed in the trunk of a car for transportation over long distances. Its controls are so simple and intuitive that even a child can easily use it.
DIY children's snowmobile: photo with description
The operating principle of the device is as follows.
A power unit mounted at the rear or under the operator's seat (the engine from a chainsaw, trimmer, or other device) causes one or a pair of wheels to rotate. They push the structure forward, and it glides over the snow thanks to a pair of skis, which reduces friction and evenly distributes the load on the snow mass. The operator sits on the seat and selects the direction of movement using the steering wheel, which also ends with a single ski.
The basis of a snow scooter with a motor is a power plant - an engine from a trimmer
Gasoline snowmobiles
Two-stroke engines are lightweight, easy to repair, quickly warm up, and can use cheap fuel.
Four-stroke engines have a significant resource, have lower fuel consumption and low noise levels.
There are air- or water-cooled engines.
The air cooling system is simple, but if used incorrectly it can lead to overheating.
With water cooling, the radiator is cooled by snow. Overheating is practically excluded , but can occur in the absence of loose snow.
There are carburetor and injection engines. The latter have a number of advantages: they are cost-effective, environmentally friendly, and stable in operation. Injectors are less reliable and practically cannot be repaired in the field.
When refueling a snowmobile, it is necessary to fill in unleaded gasoline, because... the use of leaded gasoline increases the harmfulness of exhaust gases and reduces the service life of the engine.
If gasoline gets on the surface of the snowmobile, the body paint may be damaged.
Most children's snowmobiles have a maximum speed limit of about 13 km/h .
How to make a snow scooter with a chainsaw engine with your own hands
To make a children's gas snowmobile with your own hands, you can take the motor from a chainsaw. For example, common options:
- “Friendship” is simple, the device will be without unnecessary details. At the same time, the weight is 12 kg, and the power is small - 1 kW. Another disadvantage is that there are no safety covers, which is especially important for children.
- “Ural” - the weight is approximately the same (almost 12 kg), while the power is much greater - 3.6 kW. The engine is two-stroke and works even in cold weather.
- “Shtil” is a saw of medium power, but it is not so noisy. It does not produce strong emissions, which is also important for children.
Required materials and tools
To make a snow scooter with a motor with your own hands, you will need ready-made structures and installations: a gasoline engine, steering wheel, windshield, seat, chassis, shock absorbers. You can take a ready-made backrest for a snow scooter or make it yourself.
For work you need to prepare the following materials and tools:
- Welding machine with electrodes.
- Duralumin pipe D16.
- Bearings: 2 pcs. 16 mm each, 1 pc. – 10 mm.
- Plugs for plastic pipes – 2 pcs.
- Star element.
- Tracks 5 cm.
- Plywood, plastic or fiberglass (sheathing).
- Steel shafts.
- Pipe for frame with a diameter of 25 mm.
- Aluminum profile (letter “P”).
- Profile steel pipe with a cross section of 20*20 mm.
- Fastening elements (nuts, bolts).
Drawings and assembly diagram of a snow scooter
The easiest option is to take a ready-made children's snow scooter and mount the motor yourself. If you wish and have the necessary elements, you can assemble the structure yourself by taking the engine, steering wheel, making the chassis and other parts. You can take a ready-made drawing as a basis.
When assembling products with your own hands, you must follow safety regulations.
Step-by-step instructions for assembling a snow scooter with a motor consists of the following steps:
- First you need to make a frame. Using spot welding, a steel sheet 2 mm thick is connected in the middle of the entire structure. The chain drive shaft will be mounted here, as well as the gearbox.
- A seat is located in the middle of the frame. You can do this yourself - then you can save money on assembling a snow scooter with a motor yourself.
- The support base is fastened with a beam to the front axle crossbars. A water pipe with a diameter of 15 mm or more can be used as a connecting element. Bushings for the steering wheel are welded at the ends, and a stand is mounted in the middle.
- The next stage of assembling a snow scooter with a motor with your own hands is the stand. For installation, use steel corners with sides of 30*30 mm. They are connected by steel crossbars - 2 mm gussets are suitable for this. The motor will be mounted on this rack.
- The caterpillar is taken ready-made, for example, from the Buran snowmobile. The workpiece needs to be shortened by 50 cm. The caterpillar is secured with transport tape. And the gears are made from cardboard sheets 15 mm thick.
- The drive shaft is made of 14 mm thick pipe. The gears are fixed with the upper flange, and trunnions (tips) are welded behind the drive shaft.
- Now you need to attach the scooter motor. You can also do this with your own hands at home. To do this, take a working unit, weld it and mount it to the rear.
- To make sprockets, you need to take two tips, and the right one should be longer than the left one (to make a keyway that will fix the chain drive sprocket). The sprocket is secured with a pre-threaded nut.
- You can also make the snow scooter's steering wheel yourself. To do this, take a ready-made device from a bicycle or scooter. For proper installation, it is necessary to place it on the central axis so that the traction force controls the skis well.
- At the last stage, you can install a windshield, as well as headlights for illumination at night. It is not necessary to install the brakes yourself for a children's snow scooter with an electric motor or a gasoline engine, since the vehicle does not gain high speed. If necessary, you can always brake with your foot or release the gas.
How to make a snowmobile from a chainsaw
The snowmobile is manufactured according to one of 2 schemes:
- single-track (2 skis in front, 1 track in back);
- two-track (1 ski in front, 2 tracks in back).
Any snowmobile device has the following design:
- Engine.
- Supply system.
- Oil injection system.
- Transmission.
- Chassis.
- Steering.
- Frame.
- Electrical equipment.
Before you begin making a homemade snowmobile from a chainsaw and its further assembly, you need to design drawings of all working components and the general appearance of the vehicle. It is better to draw each assembly unit separately and take out the dimensions.
During the development process, the brand of gasoline tool is taken into account.
Models such as Druzhba, Ural and Shtil are well suited.
The Druzhba chain saw has a simple design. The disadvantage is the low motor power (1 kW) with a large mass of the tool (12 kg).
The Ural has a weight of 11.7 kg and an engine power of 3.68 kW.
- ability to work at low temperatures;
- high environmental friendliness.
When making a snowmobile from a chainsaw with your own hands, you can choose the Shtil brand. It is characterized by noiselessness during operation, a power of 1.5 kW, and has a nominal weight of only 3.9 kg.
The initial stage is the manufacture of the base of the frame structure from welded spars. For the middle part, corners 50x63 mm made of hardened steel are used, the front and rear are made of S2 steel with a flange at an angle of 90°. All elements must have holes of the same diameter for mounting with the track wheel and drive shaft. Brackets for road wheels are welded to the bottom of the frame.
The racks are made from 30x30 mm corners and connected by metal crossbars. The result should be a structure in the form of a small portal. A platform is required for the mounting location of the chain saw gearbox and the chain drive shaft. Sheet steel of the required size is selected, usually 2-3 mm thick, and welded to the center of the right side of the module and the portal.
At the back of the portal and at the same time in the middle of the module, a place is formed for the seat, which is subsequently made from boards and fabric or removed ready-made from old equipment, for example, a moped.
The front spar and the drive axle traverse are installed to the beam, which is a standard water pipe with a radius of 0.75 mm. Steering ski bushings are welded at both ends, and a stand for the engine subframe is welded in the center. The mounting points for the supports are reinforced with 2-mm metal gussets for strength and stability of the structure.
The mechanism from the Buran unit is used as a caterpillar, the belt is shortened by 0.75-1 m. The gears of the gear drive are planted on the transverse shafts, then the web is laid. The caterpillar gear is made from a nylon sheet measuring 15 mm.
Drive shaft
To make the drive shaft, a metal pipe with a diameter of 14 mm is taken, and flanges are installed on top to fix the wheel teeth. At the ends of the mechanism, pin tips are pressed in and welded with space provided for bearings.
The snowmobile engine is the most important component that affects the operation of all self-propelled equipment. Therefore, experts recommend using a power plant from a Shtil chainsaw with an engine power of 1.5-3 kW. The motor is mounted on a stable support of the cross beam. The gearbox is rotated 180°, fixed on the platform, and the intermediate shaft of the 2-speed transmission is also mounted. The fuel tank is installed on top.
The drive sprocket with an internal key made of St20 is attached to the shaft with an M12 nut and a spring washer. For precise fixation, a thread of the required parameter is cut on the tip. It is taken into account that the 1st transmission stage corresponds to a large sprocket with the maximum gear ratio (on the Ural engine there are 38 teeth), the 2nd stage corresponds to a small drive sprocket with 10 teeth.
The chains are of a standard type, with a pitch of about 16 mm.
Brake system
If the snowmobile is designed to travel at low speeds of up to 30 km/h, then the braking system may not be provided. Vehicles are stopped by friction in the chassis and transmission systems.
Steering
Control - steering on support-steering skis. The support arms are rigidly connected to the steering shaft bipod. The steering wheel is two-handed, with a gas handle mounted on the right side.
The best homemade products - a snowmobile from a walk-behind tractor
When making a homemade snowmobile, they use tracks from other snowmobiles, or homemade ones assembled from scrap materials. After choosing a track, you need to decide what type of suspension to use. You need to choose from two main types: roller suspension and skid suspension.
Each of them has both advantages and disadvantages. After this, it is important to decide what kind of layout the snowmobile will have. Typically, a snowmobile is equipped with two steering skis at the front and a track block at the rear.
Principle, device diagram, theory, how everything should work out
All work begins with a plan and drawings, which can then be relied upon. Diagrams and drawings will be required in order to take into account all the components and their location, the relationship between each other and the operation of the mechanism as a whole. Pay close attention to the location of each unit, as if you make a mistake, the snowmobile simply will not move.
Work plan:
- First, the chainsaw motor is attached to the made frame.
- Skis are installed in the steering part of the snow scooter, which are the main element of movement.
- Then the steering is installed.
- To set the mechanism in motion, it is necessary to install tracks at the rear.
- Connect the track disk and the chainsaw motor sprocket.
- Finally, the driver’s seat is installed, which is mounted on a specially equipped place.
To equip the steering on a snowmobile, borrow the handlebars from a moped or bicycle. The main task will be to properly secure the steering wheel so that when you turn, the skis also turn.
This is interesting: How to make a snow blower with your own hands from a chainsaw (video)
Chainsaw unit
Using this tool you can make a children's snow scooter. However, adults can also use a homemade snowmobile using a chainsaw. At the first stage, you need to decide on the type of tool. Its brand is not of fundamental importance if the power plant is working properly. To make a snowmobile from a chainsaw, in addition to the motor, you will need a gearbox.
To make a frame, you can take metal corners and two plates. First, the edges of the sheets are bent at an angle of 90 degrees, and then holes are drilled into them. A caterpillar shaft is mounted in the front part of the structure, and an axle for gear wheels is mounted in the rear part. Also, brackets should be welded to the bottom of the frame, parallel to each other.
An axle for 18 road wheels arranged in a checkerboard pattern is installed in the lower grooves. On the spar it is necessary to install 3 racks made from angle iron. To strengthen the structure, the racks are connected by transverse beams. A second sheet is attached to the front part, on which the intermediate shaft and gearbox will be placed. The next step is to make a subframe from metal pipes.
A flange is installed on the tubular drive shaft. Trunnions are welded at the end of the shaft, and the right one should be longer than the left one. The chain sprocket will then be mounted onto this extension. Since the snow scooter is not capable of reaching high speeds, you can do without a braking system.
Making a homemade snowmobile is quite possible, but you will have to make an effort. However, considering the cost difference with ready-made solutions, it is definitely worth it.
How to make a children's snowmobile using gasoline with your own hands: types of models
For high-speed descent from the mountain, instead of the usual sleds, it is better to use a snow scooter. Unlike a sled, it can be controlled. In addition, this technique can be used to slide down really steep slides.
You can find several interesting Chinese options on sale. However, their quality, as a rule, leaves much to be desired: very thin tubes, weak welds and an uncomfortable seat. This applies not only to ?adults? snow scooters, but also simple mini-structures designed for children. The latter are not designed for real loads at all. Therefore, if you want to have a high-quality and comfortable snowmobile, you will have to upgrade a ready-made one or make a new one yourself.
A homemade snow scooter is not only convenient, but also has other advantages. You can make a model for two or even three people. In addition to strength, if you make a snowmobile correctly, you can achieve greater controllability and maneuverability. You may find the following instructions helpful.
Snow scooter with trimmer motor
Do-it-yourself homemade snow scooter with a motor from a trimmer : a detailed description of making a homemade product with a photo.
If you have a children's snow scooter , you can improve it, for example, install an engine from a trimmer; such a snow scooter with a motor will bring a lot of emotions to your children.
Materials used
You can make a snow scooter with your own hands from wood, weld it from metal tubes, or use other types of materials. As the basis of a simple mini-snow scooter, you can use a regular sled or some other durable and lightweight metal frame.
You can also try to upgrade or modify a purchased model or mini snow scooter for children. Choosing the right materials will affect the integrity, quality and even speed of your snow scooter. If you make it from wood, then most likely it will be a fragile and quite heavy structure. [ads-pc-1]
Materials for production:
The entire manufacturing process is shown in the photo.
First of all, we disassemble the ripper attachment.
The lug mount must be secured to the wheel rims.
To prevent the wheels from slipping in the snow, we put on chains.
trimmer rod and drive cable.
We make the mount for the gearbox from a chair leg. We attach it to the frame using this fastening.
Skis can be reinforced with an aluminum angle.
The gas handle is made from a bicycle brake handle.
This is how a snow scooter with a trimmer motor turned out, great fun for children.
The design is collapsible and easily fits into the trunk of a car.
Motohoe
And also, in addition to a homemade attachment for cultivation, which, when paired with a lawn mower, can easily replace a light walk-behind tractor; You can turn the trimmer into a motorized hoe for weeding.
- To make the nozzle, you will need a thick sheet of stainless steel from which a circle is cut.
- In the center of the circle we make a hole for connecting it to the trimmer, and it is also necessary to drill small holes (selected according to the diameter of the bolts that will be needed later) along the entire plane of the circle.
- We secure the bolts into the holes with nuts.
Snow scooter with motor
Such a simple “hedgehog” will help any gardener in the fight against weeds.
Bicycle with engine from trimmer
A homemade bicycle with a trimmer is a high-tech vehicle that differs from simple analogues in its high riding speed, practicality and reduced cost due to the use of cheap equipment.
To assemble a motorbike, the following equipment is required:
- the bike is in working order;
- trimmer motor
- chain;
- tensioner;
- star;
- clamp;
- cable;
- fuse;
- controller;
- exhaust pipe;
- bushing, bolts, washers.
- 2 rubber spacers are attached to the rear wheel: the first - between the spokes, the second - behind them.
- The sprocket must fit the trimmer . It is inserted into the bushing, which is located on the outer part of the wheel. A crescent moon is attached to the inside.
- The engine is mounted on the trunk or behind the seat using a clamp purchased or made from a steel plate with your own hands.
- Install the chain on the sprocket and power unit and adjust it with a tensioner. It is not recommended to use belts instead of a chain. Under the influence of friction, they often become unusable and their service life is minimal.
- The throttle handle and the engine are connected by a cable.
- Attach the fuel tank and carburetor.
- The exhaust pipe is welded with a weld seam.
Some craftsmen create a braking system and replace standard wheel tires with non-slip ones. After assembling all the components, be sure to check the operation of the bicycle. The functionality of the mechanism and its own safety will depend on this.
Motor sleigh
Motor sleighs are a foot-powered snow scooter or Finnish sled upgraded with a motor, or are made entirely from scrap materials found in the garage, or purchased at dismantling markets. Main components:
- frame made of metal pipes, welded in the image and likeness of a “finka” sled;
- a pair of old skis;
- engine and gas tank from a brush cutter, walk-behind tractor or chainsaw;
- a caterpillar, or a wheel from a car or motorcycle (a studded wheel from an Enduro motorcycle is excellent) and a chain, if the tire cannot be “tuned” with studs;
- a steering wheel for steering a sleigh, which can be a bicycle steering wheel, a steering wheel from a walk-behind tractor, or one welded by yourself;
- seat (optional): from a bicycle, scooter, or homemade in the form of a bench or stool.