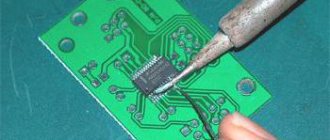
When desoldering components from circuit boards, difficulties often arise with components that have many pins. It's clear. If you use a regular soldering iron for such work, then removing a small component from the circuit is not difficult.
It is enough to heat the leads and pull out the part while the solder is soft. If there are many outputs, then it is not possible to heat them all at the same time. In this case, a desoldering braid or other special devices are used.
Dismantling methods
In some cases, for dismantling it is possible to use a soldering hair dryer, which, by heating a large area, melts the solder on all contacts.
But using a hairdryer can be inconvenient when the installation is tight. It is possible to heat the solder on the legs of adjacent components.
The ideal would be dismantling, in which the contact pads remain clean and tinned. Sometimes mechanical and chemical methods are used.
To carefully remove solder from the board, it is better to use a soldering iron. There are several options available:
- remove solder directly onto the soldering iron tip;
- use a desoldering pump to remove excess solder;
- remove using braid.
Solder can be removed mechanically using a file or needle file. This method is fast, but rough. When using the chemical method, the solder is dissolved by aggressive materials, for example, some acid solutions.
Sometimes compressed air is used to clean the board, which blows off excess material. But this method is rarely used, as it is crude and even quite traumatic.
Removing solder.
The soldered boards were not immediately thrown away. They were stored in a special box. When the box was filled, the most interesting thing began - removing the solder from them . I still can’t imagine how I came up with this then, but thanks to this, I still have never bought solder - I still use those supplies. Although I've probably already used half of it.
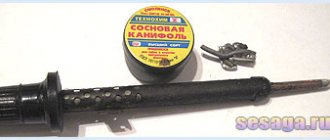
This is how I removed the solder : - I took a 60-watt soldering iron, filed the tip so that there were no holes and the edges were straight. Next, holding the board with the tracks down, I moved a soldering iron along them, rolling the solder in drops onto the board. The solder itself drips in drops - just have time to move the soldering iron. The result was a large shapeless cake, which I then melted over a gas stove in an aluminum container. The melt was poured into matchboxes. The result was neat compact ingots of tin solder . When solder is needed, such an ingot is bitten from the edges with side cutters, separating small pieces sufficient for melting with a soldering iron.
And even now, with the abundance of all kinds of solders and alloys on sale, I do not immediately throw out all sorts of non-working boards. Also, using an old soldering iron and now, in the old fashioned way, I collect solder and cry. I’m crying because the solder in modern boards makes me cry like a cat. Perhaps it was those Soviet ones - “iron” ones...
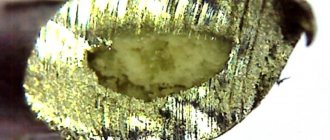
Removal with a sting and using a desoldering pump
To remove solder from a soldering iron tip, you need to thoroughly clean it and coat it with flux. Then, when the solder melts on the contact pads, the latter will stick to the tip, and the pad will be cleaned.
This method is not very convenient because it allows you to collect only a small amount of material at a time, and then the tip will have to be cleaned again.
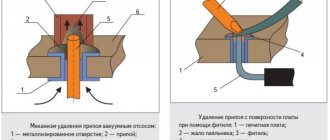
A desalination pump is a tool structurally consisting of a tube with a spring-loaded piston. At one end of the tube there is a suction device. Before starting work, the piston is pressed into the tube and secured with a button.
To remove solder from the contacts, you need to heat it with a soldering iron and, bringing the suction device of the desoldering pump closer, release the piston by pressing the button.
The piston, moving under the action of the spring, will create a vacuum in the tube, which will draw molten solder inside it. To remove the collected tin, it is enough to disassemble the tin pump housing.
Be careful with BGA contacts
The braid can damage the BGA contacts when cleaning the solder. This is due to the fact that these contacts themselves absorb a lot of heat. And the braid has time to cool, and in the meantime the solder between it and the contact begins to harden. And then the braid is sharply removed with a soldering iron onto another contact, which can cause damage to this contact.
Therefore, work with BGA contacts as carefully as possible, do not make sudden movements. Heat the board using the bottom heater or help the soldering iron from above with a hairdryer.
Post Views: 330
Braided Copper Tape
The most effective way to remove solder from circuit boards is to use braid, that is, a tape woven from copper wires. You can make it yourself by removing it from the shielded wire and cutting it into pieces of the required length, or you can purchase it in a store.
There are many options for this device on the market.
In most cases, the flux-coated braid is wound into a skein on a plastic spool. Sometimes such a reel is enclosed in a plastic case with a special outlet for more convenient use of the braid.
The product can be designated differently - desoldering thread, soldering tape, desoldering braid. Whatever the name, it is usually the same material, allowing you to quickly and efficiently remove solder from the board.
What it consists of and what it is like
The braid consists of a rod of thin copper wires that easily pick up diluted solder and flux when heated.
Roughly speaking, this is just an ordinary stranded wire without insulation.
Braids are available in different diameters. The larger the part, the larger the diameter of the braid will be needed and vice versa.
And some manufacturers add flux to the braid so that there is no need to add it when it is necessary to remove excess solder. It is very convenient and practical.
How to replace it
As mentioned above, braid is simply a rod of thin copper wires. And it can be replaced with ordinary stranded wire. But stranded wires typically do not consist of the same copper wires that are used in braided wires. Stranded wires are not the best replacement for braided wires.
The smaller the wire, the easier it is to tin. And that is why rods consisting of thin copper wires are used in braids. They pick up solder much better than regular wires.
The best replacement for braid is copper shields from coaxial cables. These shields consist of thin wires that easily pick up solder.
How to use
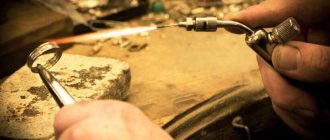
To use the braid when removing solder, you will need a soldering iron and a bottle of liquid flux.
If there is no liquid flux, use any other, but it will be uncomfortable to work with. You can prepare liquid flux yourself by dissolving pieces of pine rosin in alcohol or pieces of zinc in hydrochloric acid in advance.
Copper braid is best for removing solder alloy. The braid section must be coated with flux. This can be done with a brush, but it is better that the entire surface on which the solder will be collected is covered, and parts of the wiring inside the braid will remain inaccessible to the brush.
It will be more effective to apply flux by immersing the end of the braid in it. To do this, it is better to use a stable vessel with a fairly wide neck.
After wetting the braid with flux, it is applied to the place from which the solder needs to be removed and heated with a soldering iron. The heated braid transfers heat to the solder, and it melts and sticks to the braid, leaving the contacts clean.
When enough has been collected to prevent further collection, the end of the braid is cut off and the next section is used.
After cleaning one of the contacts, the steps are repeated with each subsequent one until complete cleaning or until the component is released from the board. As a result of high-quality cleaning, the mounting holes are smooth, and the contact pads remain clean and tinned.
Soldering iron selection
So, let's start with the fact that the soldering iron is the most basic part of the soldering process. The speed and ease of doing the job depends on the correct choice of this tool.
Electric soldering irons are divided into 2 types:
- Spiral. Spiral ones heat up slowly, but are more durable.
- Ceramic. Ceramic ones, in turn, heat up quickly, but require careful use, as they are very susceptible to mechanical stress.
Also, the device is divided by power:
- 3-10 W, mainly used when desoldering microcircuits of very tiny sizes;
- 20-40 W, in demand among radio amateurs and at home;
- 60-100 W, with their help solder wires with a large cross-section;
- 100-250 W, for working with large-sized metal;
Mostly, experienced soldering stations use soldering stations as they are equipped with an adjustable heating range and are able to maintain a constant temperature. A soldering station in the hands of a master greatly speeds up and improves the work process, but a beginner, unfortunately, will not be able to feel the benefits.
There are a certain number of characteristics by which soldering irons differ:
- Soldering iron supply voltage.
- Shape of the sting.
- Maximum tip temperature.
How to do it yourself
The removal braid is a consumable item and should be in the arsenal of every electrician involved in the manufacture and repair of electronic modules.
But sometimes a situation arises when neither braid nor suitable shielded wire is at hand. Then you can make a similar device from any flexible copper stranded wire with thin hairs.
To do this, you need to remove the insulation from the wire and twist the hairs a little to collect them into a bun.
The braid produced by industry is, as a rule, already coated with flux, and the need for additional wetting disappears. It is, of course, more convenient to work with such material. The sections with the collected solder can not be thrown away, but can be used later for tinning contacts.
Radio components from old boards.
At first I stored all the parts soldered from the boards in boxes, but then I suddenly realized that this was going nowhere. I have already walked this path. There were too many radio components Well, why do I need, for example, a bucket of MBM capacitors or half a bucket of 5-watt green resistors . I found another, military use for them - to shoot them through an open window with a slingshot into a vacant lot. Where can you put so many of them? You can’t sell through the Internet - there was no Internet at that time. But microcircuits, transistors, diodes, etc. are in short supply. Of course, they were carefully stored in a glued cassette made from matchboxes.
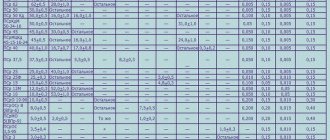
Purpose and classification of wires
A wire is an electrical product that consists of 2 or more metal wires covered with a winding of some non-metallic fabric. Serves to connect the current source with the consumer.
The wire consists of 2 parts. The first is the core - the part that conducts current. The second part is insulation, that is, what protects the core from external irritants. Copper and aluminum wire is usually used as a core; the insulation is made of paper, rubber, or varnish.
There is a certain classification of wires:
- winding;
- copper;
- high resistance wires;
- installation connecting;
- output;
- wires for rolling stock;
- insulated for overhead lines;
- non-insulated;
- wires for geophysical work;
- heat resistant;
- thermoelectrode;
- warm-up;
- automobile;
- aviation;
- installation;
- communication wires;
Soldering iron selection
So, let's start with the fact that the soldering iron is the most basic part of the soldering process. The speed and ease of doing the job depends on the correct choice of this tool.
Electric soldering irons are divided into 2 types:
- Spiral. Spiral ones heat up slowly, but are more durable.
- Ceramic. Ceramic ones, in turn, heat up quickly, but require careful use, as they are very susceptible to mechanical stress.
Also, the device is divided by power:
- 3-10 W, mainly used when desoldering microcircuits of very tiny sizes;
- 20-40 W, in demand among radio amateurs and at home;
- 60-100 W, with their help solder wires with a large cross-section;
- 100-250 W, for working with large-sized metal;
Mostly, experienced soldering stations use soldering stations as they are equipped with an adjustable heating range and are able to maintain a constant temperature. A soldering station in the hands of a master greatly speeds up and improves the work process, but a beginner, unfortunately, will not be able to feel the benefits.
There are a certain number of characteristics by which soldering irons differ:
- Soldering iron supply voltage.
- Shape of the sting.
- Maximum tip temperature.