. We are engaged in the installation of fences, gates (including automatic ones), installation of poles and power lines throughout Moscow and the Moscow region. Call from 09:00 to 21:00 daily.
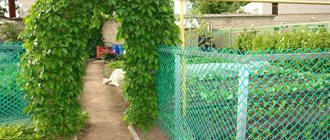
Metal mesh is the simplest fence option; it is easy to transport, not difficult to install, its cost is low, and with proper care it lasts a very long time. Before installing a chain-link fence, it is recommended to properly prepare the area, select tools and learn some of the intricacies of installation.
Chainlink fencing
Grid selection
The range of chain link is wide; it differs in cell size, appearance, and width of the canvas. It is made of black and galvanized wire, which is often coated with polymers. The width of the mesh corresponds to the height of the fence, which means you need to choose a chain-link taking into account the height of the fence. The mesh sizes matter if the fence is intended to enclose poultry. In all other cases they do not play a special role.
The most important criterion for selection is the type of wire that makes up the mesh. Ordinary black wire, not treated with polymers, quickly becomes unusable. After rain, the mesh becomes covered with rust, and it is no longer possible to avoid corrosion of the material. Such mesh is usually purchased for temporary fencing, since its cost is the lowest. To extend the service life of a chain-link made of black wire, you can paint it yourself or treat it with anti-corrosion compounds.
Galvanized mesh
Galvanized wire is much more durable, more aesthetically pleasing in appearance, but also more expensive. A mesh made from it can last twenty years, or even more. If you plan to install a fence for a long time, you need to purchase galvanized mesh; saving here is not advisable.
About chain-link fences
Chain-link is a mesh woven from spiral-shaped pieces of wire. Dimensions, shape and materials used correspond to GOST 5336-80. The mesh fabric is made with rhombic and square cells. For a rhombic cell, the acute angle of the rhombus is 60 degrees, while for a square cell, all angles are 90 degrees. The cell side size of the mesh fabric is from 5.0 to 100.0 mm.
Steel wire with a diameter of 1.2 to 5.0 mm is used as a semi-finished product for the mesh. It can be made of carbon steel without coating or galvanized. Another type of woven mesh is chain-link with a protective and decorative polymer coating. The mesh is sold in rolls, the length of the material per roll is 10 m.
Purpose of the mesh depending on the type of coating
- Uncoated mesh is usually used for installing temporary fencing at construction sites. After installation, the mesh becomes covered with rust almost immediately. The service life of such a fence is 10-12 years.
- Galvanized canvas is used for fencing garden plots and summer cottages, and for the construction of walking enclosures for poultry. A layer of zinc reliably protects the metal from corrosion and moisture. However, the protective coating is not decorative. The service life of this type of fencing is 50-60 years.
- Polymer-coated mesh has an aesthetic appearance, which is why it is most often used for fences of country houses. The protective and decorative coating has high mechanical strength, moisture resistance, resistance to seasonal temperature changes, and retains its original color in direct sunlight. Service life - up to 70 years.
Preparation of materials
When arranging a mesh fence you will need:
- Rabitz;
- wire for fastening;
- support pillars.
With wire and chain-link everything is simple, but the poles need to be selected separately. A variety of supports can be used for this fence: concrete posts, wooden beams, metal pipes, channels. Since mesh is a lightweight material, the supports do not need to be too large. Wooden supports are much cheaper than metal ones, but their service life is shorter. Additional processing is required to install them. If ordinary poles are used, they must be cleared of bark, dried and painted. The part of the support intended for deepening should be treated with bitumen mastic.
Iron pillars also need preparation. Of course, you can take ready-made supports with hooks, but it’s more economical to make them yourself. Any metal pipes are suitable here; Small hooks are welded to them, thoroughly sanded, degreased, and coated with an anti-corrosion primer. After drying, a thick layer of paint is applied over the primer, and the lower part is treated with mastic. You also need to prepare a plug for each pipe.
Profile pillars
Concrete pillars require the least amount of work: they are resistant to dampness, do not rust, and withstand any conditions well. They do not need special treatment, and their service life is much longer.
Where to buy fence posts for mesh
Today there are many specialized stores where you can buy such products. Judging by the reviews left by users on specialized forums, the leaders (in Russia) are the trading platforms presented below.
It is advisable to make a choice from products without defects
Trading house "Vimos"
Trade House "Vimos" has an extensive network of stores selling building materials and household goods in the market of the North-West region. We offer fence supports for mesh fencing made of various materials and any size.
The company has an online platform for ordering goods online.
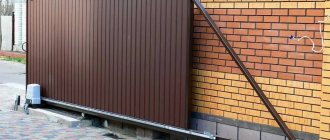
Sample of the finished design
STD "Petrovich"
The private retail chain "Petrovich" has opened trading bases in the North-Western and central regions of the Russian Federation. The company offers a wide selection of construction products, including support posts for mesh fencing.
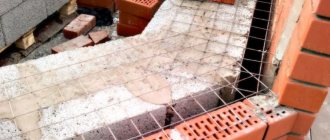
Framed fence on a brick base
"Leroy Merlin"
The leader of the list is the famous French offline and online trading platform Leroy Merlin, which has been cooperating with the Russian market since 2004. It is one of the largest DIY retailers in Europe. The company's construction hypermarkets are present in all major cities of the country.
Budget option with a base made of profile pipes
Marking for the fence
Before installing a chain-link fence, you need to make markings. First, determine the location of the corner post, marking it with a piece of rod. Next, mark the second corner and connect the rods in a straight line with a rope. This is how the entire perimeter of the future fence is marked, and the amount of materials is calculated from it. As a standard, the mesh is sold in rolls of 10 meters, so the perimeter is simply divided by 10. The number of posts is also easy to calculate: the spans of the fence are 2 meters, which means the supports should be at the same distance. One roll of mesh will require approximately five supports.
Installation process
Chain-link mesh is mainly installed using the tension method, which is faster and less labor-intensive compared to fastening mesh sections. The standard span width is 2.5 m, the fence height is 1–2 meters.
Fixation model
Installation of support posts begins with marking the intermediate step between the columns. First, mark the area for the corner posts. This procedure is carried out using pegs that need to be driven into the ground. Then a rope or fishing line is pulled between them. Next, the width of the span is fixed and a well is dug under the pillar.
Scheme for calculating the main elements and the order of their installation
The racks are placed in prepared pits and then filled with concrete. Until the solution hardens, the pillars are leveled to the same level. The next stage is attaching the mesh. You can do this in three ways:
- A pre-welded frame structure made of a profile and an angle is fixed on the supports.
- Thick wire is stretched between the posts through the top and bottom edges of the mesh and screwed to the posts with thinner wire.
- To attach the chain-link to the supports, special fastening hooks are welded (either independently or in production).
Next, we will consider in more detail the principle of installing fence supports made of the above materials.
Wire placement diagram
How to install wooden posts
Installation begins with preparing the timber: removing the bark, cutting off the excess piece and adjusting the length. A hole is made in the ground with a depth of 10 cm below freezing of the soil. The part of the product that needs to be dug into the soil is impregnated with an anti-rotting agent or liquid bitumen. The pillars can then be buried.
The mesh is fixed with nails or clamps.
Methods of fixation to wooden elements
Installation of rolled metal support pipes
Metal profile products with welded fastening hooks (either independently or in production) are placed in a dug hole 600–700 mm deep. Then the hole is filled with concrete. The width of the span between the posts is determined by the height of the mesh fence: the higher it is, the smaller the intermediate distance is provided.
Types of installation of supports
How to install asbestos cement pillars
If you install racks made of asbestos cement material correctly, they will last much longer. To avoid distortion, the distance between the pillars is carefully calculated. When installing, take into account the properties of the soil and the amount of wind pressure on the support posts.
Types of concreting of asbestos-cement supports
The base of the pillars is concreted, or the supports are fixed to a reinforcement frame with the obligatory provision of anti-corrosion waterproofing of the well. The mesh is fastened to the posts using wire or special fastening brackets.
Concrete pouring diagram
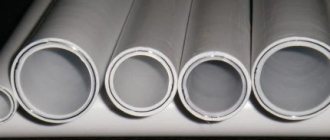
Installation of plastic support products
Plastic support products are produced in the form of pipes. Due to the lightness of the material, their installation does not require much physical effort. The bottom of the holes dug in the soil under the tubular posts is covered with fine-grained crushed stone. Then the crushed stone cushion is properly compacted. The bases of the installed supports are concreted.
Marking and preparing places for placing plastic supports
Installation of pillars
Since the chain-link has a low weight and low windage, there is no need to deepen the supports too much. It is enough if the pillars are dug in about a meter. Sometimes metal supports are not dug in, but driven into the soil, but this is only justified where the soil is very dense and stable. It is safer to dig in the supports and concrete them. To make holes you need a drill, shoveling takes longer and is more tiring. So, according to the markings, holes are dug 1 meter deep, they should all be located along the same line.
Fence scheme
To prevent the pillars from sagging later, the holes below are filled with a layer of sand, then crushed stone, and compacted. Then the pillars are lowered, leveled, and secured with spacers. A more economical option involves filling the holes with soil and then compacting them, but more often a concrete solution is used. Even heavily compacted soil can settle and erode over time. And the concrete base will remain unchanged for many years. Before pouring the solution, you need to make sure that all the pillars are equal in height and stand vertically. The solution must be poured very carefully, slowly, without leaving any voids. During the filling process, you can pierce the solution several times with a piece of reinforcement or a crowbar - this will help the concrete to be distributed and compacted more evenly.
While the concrete has not hardened, the pillars are checked again with a plumb line: if there are deviations from the vertical, they are immediately eliminated. Further installation can be carried out after the concrete has dried - about two weeks later. The better the concrete stands, the more reliable the support will be.
Mesh attachment
The last point from the instructions on how to install a chain-link fence yourself involves attaching the fence fabric to the posts. Everything is quite simple here. The first roll is placed near the corner post, and the edge of the mesh is secured vertically. The hooks are threaded into the cells and then secured with wire.
Retaining wire
It is advisable to stretch the mesh 15 cm from the soil to protect the bottom of the fence. Next, the roll is transferred, simultaneously unwinding it and tensioning the mesh. The mesh should not sag between the supports, and thick wire or cable is used for this. They are threaded into cells on top of the mesh and secured to supports. The tighter the mesh is stretched, the more aesthetically pleasing the fence looks.
Painting the fence
In order to increase the service life of the fence, you need to know how to paint the chain-link mesh on the fence. There are several ways to solve this problem.
Painting with a brush
This is a fairly economical method, although its implementation will require a lot of effort and time. If you work carefully, the amount of paint spilled will be insignificant.
The easiest way to paint
Using a mitten
This is a rather interesting method that is highly effective. It consists of dipping an inverted fur mitten into paint and using it as a brush. To protect the skin on your hands, you should use thin rubber gloves. It is important to know that a high percentage of solvent in the paint can react chemically with the glove material. This method is most successful when using oil paints.
Painting using a spray gun
Using this method, the mesh will be painted in an even layer in record time. In this case, the jet should be kept at an angle of 45°, which is quite difficult. Also, the disadvantages include the unreasonably high consumption of paint.
Painting with a roller
This technology is considered the most optimal, especially if two people paint the mesh on both sides at the same time. For the most uniform coverage, you should choose a roller with a longer pile.
It is also worth considering that before painting you should remove the rust and cover the surface with a primer.