The topic of this article is how to make sliding gates with your own hands. In it you will find information about the technology for manufacturing gate structures of this type, learn about some tricks and nuances, failure to comply with which will lead to a decrease in the quality of the manufactured product. Knowing the information offered, you can calmly speak on equal terms with specialists in this field of construction.
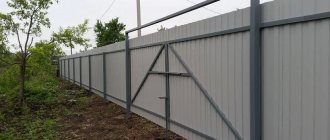
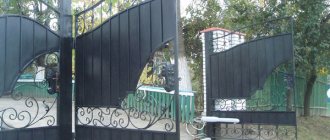
Sliding gates on a suburban area
Advantages and disadvantages of sliding gates
Before moving directly to the analysis of the topic: how to make sliding gates yourself, it is necessary to outline the pros and cons of this design.
Advantages:
- ease of opening, not requiring much effort;
- reasonable cost of the product;
- easy to automate;
- there is no need to fix the gate in the open state; the wind will not close it, like swing gates.
Flaws:
- for manufacturing it is necessary to purchase special fittings; you can make them yourself, but the quality of the product can only be guaranteed by a highly qualified specialist;
- rollback will require space;
- a solid foundation is poured under the gate itself, which increases material costs.
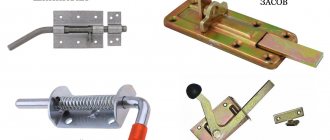
Accessories for sliding gates
As for the section for sliding gates, its length is calculated using the following formula:
L = H x 1,4,
where L is the length of the gate, H is the clear width of the gate opening.
The increasing coefficient can be 1.33, but not less. Why is this particular section length chosen? In principle, it is equal to the length of the gate itself. The thing is that the design has a so-called shank. It acts as a counterweight to the gate structure itself so that it does not collapse during the moving process. And the displacement itself with a shank is much easier.
If the sliding section falls within this size range, or is larger, then you can safely manufacture and install sliding gates. If the area of the territory does not allow this, then you will have to choose a different type of entrance gate.
And a few more subtle points regarding the shank:
- if the width of the gate opening exceeds 5.5 m, then the tail should be made not triangular, but rectangular;
- in this case, the length of this part of the gate structures should be made in the range of 45-50% of the size of the opening width.
On the left is the shank, not covered with finishing material
We decide on the dimensions and design a drawing
To correctly draw up a drawing, you can use a ready-made diagram taken from the Internet. First you need to decide on the width of the opening, since the remaining dimensions depend on this. With a perpendicular entry, 2.5 - 3 m is enough for a passenger car. A truck or tractor will need at least 3.5 m. If entry is only possible at an angle, the width increases by one and a half times. According to safety conditions, the distance from the most protruding elements of the car to the support pillars is chosen to be at least 30 - 50 cm. The optimal opening width, sufficient for convenient passage of all types of transport, will be 4.5 m.
The width of the sash is made 20 cm larger than the size of the opening, so that when closing there are no gaps left on the sides. When installed, the lower edge of the sash is raised 10 cm from the ground. When drawing up drawings, it is also necessary to take into account the thickness of the support beam so that the height of the gate is level with the fence.
To prevent the sash from falling down when moving, a slope is welded to it, used as a counterweight. Its length is made equal to 0.5 of the width of the canvas. The entire load is carried by the support trolleys, so they are attached to a channel mounted on a solid concrete foundation. It is also used for installing an electric drive for remote gate opening.
To correctly draw up a drawing, you can use a ready-made diagram taken from the Internet
Opening for sliding gates
Let's start with the fact that usually the opening is limited by two pillars made of brick. For sliding gates, you will need to insert three 60x60 mm mortgages for each post. Mortgages should be located on the vertical plane of the pedestals located towards the yard. The hermits will subsequently be attached to them. It is optimal if you install a steel pipe in the pillars, to which the embedded parts will be welded.
Requirements for brick pillars:
- they must be assembled vertically;
- high strength of the structure, so that during operation of the sliding gates the pillars do not wobble or collapse;
- they are collected on a foundation, the depth of which should be below the freezing level of the soil in the construction area.
Attention! If the pillars are one of the types of metal profiles, then mortgages are not required in them. The guards will be welded to the posts.
Complete opening for sliding gates
See also: Catalog of companies that specialize in the installation of metal structures.
Gate foundation
Before you make sliding gates yourself, you need to figure out how they will open. Their design will include fittings, which are rollers attached to the lower supporting beam of the gate. They will move along the rail. The latter is a base with high load-bearing capacity.
To prevent the rail from moving or shifting, it is concreted in the ground. That is, they are building a foundation. The simplest and most reliable option is a strip foundation.
Its dimensions:
- length – half the width of the gate opening;
- depth – 1-1.5 m depending on the type of soil at the construction site;
- width 40-50 cm.
They begin digging a trench from one of the pillars, towards which the rollback will be made.
A channel with a width of 10-16 mm is usually used as a rail. Reinforcement with a diameter of 10-14 mm is welded to it, from which a reinforcing frame is formed.
Construction of a strip foundation for sliding gates
The following operations are performed next:
- install the channel and the reinforced frame welded to it into the trench so that its upper plane is at the level of the final finishing of the territory of the summer cottage: paving slabs, asphalt, paving stones, etc.;
- the channel is aligned strictly horizontally;
- the rail must be pressed against the post;
- if necessary, formwork is installed for the part of the foundation protruding above the ground;
- the trench is filled with concrete;
- After a week, the formwork is removed, and the foundation can be loaded through another.
Ready foundation for sliding gates
Manufacturing the supporting frame of sliding gates
Let's move on to the main section of the article - how to make sliding gates for your dacha yourself, that is, we will deal directly with the assembly process.
Please note that components for assembly can be purchased separately or in ready-made kits. For example, examples of such ready-made kits for assembling sliding gates can be found at the manufacturer of gates and components "ALUTECH"
First of all, you need to make a frame. For this purpose, one of the types of metal profiles is used. Today craftsmen give their preference to profile pipes. It is easier to work with, plus, this material has low mass but high load-bearing capacity.
The frame is assembled from two frames inserted into each other. The outer one will serve as a supporting structure, the inner one is used for cladding and increasing the rigidity of the overall product. Therefore, for the first it is better to use a pipe with a cross-section of 60x30 mm, for the second 40x20 mm.
Variant of sliding gate frame diagram
First, the outer frame is assembled. Before welding sliding gates, meaning a frame structure, you need to decide on the dimensions. Everything is clear about the length; this was written above. As for height, the optimal size range is 1.8-2.0 m.
Therefore, the profile pipe is cut to these dimensions, taking into account the required quantity. Please note that the lower guide should have a length equal to the width of the opening, plus 40%. The top one should be equal to the width of the opening. Two vertical posts are also cut off, as well as an inclined element that will form the shank.
Now you will need a flat area where all the cut pipes are laid at their location and welded to each other by electric welding.
If you ask a master how to make a sliding gate yourself, he will draw your attention to the following requirements for the frame:
- all corners of the structure must be straight;
- the door leaf itself must be in the same plane without distortions or curvatures;
- the seams are made continuous.
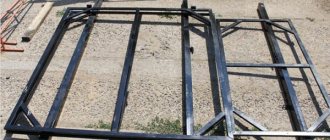
Frame made of external and internal frames
What you will need to build it yourself
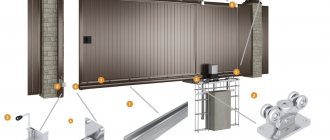
The sliding gate circuit consists of the following elements:
- Support or trolley for installing the console part.
- A guide beam that takes the load from the gate itself.
- Upper catcher - allows you to reduce the windage of the structure.
- Lower catcher – to transfer the load of the support rollers when closing the gate.
- Top bracket – ensures the verticality of the sash structure.
- A removable roller that serves as a support for the structure in the closed position.
- Support bracket with rollers and stand for roller platform.
- Plugs on structural elements that protect them from precipitation and dirt.
Usually they are all sold as a set; the variability of the set depends only on the weight and width of the gate.
When choosing a kit, please note that the roller carts and guide must be made of high-quality metal.
Rubber rollers are best suited because they look aesthetically pleasing and do not damage the frame of the structure while moving.
Gate installation
Let's move on to the next stage - how to install sliding gates:
- It is necessary to install the carriages included in the sliding gate fittings. There are two of them. They must be located at the maximum distance from each other within the length of the shank.
- We insert the rollers into the frame guide.
- We install the frame on the carriages, align and weld the latter to the channel located in the foundation.
- It is necessary to weld spotwise so that there is an opportunity to level or correct something. If everything is fine, cook with a continuous seam.
- Next, we weld the upper support rollers and one end roller. And also catchers: upper and lower. Both of these fittings are attached by welding to the flashing - this is a profile pipe, which itself is welded to the gateway post embedded parts. If the post is a pipe or channel, then go straight to it.
Installation of carriages for sliding gate fittings
And some nuances that you need to know when implementing the task - how to make sliding gates with your own hands:
- the end roller has a standard size of 110 mm, so the front carriage is installed taking this value into account, away from the opening;
- the far carriage is installed so that it does not knock down the plug;
- the larger the span between the carriages, the better, but without much effort;
- the rolling roller is mounted so that when the gate is opened, it rolls onto the lower catcher, in this way it reduces the load on the gate in its closed state;
- Today, manufacturers of fittings for sliding gates offer carriages with adjustable platforms, with their help you can adjust the height of the gate within a small range and eliminate distortions.
Video description
The video shows how to install sliding gates with your own hands, step by step:
At this point, we can assume that the answer to the question of how to make sliding gates has been given in full. Of course, there are many additional nuances that you need to pay attention to. But, as practice shows, each master with extensive experience has his own approach to the implementation of the task. Therefore, anyone who solves the problem of how to make sliding gates with their own hands must understand that the quality of the final result is experience in carrying out construction operations of this type, plus skills in working with tools: an electric welding machine, an angle grinder, and others.
Height-adjustable carriage
Selection of automation system
When assembling gates with an electric drive, you should select the correct automation elements. To do this, it is important to consider the dimensions and weight of the structure:
- For systems with an opening of 4 m, a drive unit of 500-600 kg is suitable.
- If the opening size is 6 m, it is better to use a device with a capacity of 600-1300 kg.
- In case of intensive use (applies to production facilities), you will need to install a device with a capacity of 1200-1800 kg.
Special attention is also paid to other equipment parameters:
- The presence of a temperature control option for operation in cold weather.
- Supports changing the speed of the sash movement.
- Availability of backup power supplies.