Bicycle with engine from trimmer
A homemade bicycle with a trimmer motor is a high-tech vehicle that differs from simple analogues in its high riding speed, practicality and reduced cost due to the use of cheap equipment.
To assemble a motorbike, the following equipment is required:
- the bike is in working order;
- trimmer motor;
- chain;
- tensioner;
- star;
- clamp;
- cable;
- fuse;
- controller;
- exhaust pipe;
- bushing, bolts, washers.
- 2 rubber spacers are attached to the rear wheel: the first - between the spokes, the second - behind them.
- The sprocket must fit the trimmer motor. It is inserted into the bushing, which is located on the outer part of the wheel. A crescent moon is attached to the inside.
- The engine is mounted on the trunk or behind the seat using a clamp purchased or made from a steel plate with your own hands.
- Install the chain on the sprocket and power unit and adjust it with a tensioner. It is not recommended to use belts instead of a chain. Under the influence of friction, they often become unusable and their service life is minimal.
- The throttle handle and the engine are connected by a cable.
- Attach the fuel tank and carburetor.
- The exhaust pipe is welded with a weld seam.
Some craftsmen create a braking system and replace standard wheel tires with non-slip ones. After assembling all the components, be sure to check the operation of the bicycle. The functionality of the mechanism and its own safety will depend on this.
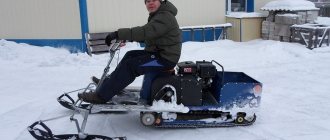
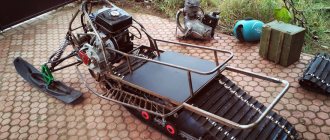
Motor sleigh
Motor sleighs are a foot-powered snow scooter or Finnish sled upgraded with a motor, or are made entirely from scrap materials found in the garage, or purchased at dismantling markets. Main components:
- frame made of metal pipes, welded in the image and likeness of a “finka” sled;
- a pair of old skis;
- engine and gas tank from a brush cutter, walk-behind tractor or chainsaw;
- a caterpillar, or a wheel from a car or motorcycle (a studded wheel from an Enduro motorcycle is excellent) and a chain, if the tire cannot be “tuned” with studs;
- a steering wheel for steering a sleigh, which can be a bicycle steering wheel, a steering wheel from a walk-behind tractor, or one welded by yourself;
- seat (optional): from a bicycle, scooter, or homemade in the form of a bench or stool.
The assembly should begin with the engine, connecting to it a chain, cables and tubes that will serve as the transmission of future snowmobiles. It is best to fix the skis on a low-moving, flat base - on the floor or table. Next, a frame with a steering wheel is attached to the skis, and a motor is installed. Before installing the seat, test the sled to ensure any imperfections are corrected. And the last place to put the seat, if provided.
How to make a snow scooter with a chainsaw engine with your own hands
To make a children's gas snowmobile with your own hands, you can take the motor from a chainsaw. For example, common options:
“Friendship” is simple, the device will be without unnecessary details. At the same time, the weight is 12 kg, and the power is small - 1 kW
Another disadvantage is that there are no safety covers, which is especially important for children. “Ural” - the weight is approximately the same (almost 12 kg), while the power is much greater - 3.6 kW. The engine is two-stroke and works even in cold weather. “Shtil” is a saw of medium power, but it is not so noisy
It does not produce strong emissions, which is also important for children.
Required materials and tools
To make a snow scooter with a motor with your own hands, you will need ready-made structures and installations: a gasoline engine, steering wheel, windshield, seat, chassis, shock absorbers. You can take a ready-made backrest for a snow scooter or make it yourself.
For work you need to prepare the following materials and tools:
- Welding machine with electrodes.
- Duralumin pipe D16.
- Bearings: 2 pcs. 16 mm each, 1 pc. – 10 mm.
- Plugs for plastic pipes – 2 pcs.
- Star element.
- Tracks 5 cm.
- Plywood, plastic or fiberglass (sheathing).
- Steel shafts.
- Pipe for frame with a diameter of 25 mm.
- Aluminum profile (letter “P”).
- Profile steel pipe with a cross section of 20*20 mm.
- Fastening elements (nuts, bolts).
Drawings and assembly diagram of a snow scooter
The easiest option is to take a ready-made children's snow scooter and mount the motor yourself. If you wish and have the necessary elements, you can assemble the structure yourself by taking the engine, steering wheel, making the chassis and other parts. You can take a ready-made drawing as a basis.
When assembling products with your own hands, you must follow safety regulations.
Step-by-step instructions for assembling a snow scooter with a motor consists of the following steps:
- First you need to make a frame. Using spot welding, a steel sheet 2 mm thick is connected in the middle of the entire structure. The chain drive shaft will be mounted here, as well as the gearbox.
- A seat is located in the middle of the frame. You can do this yourself - then you can save money on assembling a snow scooter with a motor yourself.
- The support base is fastened with a beam to the front axle crossbars. A water pipe with a diameter of 15 mm or more can be used as a connecting element. Bushings for the steering wheel are welded at the ends, and a stand is mounted in the middle.
- The next stage of assembling a snow scooter with a motor with your own hands is the stand. For installation, use steel corners with sides of 30*30 mm. They are connected by steel crossbars - 2 mm gussets are suitable for this. The motor will be mounted on this rack.
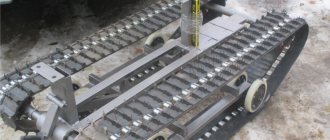
- The caterpillar is taken ready-made, for example, from the Buran snowmobile. The workpiece needs to be shortened by 50 cm. The caterpillar is secured with transport tape. And the gears are made from cardboard sheets 15 mm thick.
- The drive shaft is made of 14 mm thick pipe. The gears are fixed with the upper flange, and trunnions (tips) are welded behind the drive shaft.
- Now you need to attach the scooter motor. You can also do this with your own hands at home. To do this, take a working unit, weld it and mount it to the rear.
- To make sprockets, you need to take two tips, and the right one should be longer than the left one (to make a keyway that will fix the chain drive sprocket). The sprocket is secured with a pre-threaded nut.
- You can also make the snow scooter's steering wheel yourself. To do this, take a ready-made device from a bicycle or scooter. For proper installation, it is necessary to place it on the central axis so that the traction force controls the skis well.
- At the last stage, you can install a windshield, as well as headlights for illumination at night. It is not necessary to install the brakes yourself for a children's snow scooter with an electric motor or a gasoline engine, since the vehicle does not gain high speed. If necessary, you can always brake with your foot or release the gas.
A finished snow scooter with a motor, assembled with your own hands, is in no way inferior to the factory design
The advantages of a snowmobile that is designed by yourself:
- Price. Making a homemade snowmobile will cost much less money than buying factory-made equipment.
- The opportunity to make the snowmobile of your child’s dreams (the desired design, power, etc.).
- High reliability. Every parent wants only the best for their child, so the snowmobile will be developed with high quality. In turn, not every manufacturer pays attention to the level of safety in pursuit of increasing cash flow.
The main parts that are needed to develop a homemade snowmobile are: power unit (engine), fuel tank, frame, tracks, track, control and seat. In addition, there must be a drawing according to which all the parts will be assembled into one whole. First, the frame is welded from pipes and angles, then it is connected to the steering mechanism. Next comes the installation of the engine. The location of the carburetor should not be far from the fuel tank. After installing the engine, tank and mounting the fuel system, we proceed to installing the track. You can buy the caterpillar separately or make it yourself by first watching the instructional video. The driven axle is installed at the rear of the frame, the drive axle is installed in the middle of the vehicle. The final stage includes connecting the gas and brake cables.
What are they?
In the good old days, metal skis were churned out by the thousands and fitted to virtually every model, and on spring sleds the design of the skis was not particularly important. For many years now, manufacturers have partnered with various snowmobile parts suppliers, who are constantly developing new models of plastic skis with improved performance.
The use of high-tech plastic options allows the skis to flex to stay on track.
Some are suitable only for one specific model with the corresponding marking, while others have a more universal device for wide use. Efficient winter driving depends on proper design and provides improved handling in all conditions.
The weight of each plastic ski is about 2 kg, width from 130 mm, length from 1 meter. At the same time, the supporting area is about 1 m2, which makes it possible to demonstrate surprisingly high cross-country ability in powder. The thermoplastic from which they are made has unique properties, great flexibility and the ability to take on most of the load upon impact.
Models of chainsaws for conversion
We choose a model for remodeling - Ural, Druzhba, Husqvarna, Shtil. You can use an old tool with a worn saw blade.
The most popular option is the Druzhba saw, which has a simple device with a minimum number of components and components. The disadvantages include the heavy weight of the unit (12 kg) and the low level of safety. In addition, this technique is low-power 1 kW and is far from meeting the requirements of today - it is morally outdated even for creating a snowmobile from a chainsaw.
If we consider the Ural, then this is a more suitable modification, since it was originally developed as a powerful machine for felling forests. Therefore, in terms of technical parameters, the Ural is fully consistent with the expected loads on the snowmobile. With almost the same weight as Druzhba, the Ural saw is much more powerful - 3.7 kW.
A homemade snowmobile from a chainsaw, Shtil, Husqvarna, are very suitable options, given the sufficient power of 1.5 -3.0 kW with a low weight of 4 kg and the modern design of the tools.
Metal frame
Of course, a metal structure is not as practical as a wooden one. The material is very expensive and heavy, and creating a snowmobile will be more difficult.
In addition, the disadvantage of metal is its cold surface, which must be covered with something in order to move in it. But there is one big advantage of this option - the durability of the finished structure.
To create a metal snowmobile frame, you will need some materials and tools. The tools include welding and electrodes, a hammer, a grinder, pliers, a set of keys and fasteners for the system.
As for the material, here you will need to prepare metal pipes, a metal corner, steel sheets and a channel.
Before building the frame, be sure to make a drawing here with precise dimensions. This will help you select the quantity and type of material as accurately as possible.
Using a grinder, pipes are cut and welded into a frame. Fastenings for all parts of the snowmobile will be made from the corner. You can make them from channel wood.
Only after this is everything sheathed with sheet metal. In order to make a snowmobile from a walk-behind tractor, it is necessary to provide a place to place the motor.
What it is?
At first glance, the design of a children's snowmobile is not too different from an adult's - there is a seat, an engine, and controls necessary for successful operation.
Technologically, certain very important points can also be highlighted here:
- the presence of a height-adjustable steering wheel;
- simplicity, safety and functionality of management;
- soft and smooth operation of the brake mechanism;
- limited engine power, which prevents strong acceleration;
- high stability associated with the location of the center of gravity in models at a low altitude from ground level.
A snowmobile for a child is generally similar to another popular winter device - a snow scooter. Only instead of a mechanical driving force, an electric or gasoline motor is used here. In addition, such models actively use various control options and more reliable brakes that can easily provide a quick stop.
The snowmobile itself is a vehicle designed to travel on snow. It is equipped with special runners that provide stability when moving on snowy roads.
Adjustment of the steering wheel in children's models is provided on an individual basis, which greatly facilitates the use of riding equipment for children of different ages.
All existing versions of snowmobiles produced for children can be divided into several categories, according to their technical characteristics and design features.
Children's snowmobiles with electric drive. They are equipped with a rechargeable battery that can maintain the operation of the equipment for a long time. They are environmentally friendly, low noise, and safe for children of all ages. When stored at home, such equipment does not emit harmful substances into the atmosphere. The battery is easy to replace after use. Such models practically do not require complex or expensive maintenance.
ATVs and all-terrain vehicles are a universal solution for any age. Recommended for year-round use. Hybrid solutions are equipped with a single chassis with replaceable modules. For example, the package may include wheels for summer driving. Rear tracks exist for use as an all-terrain vehicle. There are special skis required when operating in snowmobile mode. Hybrids are produced mainly in gasoline versions.
On gasoline. They are equipped with modern and reliable gasoline engines, are energy independent, but cannot be called environmentally friendly. Such models are recommended for use by teenagers and are equipped with quite powerful motor options.
Let's look at some features of battery and gasoline models in more detail. Electric, environmentally friendly models are most often developed independently or presented as a concept. Can be produced in limited editions. The batteries they use are usually powerful, similar to those installed in a car.
Maintenance-free solutions used in such an energy carrier minimize losses associated with electrolyte evaporation, which also contributes to a significant improvement in the overall environmental friendliness and safety of the equipment.
Gasoline children's snowmobiles are widely represented on the market in versions from well-known companies specializing in the production of motorcycle equipment. Such models are equipped with two-stroke or four-stroke engines and warm up easily and quickly even in the cold. The equipment's maintainability and ease of maintenance make them a good choice for winter skiing.
Gasoline snowmobiles for children typically use one of two types of cooling systems: air and water type. In the second case, the environment acts as a source of cold supply, namely fallen snow.
Chainsaw snowmobile
Advice. The snowmobile can be made as either a tracked vehicle or a ski vehicle.
Before you start making a snowmobile from a chainsaw, you need to choose equipment that will have all the necessary characteristics. The best option for this purpose is the Druzhba, Ural and Shtil chainsaw (the power of these tools is ideal for creating high-speed snowmobiles).
The snowmobile design consists of four parts:
- Caterpillars.
- Ski
- Transmissions.
- Engine.
Chainsaw Ural
The assembly of a homemade snowmobile is carried out not according to some proposed scheme or standard drawing, but based on the materials and tools that the master has at his disposal.
Instructions for assembling a snowmobile from a chainsaw
Assembling a product is quite an interesting job. It consists of several successive steps that must be performed carefully and responsibly.
The first stage is the assembly of the frame base of the future homemade snowmobile. For work you will need steel corners (size - 50 x 36 cm) or steel sheets (thickness - at least 2 mm). The middle part of the structure is made from the corners, and the front and back are made from sheets.
Advice. To give the necessary rigidity to the structure, the metal is bent at an angle of 90 degrees.
Carefully make two through holes to accommodate the track shaft and track wheel guides (tensioners are installed on both sides of the side members).
- Special brackets are carefully welded to the bottom of the side members (they are attached at the same distance from each other), support rollers are installed in their open grooves.
- The rollers (in rubber covers) are placed on five axes, each of which is attached to the underside of the open grooves.
- Between each of the elements special bushings made of duralumin are installed (they are made from a suitable pipe).
Advice. In order not to waste time making rollers and axles for them, they can be borrowed from old equipment for digging up potatoes.
- The bracket axles themselves are secured using nuts and locknuts (they are designed to strengthen the snowmobile frame and hold the side members at a certain distance from each other).
- Three metal corners are used to make racks for attaching the prepared chainsaw gearbox, and install the intermediate shaft of the chain drive.
- A seat for the user is installed on the prepared frame (a suitable box or car seat is used for these purposes), it is fixed in the area between the middle and rear parts of the structure.
Chainsaw snowmobile
- A hole is made in the front section of the frame to accommodate the steering wheel; it is made from a pipe with welded control handles.
- Metal gussets are installed in the places where the snowmobile racks are attached (they strengthen the structure, make it stronger and more reliable).
- A snowmobile drive shaft is made from a metal pipe, and a special round flange is inserted into it for attaching gears.
- To create the steering, equipment from old motorcycles or mopeds with three-lever control is used.
The finished snowmobile is light in weight and can easily be placed in the trunk of a car for transportation over long distances. Its controls are so simple and intuitive that even a child can easily use it.
How to make a snowmobile with your own hands: detailed instructions
Features of homemade snowmobiles
Self-propelled guns made by yourself have a number of features:
- Riding a snowmobile can be quite dangerous and this must be taken into account, so although most snowmobiles cannot go faster than 15 km/h, extreme care and caution must be taken when assembling a snowmobile.
- When riding a snowmobile, the user will not get stuck in a snowdrift, since the device is equipped with a crawler walk-behind tractor.
- The snowmobile is reliable and can easily overcome many obstacles.
- When making a snowmobile with your own hands, the creator carefully selects the parts and assembles them into a single system, so the designer is responsible for the quality of his device.
- The cost of snowmobiles is quite high, but its individual elements cost little; By assembling a snowmobile yourself, the designer also saves on labor, so a homemade snowmobile costs several times less than a purchased one.
Preparation
First you need to make a drawing of the device. If you do not have such skills, then simply calculate the parameters of the machine. The design of a snowmobile is quite simple, so you can easily make a device based on a sample or video.
To make a snowmobile, you will need:
- pipe with a diameter of 40 mm. and a wall thickness of 2 mm. – needed for the frame and other frame elements;
- conveyor belt 3 mm thick. (you can use V-belts) - this is the main element of the track mechanism; lugs with a diameter of 40 mm are made from them. with a wall thickness of 5 mm;
- engine, fuel tank and carburetor from a motorcycle (for a snowmobile);
- sprockets and chain from motorcycles and snowmobiles;
- any drive shaft of suitable size;
- skis from another snowmobile;
- steering wheel with throttle and cable (from a motorcycle);
- the platform is optional because you can mount all the parts directly to the frame (most people skip this part because it's a little tricky and has little payoff); Several seats can be attached to the platform;
- seat;
- body;
- small elements (nuts, bolts, hinges, etc.).
Materials and manufacturing
When making a snowmobile on tracks with your own hands, you can follow this algorithm:
- Calculation of frame and chassis.
- Engine selection.
- Initial frame welding.
- Steering.
- Installing the engine on a temporary mount.
- Checking the design.
- If the test is successful, complete welding of the frame and installation of the engine.
- Drive system.
- Caterpillars.
- Attaching body parts.
- Final check.
You need to start work by making a frame on which the remaining elements will be attached. The frame should not be massive, otherwise the device will turn out to be heavy and lose maneuverability. It is desirable that its length be ±2 m.
Then the following are attached to the frame:
- drive shaft and receiving star;
- power plant with a transmission star and gas tank;
- front and rear wheel axles;
- front suspension with steering wheel and skis;
- seat and body.
Then tracks 40-50 cm wide are made. They can be made from conveyor belts or V-belts.
Information on how to make lugs from plastic pipes is provided above.
The rear wheel axle is secured using a movable guide element. It allows you to fix the position of the axis in a certain position. This is done so that the user can adjust the tension of the tracks.
Operating rules
In general, the rules for operating children's snowmobiles are very similar to similar requirements for using ATVs. Without going into complex technical details, let's start with the fact that the baby will probably show great impatience when he finds out what kind of toy he was given. However, it is unacceptable to let him go on an independent journey before he masters the controls. The first step is to carry out a global briefing, which begins with the principles of correct seating: hold the steering wheel with both hands, place one foot on the near step, then the other is thrown over to the far one.
After this, you need to explain to the child that while riding he must wear a helmet and other elements of protective equipment.
It is also very important to keep both hands on the handlebars and both feet firmly planted on the footpegs at all times. You need to turn the steering wheel smoothly
Before setting off on the first trip, you need to clearly explain to the little driver the meaning of all the buttons and levers, make sure that he understands correctly and remembers everything.
The first training should take place in the presence of an adult, on a level surface, at a speed no faster than a human step - the severity of execution is best controlled by forced restrictions. An adult must literally follow on the heels of the vehicle. In the first lessons, smooth turns are practiced, only after mastering them can you choose more complex sites (with a slope or hills, with sharper turns and obstacles). The speed limit should be removed gradually, only after making sure that the child is responsible and demonstrates skillful control.
For a review of the children's snowmobile RM Taiga LYNX, see below.
Purchased or homemade
A homemade snow scooter has many advantages over a purchased one. Firstly, it's its weight. For the structure to move smoothly in the snow, it must be as light as possible, because the driver’s weight will also need to be added to it. Purchased ?Husky? it will weigh about 80 kilograms. This weight is due to the gasoline-powered engine installed on the snow scooter. A homemade snow scooter can be made, as we discussed above, using electricity. It is cheaper, lighter, more convenient and environmentally friendly. On the other hand, there are children's models that can support one adult. The weight of this design does not exceed 20 kilograms.
Purchased ready-made models, if not made in China, are of better quality. After all, if you are not a master mechanic, then a homemade snowmobile can have various disadvantages? either they didn’t calculate the thrust star, and it quickly “slipped”, then the speed of the snow scooter suffers, and so on. But constructiveness and quality imply considerable costs.
Please note the prices above, including the famous ?Husky?
Skis and tracks
In order for a snowmobile to be constantly on the move, it is necessary to make high-quality tracked wheels and skis for speed.
In order for the tracks to be of the highest quality, their area must be large enough. If they are small, they will simply sink even in shallow snow.
You can purchase ready-made tracks at the store or make your own from rubber pipe. The video shows how to make a snowmobile in detail.
As for skis, they must be strong. Skis serve well in deep snow, as they are very easy to control and their speed is not low.
To ensure a perfect fit, skis are mostly made of metal.
If you want to make a wooden structure, then it is best to make it from birch or oak. The wood is thoroughly dried beforehand. Here are the basic rules on how to make a snowmobile with your own hands.
How to make a snowmobile
You can make a snowmobile from different vehicles that are in the garage.
From a motorcycle
You can make a snowmobile from a motorcycle using different models. The most popular are IZH and Ural. The advantages of such a rework are that no special changes need to be made. If the product is in good condition, you can even keep the original frame.
The conversion technology is as follows:
- Make a rectangular frame from metal pipes or appropriate corners. Its optimal dimensions are 150*43.5 cm.
- In addition to the IZh motorcycle, it is necessary to make a steering beam. It is made from metal corners. The optimal dimensions are 50*50*5 mm. Additionally, the beam is sheathed with metal plates.
- After this, it can be installed horizontally on the drilling machine. Treat the connection area. Do the same with the frame. In these places you need to make special grooves for reliable fixation. Additionally, attach a corner to the front frame.
- Now you can attach the seat for motorcyclists.
- You need to make holes in the side members.
- A channel must be placed between the front and middle parts of the frame to strengthen the structure.
- Regardless of whether the snowmobile is made from a Ural or another model of motorcycle, it is necessary to select a track sprocket and rubber band in advance. The optimal dimensions are 220*30 cm with a thickness of no more than 1 cm.
- Before installation, it is recommended to cover the track with nylon, which will allow the material not to delaminate during operation.
- Now you can move on to the transmission. It consists of two parts. The first, the front axle, is the drive axle. It is made of a tubular shaft, a track sprocket and a roller. The second is the rear axle. It is made from a caterpillar drum and a tubular shaft.
- You need to complete the snowmobile manufacturing process by welding sheet metal skis.
When converting a motorcycle into a snowmobile, it is important not to change the steering system. In the final product, this part must perform its original functions
The principles of modification are the same, they do not depend on the vehicle model. But the snowmobile from the Ural motorcycle will be heavier.
From Zhiguli
The design of the car is characterized by simplicity, ease of operation and high maneuverability. To make it you need to follow the instructions:
- Frame assembly. It's better to make it from pipes. The frame consists of front and central beams (steel pipes with a diameter of 5 cm), two lower diagonal elements (bent pipes with a diameter of 3 cm) and a rear strut. Welding is used to fix the elements.
- Installation of steering columns. To do this, you need to place two bushings on the front beam.
- Fixing the axle shaft. It is located on the rear frame; first you need to weld the body under it. It is made from a metal pipe with a diameter of 6 cm. Secure the axle shafts using bushings and electric rivets.
- Installing a car engine. First you need to make the front and rear fastening units on the central beam of the frame. First they need to be placed on the engine itself, and only then welded to the frame.
- In a homemade snowmobile, you can install large diameter wheels or skis made of sheet metal. In the first case, the rear and front wheels need to be connected in pairs with a metal pipe. At the same time, make grooves in the hub for the bearings, which are subsequently secured with spring rings. Additionally, install a spacer between the bearings.
- Install a sprocket on each wheel depending on the expected maximum speed. This snowmobile can be used at any time of the year. For a snowy winter, a design in which the front wheels are replaced with skis is suitable.
- Installation of the steering system. It is taken whole from a car, for example, from a Zaporozhets, or a motorcycle. The choice depends on personal preference. In the first case, gas, clutch and brake pedals are additionally installed. The gearbox is controlled using a lever and a rigid rod.
- Installation of a snowmobile cabin, the role of which is played by the car body.
Snowmobiles sold in stores have a fairly high price and often do not fit into the budget. But you still need to move in the snow. Fishing, hunting and just active recreation in the wild require cross-country ability. Therefore, we will look at ways to make a snowmobile with your own hands.
Snowmobile from motorcycle
The first model was assembled at a service station from scrap parts, plus a little welding. The engine is from a Voskhod 1 motorcycle, the sled is welded from metal pipes.
DIY children's snowmobile: photo with description
A simple homemade children's snowmobile made from a snow scooter and a cordless screwdriver: photo of the homemade product with a description.
The author decided to pamper his son and make him his own personal real snowmobile. For a child, such a vehicle is a lot of fun, because a snowmobile with a motor drives itself and does not need to be pushed.
To build the homemade product you needed the following materials:
- Children's snow scooter.
- Old Makita cordless screwdriver.
- Bicycle sprockets from wheels and pedals.
- Bicycle chain.
- The handlebars, brake lever and cable are also from a bicycle.
- Bolts, nuts.
- Duralumin pipe D16.
- A pair of 16 mm bearings.
- One bearing per 10 mm.
- Two plastic plugs for plastic pipes with a diameter of 200 mm.
- Aluminum U-shaped profile.
- Profile pipe 20 x 20mm.
Below you will find several photos describing the snowmobile assembly process.
First of all, the author of the homemade product replaced the standard round plastic handlebar on the snow scooter with a bicycle handlebar.
I made a trolley frame from a profile pipe using a welding machine.
Then I made a shaft and drive wheel from plastic pipe plugs and pieces of metal profile.
On one side, a large bicycle chainring is bolted to the wheel.
On the reverse side, we weld a wide washer to the shaft, drill holes and attach the wheel to it with bolts.
The bearing mount is welded from pieces of pipe along the outer diameter of the bearings.
A screwdriver with a small star is attached to the bottom of the cart frame, and a bicycle chain is pulled between the stars.
The speed of the snowmobile is controlled by a handle on the steering wheel; the cable is secured with a bracket near the screwdriver power button.
To power the electric motor, you can use any 12 V battery, for example from a motorcycle. If necessary, the cart can be quickly removed, which is very convenient when transporting a snowmobile in the trunk of a car.
The homemade product is designed for children aged 3 - 6 years; older ones will need a more powerful electric motor. I recommend watching a video showing original homemade snowmobiles made from a screwdriver.
Snowmobile made from scrap materials.
From a screwdriver.
Popular homemade products on our website
- DIY gazebo: photo of construction with description
- DIY solar collector: assembly photo with description
- DIY snowmobile: photo of homemade assembly
- Do-it-yourself snowmobile from a motorcycle: photo, description
- DIY snowmobile made from a chainsaw
- Do-it-yourself snowmobile from a walk-behind tractor
- Homemade heater: photo with description
- Restoring a Java 350 motorcycle: photo with description
- Wind generator from a motor wheel: photo with description
- Homemade ATV: (44 photos) assembly with description
- Homemade VAZ 2102 pickup: assembly photo with description
- Homemade motorized trolley: photo of a self-propelled trolley with description
- Homemade 4x4 fracture mini tractor: photo of assembly with...
- Homemade all-terrain vehicle on low-pressure tires: 45...
- Homemade car based on Moskvich-2140: assembly photo with description