Tools and materials
In the vast majority of cases, snowmobile tracks are formed from a conveyor belt or tires. But making tires is complex, time-consuming and too painstaking. In some cases, the propeller of a snowmobile is made from V-belts. In various versions, tracks are also made from chains and plastic pipes.
To work you will need:
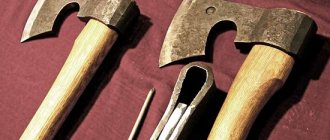
- large knives with a well-sharpened blade;
- electric jigsaw with fine teeth;
- bolts;
- nuts;
- wrenches;
- fishing line (helps strengthen the edges);
- cable or similar material that helps strengthen the track;
- hammer and sharp tool for preparing holes;
- rectangular profile pipe;
- Grover;
- washers;
- fittings
Manufacturing options
The photo below shows a possible scheme for creating a track for a snowmobile. The length of the main section is 5.8 m. In this case, rollers measuring 0.07 m are used. The center-to-center distance is taken to be 0.9 m.
Advanced people may not limit themselves to this drawing and study another version of the kinematic diagram of the snowmobile as a whole.
Making a snowmobile track with your own hands if you have the drawings is very simple. But if you take even the best conveyor belt in its pure form, it will quickly wear out during operation. Stitching along the edges with thick fishing line helps correct the situation. There is no need to come up with anything original here - you just have to act in the same way as when sewing, you overcast the edges of the fabric.
It is the perimeter that is the most vulnerable link, and it does not matter whether the caterpillar is made 1 meter, 2 meters or some other length.
The rubber strip must be looped. Some people simply sew the ends together, but this technique is not reliable enough. It would be much better to use a hinge that is matched to a piano hinge.
Important: the thickness of the tape must be selected according to the engine power. In most cases, a thickness of 1 cm is sufficient, as on agricultural machines.
But some people note that tires removed from an old motorcycle (manufactured before 1990) are also suitable for a snowmobile track. True, such a resource is, for obvious reasons, rare. An alternative solution is to make a track propulsion system based on belts. Grousers of their own design are added to the wedge-shaped blade. Most often, rivets or a nut-bolt combination are used for clutch.
The belts are equipped with holes at the factory, which can easily be adjusted to the main sprocket of the snowmobile. You just need to leave a certain gap between the stripes. Fastening of such a structure is done using a cable of small diameters and other durable materials.
Important: do not rush. Otherwise, there is a high risk that the entire assembly will fall apart while moving.
It is useful to consider alternative solutions (of which, in fact, there are a lot). One of the schemes also involves the use of a conveyor belt. Additionally, you will need a profile pipe of rectangular cross-section. Nuts, bolts, engravers and washers are used for fastening. They begin work with a homemade propulsion unit, forming track blanks.
They are simply cut exactly to the width of the track using an angle grinder. When the rough blanks are made, they need to be given a special shape by pressing on a machine.
Recommendation: the edges of the tracks should be lubricated with used oil.
After this, limiting fangs and fittings resembling the letter Y are welded on. The resulting specimens are checked and adjusted to the place where they should fit.
Assembling the caterpillar yourself, once the tracks are made, is no longer difficult. You just need to make holes in the tape using a tube sharpened at the end. The side of the tube is also equipped with a hole, which helps remove crumb rubber and dust. The tracks are drilled with an electric drill; there should be two holes on each edge. Assembly with such blanks is not difficult.
But there are a few more subtleties that need to be taken into account in any case. If increased cross-country ability is in the foreground, then you need to make a two-track snowmobile, which is also more stable than one with one support. There is no practical difference in the work, unless you have to make one more caterpillar additionally.
The movers themselves sometimes have to be modified by tenoning with self-tapping screws. This procedure is designed to increase the vehicle’s cross-country ability to the maximum.
On a snowmobile without studs, as practice shows, it is very difficult to drive onto icy shores and slippery serpentines. If the procedure is performed correctly, you can forget about this problem for at least one season. However, it is worth considering that studded tracks turn worse, especially on asphalt. But safety in difficult conditions is worth it. It is also necessary to pay attention to the rear suspension, which must work well in conjunction with the tracks.
Linked suspensions are used in sports and cargo models. But in deep snow and when using long tracks, unlinked suspensions are better. This design enhances traction and perfectly distributes the weight load.
Important: shock absorbers must also match the tracks. In addition to the main points, it is advisable to take into account several additional nuances.
Hanging equipment
To make a snowmobile fast and strong, you need to put a good engine on the frame. If you install a low-power motor, then such a structure will move poorly. You also need to correctly calculate the caterpillar. If the area is too small, it will drown in large snow and will not pull even on flat terrain. Particular attention should be paid to skis, which should create good stability and safety when moving at high speed.
DIY rubber caterpillar
To easily move through the snow, it is very important to give your homemade snowmobile a good rubber track. It is not easy to make such a device with your own hands and it is better to purchase it in a store completely with rollers. Installing a standard factory track on a homemade structure is not difficult. To do this, you just have to secure the drive shaft and rollers with bearings to the frame. If your financial situation does not allow you to buy the entire device, then the most expensive parts can be easily made yourself. For this you will need:
- Conveyer belt.
- Plastic pipe.
- Bolts, washers and nuts.
A cheap homemade snowmobile track is usually made using a thin conveyor belt. To do this, plastic pipe blanks are sawed off to fit the width of the rollers. Then they are cut lengthwise into two equal parts and holes are drilled for small bolts. After this, the halves of the plastic pipes are secured to the conveyor belt with bolts, washers and nuts. The caterpillar is ready and further construction needs to begin .
Read also: How to modify the Kurakin EPS tester circuit
Homemade skis
It's no secret that in winter it is much more convenient to travel on deep snow on skis. They also serve well as a control device on a snowmobile. It is not difficult to make a wooden structure, but only strong boards made of birch or oak are suitable for this. They need to be well dried, planed, and then heated and the ends bent. It's no more difficult to make metal skis. To do this, you will need to cut two plates from sheet steel and weld a thin corner on the sides.
In order for the skis to turn freely, metal pipe stands are welded to them. In working condition, they are held in the front bushings of the frame, where they rotate easily .
Washers or large nuts are welded to the top of the racks, into which rods are inserted to control the snowmobile.
The steering wheel itself is easy to make with your own hands, or it’s easier to remove it from an old motorcycle. Thus, all that remains is to install the motor, as well as the driver’s seat, and you can hit the road.
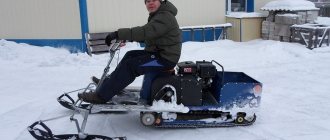
With the arrival of winter, some people successfully replace two-wheeled vehicles with homemade snowmobiles. This equipment is capable of overcoming large snowdrifts and is convenient for moving on snow-covered roads. It is expensive and not everyone can afford to buy it, so many assemble snowmobiles on their own using scrap materials.
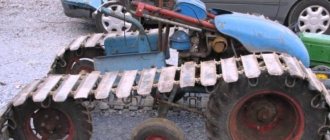
Making tracks from tires
This option for constructing rubber tracks has a number of advantages. There is plenty of material to be found. In case of urgent need, it will not be difficult to carry out repair work in a very short time. To make rubber tracks, you should choose truck tires. In addition, the tread must be identical in pattern to the rest of the tires - this will significantly simplify further work.
Manufacturing process:
- Initially, a tire is taken. A transverse cut is made to create a strip. The sides are cut out of it - a kind of treadmill should be formed. The procedure requires a lot of patience, because cutting out excess parts of the tire is quite labor-intensive. The tools used are a large knife with a good sharp blade.
- Rubber is easy to cut if the knife is soaked in warm, soapy water. Wetting needs to be done periodically. To achieve greater ease of operation, you should use an electric jigsaw with a fine tooth blade. The blade is also soaked in soapy liquid from time to time.
- If the tire hardness is high, it is recommended to remove a couple of layers of rubber from the inside - this is very difficult, so it is easier to find a tire with a soft structure. In case of dissatisfaction with the tread pattern, new cutting of the lugs is allowed at your discretion.
- A rubber track made by yourself has a huge advantage - it is a closed loop. With this advantage, reliability and strength are significantly increased. The only thing you need to pay attention to is securing the individual elements of the tire when creating a track for a snowmobile. Often, some tire options are not suitable in width. In this case, you should find material for specific parameters or tighten individual pieces with a small cable.
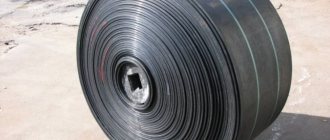
Transport belt for caterpillar
This material is very common. Therefore, it will not be particularly difficult to find a transport tape. You can purchase it in used condition or, if possible, simply ask your friends.
Manufacturing process:
The conveyor belt may soon deteriorate during operation, so it is necessary to stitch the sides of the material using thick fishing line. You need to do it the way seamstresses sew the edges of fabric using the overcasting method. If you do not do the work, then after some time the edges will turn into rags, therefore, the tape cannot be avoided. To give the rubber strip the appearance of a ring, stitching the ends is used, but the method is not very reliable. It is easier to use a hinge based on the type of piano hinge.
The thickness of the conveyor belt depends on the power of the motor. A strip 1 cm thick shows excellent results. It is used in agricultural machinery. It is allowed to use tape from old Soviet motorcycles.
The advantages lie in the abundance of resources. If a homemade track breaks down, it can be restored in a short time without professional tools. Before purchasing a full-fledged track, you can use the belt version for quite a long time.
Assembly nuances
Homemade tracked snowmobiles are assembled as follows:
- A fixing shaft with a receiving star is installed on the frame.
- Next, the engine is installed with a transmission sprocket and a gasoline tank. The motor and shaft stars are connected to each other by a chain.
- The front and rear wheel axles for the tracks are mounted. As a rule, the front axle is fixed with a fixed mount or welding, and the rear axle with a movable mount.
- The front suspension with guide ski and steering column is assembled.
- The seat, brakes and individual body elements are installed.
To tension the track, a movable rear axle mount is used. After installation of the main components and assemblies, the brakes are installed. Typically, disc brakes are used, which stop the track shaft when the handle is pulled.
When assembling, you need to pay special attention to fasteners. All bolts must be tightly tightened. Pre-prepared fasteners must be properly welded to the frame so that not a single unit falls off the equipment while driving.
Having studied in detail the information on how to make a snowmobile, you can proceed directly to creating and assembling the vehicle. You need to understand that the homemade version will be inferior in quality to mid-budget store models. The main advantages of homemade products are extremely low cost and the ability to set your own parameters for the product.
Track belts
This option is very easy to manufacture and does not require any skills. The material is quite common. There will be no difficulties in purchasing it.
Manufacturing process:
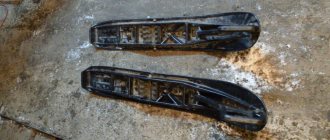
- The belts are wedge-shaped, therefore, creating a single piece of fabric is very simple. And the lugs can be made at your own request. Bolts and nuts or rivets are used as coupling.
- The belts are convenient because they have holes that can easily be adjusted to the snowmobile's drive sprocket. For these purposes, a gap is left between the strips during operation.
- For fastening, it is allowed to use any durable material, for example, a small diameter cable. It is important that the work is done efficiently, otherwise the entire structure will fall apart when driving.
There are actually many more methods for making DIY tracks. It also doesn’t hurt to use your imagination and come up with something better and replace the tires and rubber with a more practical material. But, nevertheless, tire tracks are considered the best solution. They are simple to manufacture, and the time spent on work will be minimal.
Snowmobile device
Homemade snowmobiles are built on caterpillar tracks. The tracks are driven by an internal combustion engine mounted on a rigid metal frame. They are supported in working position by wheels and special rollers. Main options:
- With a solid or fracture frame.
- With rigid or shock-absorbed suspension.
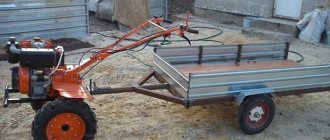
- With an engine from a walk-behind tractor or from a stroller.
Short skis are used for steering. Light snowmobiles (weighing up to 100 kg), designed to travel at a maximum speed of up to 15 km/h, do not necessarily require a braking system. They stop easily when engine speed drops. make a homemade snowmobile on tracks using the following algorithm:
- Selection of engine, calculation of frame and chassis.
- Frame assembly by spot welding.
- Steering device.
- Installing the engine in the design position on a temporary mount.
- Checking the structure for resistance to capsizing.
- If the test is successful, the frame is completely welded and the engine is installed.
- Installation of drive system, axles.
- Assembly and installation of tracks.
- Installation of body parts.
After this, final tests are carried out. If the snowmobile drives normally and does not tip over, then it is driven into the garage and disassembled. The frame is cleaned of rust, painted in 2 layers, the remaining elements are finished, and then a homemade snowmobile on tracks is assembled with your own hands.
Recommendations
The thickness of the tape is selected according to the engine power. On a snowmobile where a motorcycle engine is installed, there is also enough belt like that used in agricultural conveyors. If truck tires are used as a basis, then you need to select them according to the tread pattern to simplify the work. The beads are cut out of the tires, but areas are left for treadmills.
Important: the knife must be extremely sharp for such work; Wetting the blade in a soap solution helps reduce the complexity of manipulations, although it is better to use an electric jigsaw.
Whatever option is chosen, one must strive to make the entire structure as light as possible. Then traveling on loose virgin snow will not be difficult. To drive homemade tracks from the engine, some enthusiasts take drive sprockets from old Burans. The lugs can be attached to furniture bolts with a diameter of 6 mm; the same distance must be maintained between them. Cutting pipes will work better if you work alternately on both sides and do not try to cut through.
Installation of “barrels” (slides) is optional. Snowmobiles without such an element do not ride much worse. Any drawing or diagram must be adapted to the available consumables. It is advisable to take longer bolts so as not to experience inconvenience. There is also the most radical way to make a caterpillar for a snowmobile with your own hands - cut the standard propeller from the Buran in half.
DIY snowmobile: manufacturing tips
I’ll share a few tips that may be useful when repeating this design.
1. I cut the pipe for the tracks lengthwise using a hand-held circular saw for wood, first on one side, then on the other. This makes it smoother than cutting both walls at once. It is more convenient to process small workpieces. If you immediately cut a long pipe lengthwise, then the plastic will melt and the saw blade will jam.
2. Caterpillars can be made of any width. And each designer has the right to choose what is more convenient for him: to make a wide but short track or a narrow and long one. Just remember that with a large caterpillar the snowmobile will be difficult to control and the engine will be more loaded, and with a small one it may fail in loose deep snow.
3. Some of my photos show that plastics are installed inside the tracks. These are guide stops for the slide, which should prevent the caterpillar from sliding off the rollers. But during the operation of the snowmobile, the caterpillar did not slide off the rollers even without slipping, so “barrels” can not be installed, which will reduce the weight of the snowmobile.
4. At the end of winter, I completely disassembled the snowmobile to determine its weight. The weight of its individual nodes turned out to be as follows:
- caterpillar - 9 kg;
- drive shaft assembly - 7 kg;
- two pairs of wheels with axles - 9 kg;
- engine and steering wheel - 25 kg; pair of skis - 5 kg;
- frame—15 kg;
- double seat with posts - 6 kg.
In total, everything together weighs 76 kg.
The weight of some parts can be further reduced. Nevertheless, the weight indicator for a snowmobile with a track of this size is quite satisfactory.
The geometric dimensions of my snowmobile are as follows: snowmobile frame length - 2 m; the distance between the axes of the support wheels (rollers) is 107 cm; The width of the caterpillar is 47 cm. The pitch of the caterpillar lugs depends on the thickness of the conveyor belt and it must be selected experimentally (I got 93 mm).
I do not provide exact dimensions and drawings of the snowmobile parts, since anyone who plans to repeat the design will be guided by those parts and components that they can purchase or manufacture on their own.
The photo shows the stages of manufacturing a snowmobile according to the above diagrams and drawings:
- Blanks for the lugs of the future caterpillar.
- Special drive sprocket from the Buran snowmobile.
- Homemade track drive shaft with sprockets installed for the chain and track.
- A jig for drilling holes in the conveyor belt.
- Track rollers with axles and mounting brackets to the snowmobile frame.
- The drive shaft of the track is driven from the engine by a chain from the motorcycle.
- Snowmobile frame with drive shaft and track rollers.
- Ski turning control mechanism.
- On this snowmobile I installed plastic skis from Chinese children's sleds. But the plastic from which they were made turned out to be very fragile and by the end of winter one of the skis broke.
- Skis from the Argomak snow scooter with an installed undercut (skate) and mounting angles for installation on a snowmobile.
- Ski turning bushings. It's very simple: no bearings. You only need to apply lubricant to the threads, and a long service life is guaranteed. In addition, by screwing in or out the pipes, you can change the ground clearance of the snowmobile.
- The axle of the front wheels (caterpillar rollers) is fixedly attached to the frame, and the axle of the rear wheels-rollers can be moved by rotating the bolt to regulate the tension of the track.
How to make a snowmobile on tracks: photo for article
Making caterpillars from car tires
You can make your own caterpillar using car tires. To carry out the work, you need to select tires borrowed from trucks; it is recommended to use a suitable tread pattern, and you will spend less effort when working with the tire. The manufacture of such a caterpillar must be done by cutting out the sides from the tire, while leaving space for a treadmill.
It is worth considering that this work is quite labor-intensive and requires the application of a lot of patience and effort; in this case, it is necessary to use only a well-sharpened shoe knife.
In order to spend less effort when making a caterpillar for a car with your own hands, you can wet the blade from time to time using a soap solution. As an alternative solution, you can use a device designed for cutting; it is also possible to use an electric jigsaw. On the latter you first need to attach a file with small teeth, the file must also be pre-moistened with water, during the work such manipulations must be done periodically.
Work technology
Do-it-yourself tracks for a car must be made using a technology that involves the initial removal of the tire beads, then, if necessary, you need to remove the excess layers that are located on the wrong side of the formed ring; this is necessary if the track has increased hardness.
If the tread pattern is not suitable, then you need to cut a new structure, which will be necessary so that the structure can cling to the soil.
A snowmobile track made with your own hands according to the scheme described above will have many advantages, even if compared with the option described above. This is due to the fact that it has a closed loop, which indicates reliability. But there are also disadvantages, one of which is expressed in the limited width of the track, but if there is a need, then a double width can be used.
Manufacturing of structural elements
Before starting to manufacture structural elements, prepare a drawing, required materials and tools. You can take ready-made drawings based on the Bullfinch or Vepr snowmobiles. Tools you will need:
- welding machine;
- pipe bender or finished frame;
- hammer;
- screwdrivers.
Since the design of the mini snowmobile is low, the seat is made of durable waterproof material. The fuel tank is made of metal. Its volume should be from 10 to 15 liters. You can use a motorcycle chain as a drive.
Wood frame
The basis of a snowmobile made from a walk-behind tractor will be its frame, which can be made of different materials. One of the most popular options for creating a frame is wood.
Wooden blocks are perfect for the structure, as they are light and at the same time very durable. In addition, you can find the right amount of timber in the yard. Essentially making a frame means assembling a sled for a snowmobile.
If there is no or not enough wood on the site, its cost is not very high. In order to make a frame from wood, in addition to timber, you will need the following: iron in sheets, a metal cutter, a drill, drills, bolts, nuts, a saw.
In order to rid the frame of burrs and make it as smooth as possible, you will need sandpaper or a sanding attachment on a drill.
A homemade snowmobile made of wood has many advantages over other models except lightness. It is very easy to repair such a frame not only at home, but also on the road, because the material can be found in any forest belt.
This option is unlikely to fall through the ice, and if this happens, it will stay afloat.
How to make a snowmobile track
A snowmobile track is created from tires or conveyor belt. The work will be difficult and time-consuming if tires are used as the basis. The sides are cut out of them, so the work requires a sharp shoe knife or an electric jigsaw. To facilitate the process, tires are selected with a suitable tread pattern. Making a homemade caterpillar:
The sides of the tire are cut out with a knife. If the knife blade is periodically moistened in a soapy solution, the cutting process will become easier. When using an electric jigsaw, install a blade with small teeth and moisten it with water.
If, when cutting, the track turns out to be hard or extra layers have formed on the wrong side, they are also cut off.
Cutting a new structure is done when there is a mismatch in the tread pattern. The structure made must cling to the soil, so the structure of the pattern must be correct.
A caterpillar made according to this design is quite reliable due to the fact that it has a closed loop. Its disadvantage is its narrow width. To make a larger size, it is doubled. If the caterpillar is made from a conveyor belt, then it is combined into a single ring.
This can be done in 2 ways:
- like a piano hinge (with a hinge);
- ribbon stripes.
You need to choose the appropriate thickness of the tape if it is sewn on. Its thickness should be suitable for the engine power. A homemade snowmobile from an IZH motorcycle requires the use of a 10 mm thick tape. To increase the service life of the snowmobile, the edges of the conveyor belt are stitched with fishing line. The seams are made according to the method of overcasting the edges with an interval of 1 cm.
Is it necessary to obtain a license for a homemade snowmobile and register it?
The first question is classified as practically unsolvable. Theoretically, a homemade product can be certified by the Federal Agency for Technical Regulation and Metrology; to do this, it must meet a number of requirements and have all the necessary technical documentation. The snowmobile must pass testing and certification of all major components. In practice, those wishing to obtain a technical passport for a homemade snowmobile encounter a huge number of problems; the procedure will take more than one month, if it brings a positive result at all.
If there is the slightest discrepancy with technical standards, the snowmobile cannot be certified, and if you do not assemble your machine from ready-made parts of serial snowmobiles, but make most of the components yourself, you will have to spend a lot of time and money on certification of the snowmobile - it is cheaper to buy a production model.
You cannot ride such a snowmobile, and it must be transported to a hunting or recreation site on a trailer. But here another problem arises: if you are stopped by a traffic police officer, you will need to confirm ownership of the snowmobile. Any invoice or receipt will do for this. No one should require you to present documents certifying your right to drive a snowmobile until you are stopped while driving the vehicle. Therefore, when designing a snowmobile, keep in mind that you will need a trailer to transport it.
Most homemade models for hunting or recreation fall into the category of vehicles that do not require a license to drive. If the characteristics of the snowmobile require the driver to have a license, this is a category A1 or A license.
It is quite possible to assemble a snowmobile for hunting or recreation, and if you have a motorcycle or moped that can be used as a donor for the main components, then production will cost very little. But it should be borne in mind that it will be extremely difficult to legalize a finished car, so its use will have to be limited to areas that are difficult for traffic police officers to access.
Tackles
A trolley is a movable platform that protects the chassis of equipment from unnecessary mechanical loads. The platform is used when it is necessary to drive a snowmobile into a garage. For its manufacture, a metal pipe of medium diameter (6×6 mm), rollers and a bearing system are used. The wheels are installed with rubber coating and metal discs. Their diameter must correspond to the weight of the equipment.
Snowmobile skis consist of a base, a shock-absorbing part, a rod, a fork and bipod, and a link leg.
Skis can be made in different designs from different materials. If plastic linings are used for the base, they are supplemented with expanders. The extensions are mounted with fastenings to the snowmobile chassis. The plastic design is suitable for small equipment. For large and medium-sized snowmobiles, you will need metal skis.
- To give the skis a shape, cut out the base from a cardboard stencil. At the same time, a bend is formed in front. The amount of bending is done at your own discretion. A ski track with a large bend glides poorly and collects snow. And this creates unnecessary braking. Therefore, you should not make it too large. The approximate size of the ski track is 2.5 cm wide and 100 cm long.
- A pipe is welded along the edges of each part. This gives additional rigidity to the product and protects it from stones that come along the way.
- Where the bend passes, the pipe is welded along the contour.
- Shock-absorbing parts are fixed to the skis. Bolts are used as fastening elements.
- The platform and the nose of the skis are connected by a hydraulic pipe. The top part is ready.
- For the lower part, the hydraulic pipe is fixed at 4 points and compressed.
- Then the polyethylene pipe is attached with self-tapping screws, having previously cut it. Instead of a polyethylene pipe, you can use polypropylene.
Another option for making a caterpillar
Before you make a caterpillar with your own hands, you need to choose a technology for carrying out the work. It is also possible to use the method presented below. The propulsion frame can be welded using pipes that have a rectangular cross-section. It is recommended to connect them using a frame, this will make the structure collapsible. The splined part can be borrowed from the Buran, this will make it possible to make drive shafts; the splined part of the shafts, which are borrowed from the Oka, must be welded to them. It will also be necessary to use brake discs. When working on the front shafts, you need to install brake mechanisms on them. Some part of the gearbox housing needs to be cut off.
Making a caterpillar with your own hands will allow you not only to save money, but also to move through snowy areas without any problems. This design can be used for a long time without the need for repairs.
Frame and body
Before work, it is recommended to draw up a drawing of the frame. The structure is welded from a square pipe 25 x 25 mm with a wall thickness of 2 mm. For a payload of over 150 kg, the section size is increased to 30 x 25 mm. The loading area and body elements are covered with plywood. The seats are selected with a hydrophobic coating.
In the center of the fracture frame there is a hinge that allows rotation around a vertical axis. The maximum rotation angle is limited by welding metal plates. The front half is used for steering, and the engine is placed on the rear half frame.
The solid frame is welded in the form of a rectangle, inside of which axles and tracks are located. The engine is placed in front on a special platform, rigidly welded to the rest of the frame. In both cases, the motor is installed in the transverse direction (the shaft faces the end).