Fishermen, hunters and winter sports enthusiasts use snowmobiles to travel to the best vacation spots. Even inexpensive models of such equipment cost about a hundred thousand rubles, often more. Those who want to save money can assemble a homemade snowmobile on tracks in a regular garage workshop. The cost of parts for construction does not exceed 40 thousand rubles.
Snowmobile device
Homemade snowmobiles are built on caterpillar tracks. The tracks are driven by an internal combustion engine mounted on a rigid metal frame. They are supported in working position by wheels and special rollers. Main options:
- With a solid or fracture frame.
- With rigid or shock-absorbed suspension.
- With an engine from a walk-behind tractor or from a stroller.
Short skis are used for steering. Light snowmobiles (weighing up to 100 kg), designed to travel at a maximum speed of up to 15 km/h, do not necessarily require a braking system. They stop easily when engine speed drops. make a homemade snowmobile on tracks using the following algorithm:
- Selection of engine, calculation of frame and chassis.
- Frame assembly by spot welding.
- Steering device.
- Installing the engine in the design position on a temporary mount.
- Checking the structure for resistance to capsizing.
- If the test is successful, the frame is completely welded and the engine is installed.
- Installation of drive system, axles.
- Assembly and installation of tracks.
- Installation of body parts.
After this, final tests are carried out. If the snowmobile drives normally and does not tip over, then it is driven into the garage and disassembled. The frame is cleaned of rust, painted in 2 layers, the remaining elements are finished, and then a homemade snowmobile on tracks is assembled with your own hands.
Design Features
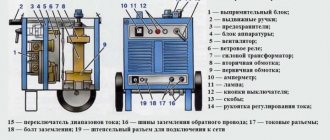
A snowmobile is a highly efficient means of transportation that allows you to move through shallow snow and snowdrifts in winter. The main elements of transport design are:
- engine;
- caterpillars;
- skis;
- transmission.
By type of construction, a snowmobile can be two-track (two tracks, one ski) or single-track (one track, two skis). Single-track vehicles are considered more manageable.
Among the advantages of this technology is the ability to move through fairly deep snow at high speed. No other type of transport can compare with the efficiency of even a homemade snowmobile. Finished structures are divided into sports, work and mountain. Before moving on to creating a product, you need to decide on the necessary parameters.
Formation of the drawing is one of the most important stages in the creation of this vehicle. If a person has not previously engaged in design, then it is better to make a preference in favor of ready-made plans.
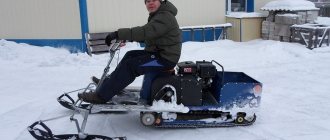
Two-track
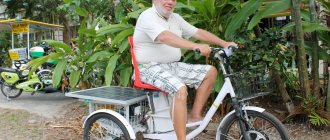
Single track
Engine selection
Gasoline engines are used for walk-behind tractors or strollers. Engine speed is controlled by a throttle handle located on the steering wheel. To make a homemade tracked snowmobile with your own hands, the easiest way is to use ready-made small-volume engines for walk-behind tractors with pre-installed:
- Fuel tank.
- Ignition system.
- Reduction gearbox with a ratio of 1:2.
- Centrifugal clutch, automatically activated when the speed increases.
The power of these engines does not exceed 10 horsepower, but they are easy to install: the technician does not need to separately assemble the ignition system, connect fuel pipes, adjust the clutch, etc. There are different options on the market:
| Brand | Model | Power, l. With. | Volume, cm3 | Weight, kg | Approximate price, thousand rubles. |
| Kipor | KG160S | 4,1 | 163 | 15,5 | 20−25 |
| Sadko | GE-200R | 6,5 | 196 | 15,7 | 15−20 |
| Lifan | 168 FD-R | 5,5 | 196 | 18,0 | 15−20 |
| Zongshen | ZS168FB4 | 6,5 | 196 | 16,0 | 10−15 |
| Nomad | NT200R | 6,5 | 196 | 20,1 | 10−15 |
| Brait | BR-177F-2R | 9,0 | 270 | 30,0 | 10−15 |
| Honda | GX - 270 | 9,0 | 270 | 25,0 | 45−50 |
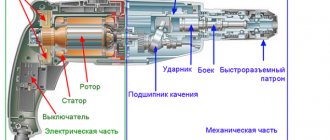
If it is not possible to purchase a ready-made engine from a walk-behind tractor, then you can use an engine from a stroller. Such engines are 10-15 horsepower more powerful, but require self-assembly. The system includes:
- Engine.
- Clutch.
- Gearbox.
- Gas tank (volume 5-10 liters).
- Muffler.
- Generator.
- Electronic ignition switch and coil.
Some of the elements will come from old motorcycles (“Minsk”, “Vostok”, “Java”, “Ural”). The gas tank is located as close as possible to the carburetor to reduce the length of the pipes.
Other creation options
There are other ways to build a snowmobile using skis or a crawler rear. These makeshift snowmobiles and snowbikes use bicycle wheels.
Snowmobile from scooter
One of the simplest homemade options you can create yourself from any scooter or moped. The only differences here are the frames, the sizes of the tracks, and other parts. Such a snowmobile is unlikely to be powerful and will have difficulty moving through snow-covered snowdrifts. Therefore, they use wheels of a smaller diameter and increase the frame. This homemade moped moves well on light snow or crust. In the spring, you can replace the ski or track back with wheels and get a scooter or moped again.
Chainsaw snowmobile
Using a motor from a trimmer, many craftsmen can independently make various devices: cultivators, motorbikes, snowblowers and, of course, snow scooters (or snowmobiles).
Important How to make a lawn mower from old tools and household appliances with your own hands
The product is not particularly powerful, but reliable, lightweight and easy to use.
Snowmobile from a motorized dog
It is even easier to get a snowmobile from a motorized towing vehicle or a motorized dog; there is practically no need to reassemble it - just add skis with steering and make minor changes.
Snowmobile from ATV
The ATV undergoes even less alteration for better maneuverability in winter snowy terrain. Essentially, everything is limited to tuning, which consists of installing tracks, although this process is expensive and time-consuming.
Snowmobile on tubes
About homemade products using cameras or pneumatics has already been noted above. The homemade device consists of a control support ski and a leading support pneumatic.
The advantages include the high cross-country ability of the vehicle, and the disadvantages include low maneuverability.
Transformable snowmobile
A folding snowmobile is called a mini snowmobile or transformer. Its main difference is convenience and ease of use. It easily fits when folded in the trunk or even on the seat of a car.
Snowmobile from a cultivator
And another savvy option for inventive use - a snowmobile made from a cultivator. Usually, every farm has a cultivator and sits idle in the winter. Using the engine according to the assembly diagram, we make an apparatus for winter movement. The power is small, but in reality it is practical and effective.
Frame and body
Before work, it is recommended to draw up a drawing of the frame. The structure is welded from a square pipe 25 x 25 mm with a wall thickness of 2 mm. For a payload of over 150 kg, the section size is increased to 30 x 25 mm. The loading area and body elements are covered with plywood. The seats are selected with a hydrophobic coating.
In the center of the fracture frame there is a hinge that allows rotation around a vertical axis. The maximum rotation angle is limited by welding metal plates. The front half is used for steering, and the engine is placed on the rear half frame.
The solid frame is welded in the form of a rectangle, inside of which axles and tracks are located. The engine is placed in front on a special platform, rigidly welded to the rest of the frame. In both cases, the motor is installed in the transverse direction (the shaft faces the end).
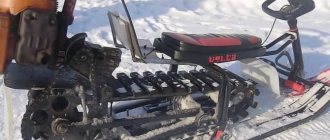
Drive system
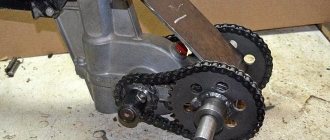
A small diameter drive sprocket is installed on the engine output shaft. From it, torque is transmitted through a chain to the driven shaft, located under the engine seat. On the driven shaft there are:
- Large diameter driven sprocket.
- Gear wheels that drive the tracks.
- Guides for tracks.
The driven shaft is mounted on the frame using bearings. Gear wheels push the tracks, causing the tracks to move. The chain and sprockets are removed from one device. Old motorcycles and snowmobiles (Buran) are suitable donors. Gear wheels for tracks can only be removed from other tracked vehicles.
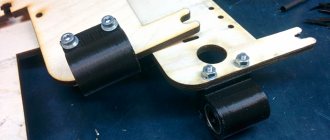
The guide rollers rotate with the shaft, are attached next to the gears and serve to tension the belt. They are made of wood or plastic and have a layer of soft rubber at the ends. Rubber prevents damage to the track. It is easy to make such rollers yourself by securing the edging with a furniture stapler.
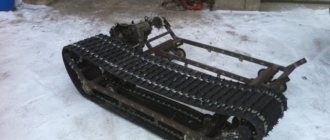
Calculation and assembly of caterpillars
The caterpillar is a tape, on the outer surface of which tracks are attached. Tracks are rigid lugs installed along the entire length of the tracks. Track options:
- Made from 3mm thick transport tape.
- From a car tire.
- From V-belts.
- Ready-made factory-made tracks.
The conveyor belt must be looped. Its strength is only sufficient for light snowmobiles with engines no more powerful than 10 liters. With. Car tires are stronger than tape and are suitable for powerful engines. Solid tires do not need to be looped, so the likelihood of a rupture is minimal. It is more difficult to choose a tire of the required length than a tape.
Finished tracks are removed from other similar equipment (snowmobiles “Buran”, “Sherkhan”). They are equipped with lugs from the factory. The products are not suitable for use with low-power motors from walk-behind tractors. Homemade snowmobiles made from Buranovsky tracks must have gears from the same “donor”.
The size of the caterpillar is selected according to the required driving characteristics: the larger the width, the lower the handling, but the higher the maneuverability. The minimum area of the contact patch from the snowmobile (skis and tracks) must be such that the pressure from the equipped vehicle does not exceed 0.4 kg/cm2 of surface. Light snowmobiles use a 300 mm wide conveyor belt, cut lengthwise into 2 strips of 150 mm each.
Preparing the Tape
The tracks are attached to homemade tracks with M6 bolts with a wide head. The bolts are fixed with a nut, a washer and a groover are used. Before fastening, leading holes with a diameter of 6 mm are drilled in the tape and tracks. When drilling, use a jig and wood drills with special sharpening.
The conveyor belt is also looped with M6 bolts. To do this, the edges of the tapes are overlapped with an overlap of 3-5 cm, the connection contains 1-2 rows of bolts. For a 150 mm wide track, the following distances are maintained:
- From the edge of the tape 15-20 mm.
- Between bolts on tracks 100-120 mm.
- Between the bolts when banding 25-30 mm.
In total, one track requires 2 bolts, and one belt connection requires 5-10 bolts, depending on the number of rows. When using car tires, only the tread is left, and the sidewalls are removed with a shoe knife.
Homemade lugs
The tracks are made of polyethylene pipe with a diameter of 40 mm with a wall thickness of 5 mm, sawn in half in the longitudinal direction. The entire section of the lug is adjacent to the tape. In light snowmobiles, one track connects the tracked pair. With a track width of 150 mm, the track length is 450-500 mm.
The lugs are cut using a wood circular saw. They use a special machine with two guides (metal and wood), rigidly fixed on a fixed tabletop. The walls of the pipes are sawed one by one.
The distance between the tracks depends on the parameters of the gears on the drive shaft. Typically 5−7 cm. The specified distance is maintained with an error of no more than 3 mm. Otherwise, the operation of the drive is disrupted: the lugs “run” onto the teeth of the drive wheels, the caterpillar begins to slip and fly off the rollers.
How to make an all-terrain vehicle on low-pressure tires?
Work on manufacturing an all-terrain vehicle begins with drawing up an action plan, the full implementation of which means achieving the desired result. The following tips will help you save time and money:
- Availability of free time, allowing you to regularly carry out work on assembling the all-terrain vehicle. If it is absent, it is better not to start at all.
- Budget planning. Creating an all-terrain vehicle yourself allows you to save on purchasing a production model, but in order to eliminate unnecessary expenses, you need to make all the calculations and buy the necessary components and parts, and also leave a certain amount for unforeseen expenses or breakdowns.
- Developing a plan. If you have experience in developing vehicles or the inclinations of a design engineer, it is possible to independently create a drawing of an all-terrain vehicle. In the absence of such, they use other people’s experience and ready-made drawings, of which there are a sufficient number on the Internet.