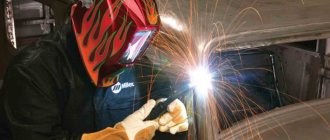
Cuts, breaks and other damage at different points of the aluminum car body are a problem for the owner. It can be problematic to eliminate such deficiencies on your own, since this may require argon welding. In addition, it is quite difficult to solder such damage due to poor solder adhesion.
Despite the rapid formation of aluminum oxide, there are simple technologies that allow you to repair car body damage yourself. In this case, all connections will be quite strong.
Car body repair without welding: do-it-yourself repair
Years of use of the car render the body unusable.
Repairs are carried out in specialized centers. The use of welding becomes necessary. An alternative is non-welding methods . The use of welding machines to restore a car body is often not economically feasible. The work requires special equipment and great skills.
Load-bearing elements must be welded, but when repairing body surfaces, you can do without welding. Such repairs can be done with your own hands in a garage. Even a beginner can cope with the task. A video from specialists will help.
Weldless auto repair options
Car body repairs without welding are considered unprofessional, since this is not the product of numerous scientific research. There are several ways.
If the problem is not with the body with the exhaust system, then we advise you to see how to seal the muffler using cement or sealant
General requirements: the damaged area is removed with a grinder or chisel. Anticorrosive and zinc are applied and degreased. Next, the holes are sealed with paint putty, creating a surface of a suitable shape, and painted.
Puttying a car
The material used is fiberglass with the structure:
- small;
- average;
- large.
The coarse fiber composition is suitable for repairing minor damage. Applicable when they are located near structural pockets. The composition of the lining is fixed, placed on the inside. Puttying is a budget option, but it is not very reliable.
A layer of putty is applied to the cleaned, primed metal surface. First inside, then the surface is worked. After the starting layer has hardened, the second layer comes on. Drying is done at room temperature.
The use of aluminum/brass mesh makes it possible to repair significant damage. The hole is covered with a mesh and secured with tape. After puttying and processing, the tape is removed.
If body corrosion is removed with mesh and putty, the service life of the patch is from one to two years.
Fiberglass + synthetic glue
Large damages are repaired with fiberglass. The adhesive is epoxy or polyester resin. Fiberglass fabric is applied in several layers, each overlapping the previous one by 2 cm .
Everything is coated with adhesive. Fabric sagging is eliminated by installing linings. Drying is in progress. This option is suitable for minor damage.
When treating your car with a chemical, strictly follow the instructions included with it!
Soldering
A method for removing significant body damage. The metal patch is pressed against the body and connected with solder. Flux will give strength. Solder and flux are selected based on metal alloys. They work with a high-power electric soldering iron.
Negative points:
- high cost of solder;
- low strength.
The metal patch should cover the hole without a gap. The initial stage is tinning the surface. The protruding overlay is hammered down. Next - puttying and painting.
Rivets
Option for repairing large damaged areas and replacing parts. The method is preferable to welding when repairing the bottom. The damaged area is removed and a new piece of metal or part is placed. They are riveted with steel rivets, diameter - 5 mm , for load-bearing elements - 6 mm .
Before placement, the rivets are treated with an anti-corrosion substance. A riveter is required.
Other methods
The bottom is repaired with galvanized sheets using bolted connections. The damaged area is removed with an angle grinder. Cut out 2 pieces of galvanized metal - for the top and bottom. The floor is coated with bitumen mastic on both sides. Galvanization is also processed.
Mount the lower component, securing it with self-tapping screws. Long ends are removed. Install the upper component. Fastened with M5 . The fasteners go along the perimeter to avoid bending of the sheets.
Repair of box-shaped body elements without welding equipment is carried out by drilling holes. Then the tool is inserted and the fault is corrected. The hole is sealed using any of the above methods.
Car body repair without welding: do-it-yourself repair, video
Work plan:
1) First, we clean off the rust so that there is none left, AT ALL! Otherwise, in a year everything may fall off (although it holds very tightly). To do this, use sandpaper, a file or a grinder, but ideally, sandblast
2) Thoroughly degrease the surface and take extra
3) We dilute the epoxy resin with the hardener in accordance with the instructions; when working with epoxy, you must avoid inhaling its vapors and getting it on your skin! (I assumed both while I was alive, but I’m not sure that my body thinks the same way)). You don’t have to rush, its polymerization time allows!
4) We cut the fiberglass into small pieces - it’s more convenient to work with it, but still, if the hole is large, it’s more convenient to cover the first layer with a large piece
5) We soak the fiberglass in epoxy resin with a thinner and place it all on the degreased surface of the arch being repaired; if possible, we do this procedure from the inside (through the trunk). This composition dries in about a day
6) The next day we sand the resulting surface and level it with putty and sand it even to the plane of the body
7) The renovation is almost complete! All that remains is to prime, paint and treat with anti-corrosion agent! You can carry out this procedure yourself if the painting element is not large, but it is still better to entrust the car to professionals because the risk of ruining everything at this stage is great
How to fix a hole in the bottom of a car without welding
When getting your car in order, sometimes you have to find an unpleasant problem - a through hole in the bottom of the body.
Some car owners immediately turn to a car service center for help, while others try to repair the hole on their own.
In the second case, you have the opportunity to save time and money, and will also be able to master new car repair techniques, which is always useful and relevant.
Holes in the bottom
Many people do not have a large number of repair and construction tools and equipment, so not every car owner has a welding machine in their garage or workshop. In fact, if the hole in the body is no larger than a matchbox, it is quite possible to repair it yourself without welding. There are several ways to do this:
- cover the hole with putty;
- solder a metal patch;
- seal with epoxy resin;
- apply fiberglass and glue;
- install rivet connections;
- use galvanized metal sheet.
Galvanized sheet
Method for filling holes using putty
In the area of the hole in the bottom, the damaged coating, that is, the old layer of paint, should be removed, the metal should be cleaned, and treated with a special preparation - a rust converter. Then the working surface is degreased and primed. Next, prepare a putty solution of uniform consistency.
For greater efficiency, fiberglass is added to it (most often with large elements). Then the composition is carefully applied to the damaged area. This is perhaps the most important part of the job. It is necessary to seal all the holes, cracks and microcracks that may arise around it.
Application of the solution should occur in several stages, allowing each new layer to dry.
Sealing with putty
To achieve maximum fixation of the putty on the damaged area, a backing is applied to the reverse side. It does not allow the solution to spread, but acts in the area that needs to be repaired.
If the hole in the bottom of the car is large enough, this repair method can also be used with auxiliary elements. Instead of a lining, a metal mesh is installed in the damaged area. Therefore, the putty is evenly distributed over it, filling the entire space.
After the solution has completely dried, this area is treated with automotive paint putty. Then the damaged area is painted and a protective film is applied.
Putty for cars This method of filling holes in a car is the simplest. But experts do not recommend using it, since the putty allows moisture to pass through and can deteriorate over time. Holes are also treated with a solution when repairs need to be done urgently and there are no other alternatives.
Soldering a metal patch
Soldering a metal element to a damaged area is a way to seal holes in the bottom or any other part of a car when you can close a small hole. To repair a machine using this technology, you must have the following tools:
- a piece of metal sheet;
- powerful soldering iron;
- flux or rust converter;
- putty;
Materials in the car
So, first, the area that needs to be repaired is cleaned, paint, rust, and dirt are removed. Next, it is treated with flux and degreased. Then measurements are taken and a metal piece of the desired shape is cut out.
Such an element will completely seal the hole, and the edges will overlap. When the part for the patch is ready, it is attached with a soldering iron. Then the edges of the patch are treated with flux. Finally, it is worth treating the area with putty and priming it.
When the surface is dry, paint and a protective layer are applied.
This method of filling holes in the bottom of a car is the most popular. Experts note the durability of the soldered patches, since the connection is quite reliable. In addition, this method can be used to seal a hole of any size. In general, soldering a patch is quite simple, and even a beginner who does not have much experience in repairing cars can handle it. Sequence of actions when soldering holes in the bottom
Application of fiberglass and glue
For moderate damage, the method of sealing holes with fiberglass is often used. When this area has been processed and cleared of layers of paint and rust, it is necessary to cut several overlays from fiberglass, the size of the hole plus 2 centimeters. This area should be pre-primed and allowed to harden.
Auto repair kit
An overlay is applied to the dry surface and secured with a mixture (polyester or epoxy resin + glue). The next “part” is applied and also fixed.
Thus, all the fiberglass parts are glued, placing them one on top of the other. To prevent them from sagging or deforming, you should put a lining.
When the resin and glue have dried, you need to treat the work area and paint it.
Fiberglass
Installation of galvanizing and riveted connections
Processing holes in the bottom of a car with galvanized metal is quite common. The main material required for this is iron sheet. Before installation, it should be secured with self-tapping screws and lubricated with mastic.
It is best to use an anti-noise bitumen mixture. The galvanized sheeting is then laid and bolted in place using a drill. Then you need to treat the area with special means and level the entire surface.
When everything dries and the structure is fixed, it should be coated with paint.
Another reliable option for filling holes is to make rivet joints. Using this technology, large and small holes can be eliminated.
To do this, the damaged area is cut out and the edges are cleaned of paint and rust. Next, steel rivets are cut out, since they are least susceptible to corrosion.
Then the part is applied and secured with these rivets. When the structure is completed, the entire area is painted.
Pneumatic riveter
So, there are several ways to repair holes in the bottom of a car without welding. You can use any method described in this article. Choose exactly the option that you can implement. And remember, it is possible and very pleasant to carry out any task on your own.
Fiberglass and mesh
To repair more extensive damage, an aluminum patch mesh is used. A piece slightly larger than the hole is cut out of it and attached with masking tape. Next, sealing holes in the car body without welding is carried out in the following sequence:
- a thin layer of fiberglass putty is applied without touching the tape;
- after drying, the tape is removed;
- subsequent layers of putty are applied after the previous one has dried;
- the surface of the car is treated with sandpaper or a grinding machine until smooth;
- To strengthen the mesh, several layers of putty are applied to the back of the body.
Long-term auto patches are made from fiberglass and epoxy resin. Several overlays are cut from it, the first of which should cover the hole with a margin of 2 cm. The size of each subsequent piece is made larger than the previous one. The last overlay should cover all the metal stripped during the preparation process.
The cut pieces are impregnated with resin and placed on the hole in a sequence of increasing sizes. If you need to seal large holes on the back of the body, use linings to prevent the fabric from sagging. After laying all layers of fiberglass, wait for the resin to completely harden. The time required for this is indicated in the instructions.
Car underbody repair without welding - Metalworker's Guide
Due to many reasons, a car may require sudden bumper repairs, painting, or replacement of spare parts. Often repairing external damage to a car involves welding work.
However, the use of welding is only possible with the involvement of specialists; it requires time and serious financial investments, which is not always justified. If the damage appears “in the field,” so to speak, it becomes necessary to repair the car body with your own hands without welding.
Please note that these methods are not recommended when working with load-bearing parts. Next, we will consider the main non-welding repair options.
For the most part, such work is carried out to correct minor damage or as a temporary solution. They are perfect for field repairs, for example, for urgent repairs of a broken bottom. Independent work is not regulated by GOSTs.
Technical regulations were not developed specifically. All these decisions are prompted by life. In general, it’s a crutch. The advantage of these methods is the availability of materials and tools, ease of understanding and development, and, as a result, low cost.
The general essence of the work is to close through holes.
In general, car body repair without welding goes like this:
· First, the damaged area of the body is cleaned of dirt, paint and varnish coating, and pockets of corrosion are eliminated (followed by anti-corrosion treatment). · After eliminating the holes, level the surface.
· Then preparatory work begins, including puttying, priming, followed by the actual painting of the car.
· If necessary, the damaged part can be cut out (although you will have to contact a welder later).
Car body repair without welding: stages of work
Car body repairs without welding can be done by puttying, soldering, or using rivets. What makes them special?
The most unreliable method of repair is puttying. Used as a temporary solution to quickly eliminate a defect. According to the composition, putties come with small, medium and large fiberglass.
The latter are used for through holes. When sealing, the hole is filled with putty, placing something on the back side. This method is only suitable if the hole is small or located in a technological pocket.
Please note that the putty crumbles quickly.
First, the repair area is cleared of paint, then primed. They begin to caulk from the inside from the bottom up. If necessary, give the material time to dry.
Attention: when mixing the putty with the hardener, no bubbles should form. Everything should dry in the open air.
To eliminate large holes, you can use aluminum mesh as a basis for applying a layer of putty. The mesh is secured with tape, glue or tape.
For more reliable operation, fiberglass is used. Pieces are cut out of fiberglass in the shape of the hole and overlapped and glued to the metal. The pieces should overlap the required area by 2-3 centimeters. We fix all this with glue or tape. Linings are used to give a rigid base.
Don't forget to wait until everything dries. In principle, both of these methods can be used in combination. First fill the inside of the damage, then secure everything with fiberglass on the outside. Once again I emphasize the temporary nature of such repairs. If you need to get to a car service center, you can simply wrap everything tightly with tape.
It’s realistic to drive like this for a couple of days.
Car body repair without welding: we act quickly!
To eliminate large damage, you can solder a sheet of metal onto the hole. This requires some skills and equipment. The disadvantage is the price of materials. However, it is much more reliable and durable than gluing and much cheaper than welding. The sheet of metal is tightly soldered to the car body using flux to add strength.
To select materials, you need to familiarize yourself with the compatibility of alloys. Everything is done with an electric soldering iron. One metal patch is used according to the size of the hole. The place of future soldering is treated with a soldering iron (that is, we are mastering the craft of a tinker). Remember that the larger the soldering area, the more reliable the result will be.
After finishing the work, the soldered plate is straightened to the desired shape. Dents are puttied.
One of the most reliable methods available for repairing a car body without welding is the use of rivets. This method will eliminate serious damage and repair the case by replacing its parts.
This repair method consists of cutting out the damaged section of the body and replacing it with a new one, which is secured with steel rivets. Steel rivets are preferred to avoid corrosion. When repairing the bottom, this method is even better than welding.
If it is necessary to remove large dents in the threshold, several holes are made in it and, through them, the dent is straightened from the inside. Technical holes are sealed using the previously indicated methods and, together with the residual dent, are prepared for painting.
come back
Car underbody repair
The underbody of the car is more susceptible to aggressive environmental influences than other parts of it, and is also susceptible to mechanical damage. If it is possible to protect the bottom from corrosion, then this is unlikely to be possible from various types of damage.
The reason for this is often the unsatisfactory condition of the road surface.
In general, sooner or later a car owner will have to face the need to repair the bottom of his iron horse, especially if it has served its owner faithfully for many years.
Bottom overcooking - this diagnosis is often given to car owners at service stations. He sounds very serious and these words reek of a hopeless situation and the high cost of resolving it. Is it really? Situations are different, but often things are not as dire as car service specialists make them out to be. If you wish, you can do everything yourself.
Tricks
Masters at car repair shops most often exaggerate and tell the car owner that a rotten bottom requires a lot of painstaking work and the cost of a lot of materials. This is what accounts for such a high price.
At the same time, they try not to allow the owner to examine it, or they show problem areas in low light. In this case, ordinary dirt can be mistaken for oxidized rotten metal, which you just need to touch and it will crumble.
With the help of such small tricks, the colors are thickened, which allows you to inflate the price.
How to save money?
If a car owner wants to save money, he needs to do a preliminary inspection of the bottom himself. For this you will need:
- Lift, inspection hole, overpass.
- Good lighting: a flashlight or a carrier with a powerful lamp.
- Hammer.
Using a hammer, it is necessary to tap all suspicious areas of the bottom and determine the extent of their damage in order to approximately know the volume of materials needed.
If all of the above is not at hand or there is simply not enough time for a thorough inspection, then a special mirror for inspecting the underbody of the car will come to the rescue. It will allow you to generally assess the condition of the metal and get an approximate idea of the amount of work. But the situation will become completely clear only after a thorough examination.
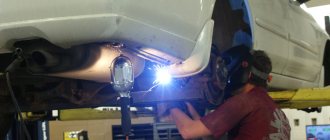
The welding process itself is simple; anyone can master it in the shortest possible time. Sometimes it takes longer to connect and set up equipment.
The easiest way to overweld the underbody of a car is to use a semi-automatic welding machine. But often such repairs are simply impossible without the use of gas welding.
Best of all, when both of these devices are used, they complement each other and improve the quality of underbody repairs.
What is needed to repair the bottom?
As the saying goes: “If you want something done well, do it yourself.” Car underbody repair is no exception. To implement this you will need the following equipment:
- Semi-automatic welding machine.
- Gas welding.
- Regular metal scissors or electric.
- Grinder (angle grinder).
- Hammers of various sizes and configurations.
- Good lighting.
You also need to stock up on the following materials:
- Oxygen and calcium carbide (for gas welding).
- Carbon dioxide and copper wire (for a semi-automatic welding machine).
- Wheels for cutting and grinding metal on a grinder.
- Metal for patches.
Metal thickness
To repair the underbody of a car with your own hands without any problems, you need to choose metal of optimal thickness. Its recommended thickness varies from 1 to 2 mm.
But here you should take into account the qualifications of the person who will carry out the welding work. When working with thinner metal, you must strictly observe the temperature requirements during welding.
Which, in turn, depends on the debugging of equipment and the quality of consumables.
Thicker metal is more difficult to process, but it is also more difficult to damage or spoil. Therefore, before purchasing consumables, you need to realistically assess your qualifications as a welder.
Preparatory stage
Now you can begin the preparatory work. There is nothing complicated about this, and it will not be difficult to do them yourself. You just need to clean all the problem areas of the bottom from rust. This can be done in two ways.
Using a grinder. In this case, it is necessary to use both cutting and grinding wheels. During work, be sure to follow all safety regulations. It is better to clean hard-to-reach places from rust using gas welding.
After the impact of rusty metal and corrosion, the edges of the surface to which the patches will be attached must be thoroughly cleaned. It is advisable to do this work with a grinder. Now you can cut out the metal patches and start welding.
It is best to cut metal using manual or electric metal shears. This will allow you to make blanks of exact size and maintain straight edges. Cutting metal, especially thin metal, by welding requires high qualifications.
Applying a patch with a soldering iron
The second method is no less popular among motorists - using a soldering iron.
Just as in the first case, the area where the patch is applied should be thoroughly cleaned of rust. You can cut a patch from an ordinary aluminum tin can.
The quality of the repair can be increased by applying a layer of a compound with anti-corrosion properties to the edges of the hole and the surface of the patch.
After this, use a soldering iron to walk along the edges of the patch. The seam should be uniform and not very thick.
It is possible that the patch will protrude beyond the edges of the body. In this case, you should trim it with a hammer.
When finished, coat the patch with a ball of primer. This step is considered necessary in order to avoid further development of corrosion. The primer is applied in 2-3 layers at intervals of 3-4 minutes.
You can speed up the drying time of the primer by using infrared heating.
Methods for sealing the underbody of a car without welding
A source of through corrosion, or simply a hole, in the bottom of the car is the price to pay for comfort in the cabin. Its primary source is not anti-icing reagents acting outside, but moisture accumulating under the “pie” of heat, sound and waterproofing. Therefore, when eliminating it, work is carried out mainly from the inside.
If you follow all safety rules when welding, you must completely dismantle the interior, including the trim. This is always very time consuming. Therefore, the question of how to seal the bottom of a car without welding is very relevant. Moreover, most alternative methods do not give worse, but rather better results.
Cold methods of sealing holes in metal
There are two ways to repair holes in the underbody of a car without using hot work.
- Using composite materials - various types of polymer resins in combination with a reinforcing filler and a curing reaction accelerator. With high-quality surface treatment, in addition to restoring mechanical strength, they play the role of inhibitors - retarders of chemical and electrochemical corrosion reactions;
- Installing sheet material patches onto rivets.
General technological rules
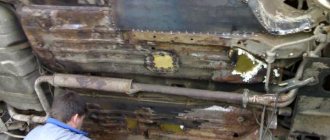
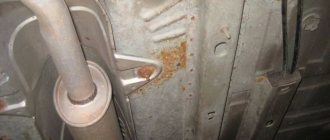
Holes in the bottom are usually discovered from the outside, when inspecting the car on a pit or lift. Signs of through corrosion are local swellings, which, when you try to pick them out, crumble into dust.
If you find such troubles, you need to open and remove the pie of heat, noise and waterproofing on the floor in the cabin in the entire area where the sheet of iron forming the floor is welded to the power elements of the body - thresholds, tunnel and others. Then you will see the whole picture of the damage and will be able to take preventive measures in those places where corrosion has not yet become through.
Before the actual process of sealing the holes, you need to take measures to slow down the corrosion process (stopping it is an unattainable ideal to strive for).
To do this, all rags of iron are removed, and the edges that have residual strength are treated with sandpaper and a wire brush until shiny.
The cleaned surface is treated with rust converters. For example, the “Tsinkar” composition. Work is being carried out inside and outside.
After completion of the work, the surface of the unprotected metal is covered with bitumen mastics, putty (acrylic, epoxy), paint or gun fat.
The work makes sense if the total surface of through holes does not exceed 15% of the floor area.
Fixing pinholes
If the source of through corrosion has a diameter of no more than 1 centimeter, it can simply be covered with a two-component polymer composition. Poxipol glue or a cold welding kit similar to plasticine gives good results.
A small hole makes it possible to use so-called cathodic electrochemical protection. Find an aluminum rod, make a rivet out of it and fill the hole with it. Within a radius of 20 cm from it, corrosion will stop. True, the rivet will gradually collapse on its own. But this may take five years.
Repairing large-scale damage
In this case, you will have to take care to restore mechanical strength. If the hole is on a flat area, then there is no point in messing around with epoxy and fiberglass.
A truly durable composite material is obtained only with absolutely precise adherence to technology - mixing proportions, drying mode and much more. Use ready-made material of this kind, for example, textolite.
Having a thickness of 3 mm, it is not inferior in strength to sheet iron. The plate can only be installed with epoxy glue, but it is better to use a combined connection using rivets.
The latter should be made of aluminum, then they will play the role of cathodic protection.
Patches on the bottom of the car
Long holes at the joints with power elements are eliminated with patches made of sheet iron or aluminum. They need to be bent according to the shape of the joint so that the width of the contact zone with the still living material is at least 2 cm.
They are installed on aluminum rivets; the use of an epoxy compound would be useful. Especially if sheet metal is used. After all, you cannot know exactly its composition and in which direction electrochemical corrosion will go - whether it will destroy the patch or the body.
The polymer resin will act as an inhibitor.
The final sealing of cracks and holes is carried out using, for example, the Novol Plus 710 kit. In addition to the epoxy filler and hardener, it includes a piece of fiberglass.
Is it worth soldering
You can also seal holes in the bottom using soldering. However, ordinary household soldering irons are not suitable for heating metal with a thickness of 0.5 mm or more. Most likely, a hair dryer will not help you with this. You need to use a portable gas burner, for example, Super-Ego R355, which fits into a small - volume from 400 to 700 ml - cylinder for camping stoves.
Solder and flux are required for soldering. The solder used is low-melting, with a predominant content of tin or lead. Flux can be replaced with electrolytic acid. The connection is strong and can withstand high vibration loads.
Soldering has two disadvantages.
- It involves hot work, which increases the overall complexity of the repair. This can be neglected if your hands grow from the right place;
- The main material of solder - lead or tin - is a substance that has a lower electronegative potential than iron. Therefore, upon their contact, electrochemical corrosion occurs, in which iron will play the role of a “sacrificial anode” and be destroyed.
Now you have an idea of how to seal the underbody of a car without welding. If you are careful and persistent in cleaning the surfaces, then treating them and protecting them, then the installed patch can outlive the car itself.
Final stage
Regardless of how the car body was repaired, they all end with putty. However, it absorbs moisture, which leads to rapid destruction. Therefore, it must be coated on top with an anti-corrosion or epoxy primer. Body repairs are completed without welding by painting. To do this, use a spray gun or aerosol cans, after covering the adjacent surface of the car with plastic film. You should not use a brush, as drips are possible.
The proposed methods will help to repair a car without welding in case of single damage. However, if a large area is affected by corrosion, it will be easier and more reliable to contact a car repair shop to replace the rusted area by welding. Most often this happens to the floor, so it is recommended to regularly check it from underneath the car using an inspection hole or lift.
Car underbody repair without welding
The underbody of the car is more susceptible to aggressive environmental influences than other parts of it, and is also susceptible to mechanical damage. If it is possible to protect the bottom from corrosion, then this is unlikely to be possible from various types of damage.
The reason for this is often the unsatisfactory condition of the road surface.
In general, sooner or later a car owner will have to face the need to repair the bottom of his iron horse, especially if it has served its owner faithfully for many years.
Bottom overcooking - this diagnosis is often given to car owners at service stations. He sounds very serious and these words reek of a hopeless situation and the high cost of resolving it. Is it really? Situations are different, but often things are not as dire as car service specialists make them out to be. If you wish, you can do everything yourself.
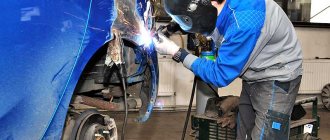
Welding process
It is advisable to use two people to weld the bottom. It will be difficult for one person to fix the patch and scald it at the same time. If the metal is applied to a flat surface, then it is faster to fix it using a semi-automatic welding machine.
If it is necessary to make a bend, you should resort to gas welding. When heated, the metal becomes soft and can be bent and given the desired configuration using a hammer. It should not be forgotten that high temperature reduces the properties of the metal. Another option in this case could be a special device designed to create bends on metal workpieces.
After completing the welding work, all seams must be cleaned with a grinder and coated with anti-corrosion compounds.
And this option is possible. It is enough to simply periodically inspect the bottom, if necessary, clean the places where rust has appeared and coat them with special compounds.
This method will save time, money and nerves of the car owner. You won’t need to pay huge sums to service station technicians or learn the profession of a welder.
Tired of paying fines? There is an exit!
Forget about fines from cameras! An absolutely legal new product - NANOFILM, which hides your license plates from IR cameras (which are installed in all cities). Read more about this at the link.
- Absolutely legal (Article 12.2.4).
- Hides from photo and video recording.
- Installs independently in 2 minutes.
- Invisible to the human eye, does not deteriorate due to weather.
- 2 year warranty
Self-repair of the underbody of a VAZ-2110 car
The car body is subject to corrosion over the years, and it begins to rust especially quickly if you do not take care of it and do not apply an anti-corrosion coating. How quickly body parts begin to rust also largely depends on the quality of the iron, factory processing; over time, the car requires repairs to the underbody, sills, side members, wheel arches, and so on.
Rusted sills and a rotten bottom are a fairly common problem on VAZ-2110 cars, and since such work in a car service center is quite expensive, many car owners try to repair the car with their own hands. You can patch holes in the body and bring the car back to normal by yourself using various methods; there are non-welding methods, but basically all car owners try to make repairs using welding.
Repair of the VAZ-2110 underbody without welding
With any body repair, first of all, it is necessary to carry out an external inspection of the hardware, identify and note for yourself which areas are in poor condition and need repair or replacement. The condition of the bottom metal is determined in different ways:
- using a hammer and a core - if you think that there is rust in a certain area, you need to lightly hit the metal, check if there is rotten iron under the anti-corrosion coating;
- try to jack up the car on each side - if the thrust pads are rotten, this will be noticeable when you try to jack up the car;
- press in different places on the floor of the car - weak, rotten iron will bend under your feet;
- try to move the front seats back and forth in the cabin - problematic movement of the seats also often indicates the poor condition of the metal.
Any repair of sills and underbody using a non-welding method is not professional, and craftsmen consider it only a temporary measure to properly restore the condition of the body; a welding machine is indispensable.
When repairing the bottom without welding, patches and new body elements are not welded, but installed on rivets or self-tapping screws (bolts), preparation and all other work is carried out in the same way as during traditional body repair using a welding machine.
Tools and materials for car underbody repair
Before you begin restoring the body in the traditional way (using welding), you need to prepare everything you need, the tools you will need are:
- welding machine;
- Bulgarian;
- electric drill with drills;
- screwdrivers;
- hammer.
To remove old noise insulation, you may need a chisel; you can remove noise faster and more efficiently using a hammer drill.
To clean metal, you need sandpaper of various grain sizes; to increase productivity, it is recommended to use a sanding machine.
It is also impossible to do without materials when repairing the bottom; a lot here depends on the volume of restoration work. Most often you have to use:
- patches (pieces of new iron) or ready-made spare parts, for example, floor members, panels, threshold reinforcements, etc.;
- priming;
- rust converter;
- anti-corrosion and sound-proofing materials (you can use Movil, Tektil, bitumen mastic, Dinitrol, Prim Antishum, etc.).
Since the brake and fuel pipes under the bottom often rust thoroughly, stick and do not come off, in many cases they also require replacement.
Preparatory work
Before installing new frames on the bottom or welding body parts, you need to make preparations and partially disassemble the car:
- remove the seats;
- remove carpet;
- dismantle the old sound insulation;
- put aside electrical wiring in those places where repairs will be carried out.
Before replacing individual elements or installing patches, the entire metal surface is freed from old sound insulation, thoroughly washed and wiped, and cleaned using a grinder, a sanding machine or sandpaper. Then the metal should be degreased and treated with a rust converter; only after this can you begin working directly with the iron.
Replacement of car underbody elements
Most often, when replacing individual parts of the bottom or installing patches, welding is used; a semi-automatic welding machine is best suited for such repairs. If an entire separate part is being changed, for example a cross member, you can drill out the rivets and dismantle the element without welding.
When the bottom and sills are changed at the same time, the latter are removed from the car first, and when replacing sills it is important to control the geometry of the body.
Replacing a rusty rear fender arch. How to do everything right.
Hello dear reader!
Let's talk about replacing the rear arches of a car. The rear arches of some car models are a weak point that is easily subject to corrosion. There are options when you can “cure” rust without changing the arches, but, usually, car owners wait until the last minute, when drastic measures are needed. The need to replace the rear arches arises, as a rule, due to their through corrosion. In such cases, all that remains is to cut off all the rusty metal and weld a new, non-rusty segment in its place. How to do this, and what subtleties need to be taken into account. Let's look at everything in detail.
First we need to determine the boundaries of the area that has been corroded. To do this, you need to clean off the old paintwork in the place where the rust is visible. An autopsy, as they say, will show what's under the paint. It is necessary to clean, with a reserve, retreating from the zone with corrosion to the zone with normal metal. Usually an autopsy reveals that there is much more rust than it seemed at first glance.
Next we need to cut off all the corroded metal. We use a grinder and cut everything down to bare metal. After cutting off the rusty segment, you need to check the back side of the remaining intact metal as much as possible. Why do we need this? It happens that the front part of the part does not contain corrosion, but on the back side everything is much worse. Usually you just have to slightly enlarge the area being cut so that the repair segment can be welded to metal that is good on both sides.
Rear wing segment cut out
Homemade rear fender repair insert
Next, we need to get a repair insert somewhere to weld and restore the arch. Here you can choose the following options:
- Take the desired segment from the donor's hind wing.
- Take the required part from the new repair panel for the rear fender (if there is one on sale for the car model being repaired).
- Cut the desired segment from sheet metal (usually from an unwanted body panel). It all depends on what shape you need the segment. If a large part of the arch with complex shapes and edges was cut off, then of course it is better to take and cut out a similar part from the donor wing. Again, it depends on the cost of the rear wing of a particular car. Despite the complexity of the shapes, it is also possible to bend the desired segment from, for example, an unnecessary hood. If a complex shape does not work out, then you can make a segment from several simpler ones by welding them together.
- There is another option - take the desired segment from a new or used front fender. In most car models, the front and rear fenders are similar in shape. A front fender is usually cheaper and easier to find than a rear fender. Thus, we take the desired “piece” from the front wing and adapt it to the rear one.
Welding the Rear Fender Arch Repair Insert Factory Rear Fender Arch Repair Insert The front fender has similar shapes to the rear fender arch
How do I cut a patch to the desired shape from sheet metal?
You can use this method. Take cardboard, lean it against the cut-out area and the boundaries of the cut-out area will be imprinted on it. Now, along these boundaries, you can cut out a stamp from cardboard, and using this stamp, cut out the desired patch from metal. It is better to slightly increase the boundaries of the cut metal, since welding will need to overlap.
Welding the repair insert
The next step is to weld the repair insert. When welding, you must not overheat the metal. It is better to weld with points, starting from one end of the patch, then weld with a point on the other side and at intervals, then reduce the interval. The point is to prevent the metal from moving too much.
After welding, you need to clean the seam from oxides and grind the weld seam.
Weld protection
Next you need to protect the seam from corrosion. One option is epoxy anti-corrosion primer. After the primer has completely dried, you need to sand it without rubbing it to the metal, then you can apply putty.
It is also important to protect the reverse side of the weld. To do this, you can use anti-corrosion primers in aerosol cans. The most important thing is to get to the other side. If there is no access, then you can use a can with a long tube and a nozzle on it. One of these options is “Movil”. Very convenient design. You can crawl into the hidden cavity by inserting a tube into a small hole. "Movil" is not the best option for protection against corrosion, but the tube with a nozzle can be adapted to any other means of protection in an aerosol can.
Then you can proceed to the final removal of the putty, priming with acrylic primer, preparation for painting and the actual painting.
kuzov.info
Car underbody repair
The underbody of the car is more susceptible to aggressive environmental influences than other parts of it, and is also susceptible to mechanical damage. If it is possible to protect the bottom from corrosion, then this is unlikely to be possible from various types of damage.
The reason for this is often the unsatisfactory condition of the road surface.
In general, sooner or later a car owner will have to face the need to repair the bottom of his iron horse, especially if it has served its owner faithfully for many years.
Bottom overcooking - this diagnosis is often given to car owners at service stations. He sounds very serious and these words reek of a hopeless situation and the high cost of resolving it. Is it really? Situations are different, but often things are not as dire as car service specialists make them out to be. If you wish, you can do everything yourself.
Subaru Impreza 1999, 125 l. With. — body repair
Subaru Impreza, 2005
I have blog posts on this car about the life of the repaired arches. The biggest problem is to properly sandblast the inside. When sandblasting, the person did not remove the wheels in order to crawl up properly, so he could not process the arches properly. the second reason is the wrong soil. I was told epoxy. in fact, there was some kind of simple problem (I already found out about this later when, a few weeks later, I came to the painters and drove the car in wet weather with the arches primed). third - the arches were not completely processed. in places where the molding was not sandblasted. therefore, after a year, dots (small) appeared in places where they had not sandblasted from below near the moldings. and after 2 years a bubble appeared in the sandblasted area. Every year a little swelling was added around the holes. As far as I know, the next owner opened the arches last summer because he was welding the rear side members and took the arches for company because they had lost their presentation.
Puttying
So, if we are talking about minor damage, the putty method is used. Step by step it looks like this:
- It is necessary to thoroughly wash and dry the car.
- Remove all bare metal rust from the damaged areas and sand them thoroughly.
- Treat areas with reactive primer and allow the surface to dry.
Car rear arch putty
- Place acrylic filler on top of the reactive layer - under no circumstances should putty be applied to acidic primer.
- After the acrylic has dried, apply putty and wait for it to dry.
- Thoroughly sand the dried putty, gradually reducing the grain size of the abrasive. Thus, level the surface, preparing it for painting.
- Paint those areas of the car that have been repaired.
Algorithm of actions
Dismantling and subsequent insertion of the front wing takes up to 1 hour, even for inexperienced craftsmen
It is important to perform the entire sequence of actions correctly:
- Unscrew the two nuts in the bumper fasteners and lower the edge of the bumper down.
- Remove the outer part of the sill trim.
- Remove the headlight cover.
- Remove the turn signal from the headlight.
- Remove the side turn signal.
- Using a 10mm wrench, unscrew the self-tapping screw that secures the part to the bracket.
- Unscrew the screws under the threshold, two bolts that secure the part to the rack, they are located on the inside.
- Unscrew the 4 bolts that connect the element and the front part of the body.
- Using a knife, cut off the sealant on which the wing is mounted on its top shelf on the body.