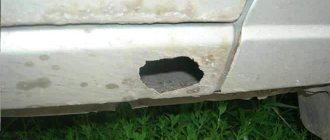
The underbody of the car is more susceptible to aggressive environmental influences than other parts of it, and is also susceptible to mechanical damage. If it is possible to protect the bottom from corrosion, then this is unlikely to be possible from various types of damage. The reason for this is often the unsatisfactory condition of the road surface. In general, sooner or later a car owner will have to face the need to repair the bottom of his iron horse, especially if it has served its owner faithfully for many years.
Bottom overcooking - this diagnosis is often given to car owners at service stations. He sounds very serious and these words reek of a hopeless situation and the high cost of resolving it. Is it really? Situations are different, but often things are not as dire as car service specialists make them out to be. If you wish, you can do everything yourself.
How to save money?
If a car owner wants to save money, he needs to do a preliminary inspection of the bottom himself. For this you will need:
- Lift, inspection hole, overpass.
- Good lighting: a flashlight or a carrier with a powerful lamp.
- Hammer.
Using a hammer, it is necessary to tap all suspicious areas of the bottom and determine the extent of their damage in order to approximately know the volume of materials needed.
If all of the above is not at hand or there is simply not enough time for a thorough inspection, then a special mirror for inspecting the underbody of the car will come to the rescue. It will allow you to generally assess the condition of the metal and get an approximate idea of the amount of work. But the situation will become completely clear only after a thorough examination.
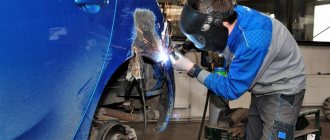
The welding process itself is simple; anyone can master it in the shortest possible time. Sometimes it takes longer to connect and set up equipment. The easiest way to overweld the underbody of a car is to use a semi-automatic welding machine. But often such repairs are simply impossible without the use of gas welding. Best of all, when both of these devices are used, they complement each other and improve the quality of underbody repairs.
Popular questions and answers on the topic:
- What is the best position to cook the underbody of a car?
On an overpass or lift you will have to cook in the ceiling position. This is only suitable for installing small patches. I recommend carrying out extensive welding work on the bottom of the car with the car tilted on its side. Remove the wheels on one side and place them under the body pillars on the other side. To lift the car, you will need 5-6 people. You need to rest against the racks with rubber, not with a disc. You can play it safe from below and place a thick beam.
What thickness of patch sheet should I choose?
If you are a beginner welder, the iron on the bottom is a bit thin, and the repair is being carried out on a straight section, take 1.5-2 mm. In the case of a “full hand” and “live” metal on the bottom, use 1.0 mm - it will be easier to bend.
How to bend the applied iron to the shape of the bottom without gas welding?
It is best to bend raised areas on the bottom using autogen heating. If it is not there, weld a 15 mm seam immediately before the bend and, while the metal is hot, hammer it to the next tack point. So you gradually bend the patch along the entire perimeter, using the heat from the applied seam. Then, before welding, you can tap it with a hammer again to reduce the gaps.
How to avoid metal burns?
Hold the arc on thick metal (patch), briefly transferring it to thin metal. This will warm up the joint, but will not burn through the old iron. I provided more detailed techniques in a similar article about welding thresholds.
How to weld a hole?
When welding the bottom with an electrode, burns are inevitable, especially when trying to carry out local repairs so as not to completely change the bottom. The burnt hole is welded in a circle, with an intermittent arc, allowing the deposited metal to cool. This is how the walls build up and the hole gradually narrows until it is completely brewed.
If after reading the article you still have questions, be sure to ask them in the comments! I will be happy to answer them or describe them in a separate article.
What is needed to repair the bottom?
As the saying goes: “If you want something done well, do it yourself.” Car underbody repair is no exception. To implement this you will need the following equipment:
- Semi-automatic welding machine.
- Gas welding.
- Regular metal scissors or electric.
- Grinder (angle grinder).
- Hammers of various sizes and configurations.
- Good lighting.
You also need to stock up on the following materials:
- Oxygen and calcium carbide (for gas welding).
- Carbon dioxide and copper wire (for a semi-automatic welding machine).
- Wheels for cutting and grinding metal on a grinder.
- Metal for patches.
Car muffler welding
The semi-automatic welding machine is also successfully used for muffler repair. To repair a broken or rotten car muffler, the following actions are recommended:
- Cut a sheet of metal of the required size and apply it to the damaged area.
- Sand the edges of the damaged area and the applied repair material with sandpaper.
- It is necessary to apply the patch to the thickest parts of the muffler - this is done so as not to burn it.
- Select electrodes with a diameter of two mm and adjust the current of the welding machine to them.
- Before performing welding work, be sure to disconnect the battery terminals.
- Welding must be performed with the welding arc separated, moving the electrode from thick metal (patch) to thin metal (muffler material).
- The resulting weld seam should be hammered away from slag and visually checked for the presence/absence of pores in it. If they are not there, then everything is in order and the muffler can continue to be used. If there are pores, you need to boil them and put another seam on top of the first one.
Metal thickness
To repair the underbody of a car with your own hands without any problems, you need to choose metal of optimal thickness. Its recommended thickness varies from 1 to 2 mm. But here you should take into account the qualifications of the person who will carry out the welding work. When working with thinner metal, you must strictly observe the temperature requirements during welding. Which, in turn, depends on the debugging of equipment and the quality of consumables.
Thicker metal is more difficult to process, but it is also more difficult to damage or spoil. Therefore, before purchasing consumables, you need to realistically assess your qualifications as a welder.
Stainless steel sheet on the bottom.
Topic author Vovay, 25.1.2005, 23:12
- 2 pages
- 1
- 2
- >
- Log in to reply to this topic
#1 Vovay
- Users-2
- 29 messages
- Offline
- Card
- PM
Message added 1/25/2005, 11:12 pm
- ∧
- Full editing
- Quick Edit
#2 Alex-Vo
- Offline
- Card
- PM
Message added 1/25/2005, 11:19 pm
- ∧
- Full editing
- Quick Edit
#3 djdenizka
- Offline
- Card
- PM
Message added 1/25/2005, 11:29 pm
- ∧
- Full editing
- Quick Edit
#4 Alex-Vo
- Offline
- Card
- PM
Message added 1/25/2005, 11:37 pm
- ∧
- Full editing
- Quick Edit
#5 Vovay
- Offline
- Card
- PM
Message added 1/25/2005, 11:42 pm
- ∧
- Full editing
- Quick Edit
#6 djdenizka
- Offline
- Card
- PM
Preparatory stage
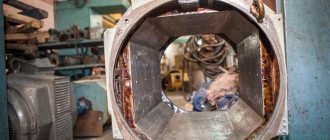
Now you can begin the preparatory work. There is nothing complicated about this, and it will not be difficult to do them yourself. You just need to clean all the problem areas of the bottom from rust. This can be done in two ways.
Using a grinder. In this case, it is necessary to use both cutting and grinding wheels. During work, be sure to follow all safety regulations. It is better to clean hard-to-reach places from rust using gas welding.
After the impact of rusty metal and corrosion, the edges of the surface to which the patches will be attached must be thoroughly cleaned. It is advisable to do this work with a grinder. Now you can cut out the metal patches and start welding. It is best to cut metal using manual or electric metal shears. This will allow you to make blanks of exact size and maintain straight edges. Cutting metal, especially thin metal, by welding requires high qualifications.
Cold methods of sealing holes in metal
There are two ways to repair holes in the underbody of a car without using hot work.
- Using composite materials - various types of polymer resins in combination with a reinforcing filler and a curing reaction accelerator. With high-quality surface treatment, in addition to restoring mechanical strength, they play the role of inhibitors - retarders of chemical and electrochemical corrosion reactions;
- Installing sheet material patches onto rivets.
Repairing large-scale damage
In this case, you will have to take care to restore mechanical strength. If the hole is on a flat area, then there is no point in messing around with epoxy and fiberglass.
A truly durable composite material is obtained only with absolutely precise adherence to technology - mixing proportions, drying mode and much more. Use ready-made material of this kind, for example, textolite. Having a thickness of 3 mm, it is not inferior in strength to sheet iron. The plate can only be installed with epoxy glue, but it is better to use a combined connection using rivets. The latter should be made of aluminum, then they will play the role of cathodic protection.
Patches on the bottom of the car
Long holes at the joints with power elements are eliminated with patches made of sheet iron or aluminum. They need to be bent according to the shape of the joint so that the width of the contact zone with the still living material is at least 2 cm. They are installed on aluminum rivets; the use of an epoxy compound would be useful. Especially if sheet metal is used. After all, you cannot know exactly its composition and in which direction electrochemical corrosion will go - whether it will destroy the patch or the body. The polymer resin will act as an inhibitor.
The final sealing of cracks and holes is carried out using, for example, the Novol Plus 710 kit. In addition to the epoxy filler and hardener, it includes a piece of fiberglass.
Fixing pinholes
If the source of through corrosion has a diameter of no more than 1 centimeter, it can simply be covered with a two-component polymer composition. Poxipol glue or a cold welding kit similar to plasticine gives good results.
A small hole makes it possible to use so-called cathodic electrochemical protection. Find an aluminum rod, make a rivet out of it and fill the hole with it. Within a radius of 20 cm from it, corrosion will stop. True, the rivet will gradually collapse on its own. But this may take five years.
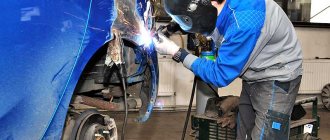
Welding process
It is advisable to use two people to weld the bottom. It will be difficult for one person to fix the patch and scald it at the same time. If the metal is applied to a flat surface, then it is faster to fix it using a semi-automatic welding machine.
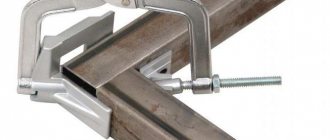
If it is necessary to make a bend, you should resort to gas welding. When heated, the metal becomes soft and can be bent and given the desired configuration using a hammer. It should not be forgotten that high temperature reduces the properties of the metal. Another option in this case could be a special device designed to create bends on metal workpieces.
After completing the welding work, all seams must be cleaned with a grinder and coated with anti-corrosion compounds.
How to treat the bottom after welding
Before applying corrosion protection, primers are first used. They are applied to clean surfaces according to the instructions and dried. The primer ensures reliable adhesion of steel to anti-corrosion. Manufacturers offer various compositions:
- Tectyl is produced in three modifications: a) classic creates an organic microfilm; b) Tectyl zinc provides an additional zinc coating that protects the metal from the action of salts; c) Tectyl NT zinc is intended for intensive use in urban environments;
- Movil is an economical product that has proven itself for half a century;
- bitumen mastic is produced on a rubber, polymer, mineral-shale and polymer basis;
- Dinitrol based on polymer rubber.
After welding the car body parts, the sound insulation must be restored. To cover the bottom, Prim anti-noise with micro-rubber crumbs is convenient. The composition is diluted with water and simultaneously acts as noise insulation and anticorrosive.
Before applying corrosion protection, primers are first used
Compositions for exposed surfaces
Protective agents for exposed surfaces can in turn be divided into:
- coatings that provide long-term protection;
- coatings requiring periodic re-treatment.
This is interesting: How to properly adjust the clutch with your own hands
Coatings that provide long-term protection are mastics based on rubber, bitumen or polymers. Their main advantage is that they are resistant to stones and reduce noise in the cabin. They can be sprayed using a special gun (shutz gun) or applied with a brush. Their task is to seal the bottom from the environment.
Most long-term underbody protection products have a bitumen base. Bitumen based products are non-curing. They remain elastic for a long time and do not become fragile.
The anti-gravel coating contains rubber and polymers, hardens, but remains elastic. Small stones bounce off it. You can read the article “features of applying anti-gravel”, which describes in detail its properties, preparation for application and application.
Coatings that provide long-term protection do not penetrate deep enough into metal folds and hard-to-reach areas where corrosion typically occurs. Such products are effective if applied to a clean, dry surface, preferably a new one. If for some reason such a coating is damaged, then moisture will enter through this damage, creating a “pocket”. As a result, corrosion will develop inside the protective coating and will not be noticeable. Even bitumen coatings can become hard and brittle over time and crack. Water can get inside through cracks.
Coatings that require periodic re-treatment are thick formulations based on oils, paraffin and wax. The protective film of these components, unlike the film formed by long-term compounds, allows the moisture remaining inside to evaporate. This property helps prevent the appearance of new rust.
The wax is not harmful to health and can be used on the underbody even inside the cabin. Wax-based formulations, unlike oil-based formulations, can dry out over time.
Oil-based compositions can be considered the best anticorrosive, as they have good penetrating ability, displace moisture and do not dry out. Oils can soften the factory underbody protection.
Protective coatings based on wax and oils do not provide mechanical protection to the bottom, are not durable and require periodic renewal.
Compositions for hidden cavities
For cavities, the protective composition must have different characteristics. It should be liquid, penetrating into all cracks and crevices, and never dry out. Internal cavities are treated with wax or oil-based products. The product must contain inhibitors that can inhibit the corrosion that has occurred. It should displace water and neutralize salt. This protection needs to be updated periodically. A quality cavity wax will help displace moisture and protect the metal. It is important to apply the composition by spraying so that it is carried out in all directions (360 degrees) and gets into all hard-to-reach places. For cavities, you cannot use sprayers designed for applying anti-gravel, as well as the products themselves for open surfaces. They are not useful for use in cavities.
Liquid cavity formulations may leak over time and require periodic re-treatment (every 1-2 years).
Cost of the kit and work with it in the service
The service station carries out the full range of work to restore the body. You can weld the bottom of a VAZ 2115, the price of work without the cost of dismantling, materials and components starts from 15,000 rubles. It is also permissible to change rotten jacks, sills and replace part of the bottom, the cost of work is up to 10,000 rubles.
Repairing the underbody, like any other part of the body, is classified as labor-intensive and complex. The cost of the repair kit must be added to the cost of the work.
- original floor from AvtoVAZ - from 3,000 rubles;
- bottom with thresholds ─ from 5,000 rubles;
- sound insulation ─ from 500 rubles per 1 sq. meter;
- anticorrosive ─ from 600 rubles per 1 kg.
Simple calculations show that self-repair will cost three to four times less, but only if the driver understands the complexity of the work and has minimal skills in using electric welding and working with metal.