If you often have to drill something, you probably have a whole set of tools on hand. For some, they are packaged in different boxes, for example, 1-5 millimeters, 5.1-8 millimeters, 8.1-12 millimeters. At the same time, the instruments are, as they say, “in bulk”, and not in single copies. Of course, this interval is very conditional, however, such storage is not entirely convenient.
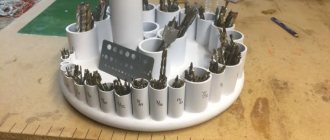
Here's the thing: let's say you needed a drill with a diameter of 3.8 millimeters. To find it, you need to shake up the entire box of the first interval. And it’s good if this parameter is marked on the shank. If you don't have one, you'll have to use a caliper. All this takes quite a lot of time. To solve the problem, you need to have a drill organizer that keeps your most commonly used items within easy reach.
Basic storage rules
Drills are cutting tools. Their main task is to cut holes on various types of surfaces . Most often, drills are made of steel or other durable alloys. The determining factors for storing drills are the material of manufacture and the method of heat treatment of the products. However, signs of improper storage of tools most often include debris sticking to the product, broken blades, and more.
The corners are the weak point of the drill - they are the first, unlike all other parts of the tool, to break off. Storage in separate tanks also means that the possibility of various injuries in the workplace is significantly reduced. It is also worth noting that one of the significant advantages of various devices for storing drills is the ability to easily carry them. This becomes especially important when moving.
When the tools are laid out in a certain order, the speed of work also increases.
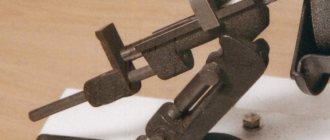
This is interesting: How to make a pipe bender with your own hands - drawings, photos and videos
Hanging structures
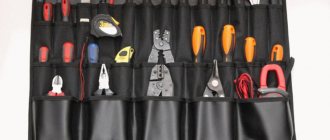
Suitable for any room with walls: workshops, garages, loggias, balconies. Wall-mounted tool organizers include panels placed along walls to hold equipment, as well as individual tools that hang on hooks, magnets, or screws.
The attachment completely transfers the load to the wall. Therefore, before proceeding with installation, you should make sure that the wall material has sufficient load-bearing capacity. This primarily applies to ceramic bricks and low-density porous concrete.
The easiest way to make an organizer is from an ordinary wooden board, nailed with the wide side to the wall. Well-bending thin nails are driven into the front side of the board to serve as holders for tools. This design is suitable for placing small hand tools. The main thing is to choose the diameter of the dowels and the thickness of the board so that they can withstand the payload.
In ready-made versions, the role of clamps is performed by powerful magnets located along the entire length of the rail. Magnets can be installed on homemade canopies. They are useful in both primary and auxiliary fastenings. There is no need to drill slots for installation; the magnet can be attached using epoxy glue.
Wall panels are more versatile due to the large working surface area. They are made of metal, wood, plywood, textolite or plastic. The surface can be either perforated or solid. Perforated panels are widely available in construction stores, and they often come with special mounted containers. Versatility is achieved thanks to a fixed hole pitch and removable fasteners.
Solid panels are often assembled by hand. They are easy to use and install - there are no fundamental differences from installing a board organizer. However, large organizers, especially with thin material thickness, are recommended to be mounted on the wall through guides (boards, slats). This principle also applies to perforated panels.
To create a metal organizer, you will need a sheet at least 1 millimeter thick. In this case, it is not at all necessary to buy sheet steel. The basis can be made up of casing from broken household appliances: washing machine or dishwasher, gas oven, microwave oven. It is sufficiently thick and, as a rule, covered with high-quality enamel.
The cladding is straightened in places of kinks, forming a single plane. Along the edges there are mounting strips in the form of wooden boards, fixed at the ends with self-tapping screws. The panel will be hung on the wall using these guides. If necessary, you can add an additional board in the center, as well as vertical elements. This will prevent the steel sheet from “walking” freely while drilling holes and during operation.
Holes are marked on the front side. The larger the size of the equipment that is planned to be placed on the organizer, the larger the step. The holes can be arranged either in a cage or in a checkerboard pattern. The recommended grid pitch, at which a homemade organizer will be compatible with most ready-made hanging holders, is 25 millimeters. For drilling holes, a step drill is best suited: it is well suited for thin metal, does not leave burrs, but is afraid of distortions, so it is better to tilt the panel slightly before work.
It is allowed to combine perforation with solid sections. The central part of the metal perforated panel is allocated for magnetic fasteners, which hold small things: screwdriver bits, small drills, bits, scissors, needle files. The design uses neodymium magnets from broken hard drives.
The remaining free space is suitable for the role of an impromptu board for depicting diagrams and drawings. Small organizers can easily fit in the perforated areas; it is enough to provide them with a reliable fastening. Hanging holders can be made from bent wire using spot welding.
Types of devices
The main purpose of cases, boxes, cases and other holders for drills is to conditionally isolate drills from other tools, and sometimes from each other, so that they do not rub against each other, which, as a rule, leads to dulling of the tools. The most famous and common containers for storing drill bits are these.
- Pencil cases. They are a convenient solution for storing drill bits in cars or when moving. Doesn't require much space. You can also include cases (soft pencil cases) in this category. The drill case can be used when hiking or transporting a small number of tools. There are also special portable bags for storing and transporting drills.
- Various wooden stands. Most often they are a three-layer structure. Holes-cells are drilled in the top two layers. Drills are inserted into them. The bottom layer plays the role of the bottom. The cells have different diameters. There is a wide variety of wooden coasters. They are durable. It is important to pay attention to the surface finish of the wood if you are making your own wooden stand. Otherwise, the service life of the wooden product will be significantly reduced.
- Plexiglas boxes . They look like pencil cases, but, as is obvious, they are only transparent. The main thing when buying or making it yourself is to check the strength of the lock.
- Organizers. Usually they are two or three parallel plates with holes of different sizes. The dimensions of the holes must correspond to the cross-sections of the tools that will be stored in them. The plates can be held together by one wall in the form of the same plate. This also includes plastic boxes. Sometimes they can be several cells into which drills can be inserted in a vertical position. In this case, the tools will not be isolated from each other, but will be sorted by size or frequency of use.
- Hanging structures. They are perhaps the most modern of all the species described here. However, the method of attachment to the surface and the structure of the surface must be taken into account. It is obvious that such holders are best secured by screwing them to the surface using nails. If the surface of the walls is covered with tiles or other similar materials, then the method of fastening must be changed. And also, especially when installing it yourself, you must take into account the load-bearing capacity of the structure. Some hanging structures will only need to be secured to the wall surface with epoxy glue. The very basis of such structures comes in two types - solid and perforated.
The latter are considered a more convenient and practical option, since, thanks to the holes located on the perforated panel, it is always possible to remove or attach new fasteners.
- Tool cabinets. They are distinguished by large dimensions. There are several subtypes - they can be mounted, stationary (similar to a regular chest of drawers or drawers), mobile (chest of drawers on wheels) and others. They represent the safest container for storing drill bits. There are combined models - hanging cabinets, which are a panel with shelves attached to it.
- Tubes . They are suitable for storing any long and thin items and tools. Most often they are stored together with similar tubes on large shelves. Tubes are used, as a rule, only when there is a shortage of free space. Tubes can be made of metal and plastic.
It is worth clarifying that almost all, and not just the last of the varieties mentioned here, can be either portable or stationary.
All currently produced models can be equipped with various parts - magnetic locks, clasps, rollers, as well as other various moving elements that make use more convenient.
see also
Comments 19
Thanks to the author! Well done. Just now I put the drill bits in order. I was figuring out how to arrange them. It turns out they thought of everything for me. Thank you.
Beautiful! no doubt! is it practical? It’s good if you need to make one hole once a month! And when with different drills at the same time? The covers get confused..., they are taken with dirty hands, the caps get confused (the diameter is different)... etc. and my nerves don’t really rest...