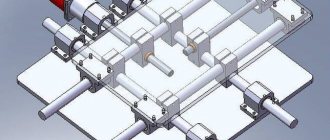
A stand for a drill allows you to significantly expand the functionality of hand tools, which is not difficult to make with your own hands. Placing a drill on such a stand (it can also be made rotary) allows you to turn an ordinary hand tool into an effective drilling machine that can be successfully used to perform various technological operations.
Homemade drill stand made from wooden elements
Will need
- Two old shock absorbers;
- drill with power handle;
- two bearing housings with bearing;
- roller chain and sprocket;
- profile rectangular pipe;
- spindle feed handle and plastic balls;
- steel sheet, plates and angle;
- stud, bolts, washers and nuts;
- extension spring, etc.
We will also need: a square and a marker, a hammer and a countersink, a drill, welding, a shot blasting chamber, a grinder, etc.
The process of making a drilling machine from shock absorbers
According to the markings, we weld a piece of roller chain to the wide side of the profile pipe.
Using bearing housings, we mark and drill holes in the steel plate for fastening them with hardware.
We screw a nut onto the stud inserted through the bearing, put on the sprocket and secure it with a second nut.
We mark another plate for installation and welding in the center of the profile pipe, drilling holes in the corners and rounding them.
We clean the old shock absorbers, and after drilling the bottoms, drain the oil and knock off the covers. After wrapping the mirrors of the rods and threads with aluminum foil, we place them in the shot blasting chamber for complete cleaning. Finally, remove the levers.
We place the shock absorbers with their upper parts in the corners at the level of the sloping shelves and weld them.
We fix the shock absorbers parallel to the steel plate at the corners using welding.
We apply a piece of profile pipe to the ends of the painted rods and drill two holes along the marks.
We lay it flat and place a U-shaped bracket in the center with its legs facing outwards and weld it.
For a fragment of a profile pipe with a length equal to the width of the larger side, remove the opposite edge. Drill a hole in the center of the square base.
We cut a fragment of a round pipe along the generatrix and weld ears with two holes along the edges of the cut. It turned out to be a kind of clamp.
Insert a bolt into a part made from a profile pipe from the inside and weld it behind the head. We fix the hardware in a vice, place the clamp along the legs with the ears up and connect them by welding.
We place the U-shaped bracket on the profile pipe between the shock absorbers, then the rods will fit into its holes. Screw the nuts onto the threads of the rods and tighten them.
We turn the shock absorbers over and place an assembly of bearing housings, pins and sprockets on the bracket leg. We weld the assembly plate to the bracket.
We weld a plate of different widths to the narrow sides of the profile pipe with a chain flush with the end.
We place the assembly on them, then the sprocket will engage with the chain, and weld the shock absorbers to the plates.
We bend a U-shaped element with rounded corners from a profile pipe. We fix the legs at right angles to the crossbar and weld them.
We weld two corners crosswise to the ends of the legs with a small gap. We make 2 holes in the shelves along the edges.
We cut out a cover for the U-shaped element from a steel sheet and weld them. This unit is the base of the machine.
We attach the assembly plate with shock absorbers to the base with four bolts and nuts.
We put the spindle feed handle on the pin and secure it with a nut.
We screw plastic balls onto the ends of the handle spokes, drilling blind holes in them and cutting threads.
To lift the spindle, we attach a tension spring to the body and spindle.
We attach a clamp with a base to the plate between the shock absorbers, into which we insert a drill with a reinforced body and tighten it.
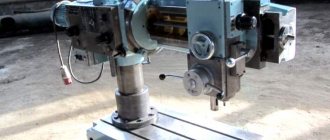
Making a steel machine: instructions with step-by-step photos
A metal machine consists of similar units, but they are more difficult to make due to the complexity of processing the material. The advantage of the design is its reliability and lack of play, which is ideal for installing additional components that expand the functionality of the machine.
The general structure of the metal machine is shown in the drawing, and the procedure for manufacturing the structure is as follows:
- For the frame you will need a steel plate 1 cm thick. The dimensions can be taken similar to those of the wooden model.
- The stand is welded from a square or round pipe with a cross section of 32–40 mm. You can weld a sleeve of a larger diameter onto the plate, and insert a pipe into it and tighten it with a bolt.
- The carriage is made from a larger diameter pipe. It should fit freely onto the stand. A steel clamp for a drill is fixed to the carriage.
Now all that remains is to put all the units into one structure and try to secure the drill with clamps.
Manufacturing of control mechanism
The main working unit of a wooden and metal machine is the carriage movement mechanism. It consists of a control handle and a spring. The last element is necessary to return the carriage to its original position.
Depending on the location of the spring installation, two options for the return mechanism can be made:
- The first version of the mechanism involves installing a spring near the control handle. Two metal plates are welded from the top to the end of the rack from one and the other edge. A hole is drilled in the first two plates. An axle is made from a bolt with a diameter of 10 mm, and the end of the handle is secured. A spring is placed between the other two plates. To prevent it from jumping off, pins are welded on the stand and handle. On the side of the handle, at the point of fixation to the carriage pin, a longitudinal groove is cut, which is necessary for the correct operation of the mechanism.
- The second version of the mechanism involves installing two springs at the bottom of the carriage. They are placed in guide grooves fixed at the ends of furniture telescopic elements. The control handle is fixed to the end of the rack in a similar way, only a spring is not installed under it.
The operating principle of any mechanism is simple. During drilling, the handle is pressed down, and the springs are compressed. The carriage with the drill is directed downwards. Upon completion of drilling, the handle is released. The expanding springs return the carriage upward to its original position.
Machine made from a photo enlarger
If you have an old photographic enlarger lying around at home, you can quickly convert it into a drilling machine. The design has a ready-made frame with a stand and even a control mechanism with a handle, but without springs. The drill will have to be raised and lowered by turning the original handle of the photo enlarger. To make the machine, it is enough to disconnect the tank where the lamp with lenses is installed, and instead attach a clamp for a drill.
Manufacturing of additional units
Modernizing the design will make it possible to obtain a multifunctional machine on which you can mill small parts and drill holes at an angle.
To mill a part, it must be moved to the side. To do this, an additional horizontal stand is fixed to the slab. A vice is attached to it, moving on a carriage with furniture guides. The control handle can be made similar to a spring or a screw mechanism can be installed.
To drill holes at an angle of 30, 45 and 60°, an additional plate is installed. It is made rotary, for which holes are drilled along an arc. Fix the plate to the main stand of the machine, where it will rotate along the axis. A carriage with a feed mechanism is attached to the additional plate.
A protractor will help you correctly measure the location of the holes. The central hole for the axle is taken as a basis and points are measured from it at the required angles.
During turning and straight drilling, the additional plate is positioned horizontally. To drill at an angle, the plate is rotated to the desired hole. The additional plate is fixed with screws on the back side of the rack.
The simplest design allows you to get a multifunctional machine at home, on which you can mill small parts and drill holes at different angles.
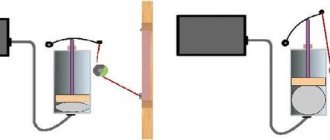
Car shock absorber strut: for drilling and tapping
It is irrational to throw car parts into scrap metal, because they can be used to make various useful homemade products for the garage and workshop. On our website you will find hundreds of interesting ideas.
In today's article we will tell you how to make a device from a car shock absorber - a stand for a drill or screwdriver.
In addition to the shock absorber, we will need the following materials:
- sheet of plywood or chipboard;
- fastening clamps;
- drill chuck;
- sheet metal;
- profile pipe.
Main stages of work
The first step is to prepare the shock absorber. We cut off all excess from it, and then pour the oil into some container. Using a grinder we clean off the factory paint.
Next, cut off a piece of metal plate. We drill four mounting holes in it.
Then drill another hole in the center. We insert the shock absorber rod into it and scald it. Clean the weld seam.
At the next stage, we cut off a piece of the profile pipe and weld steel mounting clamps for the pipes at the ends.
We put the part on the shock absorber body and tighten the clamp. On the opposite side of the corrugated pipe we attach a drill chuck.
You can use a sheet of plywood or chipboard as the base. You can also weld a metal platform. We attach a homemade stand to the base.
We clamp the drill chuck shank in the chuck of a screwdriver or drill. We clamp a drill or tap in the chuck itself (if you need to cut a thread in the hole).
Mechanism for moving the drill in the vertical direction
A homemade drilling machine must be equipped with a mechanism that will ensure the movement of the drill in the vertical direction. The structural elements of such a unit are:
- a handle with which the carriage with a drill attached to it is brought to the surface of the workpiece;
- a spring necessary to return the carriage with the drill to its original position.
Spring mechanism for moving the drill
You can make such a mechanism using two design schemes:
- the spring is connected directly to the handle of the machine;
- the springs are located at the bottom of the carriage - in special grooves.
According to the first option, the design is carried out according to the following scheme:
- two metal plates are fixed on the machine stand using screws, between which an axis is installed, where the installation handle will be placed;
- on the other side of the rack, plates and an axis are also installed, on which one end of the spring is fixed, and its second end is connected to the handle;
- the pin with which the handle is connected to the installation carriage is placed in a longitudinal groove made in it.
The basis was an old stand from a Crocus photo enlarger made in Poland
If the springs are located at the bottom of the return mechanism, then the handle of the device is also fixed using two plates and an axis that ensures its movement. With this design, the springs are located in the lower part of the guide grooves, which are modified using metal corners that limit their movement.
The principle of operation of a drilling machine, in which the springs are located at the bottom of the carriage, is quite simple: moving down during the drilling process, the carriage with the drill attached to it presses on the springs, compressing them; after the mechanical impact on the springs stops, they unclench, lifting the carriage and drill to their original position.
DIY drill stand: 3 design options
We'll tell you how to make your own budget drill stand for a drill at home. We offer 3 different options.
This device will be useful for home craftsmen who cannot afford to purchase a drilling machine.
At the same time, in some cases the stand benefits from its compactness and mobility.
If you make a small rack that does not require installation on a desktop, then it can be easily transported by car (take it with you to field work).
Unlike the same drilling machine, it will allow you to drill holes in both vertical and horizontal planes (for example, if you need to drill a hole in the wall).
To make a stand for a drill with your own hands, we will use inexpensive and accessible materials. Moreover, the stand can be used not only for a drill, but also for a screwdriver.
The purpose of a homemade stand is the same as that of a drilling machine - vertical drilling of holes at an angle of 90 degrees relative to the workpiece.
Using an electric drill or screwdriver it is not always possible to drill perfectly straight holes. A homemade stand (even of the simplest design) can easily solve this problem.
Of course, you can buy a stand for an electric drill at a hardware store or order it online. But if your goal is to save money, it will be more profitable to make it yourself.
Metal drill stand: option No. 2
If you don’t have time to study drawings and various options for rack designs, then we invite you to watch an informative video about creating a very functional mechanism that can satisfy the needs of most home craftsmen.
The result of the work will be a stand like this with an original cable drive of the carriage
How to make a simple drill stand for an electric drill
The first version of the homemade design, despite its simplicity, combines several advantages: low cost and functionality.
This stand is more reminiscent of a tabletop mini drilling machine.
The costs of implementing this idea are minimal. In any case, such a homemade product will cost less than buying the most primitive factory model.
The idea of making a stand for a drill with your own hands belongs to the author of the YouTube channel MakeTools. The main material for the manufacture of the structure is a profile pipe with a wall thickness of 1.5 mm.
The size of the drill stand frame is 300x300 mm (however, you can make the base larger if necessary).
The height of the vertical stand is 500 mm (again, you can change it up or down if necessary).
The movable T-shaped part to which the electric drill is attached consists of two parts: vertical (length - 150 mm) and horizontal (length - 100 mm).
Additionally, fastening elements are used in the form of bolts and nuts of different sizes: M10 - for connecting parts, M8 - for fastening the door spring (return mechanism).
Machine device
Before you figure out how to make a stand for a drill with your own hands, you need to know the structure of the structure. The machine consists of the following components:
- The basis of a homemade machine is the bed. The part is a platform on which the stand is fixed.
- The carriage acts as a holder for a hand drill. The unit is fixed on the stand and moves along it using a mechanism made of furniture guides.
- The handle is necessary to control the operation of the mechanism. The handle lowers the carriage with the drill along the stand while drilling and returns it up to its original position.
- Additional components allow you to expand the functionality of the machine. It becomes possible to drill at different angles and mill small parts.
You can assemble a drilling machine from wood, metal, or use a frame from an old photographic enlarger. In any case, you need to understand an important requirement: the more powerful the hand drill, the stronger the stand is needed.
Do-it-yourself vertical stand for a screwdriver
Now let's look at the second option for a homemade stand. In general, the design is very simple, but most importantly, it works. The idea belongs to the author of the YouTube channel Gökmen ALTUNTAŞ.
In this case, it is quite compact, since it is designed for use in conjunction with a screwdriver.
However, you can adapt it for an electric drill by slightly increasing its size. And then you will get a homemade drill stand.
The advantage of this design is that its manufacture requires a small amount of materials. You don’t even have to buy many parts - you can find them in the garage.
We will make the drill stand stand from 20 mm thick plywood. You can also take a piece of board.
First of all, we saw off a blank of the required size from the plywood. Then we mark and drill two holes in it. Using epoxy glue, glue the guides.
We round the sharp corners of the base on a grinding machine. We make a movable platform from wood or plywood.
In the moving part we drill holes with a diameter of 19 mm for the bearings. Lubricate the outer part of the bearings with epoxy glue and insert the bearings into the holes.
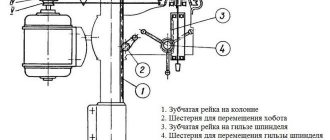
KWB system
This system has earned enormous popularity due to its wide range of functionality and low cost. Thanks to it, the most accurate positioning of drills relative to the workpiece is achieved; it is lightweight and small in size, which significantly increases its mobility and scope of application.
Separately, professional workers note the simple setup:
- With certain skills, the drilling angle can be changed in the range of 0–90 degrees;
- drilling depth is adjusted by a stepless mechanism;
- The V-shaped groove allows you to securely fasten round workpieces;
- the mounting neck has a diameter of 43 mm.
One negative caveat: proper operation of this unique device requires considerable practice. An alternative to this guide can be a design that uses a hinge block - it is fixed to the edge of the product’s work table and fixes the part in the desired position.
DIY drill guide
We bring to your attention the third budget version of a homemade device. The design is also quite simple to manufacture, but is made of metal. This idea belongs to the author of the YouTube channel Be Creative.
Materials that will be required for the manufacture and assembly of the drill stand:
- profile pipe;
- metal bushings;
- clamp for drill;
- steel plates;
- guides;
- return springs.
First of all, it is necessary to make a movable part of the stand to which the electric drill will be attached. In the previous version it was made of wood, in this one it is made of corrugated pipe.
Cut a piece of square profile and cut out the ends of the saddle. Then we weld two bushings to it.
In the middle you need to weld a clamp to attach the electric drill. It can be made from a piece of round pipe, two nuts and a bolt.
Next, we cut off three pieces of steel strip and weld the base of the stand (support platform) from them.
We weld guides made of smooth reinforcement to the base. We put springs on them.
We fix the drill with a clamp, and then put the moving part on the guides.
The homemade drill stand is ready. Yes, it looks very primitive and flimsy, but it can be made very quickly from scraps of metal.
The detailed manufacturing and assembly process of this structure can be seen in the video below.
Pros and cons of homemade racks
The most important and fat plus is saving money. In most cases, you can make a drill stand (guide) for a screwdriver or drill from scrap materials.
Even if you don’t have some components in the garage, you can buy them for pennies at a metal collection center (for example, if you decide to make guides for a moving part from shock absorbers).
To make a tripod (vertical stand), a profile pipe is usually used - many have it in stock, and buying it is not a problem.
Another advantage of a homemade rack is that the structure can be customized to suit you - make it the size you need (for example, if you transport it in a car).
At the same time, you don’t need to climb all over the Internet to find suitable drawings - you can make a rack without them.
The only downside that can be noted is that a homemade drill stand is not designed to perform high-precision operations. And, of course, it is in many ways inferior to a drilling machine.
How to choose material
It depends on what goal you are pursuing. If you need a stand for one-time work, feel free to use whatever you find at hand - scraps of metal, wood, plywood, etc.
If you want to make a desktop version of a drilling machine, then you need to approach the choice of materials responsibly.
You will have to spend money on purchasing professional pipes and other components: in particular, you will need to purchase good guides and bearings.
Share on FaceBookAdd to VKShare with classmatesSend to Whatsapp