One of the main parameters of a twist drill is the tip angle, which for durable metals (steel, cast iron, hard bronze, titanium, etc.) is approximately 120 degrees. Deviation of this angle more or less from the nominal value makes it difficult for the drill to operate effectively. In the first case, productivity drops and the tool overheats; in the second, the drill may simply break, unable to withstand the excessive load. In order to comply with the sharpening parameters without special devices, you must have high qualifications and experience as a tool sharpener. Well, it will be almost impossible for a non-specialist, especially in domestic conditions, to do this. But, having some tools and simple materials, you can make a not very complicated, but reliable device for sharpening the corner at the tip of a twist drill for hard metal.
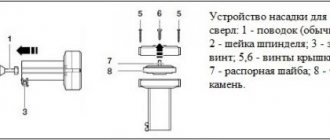
Device for correct drill sharpening angle
How to sharpen drills with the correct sharpening angle without much effort and skill?
Unfortunately, many of us do not succeed the first time. This device is very simple in design. Therefore, each of you will be able to repeat it. Many people know that the edges of bolts and nuts have the same angle as a standard drill sharpening. We will use this. We will not weld two nuts together to get the correct pattern. The design is a little different. To start, you need any nut. The larger the diameter, the larger the diameter of the drill that can be sharpened in it.
The nut has 6 faces, 2 of which we need. Take a caliper and mark 4 mm from the edge of the nut. We turn the nut the other way around and make a mark on the edge that is one and a half mm larger than the first one. We make a triangle on 2 sides. Cut with a hacksaw or grinder. The result was a nut with cuts.
We weld another one. The device is almost ready. He misses the puck, which we throw into the middle. You will also need a bolt; it screws into a small nut.
The cuts in the nut have different depths, which differ by 1.5 mm. This difference is hardly noticeable to the eye. We insert the rod, fix it, and apply a ruler. The gap between the ruler and the round timber is smaller on the left than on the right. That is, the device has a certain angle. Where the gap is smaller, the master made a mark.
Operation of the device mechanism
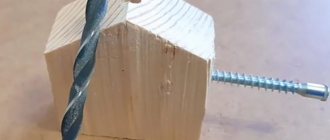
We take a straight, unsharpened drill and place it in the device. Where the mark is, the drill must be placed, as shown in the photo and video. We fix the drill so that it protrudes slightly from the edges. The drill will be sharpened on the working side. In the example shown, it is possible to clamp with a diameter of up to 8 mm.
When we start grinding the edge of the drill using sandpaper, there is a guide in the form of the plane of the edge of the nut, which sets the correct sharpening angle.
This is a great device for those who cannot find the right angle by eye.
The video shows how to position the tool relative to the sanding wheel. From the 6th minute you can see how the drill is processed.
Alexander Polulyakh.
In addition to this video tutorial, another DIY device using bolts and nuts.
Device design
drilling machine
So, the main task of the device is the correct orientation of the drill relative to the plane of the grinding wheel. To do this, its design includes a base plate, on which it is desirable to place both the device itself and the electric motor on the shaft of which the sharpener is located. The plate also contains a rotating column on which the drill is fixed. It must be able to not only rotate, but also move towards the grinding wheel.
As a column, you can use any bearing assembly with a shaft, for example from an old drill. A drill bed is fitted onto the shaft rings (you can use an adapter sleeve), to which it is pressed with screws. After fixing the drill, the sharpener drive is turned on, the column is brought to the grinding surface and rotated to give the back surface of the drill the correct shape
It is important that when initially setting up the device, the drill tip angle is maintained at 118 degrees
Drawing of a device for sharpening drills
If we talk about those drills that are used by craftsmen at home, their cost in stores is low. But even in this case, you should not use them as a consumable for one-time use. After all, updating the drill to the best working condition will not be difficult if the master has the skill or special tools.
There are factory-made machines that are designed for sharpening, but this is a separate expense item, so most often craftsmen create such devices with their own hands.
Most of the problems are caused by drills for metal, and wooden blanks do not quickly reduce the sharpness of the cutting edges.
To make a machine for restoring the sharpness of cutting elements, the necessary control means (template) are used to check the tool.
Typically, tools for ferrous metal, carbide bronze, steel or cast iron have an edge angle of 115-125 degrees. The length of another material, these parameters are different.
for soft bronze, red copper – 125, for brass alloys – 135;
for aluminum and soft aluminum alloys, granite, ceramics and wood – 135 degrees;
for magnesium and its alloys – 85 degrees;
for plastic, textolite and silumin - from 90 to 100 degrees.
Masters, if necessary, make templates in accordance with the above data. By the way, theoretically, a single drill can be suitable for all these metals and other materials, if you sharpen different working surfaces each time.
An elementary handicraft device that is often used, bushings attached to the base. There are many drawings on the Internet for self-production. It is necessary to take into account that the tool must be well clamped, the accuracy depends on 1 degree.
If desired, you can make a large-sized holder by using aluminum or copper tubes corresponding to the standard characteristics of drills, or drill many holes in a soft metal workpiece. It is necessary that the sharpener has a comfortable hand rest to move the device and hold the stop.
This primitive sharpening machine is easy to install on a workbench or table.
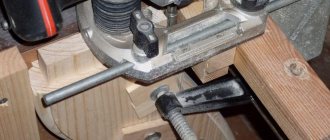
The essence of the problem: there are drills, they need to be sharpened. We will use one of the sharpening methods, close to the factory ones. Too lazy to catch with your hands. Better than the monkey method - install it and you're done. It took approximately 1 hour to manufacture the device according to the finished drawing.
Read also: The screwdriver button does not work
A little welding work according to the template. A corner was made. We put the washer on, it’s just pressed on.
Let's try the first sharpenings, if everything is assembled correctly, we will refine and refine it, make a quick adaptation.
After sharpening the drill, we carry out a test. Two casting chips are visible, which means that sharpening was carried out correctly.
The only drawback is that one chip is longer than the other, which means they missed the length of the edges. You need to make a stop that will adjust the length
Video of the channel "Anton Fomenko".
Assistive devices
Now it's time to make a device for sharpening drills. It is suitable for 2 types of masters:
Beginners who are unable to maintain a suitable inclination evenly. This results in an uneven edge and reduced drilling efficiency. Sometimes the drill starts to work even worse than before, and this reduces the speed of work. The devices will be useful for craftsmen who have to constantly sit behind the emery. In these cases, homemade tools for sharpening drills are a necessity.
Device for engraver and electric drill
An elementary device for sharpening a drill, which is very simple to make, since it consists of only
- Frame. It is usually solid and made of plastic. It has a ring that is fixed on the engraver collet and a sleeve with an angle of 60 degrees. The drill fits in there with a stop, so there is no displacement.
- Small grinding wheel. He grinds off some of the metal.
If you don’t have an engraver, there are devices for sharpening metal drill bits on a drill. They will need:
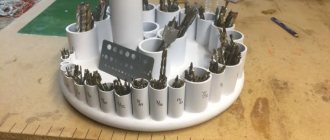
- Round pipe 50 millimeters. Even a plastic plumbing pipe and a plug for it will do.
- Grinding cone or cutter with an inclination of 60°.
In the plug you need to drill a nozzle around the circumference.
Nut based
A specific homemade device for sharpening drills with your own hands, which is still suitable for beginners. Here you will need a welding machine, since the monolithic body is more durable.
To make a sharpening tool, follow the plan:
- You will need a large diameter nut, for example, M 16. You need to cut it.
Try to get it to 120 degrees. To check this, just apply the tip of the drill. - Another nut with a smaller diameter is welded on top. You will need it to screw in the clamping bolt.
- All you have to do is screw in the bolt and you're done. The nut will serve as a guide and sharpening the drills with your own hands will be much easier.
Anyone can assemble such a machine for sharpening drills with their own hands, but its effectiveness is questionable. You shouldn’t have high hopes, since the nut will also gradually wear off.
From the door hinge
A homemade device for sharpening drills with your own hands is suitable for those who know how to work with a welding machine. Next you need to follow the instructions:
- First the loop needs to be shortened. One part will serve as a clamp for the hand rests, the second (cut off part) will set the angle.
- A metal corner must be welded to the long part. It is threaded to accept the bolt. The diameter is not so important; here you can act at your own discretion.
- Next, a corner is installed; it will serve as a guide plane.
Here is a detailed video on how to make a machine for sharpening drills with your own hands.
It is worth understanding that this homemade sharpening device is not a full-fledged toolkit. A sharpener is necessary, and the loop is only a guide.
The design also has 2 disadvantages:
Feeding is carried out from top to bottom. Therefore, the back of the edge will be flat, which will cause overheating. You will need to use coolant or at least solid oil. Not everyone will be able to orient the drill evenly, as the accuracy will be mediocre.
To make a machine for sharpening drills with your own hands, you need to make an effort. Store racks are expensive (from $50). At home, they are literally made from trash.
The stand consists of 5 parts:
- Emphasis. The drill rests on it.
- Tightening nut with protractor. You just need to immediately set the stop in the position at which angle to sharpen the drills for metal.
- Tool clamp. So as not to hold it with your hand and get rid of accidental turning.
- Boat. Allows you to move the equipment.
- Base.
Conductor type template
A simple device for sharpening drills, but it is not inferior in efficiency to factory guides. It can be made from a piece of pipe.
To sharpen a drill you will need to do the following:
- The profile section is cut at 60°.
- It should turn out so that the profile falls under the cut line.
- The jig is attached to the sharpening table with screws or a clamp.
Now all that remains is to attach the tip to the template and simply turn it.
It is easy to make a jig for metal drills with your own hands, but it will make the job much easier for a beginner. He can handle any diameter, even the smallest. In addition, soon you will be able to “get your hands on” and sharpening drills with your own hands will not be a problem.
The procedure for making devices for sharpening drills with your own hands: drawings, video
In order for the processing of materials to be high-quality and fast, it is important to take care of the necessary sharpness of the drill.
Regular replacement of the tools used requires significant financial costs, and therefore a do-it-yourself drill sharpening device would be an excellent alternative. Moreover, making it at home is not so difficult - you just need to select suitable drawings and materials.
How important is it to use sharpening equipment?
How quickly does a drill lose its sharpness? This depends on many different factors: the material being processed, the feed speed, the presence of additional cooling, and the speed of rotation. If we are talking about working with wood, then sharpening the drill is not required as often as when working with metal.
There is no point in neglecting this procedure - it is better to spend about half an hour to return the instrument to its former sharpness than to waste time in vain. After all, work productivity decreases significantly; additional efforts have to be made, increasing pressure. But in any case, the process slows down, and accordingly, you will have to spend 2 times more time on one workpiece.
Regular purchase of new drills is only relevant if we are talking about small amounts of work. Otherwise, the level of costs begins to grow exponentially - it is much easier to learn how to sharpen them correctly on a homemade machine.
Choosing a sharpening angle
How can you tell if a drill needs replacement? As a rule, the master hears an unpleasant creaking sound, and additional efforts have to be made to process the metal. Initially, the angle of the cutting edge becomes dull.
If the necessary measures are not taken in a timely manner, the service life of the tool will be reduced by an order of magnitude - the wear process will be more active.
It is important to consider that during the sharpening process on a machine, it is necessary to select the correct angle - it depends on what materials you will be working with. In this case, it is best to follow a fairly simple rule: the harder the surface being processed, the blunter the drill angle should be.
- Plastic – 30-60.
- Wood – 40-60.
- Non-ferrous metals – 40-50.
- Hardened steel – 130-140.
If desired, you can use the universal option by sharpening the drill at an angle of 90-100 degrees. But this decision is relevant only if the quality of processing can be neglected.
How to make a simple design?
At home, it is most convenient to use a sharpening machine, which is easy to make with your own hands. Moreover, this will require only a little effort and materials that are at hand. You can choose a simple drawing - the work will take a minimum of time.
The sharpening stand consists of a base that is securely fixed and a holder designed to work with drills of different sizes, which makes this device truly universal.
To make homemade sharpening equipment, you will need the following items:
- Base - for this purpose you will need to select a board whose thickness is at least 30 mm.
- Rail - attached to the base in any convenient way (you can either glue or nail this product). Fixed at an angle of about 30 degrees. The side edge should be beveled. This element is necessary to install the holder at the desired angle.
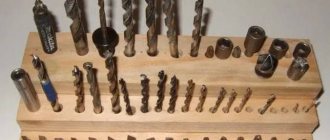
- Holder – to create it you will need a rectangular block of wood. One edge should be beveled (approximately 60-65 degrees) - it is this part that is attached to the rail. On the other hand, you need to make holes of different sizes for all types of drills used.
- Emery wheel - used for quick and high-quality sharpening. You can also purchase a diamond wheel for this purpose - although the cost is higher, its service life is much longer.
The simplest machine is ready. The design is quite compact in size, and therefore there is no need to allocate additional space for its installation - it will probably fit successfully on one of the corners of the table.
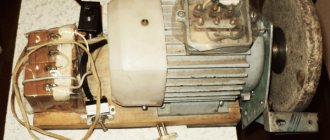
Do-it-yourself equipment with an electric motor
If desired, you can create a more advanced design, which is much more convenient to use and requires minimal time for processing. To do this, you will need to select a suitable motor, as well as take care of the choice of housing, which will make the device safe to operate.
To manufacture such a machine, you just need to select a suitable drawing, and also adhere to the chosen algorithm of actions:
- Install the motor on the chosen base, or on a table (an electric motor from an old washing machine would be an excellent solution).
- Mark the locations of future fastenings, make holes and secure the motor.
- Attach a grained wheel to the motor shaft (you can use a special attachment on the disk, which will make the sharpening process easier and faster).
- If the diameter of the shaft differs from the dimensions of the abrasive disk, it is necessary to install a sleeve.
- Connect the wires to the starter - the latter must have at least 3 open contacts.
- Install a metal box - it is necessary to protect the equipment from dust, which will increase the life of the engine.
Read also: Installing wiretapping in an apartment
As additional protection, you can use a protective cover - it should cover 2/3 of the disk. In this case, even if the circle breaks during the work, the master will be safe.
Secrets of proper sharpening
To ensure high-quality sharpening of drills, it is not enough to select a suitable drawing and make a homemade machine.
It is also important to remember a few simple rules that will help you easily achieve the desired result:
- When processing the surface of a tool, it is important to ensure that the tip is always located in the center.
- It makes sense to practice first and only then start working - this will help you learn how to maintain the required angle and not put too much pressure on the product.
- Overheating is unacceptable - you can simply ruin the instrument, and therefore it is important to constantly cool it (if the surface is hot, you should not put it in water - first you need to let the product cool).
- It is recommended to start the process with a coarse abrasive, and then move on to a finer one.
And most importantly, always follow safety precautions - then there won’t be the slightest difficulty with the sharpening procedure.
The manufacturing process of the machine used for fast and high-quality sharpening is quite simple. It does not require significant costs, since materials that are probably at hand are perfect for its creation. At the same time, such a rack will allow you to save on frequent tool renewal, which is very profitable.
The quality and accuracy of drilling depends on the sharpness of the working tool. In addition, unlike a table knife, the drill must be sharpened correctly. Experienced mechanics can straighten the cutting edge on a regular sharpening machine by simply holding the drill in their hands (at least according to them). But this method requires skill and many years of experience. Even if you have a steady hand and an excellent eye, without understanding the process, you will simply ruin the instrument.
Grinding wheel or special machine?
The process of properly sharpening drills is quite complex and requires professional skills and craftsmanship. If you have to carry out drilling work quite often, it is best not to rely on your skill and the quality and accuracy of the set angles on homemade holders, but to purchase a special machine for sharpening drills.
Unfortunately, it is not always possible to sharpen a drill designed for metal work using a regular sharpening wheel and available tools. In some cases, sharpening such drills can only be done using a machine. Such cases include:
- working with drills designed to perform drilling operations in blind holes;
- working with universal drills that have exceptional hardness of the working part and are used to make holes in parts made of especially strong alloys;
- work associated with sharpening the smallest thickness in cases where it is necessary to drill to a greater depth.
Such machines have specific equipment that makes it possible to fix the drill in any required position. Using such a machine, it will be possible to sharpen any drills, including those made of special hard alloys.
Today, stores offer a variety of machines with different functionality and different sizes. Therefore, it is not difficult to choose exactly the option that will best meet the individual needs of the master. You can also purchase a special attachment for an electric drill for sharpening drills. Masters speak quite positively about such attachments.
You can watch how to sharpen drills with your own hands, how to check the correct sharpening using drilling, and how to make a sharpening device yourself in a home workshop in the video.
A few basic rules for sharpening (using the example of twist drills for metal):
For a better perception of the material, let’s remember the structure of the drill.
- Do not press the tip against the sandpaper for more than 2-3 seconds at a time. The metal heats up and the so-called “tempering” occurs, that is, deprivation of hardening. Accordingly, the necessary hardness of the metal is lost. The first sign is the presence of temperature discoloration on the edge.
- For drills with a diameter of up to 4 mm: each time the sandpaper plane touches the drill, the drill is held in one position: rotation around its axis is not allowed. For larger diameters, the sharpening geometry is slightly different.
- On twist drills, only the back surface of the cutting part is sharpened.
- The cutting edge should be directed towards the rotation of the sharpener (for mechanical sharpening).
- The main angle (2φ in the illustration) depends on the type of material being processed.
Which drills should I sharpen and how often?
Feather and other special wood drills cannot be repaired at home, and they do not become dull so quickly. Pobedite tips for concrete cannot be sharpened in principle. The most popular tool remains - twist drills for metal. Of course, they are also used for processing wood (plastic, rubber and even stone), but this is not relevant to the topic.
Twist drill. The cutting edge is small in size, so during operation it quickly heats up due to friction (there is no dissipation area). The main reason for dullness is overheating. When used correctly, wear does not occur as intensely. Characteristic signs of a blunt drill:
- A creaking sound is heard during operation.
- Instead of curled shavings, sawdust comes out of the hole.
- Instant heating of the tool without moving deeper.
Important: Do not use a dull drill; wear from overheating will only progress.
So, it's time to sharpen the tool. You don't want to ruin the drill and want to mechanize the process.
Mini sharpening machines are at your service:
All devices are divided into two types: attachments or stops for universal tools, and independent devices of narrow specialization. Let's look at the most popular of them, from simple to complex:
Hand holder
This is just the device for those who have a steady hand and a diamond eye. In fact, it only allows you to hold the drill in a given position without fear of injuring your fingers. Angle control is visual, according to the position of the “wings” relative to any landmark. There are few advantages: instant readiness for work, compactness and price. The disadvantages are obvious: manual control of the process does not add accuracy.
Stop for electric sharpener
In fact, this element is not a special device for drills. It simply allows you to fix the tool at a certain angle. The accuracy will be higher than in the previous version. Most stops allow you to set the angle of inclination, and even have a marking scale. And yet you have to rely on firmness of hands.
Read also: What is thread needed for?
There are also more advanced stands: with replaceable elements and adjustment of not only the angle, but also the height. The devices are mounted not on the emery body, but on the workbench: which makes them more versatile.
In fact, such a stop can be adapted to any electric sharpener. An additional bonus is that with the help of such a stand you can sharpen knives, cutters, screwdrivers, chisels, etc.
Semi-professional guides for all types of drills
This is a fairly advanced tool that allows you to control sharpening characteristics with micron precision. All linear parameters are securely fixed, the values are set according to the markings. The drill is mounted in the groove, accidental displacement or rotation around its axis is excluded.
For sharpening, the possibility of both linear movement and movement of the edge along the arc path is provided (for conical sharpening of large diameter drills). Linear movement (along the axis) can be controlled by a master, or a limit stop can be installed.
From the point of view of processing quality, the device has practically no shortcomings. But for proper sharpening, the operator must know the parameters of the drill. That is, there is no automation: therefore the tool belongs to the professional category.
As a development of the line - a guide with its own sharpening unit. There is no need to install a stop on the workbench and change discs. In fact, you have a semi-automatic tabletop sharpening machine.
Important note: All listed devices are designed to work with standard electric sharpeners. Therefore, before starting to process drills, it is advisable to install a special emery disc.
Electric sharpening machines
They are specialized power tools for performing a single task: sharpening twist drills.
Even a person who is far from technology can use the machine (although why does he need sharp drills?). The operator only needs to determine the diameter of the drill and immerse it in the appropriate hole. It is convenient to work, errors are practically excluded. However, all drills are sharpened with the same comb. The price to pay for ease of use is the lack of flexibility in settings. For home use - the best choice: especially if there is an additional attachment for sharpening knives and scissors.
There are versions for masters. The drill is installed taking into account the sharpening parameters, the process can be controlled by the operator.
The sharpening angle, the method of edge processing (linear or conical), and the depth of metal removal are selected. The drill is not located in a common holder, but in an individual cartridge.
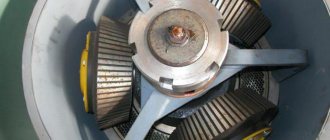
Industrial sharpening equipment for a metalworking shop
During intensive use of drilling machines, a separate post is required to restore the functionality of the tool. Professional stands for sharpening drills of any diameter save time and effort, but the cost of such equipment is too high for home use.
The information obtained will help you choose a sharpening device without extra financial costs. In addition, there are replaceable attachments for hand-held power tools (for example, a drill). But this is a topic for another article.
How to sharpen drills with the correct sharpening angle without much effort and skill? Unfortunately, many of us do not succeed the first time. This device is very simple in design. Therefore, each of you will be able to repeat it. Many people know that the edges of bolts and nuts have the same angle as a standard drill sharpening. We will use this. We will not weld two nuts together to get the correct pattern. The design is a little different.
To start, you need any nut. The larger the diameter, the larger the diameter of the drill that can be sharpened in it.
The nut has 6 faces, 2 of which we need. Take a caliper and mark 4 mm from the edge of the nut. We turn the nut the other way around and make a mark on the edge that is one and a half mm larger than the first one. We make a triangle on 2 sides. Cut with a hacksaw or grinder. The result was a nut with cuts.
We weld another one. The device is almost ready. He misses the puck, which we throw into the middle. You will also need a bolt; it screws into a small nut.
The cuts in the nut have different depths, which differ by 1.5 mm. This difference is hardly noticeable to the eye. We insert the rod, fix it, and apply a ruler. The gap between the ruler and the round timber is smaller on the left than on the right. That is, the device has a certain angle. Where the gap is smaller, the master made a mark.
Review of popular models
In Russian stores, equipment for sharpening drills is represented by a rather small assortment. This is probably due to the fact that the price of even the simplest device, on which you can only sharpen a drill, starts from two thousand rubles (which is comparable to the cost of an angle grinder), and the quality of sharpening, judging by numerous reviews, leaves much to be desired. In addition, most home craftsmen need to sharpen drills several times a month, and they prefer to do it manually. The table below shows a list of the most popular models, among which the Darex sharpening machine stands out for its price, quality and functionality.
All of the listed devices have housings and accessories made of plastic.
| № | Name | Drill diameter range (mm) | Drill fixation system | Weight, kg) | Abrasive wheel material | Average price (RUB) |
| 1 | Sturm BG6017S | 3÷10 | Conductor | 1,5 | Electrocorundum | 1 900 |
| 2 | "Instar" STCH 60090 | 3÷10 | Conductor | 2 | Electrocorundum | 2 100 |
| 3 | Parkside PSS65A1 | 3÷10 | Flat holder | 1,35 | Electrocorundum | 2 700 |
| 4 | "Diold" MZS 0.2 | 3÷13 | Cartridge | 1,9 | Electrocorundum | 3 100 |
| 5 | Darex Drill Doctor 500 X | 2.4÷12.7 | Cartridge | 2 | Diamond | 20 500 |
In addition to stores that offer new models of machines, there is also a market for used sharpening equipment. On these sites, for a very reasonable price, you can purchase professional machines from both Russian and well-known foreign manufacturers, for example, the Swiss company Meteor.
VIEW Multifunctional drill sharpener on AliExpress →