The idea to make such a selection was indirectly prompted by a recent post about creating a table, or rather a discussion about it. Thinking about some kind of answer to the question, I rummaged through my subscriptions and realized that several dozen of them were already dedicated to woodworking alone. And I definitely want to share some. As a result, we present to your attention my selection of subscriptions to Youtube channels, which are devoted to the topic of DIY in the broad sense of the word, and for the most part to woodworking, that is, carpentry and carpentry. I tried to comment on most of the channels. The order in which the channels are listed is largely random, although I have tried to put the channels that I find most interesting near the beginning.
The list does not in the least pretend to be complete. In particular, I omitted many channels of the conventionally “construction” profile, which contain videos on carpentry, but at the same time the rest of the videos there, for example, are about plastering, laying tiles or working with drywall.
Well, since it all started with the table, then the tables will be the red thread throughout the entire review.
We will start with the Russian-language segment. It seems to me that there are very interesting resources on the topic here, although there may not be as many of them as in English-language YouTube.
GARDEN TOOLS
The dacha area is that separate world that often pushes us to inventions.
And it’s understandable, because there is a huge amount of work that needs to be done quickly, efficiently, and without much investment. Therefore, today we are studying a cunning garden tool created with our own hands. Our sheds are full of special country tools - shovels and pruning shears, scissors and brush cutters, hoes and axes, hacksaws and pitchforks, and what about the Fokina flat cutter... but there are also more abstruse and modern tools - an angle grinder, a drill, a chainsaw.
But all this is definitely not enough to do all the necessary work. No, everything is real, but who wants to spend a lot of time clearing the garden of young growth, removing weeds from the spring garden, or doing other, even more mundane work, if it is possible to quickly cope with the task? Today we will give you something to think about, because making smart and modernized garden tools with your own hands is not difficult, but very useful. So, let's go in order and look at all the new products and older inventions, which, by the way, half of us have never heard of!
Contents of the material
Uprooting of seedlings and weeds from a square for homemade people
Good afternoon My long absence from the channel was not in vain; during this time I managed to do a lot of household chores. And of course, I stocked up on a bunch of homemade products that I will show you, my dear subscribers and guests! There is no point in posting everything at once, because this also takes a lot of time, but if possible I will try to post at least one per day. Not only am I sitting at the computer, I can’t leave my workshop. Messing around in the garden is another hobby of mine; I spent a lot of time there in the summer. Caring for plants and weeding, although a pleasant activity, however, also requires a lot of effort. And how I would like to make a lot easier. Wanting alone is not enough, so you need to make useful things yourself that will make your work easier and make it a pleasure, rather than hard labor with a farmhand.
Today I’ll show you a device that I successfully used almost all spring and summer and will, God willing, last for more than one season. Do-it-yourself uprooter To make it, I took a square with walls 40 by 40 mm, 220 mm long. I didn’t cut this length on purpose; I had a lot of such scraps left over from other construction work. I drew two oblique lines along the walls to the corner of the square. Having cut it out, it turned out to be such a spear. A pipe with a diameter of 25 mm was welded into the inner part of the angle. From the outside I welded a square right in the middle of the square. Instead of a square, you can weld a square, but it seemed to me that it would be more convenient.
A metal handle was installed in the pipe so that it would not break under load, because the force falls mainly on the handle. When working with a flat cutter, some types of weeds still germinate after a certain time, especially after rains. And having ripped it out by the roots, I eliminated this possibility and my garden became well-groomed and beautiful. Without damaging the root system, they can also remove seedlings for replanting, which is what I did at the beginning of the season with strawberries and other plants.
Source
A simple cheap homemade device for picking berries
We recommend this device for DIYers.
Gooseberries are a tasty and healthy berry. The plant itself is quite unpretentious and does not require any special care. The berries grow large and are quite convenient to pick. And everything would be fine if not for the prickly gooseberry branches. Because of these garden “cacti,” my hands used to constantly have small scratches. And several times you will think “do you need it - there are so many berries” before you climb deep into the bush for the harvest. But a few years ago my husband made my life easier. He spotted one very simple but useful device for picking berries on the Internet. What is it used for and how is it useful?
In fact, such a picker can be used not only for collecting gooseberries. I also use it to collect any other berries/fruits in hard-to-reach places that I can’t easily reach with my hand. For example, to remove plums, cherries or apples from high branches. How to make a device for picking gooseberries? Everything ingenious is simple! Take a plastic bottle and cut a droplet-shaped hole on the side. Depending on what berries/fruits your picker is intended for, this is the diameter of the drop. For gooseberries, 5-7 cm is enough, for apples and plums more, so that you don’t have to aim for a long time and try to hit the fruit. The volume of the bottle will also depend on what you are collecting. For berries, a 0.5 liter bottle is better.
The droplet's nose should be directed towards the bottom of the bottle. You can also make a cut a couple of centimeters in continuation of the spout so that the branch can be better grasped. That's it, our device is ready! We will pick berries by holding it by the neck.
Homemade apple press
4. If the harvest is large, then the question arises, where to put it? A great option is apple juice. For store-bought juicers, apples need to be cut and peeled, which is inconvenient. The grater shown below can handle whole apples. All that remains for Dali is to squeeze out the resulting mass under pressure. As a result, we get natural, tasty juice and almost dry cake.
Second part
Grinder cutting machine
Homemade machines for the workshop are always in demand, but the angle grinder (angle grinder), popularly known as the “grinder”, is one of the favorites in the arsenal of any home craftsman. But the instrument requires a very careful attitude, because Any disregard for safety rules when working with an angle grinder can lead to serious injuries. Therefore, when cutting large volumes of metal (when making a fence or cutting reinforcement), many people prefer to work with a metal cutting machine.
You can buy a frame for an angle grinder on the Internet, but to save money, you can make a cutting machine yourself, from an “unnecessary” or “superfluous” grinder, which almost every owner of a country house has. As we'll see, it's good for more than just sharpening garden equipment!
Looking ahead, let's say that the machine (more precisely, its second modification) was a success: it cuts smoothly and without distortions.
Ivici
I made it like this - I took a piece of channel No. 6.5 (65 mm wide and 36 mm high). This is the basis of the machine.
A steel strip of 50x5 mm was also required. With its help the angle grinder is secured. A 4x2 cm profile and a three-millimeter piece of steel were also required. A figure eight bolt serves as a turning axis.
In the first version of the machine, a powerful door hinge was used as a rotary axis. But, due to welding, under the influence of high temperature, all the lubricant in the loop burned out, and a backlash appeared in the assembly.
According to the user, the most difficult thing was to accurately mark and drill three holes with a diameter of 14 mm for attaching angle grinders with bolts to the threaded holes intended for installing the side handle.
I also had to work with a round file. A small bore of the holes, due to the backlash, allows you to move the angle grinder a little during the assembly process and accurately install it. After all the parts are ready, the user welded the piece of hardware holding the angle grinder together, assembled the entire structure in rough form, checked all the corners and, making sure that everything was mounted as it should, finally welded the entire structure.
Another homemade machine from an angle grinder was suggested by a portal user with the nickname Bistok
.
As usual, first we understand that we need a homemade tool and some kind of devices, and then the search for the most optimal solution begins. Well, don't buy it!
Everything that is usually lying around in the home workshop (and it would be a pity to throw it away) of a zealous owner went into action, waiting for its finest hour. As a stand for a Bistok
I used an overlock table.
The swivel unit is made from the hub from the “nine”, because it has a bearing.
As in the option described above, the most difficult thing was to “catch” the right angle between the cutting disc and the stop angle. After all, the accuracy of sawing metal depends on this unit.
The end result is clearly demonstrated by the photo below.
To turn on the Bistok
I made additional wiring - I installed a regular switch and a socket, and an extension cord comes from this switch. You can buy a homemade machine from a craftsman you know, but it’s much better to upgrade to a creator of devices of this level!
Tire craft ideas
Old tires on a summer cottage are a unique material. This is understandable, just look at the various photos of homemade items for the garden. You can use them not only to make a pond or use them to fence flower beds:
- halves of tires dug vertically can become an “obstacle course” on the playground: walking on them will become training for balance and coordination of movement for young athletes;
- You can make garden furniture from small-diameter tires: just build a wooden tabletop, and the seats can be woven from rope. Having made a wooden frame, you can make a chair in the same way;
- If you cut a tire in half and attach a seat board, you get a rocking chair. Paint it in a bright color and the children will be happy.
DIY carpentry tools
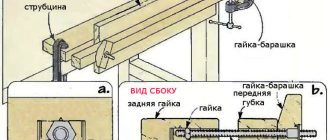
Let's move on and move on to carpentry fixtures. Those who are engaged in “carpentry” will appreciate the budget wedge - an indispensable device for any carpenter for gluing wooden panels.
One day I needed to glue together a lot of wooden panels. I didn't have any clamps. Therefore, I decided to quickly assemble a clamp from wooden blocks with a cross-section of 5x5 cm and metal plates with welded nuts in “tens”.
In total, the user made 3 of these wedges; this was enough to glue a wooden board measuring 1.5x1.7 m and 18 mm thick. To prevent the bars from sticking to the workpiece, under those places where there is a seam and glue may protrude, you can put a newspaper or shoot polyethylene with a stapler.
In order not to spoil the workpiece, you need to place a gasket under the plate into which the screw rests. The gluing width is adjusted by moving the stop bar.
Homemade woodworking tools are constantly being improved. A more advanced version of the wedge, made entirely of metal, is offered by Alano. The components and operating principle of the device are clearly demonstrated in the following photographs.
To make such a wedge you need a welding machine.
On FORUMHOUSE you will find other developments and even drawings of homemade devices.
Cyclone for carpentry workshop based on a vacuum cleaner
And at the end of the material, we offer our readers a photo selection of homemade cyclones, which are a necessary device for carpentry work.
Option 1
My first cyclone failed and I decided to make a new one. It took 20 minutes to do everything. To make it, I took a used putty bucket and polyethylene pipe fittings. They hold better and tighten quickly, ensuring the tightness of the assembly.
An oil filter from Moskvich was used as a filter element.
This is what happened in the end.
Option 2
And here is my version of a construction vacuum cleaner with a cyclone. For strength, I reinforced the bucket from the inside. It turned out that the drain hose from washing machines is perfect for my sander.
To summarize, to make homemade machines and tools of a high level, you need the ability to look at all the seemingly unnecessary household junk from the garage and boards from the carpentry shop with fresh eyes. For a true master and owner, everything should go to work, and by showing creativity and imagination, you can significantly reduce the cost of purchasing expensive “devices” required for one-time or infrequent work.
In the topic on FORUMHOUSE you can see a kaleidoscope of ideas from our users related to the manufacture of homemade machines. We also recommend a topic about the modification and restoration of hand tools.
And this video talks in detail about the selection of tools necessary for a self-builder.
Blacksmiths, metalwork
I must say that there are plenty of blacksmiths on Russian-language YouTube.
But in my selection, as it happens, there are only blacksmiths from other countries. Well, and at the same time - mechanics, welders and other metal workers. Jeremy Schmidt Jeremy amazed me with a video where he decided to make a table for his vice. His vices are huge, and he designed a table to match them - a tabletop made of 30 mm sheet steel, a kind of pancake with a diameter of two meters. Well, everything else, accordingly, is welded from a steel profile. He mainly works with metal, welding and all that, but he can also work with wood.
Well, this is the table itself.
My mechanics channel is about restoring various types of old pieces of iron: vices, scissors, watches, etc. Very versatile metal work.
Torbjörn Åhman - blacksmith.
Alec Steele Blacksmith. Some cool videos:
- Alec Steele forges a Damascus chisel as a gift for The Samurai Carpenter.
- The Samurai Carpenter makes the handle for the chisel donated to Alec Steele.
- The Samurai Carpenter forges the chisel himself. This video deserves the caption: “Caution, all stunts were performed by professionals! Don't try this at home! And in general, never forge in a carpentry workshop.
JohnnyQ90 is a modeler. Car models with internal combustion engines. The owner of a five-axis milling machine whose work makes your mouth water. Good news for those who doubt their knowledge of English - Johnny doesn’t say anything at all (or almost nothing), in his videos everything is clear without words
Well, this is also the man who screwed his engine from a car model to a Bosch micro chain saw (I think its name is Easy Cut). It turns out that it cuts no better than with batteries, but it buzzes!
Homemade circular saw machine
A do-it-yourself cutting machine made from an angle grinder is not inferior to some factory-made samples. The grinder is a fairly powerful hand-held circular saw.
The grinder-based machine performs precise cuts of lumber and metal profiles. To make it you will need the power tool itself, a welding machine and a metal profile.
Step-by-step instructions for assembling the machine
- Two metal strips are welded to the pipe section, in which mounting holes are drilled.
- Accordingly, two holes are also made in the casing of the angle grinder.
- The strips are bolted to the casing.
- The machine bed is made from a metal sheet with support corners welded to the bottom.
- A vertical section of a corner is attached to the frame by welding, in which a hole is drilled.
- A piece of angle is welded to the lower end of the lever and drilled through along with the pipe.
- The bolt is threaded through the holes and the hinge connection of the vertical post with the lever is tightened with a nut. Additionally, install a lock nut.
- In a vertical position, the angle grinder lever takes a stable position.
- A cut is made at the point where the saw blade comes into contact with the frame so that the blade can completely cut the workpiece.
- The handle of the power tool is moved to the end of the lever.
- As additional devices, a transverse and angular stop are installed on the frame.
If necessary, remove the power tool from the machine and use a circular saw in manual mode.
Homemade bow saw
A bow saw is a convenient tool for cutting tree trunks and lumber. The design of the saw is simple; making a hand tool with your own hands is not difficult. To do this you need to prepare tools and materials:
Tools
- drill;
- hacksaw;
- chisel;
- hammer;
- knife.
Materials
- cord;
- wooden slats 20 x 40 mm;
- cotter pins – 2 pcs.;
- stalk ø 10 mm;
- saw blade;
- stain;
- wood varnish.
Step-by-step instructions for making a bow saw
- The lath is cut into three parts (two vertical side strips and a middle horizontal strip).
- Grooves are made in the side handles using a chisel.
- At the ends of the centerpiece, protrusions for grooves are cut out with a chisel.
- The centerpiece is connected to the side handles.
- Through holes are drilled at the joints. Wooden cotter pins are driven into them.
- Cotter pins form hinge joints. This is necessary for the mobility of the lower ends of the side slats when the canvas is tensioned.
- Cuts are made at the lower ends of the sidewalls - parallel to the middle.
- Short bolts are inserted into the holes of the saw blade and tightened with nuts.
- The blade is inserted into the cuts so that the bolts are on the outside of the structure.
- Circular grooves are cut out at the upper ends of the handles.
- Loops are made at the ends of the double cord, which are placed on the grooves.
- A handle is inserted between the strings of the cord, the long end of which rests on the mullion.
- The saw string is twisted using a handle, achieving the desired degree of tension on the saw blade.
- The wood is covered with stain and two layers of varnish.
- After the varnish has dried, the saw is ready for use.
Folding table for the master
1. Let's start with a folding table, which will be an excellent assistant in a small workshop. It will help save an already small area. The table has a compartment for all small things. A shelf on which you can lay out the necessary tools. Thanks to the large number of holes, a clamp can be used to quickly and conveniently fix the workpieces. Stops are inserted into them. It is convenient to fix the parts in a vertical position. If we insert it into the guide bolts, we get additional stops. Having a set of clamps and such a table, you can comfortably perform a variety of jobs.
Round hammock chair
You can work well at the dacha, and then you want to have a good rest. A handmade hammock chair is very suitable for this.
PHOTO: eurosamodelki.ru Hammock chair
The product is based on two hoops intertwined with colored cord. The hoops are made from metal-plastic water pipes. If you are given the dimensions of the chair - a large circle with a diameter of 120 cm, and a small circle with a diameter of 100 cm, then you need to cut two pieces of pipe 380 cm and 314 cm long.
It is better to buy the pipe already rolled into a roll, it will be easier to work with. The brought ends of the pipe are connected by a wooden or metal pin inserted into it.
It is recommended to use polyamide cord for braiding. It is much more technologically advanced than polypropylene, softer in structure and better for tying knots. In total you will need about 1000 m of cord. Samples of mesh weaving are shown in the pictures.
PHOTO: eurosamodelki.ruMesh weaving optionPHOTO: eurosamodelki.ruAnother mesh weaving option
The simplest mousetrap in the world
This name can be assigned to many homemade mousetraps invented by craftsmen. They have one thing in common - humane treatment of animals caught in a trap. The device does not kill the animal, but isolates it. A few examples of how to make a simple mousetrap:
Plastic funnel
Cut a plastic 3 liter bottle in half. The cut neck is turned over and inserted into the bottom of the bottle. Bait (seeds, grain, etc.) is poured onto the bottom.
The trap is placed close to an object that the mouse could climb. A rodent, having fallen into a funnel, can no longer get out of the bottle.
Console
The design is a tilting platform. It is made from a piece of cardboard or plastic. The bar is placed on a plane so that half of it hangs in the air.
The bait is placed on the edge of the console so that the bar is on the verge of balance. The animal, having reached the bait, overturns the bar and falls along with it into the substituted bucket.
Suspension
An empty plastic bottle with bait at the bottom is placed on the edge of the table. A cord is attached to the neck by piercing the plastic with a hook made from a paper clip. The other end of the cord is tied to some support.
The mouse, attracted by the smell of food, enters the container. The bottle tips over under the weight of the rodent and hangs on the cord.
How to make a dryer for fruits and vegetables?
Look at what materials you need to take for this:
- sheet metal;
- square pipes;
- locking mechanism;
- polycarbonate sheet;
- self-tapping screws;
- 2 door hinges.
Here are the tools you need to equip yourself with:
- grinder;
- welding machine;
- drill;
- stationery knife;
- tape measure and marker;
- metal scissors;
- with a hacksaw.
First you need to make the base for the drying cabinet. Make a frame from square pipes. Horizontal and vertical posts are sawed off so that the edges are smooth. And the ends on the connecting elements should be beveled.
The door here will be metal. To make it, cut 4 fragments from an iron pipe and weld them into a rectangle. Then you need to sheathe this base with metal using screws with nuts and self-tapping screws. If possible, weld a steel sheet. To make a mount for baking sheets, attach wooden blocks to the back of the frame. Take self-tapping screws for this. In this case, on each side there are 4 wooden blocks for 4 baking sheets.
An absorber is installed in the dryer. Take some sheet metal and paint it black. Use heat-resistant paint. When it is dry, place this blank on the bottom of the dryer. For the absorber, take a thick aluminum or copper sheet, or, in extreme cases, steel. These materials conduct heat well.
Now you need to sheathe the outside of the dryer, make the roof transparent, made of polycarbonate. Then the sun's rays will penetrate well here. Glass can also be used. Cover the ventilation windows with a mosquito net to prevent insects from flying in.
Attach hinges and a locking mechanism to the door. Secure the door in place. Look what a wonderful, beautiful and spacious dryer it turned out to be.
All that remains is to make the baking sheets. They must allow air to pass through. First, knock together the frames from the bars, and then attach the metal mesh to them.
Now you can cut fruit and watch how your device will work. Place a thermometer in the dryer to monitor the temperature. It should be between 50–55°C. At lower temperatures, cover the bottom holes by placing a rag here.
In such a homemade dryer you can dry not only fruits, but also vegetables, herbs, fish, meat, and roots.
If this design diagram for such a device seems complicated to you, then you can make a dryer from a metal barrel. A hole for the door is cut out in it, and metal mesh racks are inserted inside.
To prevent water from flowing in here and for better ventilation, a roof like this is installed on top.
You can upgrade this fixture by installing a fan and an electric heater inside.
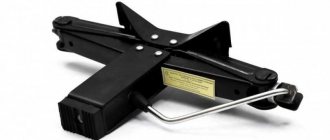
If you want to make your own lawn mower, then this is also possible.
Turn an old washing machine into it, for example, like this one.
And if you still have an old bedside table, then you can turn it into a platform for a future almost self-propelled device. But you only need the door from the bedside table.
Drill holes in the center of the motor shaft. Make a cutting knife from an old two-handed saw. It is necessary to saw off it to the size of the desired shape, cut out a recess inside.
To make it convenient to transport the lawn mower, take wheels from the same old washing machine. These will become the rear wheels of the mower.
And you can take the front ones from a baby stroller.
To avoid bumping into fences and other obstacles with your knife when mowing, place the front wheels so that they protrude slightly beyond the knife.
Cover the electric motor with a casing cut from a plastic container.
Attach two wooden pickets that will become the handles of the mower. Don't forget to secure the motor and extension cord to it. Now you can test such an interesting unit.
If you are interested in other homemade products for the garden, then you will find it useful to watch the following video.
Many interesting ideas await you in the first video. And you can get acquainted with cool homemade products made from plastic pipes if you watch the second story.
DIY crafts at home with your own hands
Man has been making homemade crafts since prehistoric times. Actually, all industrial processes are the improved once handicraft or home-made developments of folk craftsmen. Sometimes we don’t even think about the fact that we pay for things that we can do with our own hands. DIY plans are easy to find online, and materials can be purchased at a hardware store or found at home.
For example, from a cardboard box and a piece of fabric you can make a convenient portable organizer for towels and other textiles. The topic of storing all sorts of little things is inexhaustible, fortunately, as is the number of ideas.
Successful ideas for decoration can also be drawn from ordinary things - let it be buttons or empty tin cans.
Cool shelves are made from ordinary drawers. How do you like this idea?
As you have already understood, if you have detailed instructions, it is not so difficult to make homemade products with your own hands at home. The video will help you understand all the nuances of this enjoyable activity. Useful tips, interesting ideas - everyone should watch it.
The self-taught Samodelkin’s device became a revelation for the craftsmen
The master is not distinguished by greed, which some masters suffer from, who do not want to share their finds with others and, like a dog in the manger, neither to themselves nor to people. And this self-taught inventor came up with a great device with which you will always be at your best and can even improve your standard of living. Why, you can put such a tool into production and sell it to everyone. Maybe this is too strong a word, but it’s worth thinking about automating and mechanizing all routine work at home.
8 tools for craftsmen.
You probably haven't seen many of them. Cool instruments are created by DIYers. These devices will help you work more comfortably in the workshop. The video was filmed on the “Hands from Shoulders” channel.
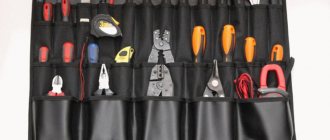
Necessary tool
For each type of work carried out on a summer cottage, a certain type of equipment is required. Gardening tools come in a wide variety. So that the country house does not end up littered with unnecessary things, and the money is not wasted, you need to approach the choice of devices carefully.
The following tools are needed in the garden plot, as well as for the vegetable garden:
garden hose
It must have a nozzle to ensure high-quality watering of plants. The nozzle with a handle has proven itself to be excellent, allowing you to control the water pressure. The presence of such a device will allow you to control the flow without having to go to the tap every time, but by supplying water by simply pressing the handle lever.
Garden saw
It is better if its blade is slightly curved. This tool is perfect for cutting old thick branches. The saw can also be folded so that its storage does not cause difficulties.
A couple of copies of such a tool for working in the garden must be present in every household. Their functions can be very diverse: opening packages with substrate, harvesting crops, cutting rope or cord. The blades of the scissors should be strong, and the handles should be plastic, covered with a soft material: rubber or silicone.
In some cases, using scissors may not be sufficient. A pruner will definitely come in handy, because cutting a thick branch can only be done with the help of a special device. When purchasing, you must carefully inspect the blades: they must be sharp enough.
Flat cutter
A unique tool that can replace a whole range of garden accessories. It can be manufactured in various variations, so it is advisable to select it taking into account the needs of a particular site. In any case, loosening the soil, weeding the beds and processing plants using this “device” will become much easier.
This hand tool comes in a variety of options. Traditional and fan rakes are the most popular. With the latter type, cleaning up fallen leaves becomes easier and more enjoyable. A traditional tool works well if you need to clear under bushes or level the soil.
With its help, you can easily remove plant roots. If you need to edge the bed, you can also use this tool for the garden. Maintaining the excellent condition of a summer cottage and giving it a certain appearance is impossible without the use of a hoe.
For each type of work, one or another type of this tool is used. Digging a hole or removing snow, digging up an area or transferring fertilizer - this device can handle all types of work. The type of shovel must be chosen based on the tasks at hand. It must be said that on the farm it is justified to have as many types of this gardening tool as possible.
Lawn care is impossible without this device. In addition, you can use it to make various types of edging and give shape to shrubs growing on the site for decorative purposes. A lawn mower cannot always fully replace a trimmer, so it must be purchased.
Garden wheelbarrow and cart
It will cope perfectly with such types of work as moving earth, removing construction waste, removing branches and leaves from the site. There are many models, the summer resident can only choose the option that is ideal for the price. If financial opportunity allows, it is necessary to have both a wheelbarrow and a cart on the farm. If money is tight for the gardener, then such helpers can be made independently.
Tool Tiller
A unique device that replaces five types of tools: a rake, a harrow, a fork, a potato digger and a humus spreader. The device simplifies the processes of digging up soil, collecting leaves, and digging up potatoes.
Sprayers and sprayers
With their help, distributing drugs to combat various types of pests will be an easy task. Watering cans for such devices should not be too large because they must be carried around the site.
Of course, this list can be supplemented with any types of tools depending on the needs of each gardener and the typology of the site. However, no matter how many tools are purchased, they should all be not only convenient, but also safe. In this case, the return on work will be more effective.
How to make a marker for sowing seeds
A homemade two-row marker allows me to significantly speed up the process of sowing seeds. Hilling potatoes with a hand hiller gave me this idea; people also call it an “eared” hiller. In essence, the marker is a smaller copy of it. During the tests, I finalized the design and I would like to tell you about the final result.
The rows made with a marker turn out smooth, and the work is pleasantly easy. The row depth can be adjusted by pressing on the marker handle, and the width between the rows can be adjusted by rearranging the marker plows on the base.
The marker is made of stainless steel. A half-inch pipe was taken as a base and a cone for the handle was welded perpendicular to it. Small gussets are welded between the pipe and the cone for structural rigidity. Holes are drilled along the edges of the pipe to change the width between the rows. Plows are inserted into these holes. They are made according to a template from two identical halves. The two halves are bent so that they touch in the middle and welded together.
To attach the plows to the frame, I took a metal rod with a diameter of 10 mm. I welded one side vertically to the plow, and on the other side I cut a thread and screwed it to the pipe with nuts. The handle is an ordinary wooden one, 150-170 cm long.
That's basically it. If you are not able to make this product yourself, then there will definitely be a craftsman nearby who can do all this, guided by the drawings I provided.
V. VITER
Link on topic: Sharpening and finishing of tools with sandpaper (sandpaper)
Rocking bed
PHOTO: eurosamodelki.ru Rocking bed
To make a bed, you need to develop a drawing, prepare the material and prepare the tools and workplace.
The material used is moisture-resistant plywood with a sheet size of 1900×1650 mm and a thickness of 20 mm or more. You will need two sheets. Six cross bars are made of round timber with a diameter of 30 mm and a length of 900 mm (this is the width between the side panels of the bed). You also need 12 plywood strips 940 mm long and 100 mm wide to form the upper surface of the bed. For the awning and for the lounger, you need to choose a water-repellent fabric to your taste.
The most convenient way to cut out the side parts of the bed is with a jigsaw or other specialized power tool. The ends of all parts after sawing should be covered with primer, acrylic paint or drying oil. This will prevent the plywood from breaking.
When assembling the bed, you should mark places for installing transverse bars at the rate of two along the lower contour of the bed, two on the upper contour and two along the middle part. They need to be secured with powerful self-tapping screws with a diameter of 6 mm or more. The ends of the bars can be coated with PVA glue. After assembling the frame, you need to lay and secure plywood strips on the middle contour. You can already put a mattress on them. The awning is stretched and secured along the upper contour. The rocking bed is ready for use.
PHOTO: eurosamodelki.ru Drawing of a rocking bed
Cheap homemade grinder
8. The most budget version of the grinder, created by the Samodelkins. Plastic bottles are used as rollers. They are mounted on bearings. The belt on the rollers is adjusted using thumbwheels. The tension is adjusted with a bolt. The structure is driven by a drill. You can slightly improve Samodelkin’s design by replacing plastic bottles with polypropylene tubes.
How to start making a wood chipper
Starting work on creating a wood chipper with your own hands involves choosing the design of the equipment. After all, installations are divided into three main classes:
- Disc shredder.
- Drum - for obtaining larger fractions of material.
- Double-drum crusher - allows you to produce large-sized wood material, which can be used as a heating raw material.
The next step is to select a suitable drive device. Electric motors or internal combustion engines are used as such. The use of a gasoline engine allows you to get not only a highly productive, but also a mobile unit. However, finding an internal combustion engine of sufficient power is quite problematic, which cannot be said about electric units. If you can’t find one on the farm, you can always buy used ones at an affordable price.
The thickness of the branches that can be chopped depends on the electric motor used. The greater its power, the correspondingly higher the capabilities and service life. When choosing an electric motor for making a wood chipper, you need to consider the following:
- If the power of the unit is up to 1.5 kW, then it is capable of handling sticks with a diameter of up to 20 mm.
- If a more powerful unit up to 3-4 kW is used, then it is capable of crushing branches up to 40 mm thick.
- To crush workpieces from 70 to 150 mm, electric motors with a power of 4 kW are used.
It is worth considering that the more powerful the unit, the greater the electricity consumption. If you are wondering how to make a branch chopper with your own hands for your home and garden, then choosing an engine with a power of more than 2 kW does not make sense. Logs with a diameter of 40 mm or more can be cut with a chainsaw and used as heating material.
This is interesting! When choosing an electric motor for a shredder, consider how it is connected to the electrical network. When connected to a single-phase network, the power is reduced by 1.5 times.
When the design of the shredder and the electric drive of the appropriate power have been selected, you can begin to prepare the necessary parts. Usually, to obtain these, you cannot do without the help of a turner, but it all depends on the selected device configuration. The final stage in the production of a garden shredder is the preparation of the frame on which the drive and shredding mechanism will be placed.
Additional arm for electronic board
Very often situations arise when it is extremely difficult without outside help. For example, when both hands are busy with installation, but you also need to hold some kind of tool. To solve this problem, you can make an additional “arm” yourself.
You will need the following things: alligator clips, small plywood, single-core copper wire, the diameter of which varies from two to three millimeters. Manufacturing stages:
- Several pieces are cut from the wire, which are subsequently bent into something similar to the letter “L”.
- One clamp is soldered to each of them.
- A grid is drawn on the plywood in ten millimeter increments.
- Holes are made at the points where the lines intersect. Their diameter should be such that the parts of the wire fit tightly into them.
- The clamps are placed in the holes.
- The board is installed in the clamps, after which you can start working.