The term hammer literally refers to a drilling hammer, as it was originally used by miners to extract stone. It was conceived as a shock-type action model.
With the help of a flywheel and transmission mechanisms, a rod connected to a pusher was raised. The spring pushed it down, the blow was delivered due to the forces of inertia and compression of the spring. Mainly used for hard rocks.
The pneumatic hammer drill was invented in 1857 by French engineer Sommelier. In 1932, the first model with electric drive was introduced.
What is a hammer drill
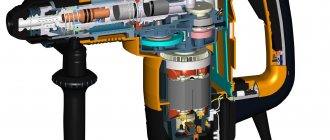
A hammer drill is a universal tool that has great capabilities. Inside it there is a pneumatic device that pushes the piston, which comes into contact with the striker. The latter forces the equipment to perform reciprocating movements. As a result, the nozzles destroy any surface. The presence of the impact function allows the tool to make holes in hard materials.
Its purpose depends on the built-in modes: drilling, chiselling and drilling . There is a toggle switch to switch modes.
Manufacturers produce models of different weights:
- up to 4 kg – light;
- from 4 to 5 kg – average;
- from 5 kg – heavy.
The power and impact force depend on the size of the hammer drill .
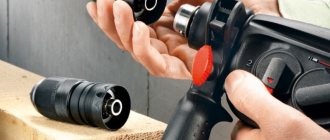
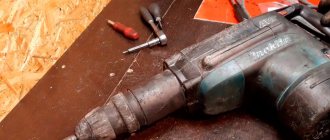
Perforator device
Replacing the cartridge
If you don't have a drawing, take pictures of the disassembly process with your phone. This will save you from errors during assembly. To work, you will need the following tools: a flat-head screwdriver, pliers with long jaws, a hammer and an open-end wrench.
- Remove the rubber tip from the end.
- Using a screwdriver, remove the first retaining ring.
- Pull the plastic coupling housing down (as you would to change a drill bit).
- Remove the second retaining ring in the same manner as the first.
- Remove the clutch cover.
- Remove the spring, locking plates and balls.
- If you can do without replacing the entire assembly, then place the steel parts in a suitable container and fill with kerosene.
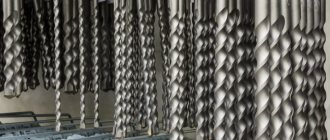
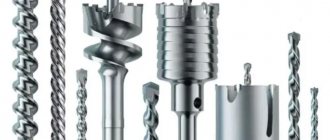
Rotary hammer equipment
Most often it is used to work with :
- concrete;
- brick;
- stone;
- reinforced concrete;
- metal.
Rarely - with wood. The variety of materials requires the presence of a large number of attachments (working body) :
- drill;
- borax;
- chisels;
- crowns
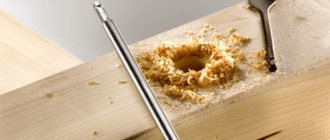
All of them are designed to perform different jobs. Drills are used to make neat holes in the surfaces of the required diameter and depth.
Products that are intended for work on such a durable material as concrete are made using carbide plates . They are soldered onto the cutting part. But during use they wear out.
How to sharpen concrete drill bits for a rotary hammer? Sharpening can be done on a corundum grinding wheel, which is installed on appropriate equipment. The drill must be sharpened so that the worn cutting edges become straight, and the place where they intersect exactly coincides with the axis of rotation of the hammer drill. You should also pay attention to the sharpening angle of the two cutting edges . If this parameter is uneven, the edge with a large sharpening angle will be more heavily loaded. As a result, the hammer drill will quickly fail.
Drills are designed for piercing high-strength materials . A tool with a drill bit simultaneously drills, vibrates or impacts. This work is necessary when installing an outlet. When a chisel or spatula is installed on the device, it works like a jackhammer.
The type of fastening for all attachments, except for drills, is only suitable for a hammer drill, because it has fastenings in the form of grooves and a mounting tail . You can attach a regular drill bit from a drill to a hammer drill; you need a removable chuck (adapter). It comes in two types: cam and quick-clamping. A special key is used to secure the cam clamp. It is inserted into the thread on the outer perimeter and turned. At this time, the collet mechanism, which is installed inside the chuck, is compressed or unclenched, depending on the direction in which the key is moved.
The keyless chuck is activated by applying slight force by hand. The drill hole will open when you press down on the chuck.
There is also a small elongated design that allows you to lengthen the drills . Thanks to the extension, you can make deeper through holes in different materials. When drilling using it, you should carefully adjust the cutting conditions.
Different drills are needed for different materials
How to disassemble and replace a hammer drill cartridge
Breakage of a hammer drill chuck is rare, but always inopportune. It’s good that the malfunction of this unit can be easily fixed on your own. But for this you need to know its structure.
All electric hammer drills are equipped with simple and reliable SDS chucks. Their prototype was designed by engineers from the West German company Bosch. Therefore, the abbreviation in the name is derived from the German words: Steck, Dreh, Sitzt. Which in this case means “insert”, “turn”, “sits”. There are currently five modifications of this design:
- SDS. For attachments with a Ø 10 mm shank, which has 2 longitudinal grooves to prevent rotation. The insertion depth of the shank is 40 mm. This design works well with attachments that have SDS-plus shanks.
- SDS-plus. Leader in frequency of use among rotary hammer cartridges. Designed for attachments with a Ø 10 mm shank, which has four grooves (two long ones - against rotation and two short ones for fixing them from falling out). Insertion depth – 40 mm. This type is used on light hammer drills. It can work with nozzles Ø 4–32 mm, lengths from 11 cm to 1 m.
- SDS-top. A rare species. Installed on medium hammer drills. The nozzle for it has a Ø 14 mm shank, equipped with two long and two short grooves. The alignment depth is 70 mm, with a drill diameter of no more than 32 mm.
- SDS-max. It is found on hammer drills only slightly less frequently than the leader. Designed for drills with a diameter greater than 2 cm. Used mainly with heavy hammer drills. The shank for it, Ø 18 mm, is inserted 9 cm, has three long and two short grooves.
- SDS-quick. This type is designed for a quarter-inch hex shank instead of slots, equipped with lugs. It can even hold drills and bits. Until 2009 inclusive, it was installed exclusively on Bosch Uneo. The drills for it are not made thicker than 1 cm.
- SDS-hex. Only peaks and chisels have shanks for working with it. And only jackhammers are equipped with them.
The designs of hammer drill chucks and electric drills have nothing in common. The drill chuck clamps the drill with movable jaws. In a hammer drill, the drill is secured against rotation by guides that fit into the grooves of the shank. The latches made of spring-loaded balls prevent it from falling out. To fix the drill, you need to insert the shank into the hole in the chuck. And, pressing the nozzle, insert it inside until it clicks. To remove the drill, pull the plastic skirt towards you.
Installing a drill into a hammer drill
The tool itself also has a quick-release mechanism . The drill is securely secured in it with the help of special balls; when locked, they fit tightly into the grooves that are located on the bottom of the drill. The installation procedure looks easy. To secure the bit or drill bit, the lower part of the chuck is moved towards the hammer drill (down). Holding it in this position, install the necessary equipment and release the cartridge. It happens that the balls do not fit into the grooves, and as a result the nozzle moves; you need to turn it until the structure is completely closed.
If a drill needs to be inserted into a hammer drill using an adapter, then you first need to install and fix a removable chuck with grooves for attaching it to the tool, and then the drill itself.
Before inserting or removing a drill into a Bosch hammer drill, be sure to check the condition of the tool . Then they turn it on, set the desired mode, and press the start button. You can start working if there is no smell of burnt plastic or burning, and there are no strange sounds.
Some tips for using the tool
It would be useful to remind you how to work with a hammer drill. This information will be useful for novice builders.
- Use protective equipment when working: earplugs, gloves, safety glasses.
- Do not exert any force on the hammer drill during operation.
- Idle operation of the device is unacceptable.
- If the material being processed has increased hardness, then it is necessary to apply a lubricant. An alternative to lubricant is regular machine oil.
- If a long drill is used, the drilling must be made shorter.
- To increase the service life of the tool, it is necessary to periodically cool the drill in water or oil and take breaks from work.
The hammer drill has firmly entered the life of the builder and installer today. If treated properly, this tool will serve for a long time.
How to remove a drill with a working chuck
With a working chuck, getting a drill is absolutely not difficult. If the cartridge has a key clamp , a special key is needed; in the quick-release fastener, manipulations are performed by hand. In the first option, remove it by inserting the key into one of the recesses on the cartridge and rotating it counterclockwise. Thanks to the teeth present on both objects, unwinding occurs.
In a situation with a quick-release fastening, the hammer drill is switched on in reverse rotation mode . Hold the outer body of the cartridge with one hand and press the start button with the other.
After removing the used nozzle and before replacing it, the shank is cleaned of construction dust and old grease. The shank of the drill being installed must be cleaned and lubricated. When prepared for work, it will last much longer; lubrication extends the life of the hammer drill and attachments.
Tools without reverse only use key chucks. Rotary hammers without reverse are considered a bad purchase.
Removing the old drill
Before changing the drill or auger in the hammer drill, it is worth taking out the old equipment. You need to check which chuck is installed on the power tool. If it is a double-clutch clamp, then you should switch the tool to reverse mode, clamp the lower clutch with one hand, and unscrew the upper clutch with the other. If the chuck is single-socket, one hand is enough to unscrew it - the drill is secured with an automatic lock.
Removing the drill
What to do if the drill does not budge
The drill may become stuck so that it cannot be moved. How to remove the drill from the hammer drill in such a situation? To remove the part of the nozzle that sticks out, you need to clamp it in a vice. Tap the chuck with a hammer to avoid damaging the tool; use a wooden adapter. When the tail of the jammed drill appears from the chuck, stop knocking.
If these steps do not help remove the nozzle, the cartridge is completely removed and placed in gasoline. Pour car oil and leave for 1 hour. Afterwards they try to extract it again.
Very often during repair work, the drill gets stuck in the wall . When you have to pull it out, you don’t have to pull the trigger and pull. This way you can break it. It is also impossible to loosen the tool too much, as the drill may break and a piece of debris will remain. You can drill another hole nearby with a drill, slightly loosen the hammer drill, and try to remove it.
If this does not help, use a gas wrench . They screw it onto a drill and hit it against the handle with a hammer from the wall. If the key is very large, use a steel plate as a spacer.
If you need to remove a drill that is stuck through, you can do this with a sledgehammer . They hit it in the direction of drilling. Do not hit the drill itself. To soften the blows, you need to put a board or any padding.
To avoid this problem, you need to remove the attachments more often. Remove dust from the drilled hole, remove various contaminants, and pieces of the material being processed.
The drill can jam in the surface if too much pressure . The hammer drill should be easy to operate. The reinforced concrete structure contains metal reinforcement, so a drill can easily get stuck in it. Before starting work, experts advise using a special device to check where these metal elements are located.
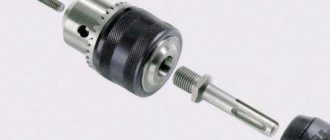
The drill is easily installed in a working tool
If the nozzle gets stuck
Like any tool, even the highest quality hammer drill can jam. When performing work, this becomes a problem that has several options and reasons.
Firstly, when the drill is stuck in a removable chuck, and secondly, if the nozzle is jammed in the hammer drill itself.
When the problem is in the tool clamp itself or the removable head, then simply pour a little liquid like WD-40 into the chuck and wait a little. The composition will relax the grip of the clamping device and the drill can be removed without problems.
There are times when there are no special mixtures or auto stores at hand. The solution may be ordinary kerosene. It is also filled in, and after waiting 10 minutes, they try to release the nozzle. In this case, light tapping on the clamp and slight shaking of the drill are acceptable. After completing the procedure, the clamp must be thoroughly cleaned and lubricated.
The cause of the malfunction can also be the poor quality of the drill itself. If a cheaper and softer metal alloy was used in manufacturing, the nozzle may be damaged by the hammer drill during operation.
There are several ways to fix this problem. The first thing you need to try is to hold the drill in a vice and, holding the tool in your hands, loosen the attachment and pull it towards you. If the deformation is not very serious, then the nozzle can be pulled out.
The second option involves double fixation with a vice - a hammer drill on one side, and a drill on the other. Then take a small hammer and hit the drill towards the exit from the clamp. For this operation, you can use WD-40.
When no other method helps, you can try removing the chuck parts and turning the drill in the opposite direction about 90 degrees. However, this technique can completely damage the parts of the clamping device.
But if this option does not work, it is better not to try to disassemble the device. It is better to take such a hammer drill to a workshop of competent specialists.
It should be noted that in order to reduce the possibility of such breakdowns to a minimum, it is better to choose high-quality attachments from leading brands. As a rule, such investments are recouped by the long operating time of the tool.
The nozzle can get stuck not only in the mechanism of the unit, but also in the wall during operation. In this case, you can try to free the drill or drill by turning on the reverse motion on the device.
If this method does not work, then the nozzle is released from the clamp, another one is inserted, and after drilling out the wall around the stuck tip, it is removed. If the drill breaks during work, then its remains are removed from the clamp, and the piece stuck in the wall is drilled out or simply cut with a grinder flush with the working surface.
Detailed instructions for attaching a drill to a hammer drill are in the video below.
Today, a hammer drill is one of the most popular tools, so it is difficult to underestimate its benefits. The tool is used by both experienced professionals and ordinary amateurs. In many situations it would be difficult without this device. In this article we look at how to insert a drill into a hammer drill without damaging it. Masterful ability to use the tool correctly will help bring your work to perfection. To insert a drill bit into a tool, you will need a hammer drill, drill bit, chuck, and lubricant.
Table of contents:
What is a hammer drill
Before installing a drill in a hammer drill, you should first of all understand. Today it is difficult to complete repairs or construction without resorting to the help of a hammer drill. When drilling is necessary, this tool is simply irreplaceable. The hammer drill is used when working with concrete and brick; it is also often used for working on metal or wood as a regular drill.
Many functions make this tool universal - rotation with impact, impact without rotation, rotation without impact, drilling in concrete, jackhammer function, drilling in wood and metal and many others. You need to know that there are many types of hammer drills. The principle of using the tool is the same, but if you need to drill a wide and deep hole, it is better to use a larger and more powerful device.
Rotary hammer equipment
To work with this tool, you need various equipment - drills, concrete drills for a rotary hammer, chisels, shovels and crowns. Drills and crowns are used when drilling holes, drills are intended for concrete and stone, chisels are used for slotting work, and spades are needed for knocking down plaster or old tiles. All hammer drill attachments have a shank shape, which allows for quick and reliable fixation in the chuck.
Read also: Simple rubber band bracelets for beginners
The hammer drill can also be used with special angle attachments, a dust removal system, stirrers for stirring mortars or paints, chisels and various types of attachments (drill sharpening, water pump, attachment for cutting metal in sheets). Before starting any work with a rotary hammer, make sure it is properly equipped and suitable for the job to be performed. A tool that is too small may not be able to handle a large load.
Means of protection
When working with a hammer drill, be sure to remember about protective equipment. Such means are glasses, earplugs and gloves. You should also work in special clothing, excluding anything that could accidentally get wrapped around the drill or drill. When working with the device, you should not put pressure on it, this may end badly.
Try not to let the tool run idle for too long; this is only allowed before checking it. When working with porous material, use non-impact drilling to prevent it from crumbling. If you have to work with hard material, it is better to use a cooling lubricant emulsion. If the work involves using a long drill, to save money, you can start working with a shorter metal drill for a hammer drill, but of the same diameter.
Lubricate the drill shanks every 180-200 holes. Pay attention to the heating of the instrument; if it gets too hot, it’s better to take a break. Alternate periods of working and resting the tool. As a rule, a break is taken every thirty minutes. Its duration is about ten minutes.
How to insert a drill into a hammer drill: step-by-step instructions
If, when working with a hammer drill, you take into account all the rules and pay attention to the subtleties, the work will be done competently and easily. Always follow construction techniques and do not forget to periodically check the tool for malfunction.
Functionality check
Before you start replacing the drill or working with the tool, you need to make sure it is working. To do this, insert the plug into the socket, and put the hammer drill in the drilling mode without fighting (leftmost position). After this, the start button is pressed. If you hear a smooth sound, devoid of glitches and jerks, you can start working.
Before starting work, do not forget to check walls or other surfaces for water supply or electrical wiring. The handle must be securely fastened and not dangle during operation. A timely check or inspection will help avoid injuries and damage to the device.
Please note: never touch the rotating parts of the tool, otherwise this may lead to a tragic outcome. For the same reason, it is necessary to install a drill chuck and a drill bit for a bosh hammer drill only with the plug unplugged.
Purchasing a chuck
You need to purchase a special chuck that fits your model of hammer drill. If you cannot choose or do not know which cartridge is needed, the best thing to do is take the tool with you and try compatibility on the spot.
Today, rotary hammers are equipped with two types of chucks - quick-release and key. The key option is traditional; a wood drill for a hammer drill is clamped in it using a special key. In this case, the fastening is reliable, but less convenient than with a quick-release chuck. The keyless chuck clamps the drill easily without the help of any tools. Simply select the most suitable option and follow the further instructions.
Choosing a drill for a hammer drill
Today, drills are made from carbon, high-speed and alloy steels. If you have to work with durable materials, the drill can be equipped with a heavy-duty, durable tip. Drills can be feather, centering, straight fluted and spiral (for deep drilling).
You can also purchase a drill designed for wood, metal, stone, concrete, glass, ceramics, diamond, or a universal version. Before you fix the drill in the hammer drill, you need to decide on the type if you want the job to be done correctly. The color of the drill indicates the appearance of the final result.
If the drill is painted black, it means it has been treated with superheated steam, but this does not affect the quality, despite the popular belief that black drills are stronger. If the drill has a brown or slightly golden tint, it has most likely been tempered to relieve internal stress. Drills treated with titanium nitrile have a bright golden color; these options are the most expensive and durable.
As a rule, good companies indicate on the drill box its characteristics, such as the grade of steel and the material that can be worked with. If the drill becomes very hot during operation, it means that it has become dull or was sharpened incorrectly.
How to remove a drill from a hammer drill
If an old drill bit is inserted into the hammer drill, it must be carefully replaced. Before pulling out any attachment, be sure to pay attention to the type of its cartridge. Remember about the keyless chuck and key chuck. The key one is more reliable, especially when working in shock mode. This cartridge is made of metal, so it is less susceptible to mechanical damage.
Read also: Microcircuit uln2003a connection diagram
Before removing the drill from a hammer drill with a double-clutch keyless chuck, be sure to switch the device to reverse mode. After this, you need to fix the lower coupling with one hand, and unscrew the upper one with the other. In a single-sleeve chuck, the nozzle can be replaced using only one hand, since it is installed on rotary hammers with automatic shaft locking.
If the drill gets stuck
There are times when the working tool gets stuck in the chuck and does not want to be pulled out. Here you need to know the following. To carefully remove the bit, you need to clamp its free part in a vice and hit the chuck jaws with a hammer through a wooden adapter until the drill tail comes out of the quick-release chuck. If the drill is stuck firmly in the hammer drill and this does not help, you can remove the chuck and place it in gasoline, and drop a little car oil into the key chuck.
There are also often situations when a drill gets stuck in a wall during concrete construction work. This occurs during clamping between concrete and reinforcement. You must stop pulling the trigger and loosening the hammer drill as it may break. First, remove the drill bit from the chuck, replace it, and begin to carefully knock out the concrete around the stuck drill bit. Avoid hitting a stuck drill bit. After this procedure, the stuck drill can be removed without difficulty.
Chuck insert
For proper operation of the tool, it is necessary to lubricate the hammer drill with special lubricant. It is better to purchase a branded product that is resistant to water and prevents moisture from entering metal surfaces, which prevents corrosion.
To do this, you need to open the tube of lubricant and squeeze a little into the hole into which the nozzles are inserted. Next, the tool is placed on the floor or other hard, comfortable surface with the handle, after which the back of the hammer head is pulled down, the chuck is inserted, and the lower part of the head is returned to its previous position.
How to remove a drill from a damaged chuck
in the chuck are often damaged or the cam breaks . The drill may break when twisted between the jaws. Chips appear and fall into the cracks, preventing them from rotating normally. Using 2 gas keys, each part of the cartridge is clamped with one of the keys and rotated and unscrewed. You can use 1 key and a vice, in which case one part is clamped in a vice.
If there is no gas key, one half must be inserted and clamped in a vice , the other half should be lightly hit tangentially with a hammer.
If the threads on the cams are torn off, these methods are useless. In this case, the cartridge is twisted. Place in a vice. The drill is knocked out from the inside with a punch. It is threaded through the hole into which the spindle .
Replacing a chuck on a rotary hammer + (Video)
As noted earlier, not every chuck will fit every drill. We looked at how the process of removing and disassembling the cartridge is carried out. To install a new cartridge, you need to complete the following steps:
- screwing the chuck onto the drill;
- inserting a screw into the socket;
- tightening the screw using a screwdriver.
The choice of a cartridge intended for a rotary hammer must be approached seriously. The price is very varied, but there is no need to waste money by purchasing a chuck that may not be suitable for your drill. The ideal option is to take the tool with you if it’s a market, or ask for help from a consultant if it’s an online store.
Source: instrument-blog.ru
What to do if the drill breaks
If you can get caught on the tip of a stuck drill bit, pull it out :
- pliers;
- wire cutters;
- tweezers.
Often it gets stuck very deep. To remove a piece of debris, you need to take into account its diameter, size and type of metal, where it is stuck, and also how deep. To remove a small fragment, the hole in which it is lodged is enlarged. The fragment is pryed with a suitable device and pulled out.
You can remove a piece of a broken drill with a diameter of 8 mm or more that remains in the metal using a bolt with welded spokes or a spring wire . But this is if its end sticks out, which you have to cling to.
The tail part remaining in the socket can be removed using a welding machine, thin electrodes, or a thin plastic tube . The latter must match the diameter of the cartridge bore. The tube is inserted into the socket and rests against the fragment. Turn on the welding, connect the mass to the tool, press the chuck lock to the nozzle release mode, and carefully insert the electrode into the plastic tube. And they quickly weld the electrode to the shank in order to later remove the broken part.
If the shank is dented, the chuck will have to be partially disassembled. The fragment cannot be pulled out even by welding the electrode .
Most often, poor quality attachments break. It is advisable to purchase high quality equipment . During operation, try not to jam. If you have to drill with a low-quality drill, do not put pressure on it. You can understand the quality of the equipment by making several holes and then looking at the shank. A good product does not wrinkle.
Sometimes the drill breaks and this requires additional work
Possible problems with attaching the nozzle
It happens that the installation of a drill or auger into a hammer drill chuck ends in failure. This word refers to defects in the fit and rotation of the drilling attachment, and unreliable fastening of the chuck. Most often there are 2 cases:
- The drill is not securely fixed in the socket and flies out during operation. In 99% of cases, the source of the problem is a worn cartridge. You can take it apart and try to restore it.
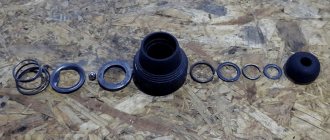
Disassembling the chuck
In the clamping mechanism, the cams often become deformed over time and deviate from their normal position. It could also be compression due to wear on the retaining spring. The mentioned parts cannot be repaired, so they should be replaced and the entire structure put back together. If there is no desire or time, it is better to immediately purchase a new cartridge.
- It also happens that the cartridge does not want to be attached to the hammer drill shaft. Here, the probable cause also lies in wear, this time of the retaining ring at the end of the raster sleeve. Using this part, the chuck body is attached to the shaft of the power tool. Replacing the retaining ring will help here.
Bottom left – retaining ring
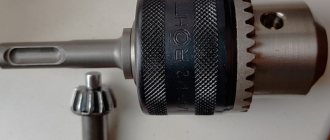
Is it possible to insert a regular drill bit into a hammer drill?
In some situations, you need to screw a drill from a simple drill into a . This can be done using a special adapter, which is a regular cartridge. Electric drills are equipped with it. It comes in 2 types: key and quick-clamping. A special adapter is inserted into the cartridge, which must be tightened tightly. On one side there is a shank, like a regular drill, on the other there is a thread. It can be different. Mostly 1/2 inch and metric type - M12. The adapter must have similar threaded fittings . It is screwed into the cartridge and secured with a special screw with a left-hand thread. It is included in the kit.
The assembled structure is placed into the hammer drill in the same way as a drill. This turns out to be a standard electric drill. You just need to keep in mind that in such a tool the cartridge will have some play . The assembled adapter is not able to withstand heavy loads, so the shock mode must be disabled. Manufacturers produce rotary hammers that already come with similar adapters. There are also models that contain several cartridges at once, which replace each other. One for installing the drill, the other for the drill.
This configuration has an important advantage - no backlash , since the adapter is suitable specifically for a specific hammer drill model. This one costs more.
How to insert a drill?
A seemingly simple question, which, however, may present some difficulties for inexperienced users holding a hammer drill in their hands for the first time.
There are two installation methods.
- One of them is simple - you need to immerse the drill shank into the chuck until it clicks. After this it will not fall out.
- The second method requires pulling back the chuck skirt before installation. That is, pull it towards the tool body and, holding it in this position, stick the shank into the seat.
The first method is usually used on all professional devices - Makita, Bosch, DeWalt, Hitachi, Metabo, AEG, etc., as well as on branded household models - Skil, Ryobi, Black-and-Decker, etc.
The second is on cheap Chinese units. These are, for example, Caliber, Zubr, Patriot, Kolner, Omax, Whirlwind and a bunch of others. True, it is worth saying that among them there are also models where installation is also carried out using the more convenient first method.
In this case, extraction in both cases is carried out by pulling the skirt towards the body.
Troubleshooting
Makita produces tools that are highly reliable . However, in some cases problems arise, so you need to know how to deal with it:
- The chuck does not turn. A similar situation is possible in case of damage to the engine or motor. You will need to disassemble the product and inspect it carefully. Sometimes the reasons may be a broken start button or shorted coils.
- Doesn't hold the drill in the chuck. In most cases, the problem lies in old parts or a damaged cartridge. It is recommended to disassemble the device and look for a solution to the problem. Sometimes it is enough to replace some parts with new ones.
- Replacing the anchor. In this case, the procedure is carried out in several stages. First, open the cover at the back, remove the brushes, and disconnect the gear housing. After cleaning the parts from dirt, replace the armature with a new one, after which rubber shock absorbers and a new air intake plate are put on. Assembling the hammer drill .
- The tool does not chisel. Often the cause is a broken floating bearing or a split striker. In both cases, parts will need to be replaced.
- Replacing the start button. A damaged start button requires replacement. To do this, you will have to disassemble the device - remove the cover, disconnect the contacts, remove the old button and replace it with a new element. Then put everything back together in reverse order.
- Overheating during use. A similar situation occurs when the device is used incorrectly. If unpleasant odors occur, it is recommended to disassemble the device and check everything.
If necessary, parts are replaced with new ones
How to disassemble and assemble a cartridge yourself
To perform maintenance and repair of a hammer drill chuck with your own hands, it is important to properly remove and disassemble this device. Knowing how to disassemble a hammer drill chuck (or how to disassemble a drill chuck), you will be able to independently inspect, clean and even make minor repairs to its internal elements, which will allow you to always maintain your tool in good technical condition. The simple design of SDS cartridges allows them to be removed and disassembled even by people who are not comfortable with technology.
So, disassembling the classic SDS hammer drill chuck is performed in the following sequence.
The plastic part is removed from the cartridge and the rubber seal is removed.
Removing the hammer drill chuck. Photo 1
Using a screwdriver, remove the retaining ring and then the retaining washer.
Removing the hammer drill chuck. Photo 2
When the locking washer is removed, you can see a second ring underneath it, which also needs to be removed using a screwdriver.
Removing the hammer drill chuck. Photo 3
After all the rings and washers have been removed, you can begin to disassemble the SDS mechanism, which consists of a washer, a ball and a spring. First of all, it is necessary to remove the ball from such a mechanism, then the washer and only then the spring.
Removing the hammer drill chuck. Photo 4
All parts of the cartridge mechanism, if you perform maintenance, must be cleaned of dirt and dust, lubricated, and then reassembled in the reverse order.
To get to know in even more detail the question of how to remove a chuck from a rotary hammer or drill, how to properly disassemble it, perform maintenance or minor repairs, you can study not only theoretical information, but also watch the corresponding video.
Why is it better to drill metal with a hammer drill?
Not only drilling concrete, but also drilling metal or wood is best done with a powerful power tool, which is a hammer drill. This tool copes with any complex tasks, which is associated with the use of more powerful electric motors. Power ratings range from 700 W and above, while drills use electric motors with a power of 300 W or more.
In addition, the unit has great torque, so there are no difficulties with mixing dry mixtures. If you have a hammer drill, then you don’t need to buy a specially low-speed drill or mixer, because this power tool will cope with the task of mixing the solution.
The reasons why it is better to choose a rotary hammer for drilling than a drill are as follows:
- Greater power, which will allow you to achieve positive results faster than using drills
- Great torque force - this indicator is very important when using power tools for mixing dry mixtures and drilling wood with a large diameter drill
- High rotation speed - for this purpose, special regulators are used in the design of straight or pistol units. When the chuck rotation speed decreases, the torque increases, and when it decreases, on the contrary, the torque decreases, but at the same time the number of revolutions of rotation of the actuator increases
Now that you know why it is necessary to buy and use drill adapters for hammer drills, you should immediately order them or purchase them at your nearest tool store.
This is interesting!
Manufacturers also produce special collet chucks for rotary hammers, however, this option is irrational to purchase, since the time for replacing devices takes at least 15 minutes, while installing the adapter is done in a matter of seconds.
Working with a hammer drill and its features
The term hammer literally refers to a drilling hammer, as it was originally used by miners to extract stone. It was conceived as a shock-type action model.
With the help of a flywheel and transmission mechanisms, a rod connected to a pusher was raised. The spring pushed it down, the blow was delivered due to the forces of inertia and compression of the spring. Mainly used for hard rocks.
The pneumatic hammer drill was invented in 1857 by French engineer Sommelier. In 1932, the first model with electric drive was introduced.