Growing plants indoors requires creating an optimal microclimate. To do this, you need to ensure not only proper watering, but also ventilation. Unfortunately, it is not always possible to constantly control ventilation in a greenhouse. But, if you don’t want to destroy the crop, a thermal drive for greenhouses is an excellent way out of the situation - a device that will automatically open and close the ventilation holes.
You can buy a ready-made device, but to save money, we suggest making a thermal drive for greenhouses with your own hands from scrap materials, using theoretical information and practical tips from our article.
- From an office chair and other materials
What is a thermal drive, advantages, disadvantages
A thermal actuator is a device that allows you to automatically open and close ventilation holes in order to regulate the microclimate.
The operating principle of a thermal drive is based on the use of a liquid in a closed cylinder that can change its volume depending on temperature. A change in volume activates the mechanism. Cyclohexanol is commonly used.
The advantages of thermal drives include:
- the ability to open/close/open a wide range of devices: vents, doors, windows, frames;
- reliability;
- ease of operation and no need to manufacture
- additional settings;
- ease of installation.
Despite the obvious advantages, thermal drives are not without disadvantages:
- fastening to glass windows requires devices of greater power due to their relatively high mass;
- When installing the device, it is necessary to take into account the size of the greenhouse.
Practice shows that the best results can be achieved when installing thermal actuators in greenhouses made of cellular polycarbonate.
Types and design features
Thermal actuators for industrial greenhouses look approximately the same. A completely different matter is homemade devices, for the manufacture of which folk craftsmen have adapted a wide variety of available materials.
Since buying and installing a ready-made thermal drive is not difficult, we will consider the main types of homemade structures:
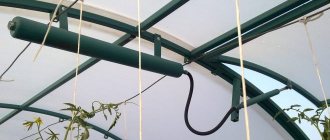
- From a gas shock absorber: in this case, automobile oil is used as the working fluid. For manufacturing you will need a shock absorber piston, two taps and a metal pipe in which the oil will be located. The shock absorber rod is attached to the window. A tap for filling oil is attached to one side of the pipe, and on the other side there is a similar tap through which the oil will be drained. The bottom of the gas spring is cut off and tightly attached to the pipe. By attaching such a device to the window, you will be sure that ventilation will be carried out on time: the oil, expanding, will lift the rod and return it to its original position when it cools.
- From a plastic bottle: This budget option is great for small greenhouses with only a few windows open. To make it, you will need two plastic bottles (5 and 1 liter), some black plastic film, a piece of wooden board, two pipes and a meter-long PVC pipe of small diameter. A hole is drilled in the center of the bottom of a clean and dry five-liter bottle. A pipe is inserted into it and connected to a PVC pipe. To ensure that the container is completely sealed, it is better to cover all joints with thermal paste. The remainder of the tube coming from the bottom is inserted into a liter bottle. It is better to do this through a hole drilled in the roof. Next, you need to wrap a large container in black film and hang it from the ceiling. A small bottle is hung next to the window. A wooden board is nailed to the transom with one edge, and the other is placed over a liter bottle so that it crumples. As a result of heating the large container, warm air will begin to flow into the small bottle. Under the influence of expanded oxygen, it will straighten and lift the board, which will push the frame out.
- From cylinders and a ball: another simple type of homemade device for ventilating a greenhouse. To make it you will need a small wooden box with a lid, a ball, a hose, a board and two cylinders. A hose is attached to the communicating cylinders, and its length must correspond to the height of the greenhouse. The second end of the hose is put on the nipple of the deflated ball. The ball must be placed in the box and the lid closed. We nail a board to the lid and connect it to the transom. The cylinders are suspended from the ceiling, and the box with the ball is placed under the window. The cylinders, heating up, will begin to supply warm air through the hose to the ball. He will puff up, open the lid, and the nailed board will open the window.
All these types of homemade devices for a greenhouse are quite simple to manufacture, but do not forget that they do not have a long service life, especially for structures made from bottles. Therefore, if you want to make a more reliable structure, you will have to use stronger materials.
Classification of thermal actuators
Based on the mechanisms of action, the following types of devices are distinguished:
- Electric – the drive is driven by an electric motor. The signal is supplied by the controller, which interacts with the temperature sensor. They are characterized by high power, as well as the ability to form intelligent systems that control automatic ventilation. At the same time, they are vulnerable to high humidity. The relative high cost and the need for power supply are factors limiting their use.
- Pneumatic - the working element is heated air, which drives the piston. For the drive to work, it is necessary to recreate the complete tightness of the container. Achieving this in artisanal conditions is not easy.
- Bimetallic - different expansion coefficients when heating the metals used are the basis of their functioning. The models are simple and convenient, but limited in power.
- Hydraulic - operation is carried out as a result of fluctuations in the weight of two containers with moving liquid due to changes in the pressure of the air mixture with temperature fluctuations. The drives are characterized by significant power and ease of assembly.
Automatic opening of the greenhouse: operating principle
Modern production of components for automated greenhouses offers gardeners many options, varying in size, appearance, efficiency and cost.
Today, automation for greenhouses according to the principle of operation differs in:
- Hydraulic installations. Such openers work on the principle of increasing pressure in containers with liquids when exposed to high temperatures. Hydraulic systems are the safest. Their disadvantages include a delay in closing the transoms, which can negatively affect the condition of the plants.
- Electrical. Such systems are the most accurate, easy to install and do not take up much space. The downside of the devices is the need for a permanent connection to the power grid. If the greenhouse is fully electrified, to eliminate the possibility of the devices stopping, you can purchase an electric generator.
- Bimetallic. Opening and closing in the case of bimetallic systems is based on the ability of metals to expand. Such installations can be used to automate homemade windows on a wooden frame: they will not be able to open heavy transoms or doors.
You can equip any window (top and side) and door with automation.
Installation of thermal drive
When the thermal drive is ready, it can be placed in any suitable place - on the structure of a vent, window or front door.
It has been experimentally established that the number of vents under ideal conditions should not exceed 25% of the greenhouse area if they are evenly distributed.
Before installation you must:
- check the “operability” of the device - the tested load should not exceed 5 kg;
- It is advisable to provide the bracket with the ability to make movements within 10 cm (the device is secured with self-tapping screws indoors with a window opening outward);
- The clamps are attached to the thermal actuator and to the spring part.
To protect the structure from condensation and corrosion, it is recommended to place the mechanism and spring slightly below the opening rod.
Manufacturers
Do-it-yourself rack: options and diagrams on how to make a high-quality rack quickly and easily
Now let’s make a short review of products for ventilating greenhouses from various companies. There are a number of automatic devices on sale today that operate on the various principles mentioned above. Any model that will be described is quite easy to install yourself. But if we are talking about electrical solutions, then it would still be better to contact a specialist.
"Dusya San"
So, the first option I want to talk about is “Dusya San”. This option uses a thermal cylinder operating on a hydraulic principle. This model operates at a temperature of no more than fifty degrees. The weight of the largest window that this device can open is seven kilograms. The machine is sold fully equipped, in addition to it comes with installation instructions.
Installation can be performed in various greenhouses. The main thing is that the window works clearly both for closing and opening. The opener does not require batteries or an electrical connection. In this case, the ventilator can be easily adjusted to open the window in the required temperature range. If the temperature rises to 30 degrees, then the window opens all the way.
"Sesame-M-2015"
Another interesting option is called “Sesame-M-2015”. The main element of this system is a hydraulic cylinder filled with oil. This model works over a wide temperature range and can be easily adjusted. The weight of the product is only one kilogram, but this is enough for the thermostat to easily open heavy oversized windows and doors. To avoid false operation of the system from overheating, you can protect it by installing special umbrellas on the street side.
"Thermal drive"
The next model is “Thermal Drive”. This development of a domestic manufacturer from Krasnoyarsk can open a window or door weighing up to twenty kilograms. But it is better to use it on window and door structures weighing up to ten kilograms. The largest opening angle is 45 degrees.
This design works using a hydraulic-type thermal cylinder. The manufacturer provides a twenty-year warranty on its products. It is quite simple to install such a system yourself - the instructions contain a similar installation diagram for this model.
Open Planet
Another solution that I would like to talk about is called Open Planet. The manufacturer guarantees that this device creates an ideal microclimate in the greenhouse for cultivating plants. Thanks to it, the temperature in the greenhouse can be adjusted in the range from 15 to 25 degrees.
This model has a reinforced structure with two springs, which makes it possible to use it not only on windows, but also on doors. The car ventilator is made of stainless steel. But in the cold season it is better to dismantle it so that the cylinder does not become deformed.
Caring for the thermal drive
In order for the thermal drive to work for a long time, it is recommended to follow a few simple recommendations:
- the structure requires regular lubrication, since metal components come into contact with moist air;
- It is not recommended to disassemble the device;
- in the cold season, it is advisable to remove the thermal drive;
- nothing should interfere with the functioning of the structure; for this reason, its fixation is prohibited;
- When opening a window or door with a built-in device, you should not apply significant force.
Need for ventilation
All residents of apartment buildings know that the only way to get fresh vegetables in winter or early spring is in the store. But those who have at least a small plot of land at their disposal can arrange a vegetable feast for themselves during cold weather and crop failure. For these purposes, greenhouses are often installed in vegetable gardens. Such outbuildings can be made of various materials: from thick industrial film to heavy glass. The most popular greenhouses today are made of polycarbonate.
The main operating principle of a greenhouse is to create the most comfortable conditions for growing crops.
Several factors contribute to this.
- Temperature maintenance. For the greenhouse to fully function, the temperature inside must be at least 22-24 degrees Celsius.
- Optimal air humidity. This parameter is developed for each individual plant. But there is also a certain norm, which ranges from 88% to 96%.
- Ventilation. The last point is a combination of the previous two.
In order to normalize the required temperature and humidity in the greenhouse, it is necessary to provide air baths for the plants. Of course, you can do this yourself. In the morning - by opening doors or windows, and in the evening by closing them. That's what they did before. Today, agricultural technological progress has made it possible to invent devices for automatically opening and closing windows in greenhouses.
It should be understood that standard methods of creating drafts for plants are unacceptable. Too sharp a change in temperature or humidity level can cause deterioration in the condition of the crop and its death. While film greenhouses have the option of self-ventilation (due to the lack of tightness of such structures), glass and polycarbonate buildings really need automatic ventilation.
In addition to monitoring these indicators, there is also a risk of the development of pathogenic bacteria and microorganisms that negatively affect the growth of vegetables and fruits. Many insects also prefer warm and humid places for their deployment. Periodic air baths in greenhouses will bring them discomfort. This way, no one will encroach on your future harvest.
In order not to worry and not to run to the greenhouse every half hour or hour, checking all the indicators, agricultural experts advise purchasing and installing thermal actuators. What it is and how it works, we will understand further.
Hydraulic cylinder installation
The last step for any of the three devices is installation. It is recommended to hang hydraulic cylinders from the ceiling, because this is where warm air collects. The device must be protected from direct sunlight, otherwise an overheated device will open the window, and the plants below will be cold. You can protect the hydraulic cylinder with foil or any other material that reflects the sun's rays.
Installing a hydraulic cylinder on a window
The stem can be installed in different ways. For example, nail it to a wooden frame. But then you will no longer open the window manually. Or just place it tightly under the transom.
An automatic ventilation system, the main element of which is a hydraulic cylinder, can be easily made with your own hands. And then the vegetables, berries, herbs or flowers in the greenhouse will not be hot even in the hottest summer.
Source of the article: https://plazmosvarka.ru/stanki-i-instrumenty/kak-sdelat-gidravlicheskij-nasos.html
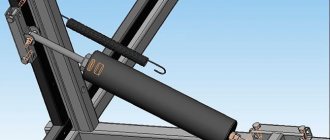
Hydraulic cylinder from an office chair
If you cannot purchase a car piston, you can use a piston that raises and lowers the seat of an office or computer chair instead. On one side of the unit there will be a plastic valve stem, on the other - a metal one.
Advice. In order to get rid of metal shavings that arose during the alteration process, you need to wash all parts in gasoline.
The hydraulic cylinder is assembled according to the same principle as the previous version.
- chair lift cylinder;
- tools.
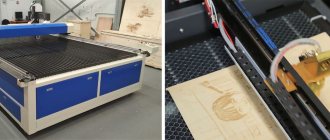
Forced ventilation with fans
Forced ventilation of greenhouses is used for large areas. The principle of operation is several fans for air inflow and outflow, located at different ends of the greenhouse. The fans are controlled by a single-channel, two-channel and three-channel thermal drive (one channel for each mechanism).
Forced ventilation in a greenhouse
Automatic ventilation from computer parts
Usually they buy fans, but domestic DIYers have also found a way to build automatic ventilation in a greenhouse with their own hands.
Conditions: greenhouse 3x8 m. There are two vents on the end sides. Natural ventilation is not sufficient for a greenhouse of this size. The only thing left is to build a compulsory one.
The following materials are required for work:
- 2 old power supplies from the computer system unit;
- bimetallic thermal relay;
- car battery;
- wires.
Computer cooler
Reliable automation with pneumatic drive
You can equip automatic ventilation of greenhouses with your own hands. The simplest option is a pneumatic drive from a hydraulic cylinder.
List of required materials
For installation you will need a couple of days, tools and several components:
- a piece of plastic pipe in the form of a cylinder with a length of 300-350 mm and a diameter of 200 mm;
- a piece of plexiglass with a thickness of 5 mm;
- wooden stick for making a rod;
- soccer ball camera;
- thin hose 1.5 - 2 m long.
Attention! A plastic pipe can be replaced by any cylinder made from scrap materials. For example, from polycarbonate left over after installing a greenhouse or greenhouse.
Pneumatic greenhouse ventilation
Preparing to install the cylinder
- Take a pipe and make two sealed plexiglass plugs for it. The top one will serve as a guide for the rod.
- Make a piston from plexiglass. It should be 1-2 mm smaller than the internal diameter of the cylinder.
- The rod is made of wood or a piece of plastic pipe (size 32). If you choose the wooden option, then a stick 500 mm long and 40 mm in diameter needs to be sanded and coated with an antiseptic.
- Drill holes in both plugs. On the bottom – with a diameter of 10 mm. On the top - such that the rod fits in it.
Step-by-step production
Our hydraulic tank is ready.
Assembling and refueling the system
Diagram of the hydraulic tank and hydraulic cylinder assembly.
- We connect the hydraulic tank to the hydraulic cylinder with a brake hose.
Now the system needs to be filled with oil. Regular spindle oil is suitable for this.
But for our system to work properly, the oil must be cooled before filling.
- To do this, place the container with oil in a cold place, the oil temperature should drop to 14 - 15 °C.
- When the oil has cooled, we begin to pour oil into the hydraulic tank. At the same time, we move the hydraulic cylinder rod, pumping the entire system in this way.
- When the hydraulic tank is almost completely filled, tighten the threaded plug. You can tighten it with a gas wrench; the hydraulic cylinder rod should be in the retracted position at this time.
- Through the plug hole, add oil to the very edge.
- We begin to screw a bolt with a lock nut and a seal washer into the hole.
- It is necessary to screw in halfway or until the hydraulic cylinder rod begins to extend.
Our system is ready.
System Calibration and Installation
Now it needs to be calibrated.
- When the oil temperature rises, it will begin to squeeze out the rod.
- By unscrewing or tightening the adjusting bolt, you can achieve the required temperature.
- The hydraulic tank must be placed under the ceiling of the greenhouse with mandatory protection from direct sunlight.
- The weight of the frame must also be adjusted so that after the temperature drops, its weight can freely retract the hydraulic cylinder rod.
- If necessary, excess oil can be drained through the adjusting bolt by loosening the lock nut.
We make a receiver
In order for our system to work as it should, we need an air receiver.
In this case, the larger the volume of the receiver we use, the better the effect we will achieve.
- Any thin-walled container is suitable for the receiver. You can use old paint containers or a regular 20 liter canister.
- If you use a canister, make sure the lid closes tightly.
- In the existing container, it is necessary to install two pipes suitable for the hydraulic cylinder hose.
- Using the first pipe we will connect the receiver to the hydraulic cylinder, and the second will act as a regulator.
- The pipes must be connected completely tightly. To do this, you can use epoxy glue or any other method convenient for you.
Hydraulic cylinder from spare parts for a machine
For vertical vents, a mechanism assembled from scrap materials is ideal. It is capable of lifting even the heaviest frames, as long as the windows swing open along a horizontal axis. To create it, you need to improve the automobile gas piston.
- the hydraulic cylinder itself. Its role can be played by stops for the trunk of Moskvich, Niva, Zhiguli (models VAZ 2108, 2109) or hydraulic cylinders from trucks that lift the cabin;
- epoxy adhesive;
- drill.
Hydraulic cylinder for a greenhouse from a car stop Work steps:
- Drill a hole in the bottom of the stop. Be careful and wear glasses when working. Gas escaping from the hole may carry chips into your eyes.
- Using a large diameter drill, increase the hole to 9 mm.
- We press on the rod and push it into the cylinder so that the piston remains at a distance of 30-35 cm from the hole.
- We degrease the resulting cavity with a solvent.
- After the cavity has completely dried, we prepare the epoxy glue for work.
- For greater convenience, the cylinder should be secured in a vice with the hole facing up.
- The piston must be lubricated with oil so that it does not touch the grease-free walls.
- Now let's create a glue plug. Pour glue into the cavity so that it completely covers the hole.
- After the glue has dried, the piston must be moved away by pulling the rod. Since it's oiled, it shouldn't stick.
- In the same place, only in the glue, drill a hole with a diameter of 9 mm.
- We cut threads in it in increments of 1.25 using an M10 tap.
- We strengthen the finished device under the window so that the rod lifts the transom when extended.
Horizontal hydraulic cylinder for greenhouse
How to use commercial water seals on a jar - instructions
You can purchase factory-made water seals for wine fermentation both in specialized stores and online. Several types of devices are available.
A two-chamber valve consists of a curved tube with two thickenings. Water is poured into them. There is a rubber seal at the end to ensure the water seal is sealed.
Manufacturers also offer a collapsible design, consisting of two elements that are inserted according to the principle of a smaller chamber into a larger one. The use of purchased water seals gives good results.
The purchased water seal must be carefully inserted into the previously prepared hole in the lid and ensure its tight closure (silicone, plasticine, etc.). Water is poured in and the device begins to work.
The success of automated windows
The automation that opens and closes the windows works on the principle of engine oil expansion. Such factory-produced mechanisms can be purchased online and in traditional stores. When purchasing, you should pay attention to important points:
- Price. A mechanism with a closer costs from 1600 to 3500 thousand rubles. You need as many of them as there are windows in your greenhouse.
- Check the weight the unit is designed for.
- Find out if the model you like can be adjusted to a specific temperature. Not all devices have this feature.
If you do not want to automate the vents using factory mechanisms, then organize ventilation in the greenhouse yourself using improvised devices.
Temperature conditions in summer
Of course, it is quite easy to monitor the temperature in the greenhouse during the warm season and ventilate it as needed if you are nearby all the time. It is much more difficult to carry out this operation if you cannot be on site all the time. In this case, it is best to automate the ventilation process.
The topic of our article today is automation of the greenhouse ventilation process. (see also Making an automatic regulator)
Hydraulic cylinder - design and principle of operation
Currently, hydraulic cylinders for greenhouses are available for sale, designed specifically for their ventilation.
The operating principle and structure of this mechanism is as follows:
- A hydraulic cylinder is a hydraulic motor that performs reciprocating motion.
- The sealed housing contains a piston with a rod attached to it.
- Due to the oil, air or other substance under pressure entering the hydraulic cylinder, the piston moves, dragging the rod with it, which in turn performs a certain work.
- As a rule, hydraulic cylinders are used in technology, various machines and mechanisms. A hydraulic jack known to car enthusiasts is nothing more than a hydraulic cylinder.
- From the above, it becomes clear that for the hydraulic cylinder to operate, a certain pressure created by the pump must be exerted on the piston.
- Hydraulic cylinders used in greenhouses work on the same principle, but with one exception, they do not have a pump and do not require the use of external energy to operate.
Temperature is like a pump
So how does it work in a greenhouse?
The thing is that any substance increases in volume when heated.
And since in a greenhouse a hydraulic cylinder is used to lower the temperature inside it, designers successfully use this law of physics.
- A certain liquid is pumped into a sealed hydraulic cylinder.
- While the temperature in the greenhouse is not high, the pressure inside the hydraulic cylinder is minimal and the rod is in the retracted position.
- But the temperature in the greenhouse begins to rise, due to this the substance located inside the hydraulic cylinder, heating up, expands.
- Due to expansion, the pressure inside the hydraulic cylinder increases, the pressure exerts its effect on the piston, which, moving, mixes the rod, and work occurs.
- By installing a hydraulic cylinder in a certain place in the greenhouse and connecting the rod to the opening frame, you can ensure that the rod, when extended, will open it. Fresh air will begin to flow through the open frame, and the internal space will be ventilated.
- After the temperature inside the greenhouse drops to the desired level, the temperature inside the hydraulic cylinder will also drop, the volume of the substance will decrease, the piston will return to its original position, and the rod, moving together with the piston, will close the window. Then the whole cycle will repeat again.
As you can see, no extraneous energy was required. The temperature regime inside the greenhouse is successfully regulated by raising and lowering the temperature.
Hydraulic cylinders – industrial regulators
Hydraulic cylinder for greenhouse.
There are a large number of different hydraulic cylinders on sale, both domestic and imported.
Each factory-produced hydraulic cylinder has its own advantages and disadvantages.
We will not consider them, but we will talk to you about this.
Many people are interested in the question: is it possible to make an automatic greenhouse ventilation system with your own hands using the principles of a hydraulic cylinder?