One of the most important conditions for the normal development of plants growing in greenhouses is timely and high-quality ventilation of such structures, which can be organized automatically using a device such as a hydraulic cylinder. Having decided to install a device in your greenhouse that automatically opens and closes greenhouse vents under certain external conditions, it is not at all necessary to purchase it in a serial version: you can make a hydraulic cylinder with your own hands, using inexpensive components and available consumables.
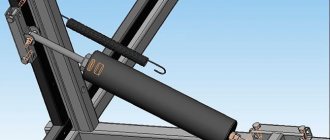
Automatic greenhouse ventilation system based on a hydraulic cylinder
The “smart” greenhouse opens the windows itself
If watering, heating and ventilation in the greenhouse work on their own, the summer resident does not have to spend 24 hours with his vegetables.
Automation installed in a greenhouse by a zealous owner will leave him more free time. Overheating of plants can destroy all the painstaking work of growing, because the seedlings will simply die. They vitally need timely ventilation. Let's look at how a “smart” greenhouse can open and close the windows independently, without human intervention.
Why is a thermal drive better than electronics?
But some summer residents are not satisfied with the sensitivity of the thermal drive running on oil. That’s why they use a homemade electric drive - it can open the transom in 20 seconds after changing the temperature. But this method is only suitable for those who are really familiar with electrics. In addition, many craftsmen are confident that the technological level of hydraulics is much higher than that of electronics.
Of course, inertia in the operation of a thermal drive is a completely natural thing. But if the oil heats up for too long, this can have fatal consequences for the crop. Therefore, the smaller the thickness of the liquid, the better.
Remember just one thing: do not settle for cheap models or too primitive devices. If one day they simply do not work and the window does not open in the heat, your plants may burn out and months of work will be in vain.
There is also another insidious disadvantage to using unverified openers. Have you noticed that it takes some time for the oil in the thermal drive to heat up? But this is a few valuable minutes, while the heat has already begun in the greenhouse, the plants are suffering, but the window is not yet slightly open.
So, if you purchased a high-quality device or made it competently with your own hands, it will really cost a few minutes, otherwise everything may not end well. So let's learn how to make such amazing devices correctly and “for centuries.”
Hydraulic cylinder principle
As you know from a school physics course, any liquid expands and contracts under the influence of temperature. This law can be used to create a device that opens and closes windows. If you place liquid, for example, machine oil, in a sealed hydraulic cylinder, then when the room temperature rises, it will expand and extend the rod. The rod will move the window frame, and ventilation of the greenhouse is ensured. And vice versa, as soon as it gets colder, the oil will return to its original state, the rod will lower, and the window will close.
Hydraulic cylinder
Attention! If the diameter of the cylinder is 50-55 mm, and the length is 50 cm, then 800 g is placed in it. oil (can be used). When the temperature in the greenhouse increases, the rod of such a tool lifts a load of about 10 kg. This may not be one window, but several connected into one system.
Advantages of the method:
- installation does not require electricity;
- it is quite possible to do it yourself;
- The hydraulic cylinder does not require constant maintenance.
Disadvantages of the method:
- the side frame, which rotates along a vertical axis, will not fall under its own weight if the rod is removed. In this case, a return spring will have to be attached to the device.
- if a cold wind suddenly blows, the window will not slam shut at that very moment. Closing will occur after 15-20 minutes when the oil has cooled.
A hydraulic cylinder for a greenhouse can be purchased in a store or made by yourself
Temperature conditions in summer
Of course, it is quite easy to monitor the temperature in the greenhouse during the warm season and ventilate it as needed if you are nearby all the time. It is much more difficult to carry out this operation if you cannot be on site all the time. In this case, it is best to automate the ventilation process.
The topic of our article today is automation of the greenhouse ventilation process. (see also Making an automatic regulator)
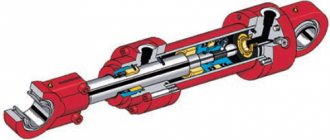
Hydraulic cylinder - design and principle of operation
Currently, hydraulic cylinders for greenhouses are available for sale, designed specifically for their ventilation.
The operating principle and structure of this mechanism is as follows:
- A hydraulic cylinder is a hydraulic motor that performs reciprocating motion.
- The sealed housing contains a piston with a rod attached to it.
- Due to the oil, air or other substance under pressure entering the hydraulic cylinder, the piston moves, dragging the rod with it, which in turn performs a certain work.
- As a rule, hydraulic cylinders are used in technology, various machines and mechanisms. A hydraulic jack known to car enthusiasts is nothing more than a hydraulic cylinder.
- From the above, it becomes clear that for the hydraulic cylinder to operate, a certain pressure created by the pump must be exerted on the piston.
- Hydraulic cylinders used in greenhouses work on the same principle, but with one exception, they do not have a pump and do not require the use of external energy to operate.
Temperature is like a pump
So how does it work in a greenhouse?
The thing is that any substance increases in volume when heated.
And since in a greenhouse a hydraulic cylinder is used to lower the temperature inside it, designers successfully use this law of physics.
- A certain liquid is pumped into a sealed hydraulic cylinder.
- While the temperature in the greenhouse is not high, the pressure inside the hydraulic cylinder is minimal and the rod is in the retracted position.
- But the temperature in the greenhouse begins to rise, due to this the substance located inside the hydraulic cylinder, heating up, expands.
- Due to expansion, the pressure inside the hydraulic cylinder increases, the pressure exerts its effect on the piston, which, moving, mixes the rod, and work occurs.
- By installing a hydraulic cylinder in a certain place in the greenhouse and connecting the rod to the opening frame, you can ensure that the rod, when extended, will open it. Fresh air will begin to flow through the open frame, and the internal space will be ventilated.
- After the temperature inside the greenhouse drops to the desired level, the temperature inside the hydraulic cylinder will also drop, the volume of the substance will decrease, the piston will return to its original position, and the rod, moving together with the piston, will close the window. Then the whole cycle will repeat again.
As you can see, no extraneous energy was required. The temperature regime inside the greenhouse is successfully regulated by raising and lowering the temperature.
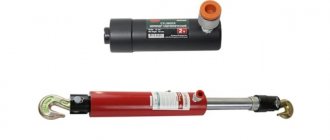
Hydraulic cylinders – industrial regulators
There are a large number of different hydraulic cylinders on sale, both domestic and imported.
Each factory-produced hydraulic cylinder has its own advantages and disadvantages.
Hydraulic cylinder from spare parts for a machine
For vertical vents, a mechanism assembled from scrap materials is ideal. It is capable of lifting even the heaviest frames, as long as the windows swing open along a horizontal axis. To create it, you need to improve the automobile gas piston.
You will need:
- the hydraulic cylinder itself. Its role can be played by stops for the trunk of Moskvich, Niva, Zhiguli (models VAZ 2108, 2109) or hydraulic cylinders from trucks that lift the cabin;
- epoxy adhesive;
- drill.
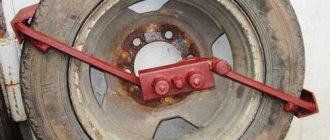
Hydraulic cylinder for a greenhouse from a car stop
Stages of work:
- Drill a hole in the bottom of the stop. Be careful and wear glasses when working. Gas escaping from the hole may carry chips into your eyes.
- Using a large diameter drill, increase the hole to 9 mm.
- We press on the rod and push it into the cylinder so that the piston remains at a distance of 30-35 cm from the hole.
- We degrease the resulting cavity with a solvent.
- After the cavity has completely dried, we prepare the epoxy glue for work.
- For greater convenience, the cylinder should be secured in a vice with the hole facing up.
- The piston must be lubricated with oil so that it does not touch the grease-free walls.
- Now let's create a glue plug. Pour glue into the cavity so that it completely covers the hole.
- After the glue has dried, the piston must be moved away by pulling the rod. Since it's oiled, it shouldn't stick.
- In the same place, only in the glue, drill a hole with a diameter of 9 mm.
- We cut threads in it in increments of 1.25 using an M10 tap.
- We strengthen the finished device under the window so that the rod lifts the transom when extended.
Horizontal hydraulic cylinder for greenhouse
Let's calculate the structural elements
To open the greenhouse, a gas lift rod with a diameter of 8 mm, moving 15 cm, displaces the volume of liquid:
ΔV=πD2/4хl = 3.1415 x 0.82/4 x 15 = 7.54 cm3.
To ensure the resulting change in the volume of the working fluid with the coefficient of volumetric thermal expansion k=0.0008 when the temperature changes by 10 C, a total volume of working fluid is required equal to:
V=ΔV/ k / (t1-t2) = 7.54 / 0.0008 / 10 = 942 cm3
(0.942 liters.)
DU-25 water and gas pipe 2 meters long as a container for oil
, having a sufficiently large surface for heat transfer.
The internal volume of the pipe will be:
V=P D2/4 x L = 3.1415 x 2.5 x2/4 x 200 = 982 cm3
To install a filler valve (top), gas lift (bottom), the pipe must have 1” internal pipe threads on both sides.
To transition from the internal thread of the pipe (in our case 1”) to the thread of the faucet 1/2“ we use a standard nipple (photo 2) with a modified gas lift glued into it.
Photo 2. Options for gluing a modified gas lift into a 1″ fitting or into a 3/4″ thread.
We saw off the plug at the gas lift. Take care of your eyes, there is compressed nitrogen in the gas lift.
The design of the gas lift piston has a micro-valve that ensures the slow flow of a pure gas-oil mixture to ensure smooth stroke of the rod. In our case, the microvalve is likely to become clogged, which will lead to failure of the ventilation machine. To ensure free flow of oil, drill a hole with a diameter of 1-3 mm in the hydraulic cylinder piston. (photo 1). Wash the piston and cylinder from chips.
Photo 1. Gas lift pistons with holes for free flow of liquid.
The piston itself with the sealing ring will remain as a guide sleeve.
To further prevent the rod from being completely retracted into the cylinder, the edges of the cylinder can be “rolled” (photo 1).
We clean the inner surface of the thread (bushings, couplings) and the outer part of the gas lift from paint, rust, scale with coarse sandpaper to bare metal.
We wrap the gas lift with a cloth soaked in epoxy resin and drive it tightly into the drive, sleeve, coupling or nipple (photo 2).
The welded joint option is quite complicated, since it is necessary to prevent damage to the internal mirror surface of the gas lift cylinder along which the piston moves. In this case, you need to weld the gas lift in the very top part, where the piston does not reach (Photo 3).
Photo 3. Welding gas lift and 3/4″ threads.
The method of attaching the automatic ventilation unit to the lower support (Photo 4) and to the openable frame can be any, but we liked those shown in Photos 5, 6). In this case, the attachment points are located along the axis of the hydraulic cylinder and the rod is not subject to bending force.
Photo 4. Method of attachment to the lower support.
For free flow of oil, when the valve is open, the hydraulic cylinder must be connected to the atmosphere (Hole in the squeegee. Photo 5,6)
Hydraulic cylinder from an office chair
If you cannot purchase a car piston, you can use a piston that raises and lowers the seat of an office or computer chair instead. On one side of the unit there will be a plastic valve stem, on the other - a metal one.
Advice. In order to get rid of metal shavings that arose during the alteration process, you need to wash all parts in gasoline.
The hydraulic cylinder is assembled according to the same principle as the previous version.
You will need:
- chair lift cylinder;
- tools.
Do-it-yourself hydraulic cylinder
It's possible that you don't have a car part or a computer chair. Using the same principle, you can make a completely homemade system.
Advice. All connections must be absolutely tight, otherwise the design will not work.
To assemble you need to have:
- any bendable material, for example, polycarbonate or tin;
- plastic pipe;
- sealed chamber, you can use a ball;
- tools.
DIY hydraulic cylinder for a greenhouse
Stages of work:
- We create a container in the form of a cylinder ourselves, using bendable material. Plexiglas can serve as the bottom and lid. We attach it at our own discretion. Some people use tape, but it doesn't last long.
- We make the piston so that it moves freely in the cylinder, but sits tightly. It can be made from metal, plexiglass, wood treated with an antiseptic.
- You need to drill holes in the bottom and cover of the cylinder.
- A deflated rubber chamber from the ball must be placed inside the cylinder under the piston. Connect it to the tube and thread the tube into the hole at the bottom of the cylinder. As soon as the air temperature rises, the ball will inflate and push the piston.
- From the side of the cylinder cover, you need to insert a rod into the hole so that it fits snugly against the piston.
- Air will enter the ball through a tube coming from a separate container, that is, from the receiver. This could be a canister or paint can.
- It is better to pass two pipes through the receiver. One will attach to the ball in the cylinder. The other, spare, will serve for pressure regulation and calibration. It must be closed with a removable plug.
- Attach the rod to the window frame.
Calibration of this version of the device is possible using a free hose. By manually applying pressure, the hydraulic cylinder can be adjusted to respond to a specific temperature.
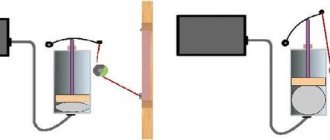
Hydraulic cylinder installation
The last step for any of the three devices is installation. It is recommended to hang hydraulic cylinders from the ceiling, because this is where warm air collects. The device must be protected from direct sunlight, otherwise an overheated device will open the window, and the plants below will be cold. You can protect the hydraulic cylinder with foil or any other material that reflects the sun's rays.
Installing a hydraulic cylinder on a window
The stem can be installed in different ways. For example, nail it to a wooden frame. But then you will no longer open the window manually. Or just place it tightly under the transom.
An automatic ventilation system, the main element of which is a hydraulic cylinder, can be easily made with your own hands. And then the vegetables, berries, herbs or flowers in the greenhouse will not be hot even in the hottest summer.
Design differences
The most common option in practice is the one where a liquid is used as a working fluid, which begins to expand greatly in volume at temperatures above 23°C. The device kit includes, in addition to the thermal drive, all the necessary elements for its installation:
- thermal drive assembly unit with an actuator;
- closer - a lever system that provides opening/closing of a door, window, window, greenhouse frame;
- a spring (there may be several of them), as an integral part of the closer, creating the condition for a smooth opening and using its elastic energy for closing;
- brackets for attaching to the frame of the greenhouse and the body of an object opened by a thermal drive (windows, vents, doors and other types);
- clamps for fastening the ball joints of the brackets to the ends of the thermal actuator and spring;
- fasteners, such as self-tapping screws.
In expensive versions of thermal actuators, gas springs are used instead of conventional springs, ensuring tighter and smoother closing.