Assembly of a pendulum machine
The design of the pendulum machine consists of three main components:
- The bed is the simplest element of the machine for an angle grinder. The unit is made of a steel plate with a thickness of at least 10 mm with supports at the bottom. You can weld a frame from a profile pipe and sew 3 mm thick sheet metal on top. A bracket with a pendulum mechanism hinge is fixed to the frame.
- The pendulum is the main working mechanism of the machine. The structure in the shape of the letter “T” is welded from a profile pipe. A clamp for an angle grinder is fixed to one end, and the other side of the pendulum is attached to the hinge mechanism.
- The clamp for the grinder is made of metal brackets. The structure is firmly fixed to the pendulum through the console.
To make a machine, you will need a drawing or at least a simple diagram. One of the options is shown in the photo. The dimensions of the machine will have to be calculated according to the dimensions of the available grinder.
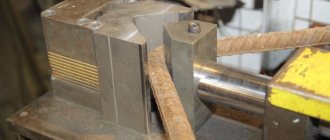
To correctly calculate the size of the machine components, first measure the dimensions of the angle grinder, and then the distance between the holes on the gear housing
When designing a pendulum, it is important to reduce the distance between the cutting disc of the grinder and the hinge mechanism to a minimum. This will give rigidity to the machine, which will allow for a more even cut.
After developing the drawing, we begin manufacturing all machine components:
- According to the dimensions of the diagram, metal blanks for all components are cut. First, the frame is made. It is necessary to take into account that during the cutting, the grinder disk will be buried in the slot of the slab. If you weld a rectangular frame from a profile for the bed, and sew a steel sheet on top, then a niche will form below. There will be enough space for the cutting disc to enter. When making a frame in the form of a plate of steel 10 mm thick, you need to weld supports from below.
- Next, we begin to manufacture the pendulum. An axle for the swivel bearings is welded to the end of the profile pipe workpiece. On the other side of the pendulum you need to make a clamp for the grinder. To do this, a bracket is bent from a steel strip in the shape of the letter “P”. The grinder gearbox should fit into it. Holes for bolted connections are drilled in the side shelves of the bracket.
- The second part of the clamp is bent from a steel rod. You should get a clamp in the shape of the letter “P”, into which the body of the angle grinder fits. A thread is cut at both ends of the clamp. The clamping strip is cut from a steel strip 5 mm thick. Holes are drilled along the edges of the strip at such a distance that the threaded ends of the clamp fit into them.
- Both U-shaped fastenings, that is, the clamp and the bracket, are fixed to the console. The part is a rectangular steel plate, which, together with the clamps for the angle grinder, is subsequently secured to the second end of the pendulum.
- The next step is assembling the hinge. Two bearings are mounted on a shaft welded to the pendulum. Nests for them can be made from a piece of pipe of the appropriate diameter. The cut rings are placed on the bearing races. Now this unit must be secured to the frame.
- The sockets will only have to be welded to the plate without removing the bearings. The knot is placed at a distance of 5–6 cm from the edge of the bed. During welding, the bearings are covered with a wet cloth or watered to avoid overheating.
The pendulum lever with the hinge is ready. Now it’s time to secure the console with clamps to its second end. The grinder itself can be fixed on the pendulum so that the rotation of the disk is carried out “from itself” or “toward itself”. Here each master chooses at his own discretion.
- To prevent the pendulum and angle grinder from lowering arbitrarily, a return spring is provided. It should act in tension and be very elastic. The spring is secured with loops welded to the frame and pendulum.
- The machine is almost ready. All that remains is to make a slot in the plate for the disk to enter. You don't even need to measure anything here. The grinder clamped in the pendulum is turned on and the slab is cut with a cutting disc. Initially the slot will be thin. To expand it, a thick disk is placed on the grinder, and then the procedure is repeated.
While making a slot on the bed, a test of the machine occurred. The only thing missing is the last component – the clamp for the workpieces. There are many options here. You can simply attach small pieces of wood to the stove. As an option, a stop is welded from a piece of profile pipe onto the frame, and a nut and screw are fixed opposite it. It turns out to be a good screw clamp. If you fasten a metal ruler on top of the stop bar, it will be convenient to cut the workpiece to the required size.
Required tools and materials
When starting to manufacture a cutting machine, you should understand that the accuracy of its operation is directly related to the stability of the structure. Therefore, the choice of a material of a certain thickness is dictated not so much by the requirements for the strength of the body, but by the need for its rigidity.
Before you start working, you need to prepare:
- square profile pipe (25x25x2.5 mm);
- profile pipe “rectangle” (40x20x2.5 mm);
- metal sheet 4–5 mm thick;
- ball bearings No. 202, 203 or 204 – 2 pcs.;
- calibrated rod with a thickness equal to the diameter of the hole in the inner race of the bearing (up to 100 mm);
- rod with a diameter of 8–10 mm;
- metal tire (20x4 mm);
- bolts and nuts with M8 or M thread.
Tools you will need:
- Angle Grinder;
- drill or drilling machine, set of drills;
- a set of dies for cutting metric threads;
- open-end wrenches;
- welding machine.
To make a machine, it is better to choose an angle grinder from a well-known manufacturer.
The main component of the cutting machine is the angle grinder. It is not recommended to use a “small” grinder designed for cutting discs with a diameter of up to 125 mm and a power of up to 500–600 W. Remember that the larger the diameter of the cutting wheel, the more versatile and reliable the machine will be.
The careful selection of power tools is also due to the wide variety of angle grinder designs available on the market. Since such equipment is not unified, the cutting machine is built for a specific model and size of angle grinder. If the equipment is unreliable, then if it fails, it will be difficult to install another angle grinder in its place without the need to rework the mounts and pendulum. That is why it is better to choose products from trusted manufacturers - Makita, Bosch and so on.
What it is?
In the course of carrying out construction or repair tasks, there is a need to carry out the most even cutting of the raw materials used. A tool such as a grinder can cope with the task, but its implementation is complicated by the peculiarity of the tool’s operation, which stands out for its monotony - as a result, the operator’s hand may not be able to cope with holding a rather heavy device in the required position for a long time. In this case, the way out of this situation would be to install a special stationary support for the tool, which is a stand for an angle grinder.
Such a holder allows a craftsman, at home or in a production workshop, to quickly and without extra costs turn an angle grinder into a multifunctional cutting saw, and then use all the ensuing advantages in his work. In this case, the main positive feature is the high accuracy of the cut; in addition, it greatly facilitates the operation of the grinder and the overall safety of operations performed with metal, polymer, wood or other raw materials.
In terms of its design properties, a tool fastening machine is a very simple device, consisting of a base made of a durable metal alloy with a pendulum-type mechanism installed on it, on which there are special areas for reliable fixation of the device, handle and protective casing. As well as a rotary system for the correct positioning of the working material in relation to the grinder at a given angle.
Typically, the production and sale of stands for grinders are carried out by the same companies that offer angle grinders on the market. Some products are additionally equipped with some useful tools, for example, a set of stands or a bench vice. As a useful functionality in the frame for grinders, it is worth highlighting the presence of an angular or standard ruler; in addition, manufacturers of modern tool supports equip their models with a return spring mechanism.
In order to have the most complete understanding of the functionality of the angle grinder stands, you should consider situations where the installation of this auxiliary device is rational.
- The bed is necessary for cutting or grinding structural parts or assembled structures, the raw materials for the manufacture of which are difficult-to-cut materials. Also, the advisability of purchasing or making equipment yourself is determined by the need to work with large-area materials.
- If necessary, the stand will need to be used to make precise cuts down to a millimeter on the material using a grinder when using small-diameter discs.
- The frame will help the master at home or in the professional field when performing work related to the processing of several elements with the same parameters.
When selecting a particular tripod model for an angle grinder, the diameter of the working disk with which the machine can perform its tasks is first taken into account. The need to select a support model based on this parameter is due to the fact that the device can only function with a stand whose diameter will correspond to the same size of the cutting disc in the tool
Reasons for DIY
When a master is forced to hold a grinder in his hands for a long time, he probably has time to experience all the disadvantages of such work. Surprisingly, the weaknesses of this tool lie in its mobility:
- A professional cannot always securely hold the workpieces during cutting. The slightest vibration can cause destruction of the abrasive disc, which can lead to serious injury.
- When the tool is not fixed to the bed, it is very difficult to control the exact perpendicularity of the cut, given the thickness of the working disk in relation to the material being cut and the designated mark. In addition, you must carefully hold the material being processed throughout the entire work process.
- It is quite difficult to cut several identical parts with a tired hand, especially when it comes to thin twigs and small pipes. The main problem is that after cutting the master has to trim the workpieces.
The fact that both hands are involved in the process of using an angle grinder deserves special attention. In addition, constant concentration is required: the grinder is considered one of the most dangerous tools. A backlash, which is most often observed when the rotating abrasive disk becomes jammed in the workpiece, can be a huge danger. The main risks are not only that the tool may be thrown, but also the resulting destruction of the wheel. Due to the fact that the unit is operated at high speeds, this can injure the operator's face, hands and even chest.
Experienced experts say that most often a kickback occurs at the moment the cut is completed, when a small jumper connects two workpieces. To minimize possible risks, you need to turn off the tool in a timely manner. The operator just has to remove the circle and cut the part from the reverse side.
A homemade frame for an angle grinder, which even a beginner can make, will help solve all these shortcomings. Professional drawings will help you make such a device. A homemade frame for an angle grinder will correspond to the tool used and all the wishes of the master: purchasing a high-quality device that would meet all the requirements is quite difficult.
Continuation of work with the base of the frame for the angle grinder
When the clamp is in place, you need to install a wood disc on the grinder. You can, of course, get by with a metal cutter, but then there will be too much smoke. It is required to make a cut in the plywood, which will be the starting point for further work, which requires clear corners.
PHOTO: YouTube.comInstalling a wood blade for cutting plywood
Measuring and setting rulers
All that remains is to turn on the grinder and cut through the plywood, simply lowering the angle grinder down.
For further work, you will need a piece of corner with two holes on one side for fixing. It must be positioned so that the undrilled edge is in the center of the cut in the plywood. The first one to mark is the hole that is closest to the cut. It will be the main one, and the rest will be “tuning”. With their help, it will be possible to subsequently set the cutting angles of the processed material.
PHOTO: YouTube.com You need to mark the first hole, which is then drilled
The nuances of drilling a hole
Initially, you need to use a 10mm drill, which should not go deeper than the width of the nut. Then you need to use a thinner drill and go right through the plywood. Now it will become clear why this should be done.
It is necessary to insert a 10mm wrench nut into the hole.
It should be flush with the surface (this is important!). It's the step inside that stops her
PHOTO: YouTube.com The hole is ready, you can drive the nut inside
Setting the corners
Now it's time for accurate measurements. You need to insert a cutting disc into the plywood slot, after which the corner should be positioned perpendicular to the grinder. A perfect 90° angle is required. Then you should mark and drill the hole farthest from the angle grinder and also hammer the nut into it. Now, if you screw in both screws, you can cut any workpiece at 90°.
PHOTO: YouTube.com A right angle of 90° is required
However, this is just the beginning of working with corners. After all, cutting is required not only at 90°. Sometimes 45° is necessary both in one direction and in the other. To ensure this functionality, you need to unscrew the screw farthest from the angle grinder and in a similar way, using a protractor or protractor, drill 2 more holes and also drive nuts into them.
You have to be extremely precise here. An error of even one degree will lead to an error in cutting parts.
PHOTO: YouTube.com Angles should be measured as carefully as possible
The frame could be considered complete, but there is a problem - if you work with metal, the plywood begins to burn, which means it needs protection.
Option 2 - how to quickly and easily make a pendulum saw
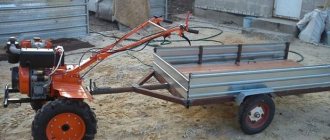
If you have a welding machine and consumables, you can make a stationary machine from an angle grinder in a matter of hours. Moreover, you don’t need to buy anything for this, since the necessary tubes, fittings and profiles can be found in a garage or a pile of scrap metal. To build a simple cutting machine using an angle grinder as the main tool, you will need to use the following parts:
- Metal profiles measuring 150-200 mm
- Sleeve 10-15 cm long
- Hairpin 20 cm long and 8-10 mm in diameter
- Washers
- Metal corner
- A sheet of metal 2-3 mm thick, which will act as a base
So, to make a simple homemade product you will need to perform the following steps:
Cut the stud to the required length, then place the sleeve inside (it should move freely along the stud), and tighten the nuts onto the ends of the protruding stud. Tighten two nuts on both sides, since the second will act as a locknut. The nuts should not be screwed in completely, they should not come into contact with the sleeve. The resulting structure should be welded to a steel sheet
In this case, it is important to grab the nuts, and the sleeve must remain mobile, that is, move freely. At the next stage, it is necessary to make fastenings for the angle grinder. To do this, you will need metal profiles, as well as washers that will play the role of brackets. Cut to the required length (it all depends on the tool used, but for a low-power angle grinder, the profile length is 15-20 cm)
Weld washers to the ends of the profiles. It is recommended to use at least 2 mounts for an angle grinder, but three are better. The angle grinder has threaded holes for connecting the handle. We use these holes to attach the tool to the movable base using pre-prepared brackets. First, the brackets are attached to the tool using bolted connections of the appropriate size, and then the reverse ends of the profiles are welded to the sleeve. As a result, we get a ready-made machine that can be produced literally within an hour
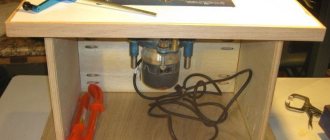
The photo below shows the design of a homemade machine made from a grinder with a detailed description of the necessary materials. Using the instructions, and for some, a diagram is enough to make a homemade cutting machine
It is important to take into account that a casing for an angle grinder must be provided, otherwise the risk of serious injury increases. It is strictly prohibited to operate the tool without protective clothing, not only on a person, but also on the device itself.
The simplest device is ready for use. The angle in the machine design is used as a guide for centering cutting materials. You also need to make a straight hole in the iron sheet, into which part of the disk will “go” when sawing workpieces.
Tool fixation options
Many experts argue that there is no better way to secure a workpiece than the well-known vice. The use of this device ensures that the risk of injury will be reduced to zero, even if the abrasive disc shatters into small pieces. Particular attention should be paid to the rotary type of vice, at the base of which there are special longitudinal grooves. If the craftsman manages to make the correct oblique cut, then it will be possible to achieve a significant increase in the functionality of the device.
First you need to prepare strong fastenings in accordance with the drawings of the rack for the angle grinder. With your own hands you can build a unique device for an angle grinder, which must consist of the following elements:
- Spring to provide counterweight.
- 2 tubes in the form of bearings.
- 2 meters of profile pipe.
- Metal sheet to create a solid base.
- 2 bolts.
You can build a rack from the most common materials that can be found in almost every garage and private home. Of course, you simply can’t do without a welding machine. Despite this, such a stand will not only be of high quality, but will also cost much less than a purchased product. For more convenient use of the device, its frame can be equipped with an ergonomic handle. In this case, a simple tube, which is attached using a welding machine, is suitable.
Read also: Choke for semi-automatic with voltage boost circuit
Those craftsmen who do not want to tinker with workpieces for a long time can use a regular protective casing. You just need to make the necessary holes in it and attach the grinder. Bolts with self-locking nuts are suitable for fixing. Finally, the entire structure must be attached to the frame.
The simplest stand with a stationary table
If the machine does not allow for complex cuts, the stand for the grinder can be made using a simplified version without a rotary table. That is, the tabletop is tightly welded to the frame.
Let's look at a step-by-step photo describing the manufacture of the stand:
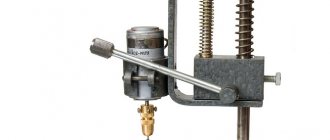
The pivot assembly will require two bearings, a threaded shaft at both ends, and a flange that can be removed from a passenger car pump. All parts mounted on the shaft are clamped with nuts. To prevent the bearings from moving, bushings are installed between them.
The hub is made from a piece of pipe with a larger diameter than the bearing race. First, the workpiece is cut off, and then this sleeve is sawed lengthwise.
Plates are welded on both sides of the cut. Holes are drilled into them so that the inserted bearings with the shaft can be firmly secured with bolts. I cut a corner to fit the plate, and drill holes in both shelves. The part is needed to mount the hinge on the bed frame.
A U-shaped bracket for fixing a power tool is bent from a steel plate 5 mm thick. Holes are drilled on the side shelves. They must coincide with the holes on the gearbox housing of the angle grinder.
A lever is welded from a profile pipe with a cross-section of 20x20 mm. It consists of a main jumper to which two elements are welded at an angle, forming the lever rods. The second end of the rods will be fixed to the hinge. I weld a U-shaped bracket onto the edge of the lintel to fix the grinder.
The frame of the bed is welded from a corner with a cross section of 32 mm. Guides from a profile with a cross-section of 20x20 mm are welded along the length of the frame. They are needed to install an adjustable stop with which the workpiece to be cut will be fixed.
The tabletop is cut out of a steel plate 3 mm thick. You should end up with two fragments. The plates can be welded or bolted to the frame.
A hinge mechanism is attached to the frame of the finished bed. The lever rods are secured to the flange using bolts. A return spring is installed between the frame and one of the lever elements. Now all that remains is to clamp the grinder in the bracket and try to make a cut, but first you need to secure the adjustable stop between the guides on the frame.
The size of any of the presented stands depends on the dimensions of the angle grinder. Here you will have to do your own calculations. It will take a couple of days to make the structure, but the homemade stand will be ideally tailored to your own requirements.
Machine with shock absorbers
A reliable machine for a small grinder will be made from old car shock absorbers. The principle of its operation is similar to the pendulum, but the design of the components is different, which allows you to adjust the reach of the cutting power tool along the guide.
The manufacturing procedure is as follows:
- For the machine you need to find two old, but working shock absorbers from a passenger car.
- Shock absorbers have a weak point - the thin walls of the body. They cannot be a load-bearing structure, so brackets will need to be made. First, two identical plates are cut and holes are drilled in the center for a bolted connection. 8 half rings are cut out of a pipe whose diameter corresponds to the thickness of the shock absorber body. The blanks are welded against each other to the plates.
- A rectangular frame frame is welded from a profile pipe. The pendulum stand is welded from two corners.
- On the side shelves of both corners of the rack, it is unlikely that adjustment holes are drilled strictly opposite each other. Car shock absorbers are fixed in the bracket with bolts, after which the entire assembly is secured with a pin in one pair of holes on the rack.
- The finished machine can be painted. Next, a clamp for the grinder is made. The console is made from a piece of angle, securing it with nuts on the shock absorber rods. One end of the return spring is attached to the rack jumper. Its other end is fixed with a clamp to the edge of the upper shock absorber.
- The grinder clamp consists of two parts. It is bent from a steel strip, giving the shape of the body of a power tool.
- The angle grinder, clamped in the two halves of the clamp, is screwed onto the console. You need to adjust the offset right away. To do this, a stud is provided along the axis of the shock absorbers with two nuts, secured to the bracket and to the console.
The machine is ready. All that remains is to sew up the frame of the bed with a steel sheet, make a slot for the disk and secure a stop for workpieces or planks.
A homemade machine made from a grinder is not inferior in its characteristics to a factory-made design.
Instructions for making a homemade stand for an angle grinder
In general, you need to act like this:
- First of all, the corrugated pipes are cut into pieces, and then either welded or screwed with bolts. In the second case, it will be necessary to drill holes for mounting. The result is a stand in the form of a frame.
- Next, a bracket is connected to which the angle grinder will be directly attached: two holes with a diameter of 1 cm are drilled in the profile and two sections are sawn off according to the drawing.
- Then they must be attached to the stand using a cross made of two pieces, in the middle of which a hole is also drilled. A hinge axis will be installed in it.
- An M10 bolt (15 cm long) is threaded through the holes - this will be the axis. Extended nuts are welded to the profile, but so that they rotate freely.
- At the second stage, the lever is made. It can be either pendulum or stationary. The length of the tripod is calculated from the length of the grinder itself. Having made two cuts, you need to weld them to the nuts, having previously marked their position.
- A little earlier, a bracket was attached to the grinder, which now needs to be screwed to the tripod. A rotating corner element attached to the base will help with this.
- When installing an angle grinder on a homemade holder, you must strictly measure the angles with a square. The angle grinder is bolted to the stand.
- The third stage is making the guides. To do this, two more cuts are attached to the base, as well as a fixed bolt. In order for the turning angle to move, it is necessary to drill a hole in it in which the bolt will be attached.
- Holes are made in the bracket on the grinder to screw hooks into them. And as a stand for the frame, bolts screwed in from the bottom are suitable.
- A spring is attached to the hooks, the length of which must be measured in advance. Its function is to allow the grinder to stand upright after finishing work.
- At the final stage, the homemade frame for the angle grinder is tested: a test cut is made and its angle is checked.
There is nothing complicated about how to make a stand for an angle grinder yourself.
Model with a small circle
The simplest device for an angle grinder stand
Actually, this device cannot be called a stand, but the work with it can be done almost the same as that provided by the most technologically advanced stand. The principle of its operation is clear from the short video:
But if instead of a strip you use a corresponding corner with a sawn-off part of one of the shelves, as one of the authors of a similar design did, then there will be no need to drill a blind hole in the head of the angle grinder.
In this case, the tool will be fastened with two screws into the threaded holes for the handle existing on the head of the angle grinder. But the principle of operation of the sole will not change - only its rigidity will increase.
The method of using an angle grinder as a kind of circular saw using the same sole, shown in another video by the same author, will also not change:
We recommend other articles on the topic
Hydraulic jack - its design and principle of operation
Forstner drill bit for wood - features of choice, drill sharpening
Renovator - a multifunctional tool
Husqvarna chainsaws (Husqvarna) - general characteristics, repair, fake and original
Option 1 - a simple way to make a cutting machine from an angle grinder
A simple way to make a homemade product involves making a base on which fixed connectors for a movable plate are attached. So, in more detail about how to make a machine from an angle grinder:
- Take a steel plate measuring 15x15 cm and at least 2 mm thick. Such a large size is needed in order to secure it to the workbench with bolted connectors. If the workbench (table) is iron, then the base can be welded to it, so in this case you can use a shorter plate 10x10 cm
- Weld two rectangular plates perpendicularly to the base, located at a distance of 5-8 cm from each other. The thickness of the plates should also be at least 2 mm. Their length depends on the size of the power tool, but usually small or medium grinders are used for stationary machines, so the length of the plates is 8-10 cm
- At the base of the plates, make a straight hole into which the connecting bolt is installed. The hole diameter is 6-8 mm, which is not so important
- At the next stage, you will need to make a movable base to which the grinder will be attached. To do this, you will need to take a steel plate at least 20-30 cm long, which depends on the size of the power tool. The width of this frame should be slightly less than the distance between the protrusions of the rectangular plates welded to the base
- On the back side of the movable plate, you need to weld a round oblong sleeve into which the connecting bolt will be placed
- It is necessary to secure the tool to the resulting movable plate using clamps, ties and other methods. The number of fasteners should be more than 2, and preferably at least three for greater safety
- Having secured the resulting structure to the workbench, you can test its operation
For ease of operation, you can weld a handle to the movable bar, and also install an auto-return spring, which will return the tool to its original position, that is, move it up. The photo below shows a ready-made installation for cutting from an angle grinder. As you can see from the example, its manufacture will require a minimum of effort and materials, and the result is a stationary device for cutting various materials.
This is interesting! Finally, you will need to cut a strip of the appropriate size in the workbench, into which the rotating circle in the tool chuck will “go” when cutting materials.
When constructing the device, do not forget that safe operation depends on how to secure the angle grinder. It should be securely fixed in 2-3 points, which will prevent it from moving during work, as well as “flying off” from the movable frame. When installing the tool on a movable bed, it is necessary that the position of the grinder be strictly at a right angle, that is, the circle must be located strictly in a vertical position.
The resulting device is suitable for processing various materials from wood to durable stone. When working with a tool, do not forget to use safety glasses, gloves, and protective clothing. Instead of a workbench, you can use a wooden or steel frame on which to realize your idea.
This is interesting! Similar simple frames for grinders are manufactured in the factory, so if you have an extra 2-3 thousand rubles, you can purchase a ready-made base and use it right today. However, there are no difficulties in making it yourself, so you need to decide on your own in each individual case which is better.
Main advantages
Quite often, home craftsmen are faced with a situation where they need to cut workpieces evenly. Despite the fact that the grinder is an indispensable tool in the household, the principle of its operation is monotonous. It can be extremely difficult to hold the weight of this unit in one hand for a long time, trying to make cuts as evenly as possible. In this case, craftsmen often have the idea to make a durable and stable support for it.
In order for the result to exceed all expectations, you need to make high-quality fasteners, as well as prepare all the necessary materials at hand: small wooden blocks and plywood. It is these details that will help to install the stand permanently on a flat plane. Having made such a holder for an angle grinder with your own hands, a specialist will no longer need to hold the tool suspended, worrying about the abrasive wheel flying out. This situation is fraught with serious injury.
The main advantages of such a rack include the following:
- The master always has the opportunity to position the grinder at the desired angle.
- The workpiece can be fixed in the most suitable position. For these purposes, a vice is used, which helps to cut workpieces of the required size.
- By making a homemade angle grinder stand with your own hands, you can quickly and accurately cut light metals: ceramic tiles, aluminum profiles, metal corners.
- In a short period of time, the master will be able to produce the required number of blanks.
- If necessary, vertical movement of parts is implemented to perform certain tasks. The main tool in this case is an angle grinder (angle grinder).
- Labor productivity increases significantly.
- The operation of such racks is characterized by a high level of safety.
- Guaranteed high degree of stability for the rotating holder.
- There is no need to hold a heavy tool in your hands.
- The risks of the grinder possibly falling out or slipping out of your hands are completely minimized.
Despite all the advantages, novice craftsmen often wonder whether a homemade machine for attaching an angle grinder will allow them to cut metal smoothly. After all, the rotation speed and frequency of this tool are simply elusive to the human eye. Of course, it is much easier to purchase a ready-made machine from a specialized store, but factory-made devices (such as Metabo) also need to be improved. After all, they are all made of thin metal, which is why they are considered flimsy and short-lived.
Types of devices, their advantages and disadvantages
There are two types of designs of cutting machines, differing in the location of the grinder, which can be made at home.
The first installation is a frame with an angle grinder rigidly fixed underneath it. Only the cutting disc is visible on the working surface, which fits freely into the table slot. Cutting a metal profile or sheet in this case is completely identical to cutting wooden blanks using a circular saw. Despite the very simple design, this scheme is not particularly popular. Those who have made such a device note that it is inconvenient to use due to the need to move the workpiece. This significantly reduces the accuracy of the work and makes the process unsafe. The only advantage of a machine with a bottom angle grinder is the ability to quickly cut thin metal sheets.
A cutting machine with a lower angle grinder can be used both for cutting metal and as a circular saw
The second scheme, in which the part remains stationary and the cutting wheel itself moves, is more convenient. The so-called pendulum saw, placed above the tabletop, allows you to cut the workpiece exactly at the required angle, and it becomes possible to make the required number of parts of the same type. Due to the location of the grinder on top, cutting workpieces does not require effort, and operation of the unit becomes simple and safe. The undoubted advantages of the design include the ability to quickly dismantle the grinder for traditional use. As for the disadvantages of this method, the weak link can be considered the hinge joint, which complicates the design of the machine.
A machine for cutting metal with an upper angle grinder has a more convenient design and makes it possible to cut workpieces at the desired angle
Assembly of the structure
When a master decides to make a tripod for an angle grinder himself, this helps to avoid many costs, since factory models are expensive and short-lived. But a good result also depends on the presence of basic skills:
- Ability to operate an angle grinder and a household welding machine.
- Drill holes carefully.
- Have some free time and patience.
In order for the rack to meet all operational requirements, its assembly must take place in strict sequence. Depending on personal preferences, the master can develop his own drawing that will correspond to a specific model of an angle grinder, or he can use ready-made drawings. In addition, before any manipulations, you need to check the working condition of the main unit. If it works poorly and often breaks down, then there is no need to build a powerful frame for it.
Experts say that the assembly procedure for an angle grinder stand is as follows:
- Initially, you need to prepare a metal pipe, which must be carefully cut into pieces of a certain length. All manipulations must correspond to the drawing used.
- Drill small holes in the indicated places.
- At this stage, make the upper and lower frames.
- Weld metal blanks with a welding machine or screw them onto bolted joints.
- Take a pre-prepared metal sheet or chipboard.
- Depending on the diameter of the stand, cut out the working surface.
- Place the finished surface on the lower platform of the desktop.
- Secure everything with bolts.
- Attach the holder to the vertical frame so that the pendulum type of rotation is free.
- Carefully install a precise spring that will return the angle grinder to its original position every time.
- One end of the spring should be fixed on the upper part of the end, but the other end on the holder.
- It's time to take a 12 V relay, which will help increase the level of comfort when working with an angle grinder. It should be located in such a way that it is convenient to reach the button during operation.
- Carefully inspect the condition of the wiring and check its functionality.
- In the workshop, be sure to allocate a separate outlet for the bed used.
- Take high-quality paints, varnishes and primers to completely cover the created device with them. These manipulations will help give the product a completed and impressive look. In addition, a protective coating of primer will protect the rack from the negative effects of corrosion.
- At this stage, all that remains is to equip the structure with a movable ruler and a special limiter.
- Check the finished frame for operability, start the angle grinder at idle speed.
Accessories
Before you begin, you need to decide which homemade design is suitable for certain operating conditions. Most often, to assemble a high-quality frame, you need to prepare the following parts:
- Bolts for secure fixation.
- Hardwood that can withstand any loads placed on it without deformation during operation.
- Keys.
- Metal corners.
- Fastening materials.
- In some cases, a chipboard may be needed.
- For strong and reliable fastening of the angle grinder, a profiled metal pipe is suitable.
- 12V relay.
- Tools for fixing bolted connections.
- Drill.
It is also worth considering that only the bracket that was assembled using a welding machine will have the highest strength characteristics. But it is precisely thanks to the bolts that you can create a collapsible structure that can be moved to any other place.
Industrial bed designs
A stand for an angle grinder will be required in the following cases:
- A structure made of difficult-to-cut material or with a large surface area is being cut/grinded.
- Increased cutting accuracy is required.
- It is necessary to process several products with the same parameters.
- The workpiece material is not continuous in cross-section, and the presence of voids and cavities can provoke vibration, shock and, consequently, sudden movement of the machine body.
The frame for the grinder is produced by almost the same companies that produce the tool itself. The price for the simplest design, depending on its manufacturer, does not exceed 2500...3000 rubles, but with increasing functionality, the price of the frame increases to 20,000...25,000 rubles, and not every home craftsman can afford such costs. In addition, such racks are not particularly versatile, and, of course, do not take into account the individual needs of the user.
Such beds consist of the following elements:
- A base plate, which is made of thick sheet steel and is equipped with T-shaped slots for fastening the workpiece. It may also be a cast iron stove;
- The actual rack, on which a mounting device is provided for an angle grinder of a specific model;
- Adjustment devices that allow you to rotate the stand itself, as well as change the vertical position of the angle grinder;
- Optional: clamps or clamps for workpieces, the dimensions of which are unified with T-slots. Sometimes the kit also includes a bench vice with a set of profiled stands;
- A rotary handle, with the help of which the working movement of the grinder itself is performed;
- Measuring devices, usually an angular or regular ruler;
- Particularly advanced models also have a return mechanism with a spring.
Positive features include the ability to cleanly cut pipes from round profiles, which is problematic and even dangerous without stable clamping of the workpiece. The grinder bed is also necessary for corner cuts of any profile.
The technical capabilities of these devices depend on the area of the supporting surface of the plate and the lifting height of the angle grinder in the frame. Typically, the parameters are calculated for a grinder disc with a diameter of up to 250 mm, and for the size of the fixed part of the workpiece no more than 100...150 mm.
Sheet steel cutting machine
Grinder machines, which can be used to cut steel sheet material, are much more complex than conventional pendulum ones. The main difficulty here is that the sheet of metal has certain linear dimensions and it is necessary to maintain evenness of cutting along the entire line. Another difficulty here can be considered the effect of heating the cutting area, during which the metal expands and clamps the angle grinder disk in the channel, which is fraught with jamming and rupture of the tool with all the ensuing consequences.
The main parts of such a machine:
- Base. Ideally, it should be no smaller than the sheet that is supposed to be cut with a grinder, or allow the entire cutting area to be laid on it. It is necessary to use steel as a manufacturing material so that it absorbs heat, preventing the steel cutting line from overheating.
- U-shaped stand. This structural element serves as a guide for pulling the angle grinder through. The length of the section between the legs of the stand should be sufficient to place a sheet between them, plus allow the body of the angle grinder to fit freely.
- The carriage is a movable element that moves along a U-shaped stand on bearings. A pendulum console and a depth limiter for lowering the cutting disc are attached to it.
- The pendulum console serves as a mechanism for lowering the angle grinder to the level of the working position. Also attached to it is a tool control handle.
You need to pull the angle grinder in the direction opposite to the direction of the sparks, otherwise the tool will be undermined with a high probability of jamming.
Making a homemade machine from a grinder features
It’s not difficult to make your own machine from a grinder yourself. Moreover, there is a wide variety of manufacturing options, which depends on the available materials and imagination. There are two types of stationary cutting machines made from grinders:
- Simple - it received this name for one reason, which is not only the ease of manufacture, but also the minimalism of the device itself. The tool is attached to the workbench using additional materials, and it can be used
- Complex - it is rational to manufacture such machines if you plan to use it often for different actions. In most cases, a simple device is enough for a home garage, the manufacture of which requires little time, effort and consumables.
In order to make a cutting machine from a grinder with your own hands, you will need consumables, which are metal plates, as well as profiles and fasteners - bolts, nuts and washers. The only specialized tools you will need are an electric drill and a welding machine. Let's look at how to make the simplest version of a cutting machine from an angle grinder in more detail below.