An angle grinder (angle grinder) or grinder has proven itself to be a very effective tool with which you can perform a wide range of work. However, during its operation, you should adhere to safety precautions, since the disk speeds are very high and you can get injured. Judging by numerous reviews, many home craftsmen have problems with the discs; they often split, and the nuts with which they are clamped become jammed. The reason for this may be the human factor or simply marriage. As a result, such a nozzle cannot be used for its intended purpose.
It would seem that there is nothing difficult about replacing the disk with a new one. However, at this stage the master is faced with a problem - the nozzle is tightly clamped by a fixing nut that does not want to unscrew. How to remove a jammed disc from an angle grinder? What methods are used for this? What means can be used if the standard key is lost? You will learn how to remove a jammed disc from an angle grinder from this article.
How to remove protection from an angle grinder?
The casing can be removed easily, on a Boche, for example, you press the lever and turn the casing until that moment. until the cutouts line up and it is removed. On other angle grinders, the casing is secured with screws, usually three screws, they need to be unscrewed. This is done so that you can adjust the casing to suit your needs.
Interesting materials:
How to determine, being in the northern hemisphere, which month is aging? How to determine the mood of verbs in Russian? How to determine the presence of methyl alcohol in alcohol? How to determine the presence of palm oil in butter? How to determine the presence of mercury in a room? How to determine the presence of a hydrogen bond? How to determine the direction north by the North Star? How to determine the direction of a river's flow? How to determine the direction of the current? How to determine the direction of rotation of an electric motor?
What solution to the problem is offered by specialists and amateurs + (Video)
- Install a newspaper gasket under the nut;
- Place a gasket from a plastic bottle under the nut;
- Replace the nut with a nut of a different design.
What is a newspaper gasket? This is a paper washer the size of a nut. It is put on the installed disk, and a nut is screwed on top. This piece of paper was a stumbling point, because the safety inspection always spoke about the harmfulness of such a decision.
Representatives of safety authorities treat the installation of gaskets made of any other materials in the same way:
- Cardboard;
- Paronitis;
- Gaskets made of various plastics;
- Rubber gaskets of various thicknesses.
But there is a solution that does not contradict safety requirements and allows you to install and remove the disk normally. This is a special nut that consists of two elements - a nut and a pressure washer. The use of such a nut does not require any shims, because with it the disk does not jam.
If you don’t have a special key at hand, then craftsmen suggest doing without a key. This does not mean that you can do without a key at all, but use a “gas key” or other device. To do this, you need to hold the latch, tighten the nut with a gas wrench and unscrew it. This way you can replace a jammed disk, but this is a very inconvenient operation for one person.
There are also suggestions to hold the disk with your hand and unscrew it. Maybe, but it’s unlikely that you’ll be able to change broken disks this way. It is better to use wrenches that are designed for removing and installing disks.
Some foreign power tool manufacturers, such as Bosh, produce grinders with easily removable nuts. They securely fix the disk on the tool shaft and are easily and quickly removed to replace the disk.
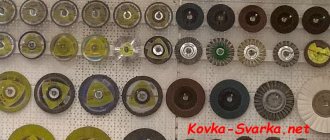
Purpose and types of disks
Grinder discs are a consumable tool in the form of a circle (bowl) with a special cutting, cleaning, grinding or other edge and a mounting hole for fixing on the angle grinder shaft. Depending on the execution and purpose, there are several varieties:
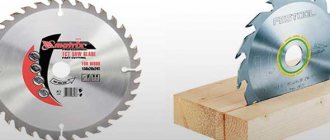
Cut-off
They are characterized by a small thickness of 1–3.2 mm with an outer diameter of 115–320 mm and a specific cutting edge. Often they stand out from other analogues with a certain marking color, taking into account the material for which they are intended for cutting:
- For metal: Steel wheels for various metals and their alloys with abrasive surfaces made of crystalline alumina or synthetic corundum (electrocorundum). The main color of the marking is blue. Cut profiles, pipes, fittings, etc.
- For stone: The abrasive cutting part made of silicon carbide can be of several types:
- continuous - for dolomites, limestones and other soft rocks;
segmented or turbo - for basalts, labradorites and other hard stones, as well as tiles.
The color of the marking is usually green.
- variable beveled - universal;
straight - for conifers and other soft species;
The safest for use are universal saw blades with a cutting edge in the form of a chainsaw chain. When the cutting element jams, the circle continues to rotate, which makes it possible to quickly turn off the angle grinder with minimal risk of injury.
- galvanizing (hard lining) - for sandstone and other relatively soft rocks;
laser welding or sintering (soft binding) - concrete, granite and other hard materials.
Depending on the characteristics of the cutting edge, the following types of diamond wheels are distinguished:
- segmented - rough cutting of concrete, stone and other high-strength materials using dry or wet methods;
- solid - high-precision cutting, including metals and stone with water cooling;
- oblique notches (turbo) - fast and precise processing of various materials using the dry method.
Depending on the type used, varieties of artificial diamonds can be monocrystalline or polycrystalline. The former are used for processing metal or stone, the latter for relatively soft materials.
Grinding
The next most important job that craftsmen entrust to an angle grinder is grinding and polishing. Similar processing is applied to metal, wood, plastic and other materials.
Flap wheel for wood: dozens of sanding flaps quickly cut off chips
The choice of grinding discs is very wide. If you are restoring a sideboard, a flap wheel is suitable for removing layers of shellac. It covers large surfaces and cuts a lot of material in one pass.
The sanding attachment is a plastic circle to which sandpaper is attached with Velcro
Another attachment is screwed onto the grinder spindle. Sandpaper is attached to it with Velcro. For coarse processing - P60 or P80, for finer processing - P120 or P180. As the grain size decreases, grinding smoothly turns into polishing.
Polishing disc made from alpaca wool
Especially for polishing, there are attachments in the form of pads, felt or fabric discs. Before work, polishing paste, for example, GOI, is applied to them.
Grinding wheels
In fact, there are special machines for sharpening tools - sharpeners. Nevertheless, the rotating disk of the grinder is capable of correcting a dull ax or cleaver, knife or scythe. Taking into account the wishes of the craftsmen, the industry produces 115 and 125 mm sharpening discs for grinders.
Sharpening discs turn the grinder into a sharpener
The discs are made of coarse abrasive, compressed into a thick plate (more than 5 mm) with a bulge in the center. If you install such a disk on a spindle, the flange is hidden in the recess and does not protrude above the plane of the disk. Coarse grinding wheels are also used for cleaning welds.
Sanding brushes and discs
Craftsmen renovating mid-century homes are faced with removing oil paint from walls. Wire brushes are suitable for this type of work.
Not a single paint can resist such a steel cup.
The brush is a cup with steel or brass strands around its circumference. They differ in the thickness and rigidity of the wire - for coarse and fine stripping. The brush is screwed onto the spindle using an M14 thread.
Stone grinding disc cuts old cement evenly
After removing the oil paint, the curved concrete wall must be sanded. Only a grinder can cope with such a task. The working surface of the diamond grinding disc is perpendicular to the axis of rotation. Synthetic diamonds cut and smooth concrete like sandpapering wood.
Milling
Nozzles in this category are produced in two types: circles and cutters. In the first case, the structure of the lateral working surface of the disk resembles a rasp. Used for rough processing of wood. Milling cutters differ in both size and tooth configuration. Allows you to perform the following operations:
- cutting grooves;
- selection of bowls and recesses;
- processing of edges and ends;
- cutting small-sized workpieces, etc.
The nut is stuck - how to unscrew it?
Removing a disc on an angle grinder if it is bitten is not so easy, especially without damaging the cutting element or tool. We will also consider several options for action.
Replacing a counter-rotating disc
This method has several advantages - it can be done without a key and with a broken spindle lock. Beginners in working with angle grinders mistakenly believe that if the stopper breaks, it is almost impossible to unscrew the nut. However, this is not the case. You don't even need keys.
The point is that the abrasive wheel needs to be rotated in different directions. Wearing thick gloves, you need to hit the cutting edge of the circle several times. This is what will ensure variable movement in different directions. As a rule, a couple of sharp blows are enough so that the nut can be easily unscrewed.
Open-end wrench and socket head
In this case, you will have to slightly modify the existing standard tools - a 17 mm open-end wrench and a 24 mm socket. The thickness of the key is ground down to 4 mm. 4 protrusions are machined on the head and fit into the holes of the retaining nut.
After preparation, the key is placed in the space under the disk, and the head is put on the flange of the angle grinder and rotated in the direction opposite to the rotation of the wheel. After this, you can easily remove it and install a new one.
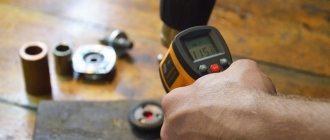
Heat
This is one way to remove a disc from an angle grinder without a key. The fixing nut is heated with an industrial hair dryer or a gas burner. After this, the flange will unscrew much easier. However, there is a risk of damage to the plastic parts of the angle grinder or gearbox.
With a nail
For these purposes, a 100 mm nail is best suited. It should be bent into a U-shape so that the ends fit freely into the holes of the clamping flange. The tip and cap are removed. By inserting a nail into the holes, the latch is unscrewed. If the manual effort is not enough, then add a nail or screwdriver in the form of a lever.
Using a gas wrench
The use of this tool is justified by an increase in the applied moment of force due to the increased arm. Using a gas wrench will make it much easier to unscrew a jammed connection. However, when eliminating snagging, it is important to remember that if you apply excessive force, there is a risk of damaging the spindle lock or clamping nut.
Using a rotary hammer or drill in chiselling mode
You can unscrew the disc on an angle grinder without a key using a drill or hammer drill, having first switched it to jackhammer mode. A suitable drill, most often 6 millimeters, is used as a working attachment. Place the drill against the edge of the hole in the clamping nut, fix the movement of the spindle and briefly turn it on to move it from place. This method allows you to turn away even very complex snacks.
Tapping the nut
This method is similar to the previous one, only you can use a suitable metal rod or chisel. Having fixed the spindle head, tap along the edges of the clamp holes in the direction of movement of the wheel. By slightly moving the lock from its dead point, you can unscrew it by hand. However, the method is not the most harmless for the tool - the mounting holes for a standard key are damaged.
Cutting wheel destruction
You can unscrew a jammed nut by completely destroying the disk. If there is already damage, you can break it off with your hands, but most often this will not be possible. It’s better to take a hacksaw or metal blade and cut it. This will leave you with a center ring and hard-to-reach pieces. Having found a suitable plate, holding it in a vice, grind off the remaining abrasive on it to a metal ring. After this, it will be easily unscrewed with a standard key.
The most radical way to unscrew a jammed clamp nut is to cut it. It is advisable to resort to it only in extreme cases. Of course, you can find a new one, but you will have to spend your time and money. It is not uncommon for spare clamping elements to be included in the delivery set of an angle grinder.
Safety regulations
Basic safety rules when working with the tool:
- When starting to work with the tool, you should only wear thick, long-sleeved clothing and a mask;
- It is strongly not recommended to remove and change the protective casing;
- mandatory checking of the tool for malfunctions;
- It is prohibited to stand in the cutting area; you must take a side position;
- movements of the switched-on grinder should be from yourself;
- no need to put in extra effort to make the cut.
All actions to replace component materials should be carried out only by disconnecting the device from the power supply.
There are many ways to unscrew an angle grinder. But the main thing when using these methods: do not neglect basic safety precautions and carry out all actions only when the device is disconnected from the power supply. Simple techniques should be used first. And only if they do not lead to results, proceed to drastic measures.
What else can you do?
If the above methods do not work, then the nut will have to be heated with a gas burner. Under the influence of high temperature, the nut will expand and begin to rotate. You can also use a rather barbaric method, namely sawing the nut with a hacksaw. Then you will have to buy a new one. Some technicians use WD-40 penetrating lubricant. It is used for processing threaded connections. Judging by the reviews, after just a few minutes the nut can be turned.
conclusions
An angle grinder is a simple and useful tool for home or professional use. The most common problem when working with it is the biting of the nut that holds the disc. This can be dealt with using mechanical action on the mechanism (hitting the fastener, using a lever and grinding off the disk), or by chemical means - treating the threads with oil or a rust solvent.
This simple operation sometimes baffles even experienced mechanics or grinder users. The reason is that the disc is secured with a special nut. The nut has 2 or 4 holes into which a special key is inserted. This key was always included when purchasing an angle grinder. Perhaps it is still included in the kits.
According to the instructions for the grinder, you need to press the latch, which is located on the back of the gearbox. When the shaft is fixed, use a special wrench to unscrew the nut and change the disk. But it is difficult to unscrew the nut if it is not clamped. And he almost always clamps it with such a nut. An attempt to unscrew the disk leads to breakage of the latch behind the gearbox.
Removing a split disk
There are times when the cutting wheel jams during operation. Not only have you lost the nozzle, in such a situation the flange (its threaded part) is clamped with repeated force. How to remove a disc from an angle grinder in such a situation?
First of all, the tool should be securely fastened. Use clamps and a sturdy workbench. Then you need to lock the shaft lock key. If the force of your hands is not enough, lengthen the handle of the open-end wrench: for example, with a piece of steel pipe.
There are cases when the flange is jammed tightly. Then there is a possibility of damage to the locking key. To save the tool, disassemble the gearbox and clamp the output shaft in a vice.
Then we continue disassembling using the above methods: a reinforced open-end wrench or a gas wrench. The disadvantage of this method is that the shaft can be damaged and nicks will remain on it.
If the shaft is completely removed from the gearbox, the bottom of the flange can be chamfered using a traditional wrench.
Then the risk of damage is minimal. For any method, it is recommended to use a penetrating lubricant: WD-40 or regular kerosene. Waiting a few minutes after application will significantly reduce the force.
Bottom line: It is easier to prevent any problem than to deal with the consequences. By following the operating rules and tools, you will minimize the possibility of emergency situations.
How to unscrew it if it's tight?
Remember! You need to unscrew in the direction of rotation of the disk. Those. If the disk rotates clockwise, then you need to unscrew the nut clockwise.
The easiest way to unscrew the disk mount is to place a key and then hit it with a hammer several times with medium force.
If this does not help, there are alternative methods to solve the problem:
- heat the fastening mechanism with a torch, which will cause the metal to expand. As a result, the structure will become movable;
- Using a small metal plate, grind the disc down to the nut. Continue grinding until its surface comes into contact with the nut and begins to turn it;
- insert the steel pipe into the holes of the nut, use it as a lever to unscrew the tightened nut. Do not apply too much force so as not to break the thread;
- Lubricate the threads with machine oil, such as WD-40. Wait 3-5 minutes and then try to unscrew the fastener using a key. Using this method, you can also get rid of rust inside the landing shaft;
- If you need to remove a circle that has not been used for a long time, you can start tightening the fasteners even more tightly. After that, try to weaken it again;
- Boiled or rusted threads on angle grinders can be treated with turpentine, vinegar, white spirit or rust solvent. After processing, you need to wait at least 30 minutes and then try to unscrew the nut again.
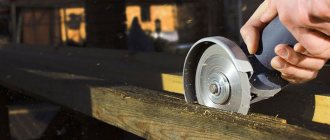
If a situation arises where you are left without a key, you can cut off the stuck fastener with a chisel or grind it off with a second grinder with a metal disc. After this, you will have to restore the threads and also look for a spare nut. If the circle still doesn’t give in, you can try combining different methods. For example, treat the shaft with machine oil, and then begin to unscrew the nozzle using a lever or tap the mechanism with a hammer.
Measures to prevent jamming
By taking care of the safe operation of the angle grinder in advance, you will save yourself from the need to take measures to eliminate an emergency situation. Such events include:
- Place cardboard or plastic washers between the disk, flange and spindle head. They do not allow the tool to jam, but even in the event of a corkscrew, they can be removed/melted and the element can be easily unscrewed.
- The abrasive wheel must be installed correctly. To do this, place the front side of the circle on the support flange (with the picture facing the gearbox). It should not come into contact with the clamping nut. In this case, the standard metal ring in the center will act as a washer preventing jamming.
- Weld a regular nut onto the clamping flange, which allows you to press the installed disk using a regular wrench.
- Check the tightening force. No excessive effort is required to install the cutting element. Otherwise, it will jam under intense loads.
Reasons for snacking
As a rule, this problem occurs on angle grinders with a working surface diameter in the range of 150-180 mm. When a strong torque occurs, the disc bites. This leads to the fact that the nozzle cannot be removed using a regular wrench, even with serious physical effort.
The second common reason is the use of a grinder disc that does not correspond to the factory parameters of the tool. This leads to disruption of the entire mechanism and jamming. In rare cases, a nut cannot be unscrewed when rust appears on its thread. This most often occurs when the tool is used for a long time or stored without changing the attachment.
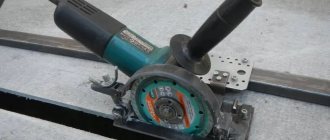
Presence of counterweight
It is up to you to decide whether the rack should have a counterweight, but its presence makes the work easier and serves as an indirect element of safety.
In theory, if you let go of the tool, it should rise to a vertical position and stop cutting material. I would advise you to turn off the end switch in the uppermost position so that when the angle grinder comes into it it will simply turn off; this measure will strengthen the security measures of your homemade device.
If you look at the photo above, you can see that two of them have counterweights, in the third case there is none. Which, in my opinion, is a drawback of this design. Here are some more examples of how you can make a counterweight. It is enough to install a spring, matching it to the weight of your tool, a simple and effective solution.
We figured out the counterweight, so as not to make the structure bulky, it is better to install a spring as in photo No. 5. The stand is easy to manufacture and allows you to tilt the angle grinder more than 90 degrees, unlike the one in photo No. 2, this property can be useful when working with large objects .
Recommendations from experts
When choosing a gas wrench as an alternative to a device with pins, you need to have medium or short handles. If the levers are long, it will be more difficult to control the degree of torque pressure. A significant jerk can cause the spindle to break off or the gearbox to fail.
In addition to the design and execution of the attachment, in order to determine how to correctly place the circle on the grinder, you need to pay attention to the direction of rotation of the mechanism. It is worth noting that when biting the nozzle, the tool is pulled out of the hands away from the user if the circle moves in the “away” direction. This is safer for the operator than reverse rotation.
How to correctly place a disc on a metal grinder is influenced by two factors. The first concerns the direction of rotation of the circle. If it is carried out away from the user, then the drawing should “look” at the mechanism. The second involves choosing an abrasive surface. Here it is permissible to neglect the instructions, but then the result of the installation work may be unpredictable.
An example of an installed disk with the marked side inward Source 220-volt.ru
Main uses of angle grinders
- Cleaning surfaces, stripping off old paint. It is performed with brushes with steel rods or sandpaper petals. There are no difficulties in operation, except that brushes with sandpaper require compliance with the direction of rotation.
- Sanding with sandpaper. A concentric attachment with Velcro is screwed onto the grinder, onto which the abrasive in turn is attached. Before use, check that the direction of the threaded fastening and the rotation of the tool shaft are consistent.
- Grinding with abrasive wheels. These attachments require careful handling, as under high load, the abrasive may break. You cannot cut material with such discs; shock loads are unacceptable.
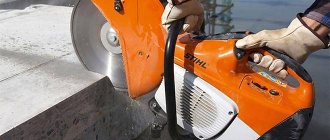
- Cutting metals, stone, gating concrete. Performed using cutting discs.
It is with such attachments that emergency situations most often occur.
What is the cause of the problem?
Before asking how to remove a disc from an angle grinder, experts recommend understanding why the nut on an angle grinder bites. It has been noticed that this problem is mainly observed in angle grinders that have a significant disc size. A disc is considered large . During operation, torque is generated. Next, when the master begins cutting, a small impact occurs. In other words, a force is exerted on the disk. If the size of the nozzle is no more than 12 cm, then this impact will be insignificant. If the disk is large, then the nut is tightened more by inertia. As a result, it is not possible to dismantle it in the usual way. Read more about how to remove a disc from an angle grinder below.
Sources:
https://stroy-podskazka.ru/instrumenty/bolgarka/kak-stavit-disk/ https://vahatehnika.com/bolgarka/kak-snyat-disk-s-bolgarki-bez-klyucha.html
Using a Gas Key
To dismantle the clamping nut on an angle grinder, you can use an ordinary gas wrench. To do this, they need to carefully grasp the surface of the flange and begin to carefully unscrew it. It should be noted that when using this hand tool, one should not apply great force when dismantling and unscrewing the flange. Otherwise, if excessive force is used, there is a high risk of damage to the rotation lock of the angle grinder, as well as damage to the integrity of the nut itself.
How to install correctly?
Installing a disk on a UMS is not that difficult. You can change it simply by following the instructions, although there are some aspects to this.
First, you need to install the disk with the correct side. This is especially important if it is cut-off. Typically, the side of the disc with the label, which indicates the marking and, accordingly, the area of its implementation, is slightly different from the reverse side. This may not be revealed immediately, but with long-term intensive work, the difference will not only be visible, it will be obvious.
On the side on which the label is glued, a wide pressure washer is placed; the moving nut will affect it when tightening (installing the disk). The nut slides along the polished surface of the washer; without it, tightening or unscrewing will become more difficult, because the abrasive will firmly hold the nut and more force will be needed. This is especially important if the disk needs to be quickly replaced or if it breaks (jammed).
With circular saws or other products that have teeth or a significant difference between the two sides, there are usually no problems with how to install them. For example, it will not be possible to fasten a grinding disc opposite it: it will simply be impossible for it to work.
Stone discs, including diamond ones, have a special rotation indicator in the form of an arrow: when installing them, it is necessary to strengthen them, taking into account where the rod will rotate. When installing, it is also important to take into account the size of the disk.
Under no circumstances should safety be compromised and the protective casing should be removed; it is better to select a disk of appropriate diameter. From time to time, a worn-out disc from a huge unit is placed on a grinder of the smallest dimensions. But a worn-out disk usually cuts worse, the working surface is limited to approximately half the radius of the disk, and the structure differs little. The disk burns faster and produces less work. This operation can be justified if the diameter of the rod matches. But you can't change it back
When installing, it is also important to take into account the size of the disk. Under no circumstances should safety be compromised and the protective casing should be removed; it is better to select a disk of appropriate diameter. From time to time, a worn-out disc from a huge unit is placed on a grinder of the smallest dimensions. But a worn-out disk usually cuts worse, the working surface is limited to approximately half the radius of the disk, and the structure differs little. The disk burns faster and produces less work. This operation can be justified if the diameter of the rod matches. But you won’t be able to change it back.
When installing, no debris should get under the disk. Naturally, the pressing nut can completely squeeze out small objects, and some will be crushed into the surface of the circle. But a distortion that is not noticeable to the eye will cause a displacement of the plane of rotation and, as a result, strong vibration of the entire mechanism; it can become a prerequisite for the destruction of the disk and, naturally, in this case it is not worth relying on a clear cut.
The clamping nut must be unscrewed with the wrench supplied with the tool. To prevent the rod from turning, it must be locked by pressing a special button. It is necessary to unscrew the nut while simultaneously holding the button pressed.
After twisting the nut, a disk is put on the freed rod, face outward, and you need to make sure that it is installed exactly in the seating area.
The kit for a new angle grinder always includes a certain number of cardboard spacers; when installing the disk, they must be laid so that they are between the disk and the pressing elements. Such gaskets will help unscrew
broken or jammed disk.
Next, the nut is manually tightened until it stops and tightened with a special wrench. That's it, the grinder is ready to work.
First way
How to remove a disc from an angle grinder if it is broken and tightly clamped with a clamping nut? Of course, you can try using a special wrench for angle grinders or a gas wrench. However, judging by the reviews, after making enormous efforts and wasting time, the master may not get the expected result. Dismantling can be easier and faster. To do this, use pliers to completely break the disk. Due to the fact that small fragments will fly away during the work, the technician will need protective glasses (mask) and gloves.
Then you need to take a metal plate, the thickness of which is less than that of the disk. With the help of this plate its remains will be ground off. To do this, you need to turn on the grinder and firmly clamp the metal piece with pliers. After completing these steps, the nut can be unscrewed even by hand.
What is causing the problem?
When rotating at idle, it is difficult to encounter a similar problem. Especially when working with light wheels and tools with a soft start function. However, after increasing speed and contact with the surface being cut, the following occurs:
- When material resistance occurs at the wheel, the angular speed of rotation sharply decreases and it slows down.
- The engine, by inertia, continues to operate for several moments at the same speed, dragging the gearbox and spindle with it.
- The locking nut is tightened by inertia more strongly along the threads of the spindle head, thereby pressing in the cutting disc.
That's it, the process of tightening the fixing flange is completed - an emergency situation is obvious. The following factors influence its occurrence:
- Large circle size.
- High power of the tool.
- Massiveness of the rotor.
- A sharp increase in cutting depth, i.e. increase in resistance.
In this case, removing the disc from the grinder can be very difficult. Additional measures need to be taken.
Features of marking discs for grinders
Along with the bar code of the country of manufacture and purpose, the following data is indicated on the marking of discs for an angle grinder:
- characteristics, for example, diamond, abrasive, etc.;
- dimensions: outer diameter of the cutting edge, thickness and diameter of the mounting hole in mm;
- maximum angular speed;
- maximum rotation speed;
- work angle;
- what operations are prohibited to perform;
- safety instructions in the form of pictograms;
- date of manufacture and expiration date.
Plus, you can find out other information from the manufacturer. For example, compliance with certain standards, regulatory documents in accordance with which the product is manufactured, etc.
Classification by material
Wheels for angle grinders are made from several different materials. Each of them has its own characteristics. Types of wheels for angle grinders:
- Diamond. They are made of steel coated with diamond sputtering. This type of attachment cuts and grinds any metal, concrete, artificial and natural stone (including granite and marble), ceramics, and glass. A diamond saw blade for an angle grinder provides the thinnest cut. You need to cut with small cuts. A new type of diamond attachments is polishing wheels on a flexible basis (“turtles”). Their surface has a corrugated structure in the form of a turtle shell (hence the name). Flexible diamond discs are attached to a base - a hard rubber attachment with Velcro.
- Carbide. Circles of this type are also made of metal. They have solder on the edges made of high-carbon molybdenum steels with additions of chromium and nickel. They are used mainly for cutting metals, less often for wood. The grinder is suitable for working with many metals. There are carbide discs specially designed for thin, high-carbon steel, stainless steel, and aluminum.
- Abrasive. The basis is thick waterproof latex paper with reinforcing mesh or fiber. A layer of abrasive material is applied to it - particles of aluminum oxide, silicon carbide, tungsten carbide or corundum. The binder for the abrasive is a resin or polymer. A fiber sanding disc for an angle grinder is used complete with a support plate made of plastic or rubber. It serves as a stop and cools the abrasive. Abrasive wheels are used as cutting, grinding or grinding wheels. The fiber wheel is suitable for working on wood and concrete, processing non-ferrous and ferrous metals. The abrasives are zirconate or aluminum oxide, ceramic grain. The fiber wheel is ideal for roughly removing old paint from walls, facades and other surfaces.
- Stripper made of metal wire. Disc brushes made of this material are used to remove rust and other types of stubborn deposits.
The discs for an angle grinder can roughly be classified as support plates. They are also called support or disc discs. Plates are made of plastic or rubber. They are used in combination with some grinding, polishing, cleaning abrasive attachments, and emery wheels. The need to use a support disk must be clarified when purchasing a particular wheel for an angle grinder.