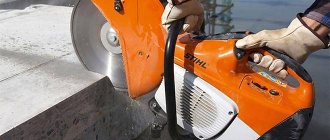
A grinder is a fairly popular tool that is often used in the household for sawing wood, metal or stone. When using these angle grinders for a long time, people often encounter the cutting disc jamming. This leads to the fact that the tool begins to work much worse. To cope with such a problem, you need to figure out in advance how to unscrew the nut on an angle grinder and what needs to be done for this.
A grinder is a power tool often used for sawing various materials.
What causes the disc to jam and why is it impossible to unscrew the disc?
Most often, a malfunction occurs upon contact with the material. In idle mode, such problems are not observed, since the number of tool revolutions remains stable. But, when we start grinding or cutting metal, then the number of revolutions begins to increase, which is reflected in the operation of the disk and the angle grinder.
You can recognize a jammed disk by the following signs:
- the number of revolutions of the tool circle sharply decreases and braking and jamming can even be observed;
- the disc may be deformed due to even stronger clamping of the nut;
- increasing the diameter and depth of cutting.
In this case, you need to react to the current situation in time and take action. In this case, you definitely need to remove the jammed disk from the grinder and try to solve the problem with the least amount of time and effort.
One of the most common reasons for a jammed nut is that you have not used the angle grinder for a long time, and the nut, bolt or washer is rusty. Consequently, this causes the tool to malfunction. If you encounter this situation, you need to perform a number of actions:
- To begin, unplug your angle grinder.
- Spray the structural parts of the angle grinder with an anti-corrosion agent or a special solvent liquid. The product must get on the washer, nut, and bolts.
- After this, you can proceed to removing the protective casing and individual parts that can be unscrewed.
If special means do not help to cope with the problem, then you need to move on to the second method. Its essence is to preheat it with wax, after which you can use a wrench to unscrew the nut. Control the force so as not to break the sanding disc.
Sometimes the wheel cannot be unscrewed due to the wrong direction of unscrewing the nut. Make sure you are unscrewing in the correct direction. If the nut cannot be unscrewed with a simple wrench, then you can apply force with a hammer. But, in this case, it is important to carefully adjust the force so as not to damage the parts of the angle grinder.
The method by which you can unscrew the nut and fix the problem largely depends on the type of grinder. The method of fixing the disc on the grinder also plays a role. Most often, in order to remove a disc from an angle grinder, you will need a wrench or a screwdriver.
If you decide to remove the disc from the angle grinder yourself or replace it, be sure to think about the security system. Grinding machines and their cutting parts are very sharp, so you need to be extremely careful and do not forget about protective equipment. In addition to overalls, safety glasses will be required. If a wheel breaks, particles can fly off and hit your face. If the wheel is stuck and you cannot solve the problem, you will have to resort to more labor-intensive methods.
Which direction should the sparks fly from the grinder?
Also a controversial issue that worries many. In fact, there are no written rules about this, and you can cut with a grinder both on your own and on yourself. The only thing I want to say is that in the process of cutting metal with a grinder away from you, holding the tool in your hands when it jams is very, very difficult.
Therefore, I cut only towards myself, so that sparks fly at my feet. There is nothing terrible about this, and it doesn’t happen, the pants don’t burn, and the legs are still intact. But I have full control of the tool, holding it with my left hand by the side handle, and slowly pressing it as I cut. At any moment I’m ready to release the power button with my right hand, and if something serious happens, then quickly move the angle grinder to the side.
By the way, when working with an angle grinder, many beginners make what is, in my opinion, a serious mistake. They put so much pressure on the disc during cutting that the grinder’s engine cannot cope with the increased load. As a result, the armature winding burns out, and the angle grinder has to be scrapped, since it is easier to buy a new one than to change the engine in it.
How to remove the sanding disc: important points
Without a tool, removing the grinding disc on an angle grinder is almost impossible. To remove the circle, you need to loosen a large number of screws and nuts, which is very difficult to do manually. Nuts, washers, screws are very tight and cannot be unscrewed by hand.
To remove a circle from an angle grinder, you need:
- disconnect the grinder from the network;
- wait until the grinding disc stops completely;
- use a wrench to turn the nut on the angle grinder counterclockwise;
- remove the protective cover;
- Install the new wheel and tighten the nut.
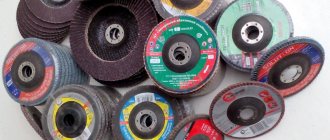
When machining the wrong material on the wrong grinding wheel, you can face two potential risks - the disc can crack or break, creating a huge number of pieces of the grinding wheel. Please pay attention to the compliance of the materials from which the discs are made and their scope of application:
- Aluminum oxide disc is designed for steel, carbide steel, iron. Alloy steel, high-speed steel and similar metals in composition;
- The grinder disc made of silicon carbide works with brass, cast iron, bronze and other soft metals. It is also designed for processing stone and non-ferrous metals;
- Ceramic aluminum oxide is very abrasive and is used on steel, hard metals. The main task of the discs is precision grinding;
- Zirconia alumina is another type of grinding wheel designed for steel and most hard metals.
Replacing a disk in normal mode
When operating an angle grinder regularly, you need to constantly change the wheels, which are consumables. If the tool is no longer comfortable to work with, then the worn abrasive wheel should be replaced.
Important! Be sure to check the electrical disconnection to avoid personal injury.
Step-by-step algorithm of actions
The circle is secured to the spindle head with a locking nut having an M14 thread. The standard configuration includes an open-end wrench with special protrusions for engaging with the holes of the fixing flange.
To unscrew the nut, you need to fix the spindle. For these purposes, there is a special lock located on the back of the angle grinder. By pressing the button, you will secure the gearbox with a cotter pin, eliminating the possibility of its rotation.
Insert the key into the holes. Hold the latch with one hand, and with the other turn the wrench counterclockwise, moving the nut.
The direction of movement of the disk is usually clockwise. However, there are models that may have something different. In any case, unscrewing occurs in the opposite direction to rotation.
Once the nut is in place, it can be unscrewed by hand without any effort.
Remove the retainer and the old circle.
Remove the bottom flange.
After intensive work with a tool with metal inside the casing, you can find a layer of burnt scale with abrasive. Use a steel brush to remove residue.
After cleaning, install the lower flange in place, aligning the grooves of the spindle with the grooves of the flange. A gasket is placed on top.
If your model does not have additional spacers, then such washers can be prepared from plastic or thick cardboard. Next, you need to correctly place the disc on the grinder and cover it with a similar gasket.
Important! Installed spacers allow you to easily unscrew the nut, even if the disc is pinched or broken. Use your hand to tighten the top clamp counterclockwise (counter-rotation), supporting the cutting wheel.
In this case, you also need to tighten the spindle lock and tighten the flange until there is noticeable resistance. Use the open-end wrench to tighten it with a little more effort. Do not over-tighten the fastener, otherwise you can overtighten the circle and it will warp
Use your hand to tighten the top clamp counterclockwise (counter-rotation), supporting the cutting wheel. In this case, you also need to tighten the spindle lock and tighten the flange until there is noticeable resistance. Use the open-end wrench to tighten it with a little more effort. Do not over-tighten the fastener, otherwise you can overtighten the circle and it will warp.
Now you can continue to work. However, problems arise from time to time and it is simply impossible to unscrew the disc on an angle grinder. Let's see below how to change the disc on an angle grinder in such cases.
How to remove a grinding wheel from an angle grinder: expert advice
To understand how to quickly and without damage remove the grinding wheel, read the advice of experts. Take note of the following important knowledge that will help you cope with the task:
- place a rag or cloth in the hole of the grinding wheel so that it does not rotate when loosening the nut on the grinder;
- Don't overtighten the nut and control the amount of effort you apply to achieve the goal. The rotating wheel should hold the nut well and firmly;
- use oils to lubricate the shaft to simplify the process of replacing the wheel;
- if the nut is too tight, use a hammer, with which you can apply a little force and unscrew the nut;
- Check the condition of the grinding wheel. Experts advise simply tapping it with a metal tool. If there is a dull sound, this indicates a breakdown. A loud sound is an indicator of a working disk;
- After replacing the grinding discs, be sure to check the functionality of the grinder while standing at the side of the tool. Rule out possible injuries;
- Read the operating instructions carefully. It contains a lot of useful information to help you use your bench grinder correctly, including changing the wheel;
- The method of unscrewing the nut largely depends on the type of angle grinder and its design features.
Angle grinder device
Any grinder consists of the following parts:
- rotor - part of the electric motor that rotates during operation and is controlled in speed, also called an armature;
- collector - the place on the rotor where the control winding wires are located;
- brushes - parts that serve as current conductors from the cable to the commutator winding;
- gearbox - a mechanism that acts as a drive from a rotating rotor to a spinning disk, consists of a spindle, a bearing, and two gears (a large gear and a shaft gear);
- stator – part of the electric motor in which the rotor operates;
- grinder cooling impeller;
- start button;
- electrically driven network cable;
- protection casing;
- grinder body;
- additional handle.
All these details can be divided into two parts:
- electrical;
- mechanical.
How to prevent a disk from jamming?
Since the problem is quite relevant and many craftsmen have encountered it, it is important to understand how to prevent jamming and prevent such a turn of events. Precautions include:
- It is best to use cardboard or plastic washers to install between the disc itself and the spindle head. Due to this, the tool will not jam. If this happens, it will be easy to unscrew the stuck nut and replace the disk.
- Follow the instructions for installing the abrasive wheel. The bright side with the picture should be close to the gearbox. There should be no contact with the clamping nut. The center ring will prevent jamming.
- You can weld a nut onto the flange. Even if an emergency situation occurs, it can be solved with a regular wrench without much effort.
- Always adjust the tightening force. Do not use too much force when installing the grinder wheel. If you overtighten the nut, jamming will be observed under increased loads. When idling, it will not be possible to determine the malfunction.
Reasons for snacking
As a rule, this problem occurs on angle grinders with a working surface diameter in the range of 150-180 mm. When a strong torque occurs, the disc bites. This leads to the fact that the nozzle cannot be removed using a regular wrench, even with serious physical effort.
The second common reason is the use of a grinder disc that does not correspond to the factory parameters of the tool. This leads to disruption of the entire mechanism and jamming. In rare cases, a nut cannot be unscrewed when rust appears on its thread. This most often occurs when the tool is used for a long time or stored without changing the attachment.
Conclusion: difficulties when replacing the grinding wheel
Before removing the grinding wheel, it is better to try to unscrew all the parts and remove unnecessary objects that could be an obstacle. This makes it easier to replace the grinding wheel.
How often you need to change the grinder wheel depends on how often you use your grinder. If you use it frequently, your wheel will wear out faster and you will have to change the grinding wheel more often.
Try to avoid malfunctions and change the grinding wheel on time. To protect yourself and not endanger your health, before any manipulation, make sure that there is no power source connected to your grinder.
Difficulties in replacing a wheel occur when the nuts, washers, and screws become seized or rusty. In this case, you will have to try several ways to remove the circle and put in a lot of effort. It is also important to consider that grinding wheels can be very fragile. If you don't want breakage and deformation, you must be extremely careful when applying force to remove them. Don't forget that certain grinding wheels are suitable for specific metals. Choosing the wrong grinding disc is one of the reasons for breakdowns and malfunctions.
How to disassemble an angle grinder
How to disassemble an angle grinder? It's not such a complicated process. This does not require special knowledge, but everything must be done carefully and with caution. Every owner needs to know how to disassemble any working tool, because periodically it needs internal cleaning from dirt and dust, and its service life depends on this.
Nowadays on the market you can choose different types of grinders, which differ in operating parameters, size, and quality. Manufacturers are also different. Whatever model of grinding machine you buy, they all have the same model for assembling parts.
Disassembling the angle grinder will require few tools; you just need a regular screwdriver or a reversible one with a ratchet mechanism.
Having prepared the screwdriver, you can start disassembling:
- We unscrew the screws from the body and remove one side of the product.
- Remove the nut that holds the disk in place and unscrew the bolts securing the protective casing.
- Remove the brushes.
- Disconnect the wires from the engine.
- We unscrew the bolts that secure the gearbox inside and very carefully remove it; the rotor is also removed with it.
- We unscrew the bolts that hold the stator and remove it.
- We assemble the angle grinder back, put everything in place one by one in reverse order and screw it on.
When disassembling an angle grinder, it is important to remember the order in which parts are removed in order to assemble it correctly.
Methods for removing a disk when the nut is jammed
If your nut is stuck, you can try to unscrew it with an open-end wrench. You need to make 4 protrusions on the socket head. This will match the flange hole structure. Then we place the open-end wrench under the disk and begin to rotate it in the direction of the circle.
Another popular method is heat treatment. As the clamping nut heats up, the metal softens and becomes more “obedient.” After this, you can try to unscrew the nut manually or use a wrench. The disadvantage of this method is the risk of deformation of the gearbox. If there are plastic elements on the grinder, they may melt.
If you use a gas wrench, the force on the nut increases. Here it is important to control the force of the stop, since otherwise there is a risk of bending the flange or breaking the lock responsible for spindle rotation. You can also move the nut from one point using a hammer drill.
The most drastic way is to deliberately destroy the disk. If it is slightly cracked, we simply break it off and remove the remnants of the circle from the grinder. As a result, only the central metal ring remains. The metal part itself is removed using a vice, pressing the ring tightly into it.
Regardless of the chosen method of solving the jamming problem, it is important to remember the safety system and not endanger your health.
The nail will help you
Another effective way to unscrew a jammed nut on an angle grinder if you don’t have a key. To do this, you will need a nail 100 mm long, the head of which needs to be bitten off, and then given a U-shape. The distance between the ends of the nail must correspond to the holes in the clamping flange of the angle grinder. Insert the resulting structure into the holes of the nut and turn it. If the flange does not give in, you can use a screwdriver as a lever or pliers.
PHOTO: i.ytimg.comYou can use a nail if you don’t have a key at hand
Security measures
Angle grinders belong to the group of dangerous power tools, so it is important to adhere to safety rules and handle manual cutting and grinding equipment with care. Adhere to the following rules for working with a grinder wheel:
- Always use the disc for its intended purpose. Pay attention to the manufacturer's instructions to determine the technical features of the disc and use the discs for a specific material.
- Never use abrasive tools after the stated expiration date. Such discs are unusable and may cause accidents. Most often, the expiration date is indicated on a metal ring inside the disc.
- Always store grinding wheels in a dry place at room temperature.
- Before use, check the grinder wheel for possible damage.
- When replacing the disk, be sure to disconnect the angle grinder from the power source.
- Always wear protective clothing, a mask or goggles, as if a disc malfunctions, chips can harm you.
- Adhere to the maximum permissible tool speed. Their meaning is indicated on the disk.
- Make sure the sanding disc is installed correctly. Make sure the diameter of the disc hole matches the diameter of the mounting on your sander.
- Both clamping flanges must have the same diameter.
- Work only with angle grinders that have a protective casing. It is designed for protection at work.
- Never use cut-off wheels for grinding unless specifically permitted by the pictogram.
- Use only discs that are clearly suitable for the intended purpose. Follow any restrictions on use, safety instructions or other information made available to you.
- Working with high-speed abrasive discs requires special care.
- Avoid applying excessive pressure to the angle grinder.
- All manipulations with dry abrasive grinding methods must be carried out in places with an equipped dust removal system. These should be special filters that promote high-quality air purification.
Bulgarian and its operation
An angle grinder is called an angle grinder. The name of the instrument is due to the fact that it was produced in Plovdiv. It is intended for performing work on grinding or trimming hard material:
- metal;
- concrete;
- stone
Does a good job of sharpening tools.
A grinder is a very necessary tool these days, so almost everyone has one.
There are grinding machines of different power: from 500 W to 2500, depending on the thickness of the wheel - from 115 mm to 230 mm. The most popular ones in use are angle grinders with a power of 1.2 W, and the most used disc is 125 mm thick.
Every year the choice for this construction power tool becomes wider, but the operating rules remain almost unchanged. And even if you always adhere to them, sooner or later malfunctions arise in the mechanism, which you can try to fix yourself by collecting everything you need to repair the angle grinder.
Main characteristics of grinders
Power.
For a household machine, the parameter is not important.
But the more power, the higher the electricity fee and the traffic jams “fly out”. A powerful grinder is needed during construction - to hammer walls, cut brick, granite, thick tiles. Professionals need powerful machines for fast and high-quality work. All other things being equal (price, brand, weight, etc.), cars with increased power are more preferable. Power factor taken into account in the rating
“What is the purpose of knowing the power you are torturing? Here I have two grinders. Big and small, I forgot what power they have, they’ve been working for a long time because.”
“I have two grinders with 125 discs: a Makita 710 watt and a Dewalt 1400 watt, when working with these grinders I can’t understand the difference in power. 710 watts cuts exactly the same as 1400 watts. I couldn’t crush 710 watts with either cutting or cleaning discs - although of course I didn’t try very hard.”
Revolutions (rotational speed)
The maximum revolutions of the grinder ( angular speed in rpm) and the linear speed of the wheel at these revolutions (m/sec) must be known by heart and without hesitation. These must be taken into account for safety reasons when selecting abrasive wheels.
When choosing a circle, be sure to look at what the “ Linear speed ” is. (m/sec.) is indicated in the circle marking. The conversion of the linear speed of the circle to the rotational speed is given in the Table of linear speeds.
The consumption of grinding and cutting wheels depends on the speed of the grinder. The lower the speed, the less durability of the wheel. The abrasive wheel is designed to operate at the linear speed indicated on its marking. When the speed decreases, the load on its grains increases sharply, they crumble, and the wheel wears out intensively.
Modern cutting wheels operate at a speed of 80 m/s. The revolutions of grinders should accordingly be as follows:
Angle grinder 115 12000 – 13300 rpm
Angle grinder 125 11500 – 12500 rpm.
Angle grinder 150 9500 – 10200 rpm.
Angle grinder 180 7500 – 8500 rpm.
Angle grinder 230 5800 – 6650 rpm
The factor of increasing the consumption of abrasive wheels with a decrease in the speed is taken into account in assessing the quality of grinders in the rating
Grinder weight
An angle grinder is a hand tool, so it must have minimal weight and dimensions; these are the indicators that determine the convenience and productivity of work. The greater the weight of the grinding machine, the higher the level of impact of its vibration on a person.
There is a misconception that the more powerful the grinder, the greater its weight. A careful analysis of angle grinder models refutes this opinion.
The factor of light grinders is taken into account in the rating
Main characteristics of grinders
Power.
For a household machine, the parameter is not important. But the more power, the higher the electricity fee and the traffic jams “fly out”.
A powerful grinder is needed during construction - to hammer walls, cut bricks, granite, and thick tiles. Professionals need powerful machines for fast and high-quality work. All other things being equal (price, brand, weight, etc.), cars with increased power are more preferable. Power factor taken into account in the rating
“What is the purpose of knowing the power you are torturing? Here I have two grinders. Big and small, I forgot what power they have, they’ve been working for a long time because.”
“I have two grinders with 125 discs: a Makita 710 watt and a Dewalt 1400 watt, when working with these grinders I can’t understand the difference in power. 710 watts cuts exactly the same as 1400 watts. I couldn’t crush 710 watts with either cutting or cleaning discs - although of course I didn’t try very hard.”
Revolutions (rotational speed)
The maximum revolutions of the grinder ( angular speed in rpm) and the linear speed of the wheel at these revolutions (m/sec) must be known by heart and without hesitation. These must be taken into account for safety reasons when selecting abrasive wheels.
Rotary hammer or impact drill
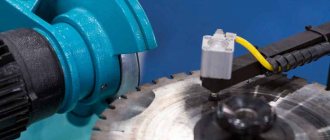
To be honest, it is not the best or easiest option to unscrew a jammed nut on an angle grinder, but it is used if other methods do not work. As an attachment for a drill or hammer drill, you need a drill of a suitable diameter, most often 6 mm. If you are using a drill, you need to set it to jackhammer mode in advance. It is better to fix the grinder in a vice, clamp the spindle stopper, insert the drill into one of the holes of the clamping nut with emphasis in the direction of unscrewing, and briefly press the “Start” button. This method allows you to move even a tightly clamped flange. The disadvantage is that this can break the mounting holes for a standard key.
PHOTO: i.ytimg.com Insert the drill into one of the holes in the nut and turn on the drill in impact mode
How to unscrew it if it's tight?
First, let’s answer a common question: “In which direction does the nut on an angle grinder unscrew?”
Remember! You need to unscrew in the direction of rotation of the disk. Those. If the disk rotates clockwise, then you need to unscrew the nut clockwise.
The easiest way to unscrew the disk mount is to place a key and then hit it with a hammer several times with medium force.
If this does not help, there are alternative methods to solve the problem:
- heat the fastening mechanism with a torch, which will cause the metal to expand. As a result, the structure will become movable;
- Using a small metal plate, grind the disc down to the nut. Continue grinding until its surface comes into contact with the nut and begins to turn it;
- insert the steel pipe into the holes of the nut, use it as a lever to unscrew the tightened nut. Do not apply too much force so as not to break the thread;
- Lubricate the threads with machine oil, such as WD-40. Wait 3-5 minutes and then try to unscrew the fastener using a key. Using this method, you can also get rid of rust inside the landing shaft;
- If you need to remove a circle that has not been used for a long time, you can start tightening the fasteners even more tightly. After that, try to weaken it again;
- Boiled or rusted threads on angle grinders can be treated with turpentine, vinegar, white spirit or rust solvent. After processing, you need to wait at least 30 minutes and then try to unscrew the nut again.
If a situation arises where you are left without a key, you can cut off the stuck fastener with a chisel or grind it off with a second grinder with a metal disc. After this, you will have to restore the threads and also look for a spare nut. If the circle still doesn’t give in, you can try combining different methods. For example, treat the shaft with machine oil, and then begin to unscrew the nozzle using a lever or tap the mechanism with a hammer.
Important! Do not unscrew the fastener with great force. This can lead not only to thread failure, but also to breakdown of the angle grinder body itself.