Do-it-yourself household feed granulator drawings
Do-it-yourself household feed granulator, drawings of equipment with an electric drive, V-belt drive and flat matrix.
Before we begin designing the equipment, we will make a simple calculation.
It should be remembered that:
- The maximum gear ratio of the V-belt drive is no more than 6.
- wrap angle on the small pulley – at least 120°
From the standard range according to GOST 17383-73, we select pulley diameters
Drive pulley (D1), diameter 56 (mm) Driven pulley (D2), diameter 315 (mm)
Calculate the length of the belt
according to the formula: L = 2a + l1 + l2
l – circumference, determined by the formula: l = πDα/360
α1 = 136.57° α2 = 223.43° a = 325.16 (mm)
Let's substitute the values and get:
L = 2 x 325.16 + (3.14 x 56 x 136.57 / 360) + (3.14 x 315 x 223.43 / 360) = 1330.89 (mm)
From the standard range we choose belts Z-1320.
The optimal rotation speed of a flat matrix is 100...150 (rpm). Knowing the gear ratio (D2 / D1 = 315 / 56 = 5.625), we select the AIR 100L8 electric motor.
Let's substitute the values into the formula and get the revolutions of the granulator matrix:
ωр = 750 / 5.625 ≈ 133 (rpm)
Making an extruder for feed at home
Extruded pet food has appeared on the market relatively recently. However, among livestock breeders they immediately gained recognition and began to enjoy wide popularity.
The thing is that when regular feed is extruded, some indigestible grain enzymes (for example, starch) are split into those that are fully digestible by both animals and poultry (sugar and simple carbohydrates). Such food is not only more healthy, but also, due to increased taste, is much better eaten.
Almost all livestock farmers know about the benefits of extruded feed. But not everyone can afford to buy a grain extruder itself because of its very high cost. To help those who “want to, but can’t,” we offer options for making an extruder with your own hands.
What is an extruder?
An extruder is a device that allows you to turn regular feed into extruded feed. In other words, a grain mixture is poured into the unit at the entrance, and the output is a kind of granulated feed.
Depending on the design of the unit, sausages with a diameter of up to 3 cm come out of it.
Extruded feed
Any grain, even slightly spoiled grain, can be processed in an extruder. This device processes feed under high pressure up to 60 atmospheres and at high temperatures up to 180 degrees.
With this physical impact, enzymes are broken down. They release sugar and carbohydrates. In addition, the finished food is not only sweetish, but also acquires the aroma of freshly baked bread, which significantly improves both digestibility (from 60% to 90%) and palatability.
Extruded feed significantly reduces the energy consumption of animals for their consumption. Thanks to this, with less feed consumption, the farmer receives a much greater increase in muscle mass on the farm. In addition, such food completely protects poultry and animals from gastrointestinal diseases and bacteria entering the intestines.
The grain extruder can be of different capacities. Everyone chooses what they need based on personal requirements and the size of the farm. For example, the KESH grain extruder has a capacity of up to 20 kg of finished feed per hour, while the EKZ 20 grain extruder produces 1.5-2 times less product in the same time.
Extruder functions
This unit is needed not only for converting simple grain into granulated feed. Its tasks include:
- Heat treatment and disinfection of raw materials.
- Grain grinding.
Extruder in operation - Mixing different components into a single complete, balanced feed.
- Enzyme breakdown and stabilization.
- Texturization.
- Expansion.
- Profiling.
What does the unit consist of?
This unit, despite the complexity of the process being performed, has a rather simple configuration:
- frame base, which is the base of the unit. All other components are fixed on it;
- drive that sets the mechanism in motion;
- bunker It is loaded with raw materials that will be processed (grain, fodder, meal, etc.);
- a dosing screw supplies raw materials at a certain speed and in certain quantities;
- screw blower;
- cylinder - a housing in which raw material processing processes take place;
- receiving chamber;
- cutting knife;
- die;
- engine;
- gearbox;
- belt and cuff.
How it works?
All manipulations to convert grain into extruded feed take place in the pressing unit. That is, all the work is done by a forcing screw , closed by a cylindrical housing. The injection screw, in turn, consists of 3 parts (input, output and middle) and a heating washer.
There is a hole in the housing above the inlet part of the screw through which raw materials enter. There are longitudinal ribs on the inside of the body that help mix the grain to create a homogeneous mass. Due to the constant rotation of the auger, high pressure arises in the housing, which breaks the grain. After high-temperature treatment, the finished product in the form of a sausage comes out through the die.
The extruder heats up gradually. Loading grain can only be done after the mechanism has completely warmed up, otherwise it will not rupture. When starting, you can load flour or meal into the hopper.
How to make an extruder with your own hands
Making a grain extruder with your own hands is not an easy task. But difficult does not mean unrealistic.
In addition, many elements of the unit will still have to be purchased. But, if you take into account the cost of the factory device, it will cost much less.
Homemade grain extruder
And so, in order to make the unit with your own hands, you will need:
- engine with a power of at least 2.2 kW with a rotation speed of 3000 rpm and above;
- springs or rod, 10-12 mm in diameter for making a sleeve;
- a rod, for example, from a hydraulic cylinder with a diameter of at least 50 mm;
- wire, 8 mm in diameter or cone spring;
- welding machine and lathe.
Making a granulator
Having made sure that all the necessary elements are present, we proceed to assembling the unit.
- Let's start with making the screw. To do this, take a shaft with a diameter of 50 mm and wind a wire with a diameter of 8 mm around it, making a kind of spring. You can take a ready-made spring, if available. The pitch between turns should gradually decrease. For example, we start with 2.4 and go up to 1.8 mm.
- Next, you need to weld the spring onto the shaft. After welding, carefully process the seams with a grinder. You should end up with something similar to a meat grinder screw.
- From a 10 mm rod or spring strips you need to weld a sleeve in which the auger will rotate. Making a sleeve from individual relief elements will increase friction and heating of the raw material during extrusion.
- On one side of the sleeve we weld the sleeve into which the bearings will fit.
- We weld guides on both sides of the sleeve on which the control flanges will be fixed.
- We insert the screw into the sleeve.
- Place the washer, install the ball bearing, and then the roller clamp bearing.
- We install the flange and screw the nuts onto the guides.
- We install a die on the other side of the auger and press it with the flange in the same way. Using the nuts on the guides, we press the flanges so that the shaft is pressed against the die.
- After the die, a knife is installed on the shaft to trim the granules.
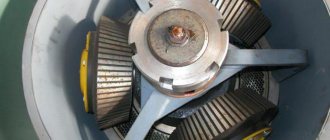
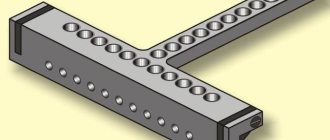
A household feed granulator consists of the following elements
- V-belt transmission housing (base).
- Granulator matrix drive.
- Granulator rollers.
- Loading hopper.
- Electric motor AIR 100L8.
- Movable plate for mounting the electric motor.
- Belt tension device.
- V-belt transmission.
- Frame.
- Shaft.
- Spatula.
- Matrix.
- Washer.
- Hexagon socket screw DIN 4762 - M8 x 20.
- Spring lock washer DIN 128 - A8.
- Prismatic key DIN 6885 - A8 x 7 x 22.
- Nut DIN 44232 - M8.
- Hexagon socket screw DIN 912 - M8x1 x 30.
- Single row angular contact bearing DIN 625 - 6307 with protective washers or 66307 according to GOST 831-75 (35 x 80 x 21).
- Lock washer DIN 6731 - 32.
- Special nut DIN 1804 – M32x1.5.
- Prismatic key DIN 6885 - A8 x 7 x 50.
In addition, let's watch a two-part video showing the assembly procedure for a household feed granulator with a flat matrix.
What is a granulator
A granulator is a device for converting crumbly feed into capsules.
Suitable for pressing:
- crushed grain (wheat, barley, oats, corn);
- grass meal;
- hay;
- bran;
- cake;
- crushed peas.
The technological properties of the feed are improved, sticking is eliminated, and flowability increases. The digestibility of granules is higher than regular feed. The ability to use vitamin and antimicrobial additives improves the quality of the product.
You may also be interested in information about how much feed a laying hen needs per day.
The video shows how the granulator works:
This food is convenient to use:
- during automatic distribution;
- transportation;
- storage.
The size of the pellets depends on the livestock industry:
- for poultry farming – up to 5 mm;
- for piglets – up to 8 mm;
- adult pigs – up to 10 mm;
- cattle - 10-15 mm.
Why are drawings needed?
Before each event, you need to make a work plan and draw up some guidelines. Also with us, before creating your press, you need to outline everything. I will now give you general drawings, but you will need to forge them for yourself.
Why is that? Yes, because everyone has their own materials at hand, and perhaps if I give strict instructions, then you will not find some material from it, but you have analogues at hand. Therefore, everyone customizes everything for themselves.
What you need to create any granulator:
- Mechanical skills, experience with a welding machine and ability to operate a lathe;
- Welding machine;
- A lathe or a familiar lathe;
- Drilling machine;
- Electric motor.
These are the general requirements for creating abs. Now we will look at several types of presses and add some missing materials.
Drawings of a granulator from a meat grinder
I wrote about this press quite recently here. This press is useful for very small volumes of granulation, for example for creating food for pets, and if there are not very many of these animals. For harder wood you will need a completely different device.
To make such a press you will need:
- Meat grinder;
- Matrix;
- Electric motor from a washing machine or vacuum cleaner.
You can read more about how to do it at the link above.
Screw granulator
This press is already more productive. It can already be used not just for one or two pets, but, for example, for preparing food for the winter for animals. In an hour it can dispense up to 200 kilograms of feed or wood pellets. Everything will depend on the size it will have.
I described its production in detail on this page. Its advantage is simplicity of design and performance.
This design can be made at home and it will be quite productive. In addition, in addition to feed, wood can also be pelletized.
To make such a press you need:
- Metal blank for making a matrix;
- Metal rod 1 cm;
- The body or, more precisely, the pipe for it;
Flat Die Press
It’s much more difficult to make it here, but it can be done, read in detail about its manufacture here. The productivity of such a machine will be even greater than that of a screw machine. But it will also be more difficult to do. I have a very good article about the structure of the press here.
- Flat matrix, how to make it, read here;
- Rollers or punch, read about their production at the link above;
- Shaft transmitting rotation from the worm to the punch;
- coupling;
- Worm mechanism;
- Electric motor;
- Loading opening;
- Unloading window;
- Bearings with a seal (so that screenings and pellets do not pass below);
- Legs of the press;
- Frame.
There is no need to take these drawings literally, I’m just throwing them out as an example...
Here we additionally need:
- Large diameter pipe for making a body;
- Sheet metal for making a matrix;
- Worm gear, it’s better not to invent anything and buy it or find it somewhere;
- Most likely the network for connecting 380 Volts;
- Additional metal (pipe, angle, channel).
Granulator device
The granulator is similar in design to an electric meat grinder with one difference: the knife is located on the outside, behind the matrix grid.
During the granulation process, the raw material mass is loaded into a hopper, from which it is pushed under pressure through a mixture heated to 110 degrees. matrix. The movement of the screw ensures that the mixture is pushed, creating pressure and pressing the crushed and moistened raw materials against the matrix.
Upon reaching a critical volume value, the compressed raw material is forced through the holes of the matrix. A special cutter cuts the granules to the required size. Plastic capsules cool down, maintaining their shape.
You may also be interested in information about how to keep Indian ducks at home.
The operating principle consists of sequential operations:
- supplying crushed feed from the hopper to the rotating shaft;
- compression;
- pressing through the matrix;
- cutting with a knife;
- entering the receiving bowl.
The diameter of the holes in the grid determines the diameter of the capsules. Depending on the power of the electric motor, the diameter can be from 5 to 10-15 mm. The distance at which the knife is installed after the grate determines the length of the granules.
The video shows how the granulator works and works:
Main parts of the granulator:
- loading hopper;
- screw;
- matrix;
- knife;
- drive shaft;
- gearbox;
- electric motor;
- bed;
- receiving bunker.
But how to breed ducks at home for beginners and what you should pay attention to is indicated here.
All parts of the device are made of metal.
The specific characteristics of the thickness and diameter of the matrix, the diameter of the screw, and the power of the electric motor are determined together.
The units offered by manufacturers can be used for preparing not only feed, but also pellets (fuel pellets made from sawdust).
Main characteristics of granulators offered by manufacturers:
- Engine power 2.2 kW. Feed productivity is 60-100 kg/hour. Matrix diameter 120 mm. Weight 80 kg.
- Engine power 4 kW. Feed productivity is 150-220 kg/hour. Matrix diameter 150 mm. Weight 115 kg.
- Engine power 7 kW. Feed productivity 300 kg/hour. Matrix diameter 200 mm. Weight 200 kg.
- Engine power 11 kW. Feed productivity 400 kg/hour. Matrix diameter 230 mm. Weight 290 kg.
- Engine power 15 kW. Feed productivity 600 kg/hour. Matrix diameter 260 mm. Weight 330 kg.
The maximum power of manufactured units is 30 kW with a productivity of more than 1000 kg per hour. The weight of the installation is more than 500 kg.
But what the blue favorite duck looks like and how to properly breed it at home is indicated here.
Device cost
- with a 2.2 kW electric motor – from 53,000 rubles;
- 7 kW – from 83,000 rubles;
- 15 kW – from 190,000 rub.
Advantages of industrial granulators:
- reliability;
- duration of operation;
- versatility;
- efficiency;
- safety;
- convenient service.
The high cost of units manufactured in industrial conditions forces livestock breeders to make devices in a handicraft way, using improvised means.
But you can read here how broilers are raised without feed and what feed should be used.
Extruder for feed: drawings and useful recommendations
A simple to use feed extruder makes it possible to independently produce compound feed for animals.
This device is considered an indispensable assistant both in large-scale agriculture and in small farms for raising animals and birds. In specialized stores, such equipment costs decent money.
To save money, you can assemble the unit yourself; drawings and recommendations from specialists will serve as an auxiliary informant in this matter.
What it is
An extruder is used to process grain crops into compound feed, which is much easier to digest in the stomach of animals. Processing is carried out using a press under a pressure of 60 atmospheres and at high temperature. The result is a product shaped like 20-30 mm corn sticks, but with a dense structure.
Extruded feed
Apparatuses for preparing feed exist with different power ratings, and the volume of product produced depends on it. For a small farm, a device with a productivity of 25-45 kg/h is perfect - the price of such a device starts from 47 thousand rubles. But a large farm will require more powerful models capable of producing up to 1.5 tons per hour and they cost from 160 thousand rubles.
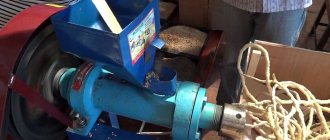
Extruder device
Due to high prices, equipment for processing products into mixed feed, even second-hand, is available to a narrow circle of consumers. But if you make an extruder for feed with your own hands, you can save a lot. Only in this case you need to study in detail the structure of the unit, the principle of operation, and also have all the necessary spare parts available.
Diagram of a large extruder
Components of the complex
The design of the device includes the following elements:
- frame - serves as the basis, all the details are fixed on it;
- drive unit;
- belt;
- loading capacity;
- cuff;
- dosing screw with separate drive;
- gearbox;
- receiving tank;
- motor;
- injection screw conveyor;
- Control block;
- carved blade;
- washer;
- adjustment key.
Operating principle
In a homemade extruder, the main function is performed by the pressing mechanism. The element includes a discharge screw unit mounted in the cylinder. The blade block gives the product the shape of oblong sticks.
The functions of the electrical appliance are not limited to pressing feed. With its help, you can grind grain, carry out heat treatment and disinfection of feed, and mix different components into a single mass.
The design of the injection screw includes:
- outer part;
- internal;
- heating washers;
- outgoing auger.
Each unit is installed on a stud with a left-hand threaded part and covered with a housing made of metal material. Thanks to the keys, the revolutions flow from the main shaft to the combined auger. All components are firmly fixed to the frame.
Detailed extruder design (download)
The housing element is equipped with a hole, and the receiving part is mounted to it. The internal area is equipped with longitudinal grooves, due to which all feed components are mixed along the longitudinal side of the axis.
A pellet regulator is installed on the output part; its design includes:
- matrix block;
- output housing;
- blade pressed by a spring element to the matrix block.
The rotation of the shaft with the blade is carried out by means of a rein. You can monitor the temperature using a thermocouple mounted on the frame. The grain extruder operates from electrical voltage. But there are already modifications that run on fuel.
Making an extruder for feed with your own hands
If you have the necessary material, parts and tools, you can make an extruder with your own hands. Let's look at how to get a low-performance model.
Blueprints
To do this you will need:
- electric motor with a power of 2.2 kW at 3,000 rpm;
- gears from a tractor box - parts from YuMZ would be an excellent option;
- spring 8 mm;
- rod with a cross section of 5 cm;
- welding equipment.
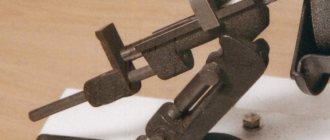
Step-by-step work on making a feed extruder with your own hands:
- To obtain a cylinder, you will need to weld the tractor gears together. As a result, a spare part with a cross-section of 625 mm should be produced. Next, a spring with a diameter of 8 mm is mounted on the hydraulic cylindrical rod. Weld all the parts; if the seam is uneven, treat the area with a grinder.
Tractor gear
- Using turning equipment, grind 2 axle boxes that will be used for the auger and gearbox. Weld the auger, shaft element and axleboxes into a single piece, and do not forget to insert a bearing between the last parts.
Blanks in the form of axle boxes
- The equipment head is mounted on the screw; it will act as a regulator of the die to which the nozzles are welded.
Workpiece on auger
- The auger is covered with a housing, all parts are assembled and fixed to the frame, an electric motor, belts and a starting part are also mounted. A loading container is installed on top.
In general terms, a homemade extruder is similar in external and functional characteristics to a household electric meat grinder.
VIDEO: Making a screw granulator with your own hands (Part 1)
How to make it yourself
To manufacture a granulator on your own, you will need special equipment:
The power of the compactor will depend on the electric motor used.
In the video - do it yourself:
Granulator design option
A pipe and welded bushings of different diameters can be used as a body. The minimum thickness of steel walls is 8 mm. To make an auger, you will need an axle shaft and a rod with a diameter of 1 cm. Having secured the axle shaft on a workbench, weld one end of the rod and make a winding on the axle shaft with an arbitrary pitch. The workpiece must be scalded on both sides, the seams must be cleaned with a grinder and thermally hardened.
conclusions
We looked at the drawings of the three simplest granulators that are suitable for home use. As I said, they go in order of increasing productivity from smallest to largest.
It is more preferable to make household granulators with your own hands for the production of compound feed; it is still recommended to buy them for wood. But I don’t mind that in some cases homemade ones are stronger than store-bought ones.
If you still want to make a sawdust press, then you need to make sure that all its elements have increased strength.
In addition, do not forget that for high-quality granulation, the raw material must have a moisture content of 10 - 12%.
In most cases, this is not possible without drying. Why am I saying this, so that it doesn’t turn out that you’ve been doing a press for a couple of months, but it doesn’t press sawdust? You can read how to dry sawdust in the article at this link.
But let me just say briefly that there are several ways to dry raw materials for pellets.
The first is tumble drying. The advantages of this process are:
- Small footprint;
- Process stability;
- Good performance.
The photo shows an industrial dryer...
The second method is drying the crushed wood in a dryer pipe, its advantages are the simplicity of the design, it is much easier to do if you have the materials and welding skills. The disadvantages include the large occupied area.
Homemade feed granulator drawings
Do-it-yourself household feed granulator, drawings of equipment with an electric drive, V-belt drive and flat matrix.
Before we begin designing the equipment, we will make a simple calculation.
It should be remembered that:
- The maximum gear ratio of the V-belt drive is no more than 6.
- wrap angle on the small pulley – at least 120°
From the standard range according to GOST 17383-73, we select pulley diameters
Drive pulley (D1), diameter 56 (mm) Driven pulley (D2), diameter 315 (mm)
Calculate the length of the belt
according to the formula: L = 2a + l1 + l2
l – circumference, determined by the formula: l = πDα/360
α1 = 136.57° α2 = 223.43° a = 325.16 (mm)
Let's substitute the values and get:
L = 2 x 325.16 + (3.14 x 56 x 136.57 / 360) + (3.14 x 315 x 223.43 / 360) = 1330.89 (mm)
From the standard range we choose belts Z-1320.
The optimal rotation speed of a flat matrix is 100...150 (rpm). Knowing the gear ratio (D2 / D1 = 315 / 56 = 5.625), we select the AIR 100L8 electric motor.
Let's substitute the values into the formula and get the revolutions of the granulator matrix:
ωр = 750 / 5.625 ≈ 133 (rpm)