The samovar is a symbol of home comfort, warmth and prosperity, known since the time of Peter the Great. Modern products that run on electricity do not provide much value. Heating devices (coal and kerosene) are of much greater interest. The restoration of samovars will help you feel the life and mood of your ancestors, which will breathe a second life into your grandmother’s dishes. However, prices for this service are not always affordable, since craftsmen consider such items to be antiques. Armed with tools and patience, you can repair your family heirloom yourself.
Why restore a samovar
If you have an old samovar in your family or you are lucky enough to purchase it on occasion, it makes sense to restore it and thereby extend the life of the samovar at least 2 times, for example from 100 to 200 years, and after 100 years by the same amount, and so on to infinity. I do all types of restoration, turning old and simply worn or tired samovars into vigorous, working and beautiful ones. The samovar is the spirit of home, wonderful summer (although tea tastes even better in winter!), family and family traditions. In this regard, a family, hereditary samovar is simply priceless - and although the restoration of a samovar with a large number of lost parts is comparable to the cost of a new one - your great-grandmother, the bride of a young cornet or maid of honor at the court of the last empress, drank tea from it.
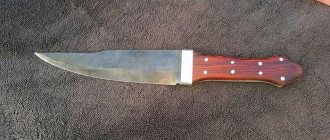
The samovar is simple, restored, from the 70s of the last century.
As for repairing a samovar for sale, you need to calculate the cost of repair and compare it with the cost of the entire model. Since the price of cleaning, soldering, etc. is the same, but the samovars themselves differ in price tenfold. In this case, you can try to determine the price of the samovar yourself, using my list of what increases the price of an antique samovar and by how much. You can also bring a samovar and estimate the cost of repairs and a restored samovar. If you return the samovar for repair, the assessment is free. Otherwise - 300 rub. Here you need to keep in mind that for a private person (not an antiques store), the cost of selling a samovar and buying the same one can differ by 50-30%.
The same is true with antique lamps, sconces and other items.
Video
Gramophone
21-05-2009 16:35
Maybe someone can tell me? We have a copper samovar, everything is fine, we use it sometimes, but one problem is a small leak at the place of the soldered seam in the bottom, where the firebox is soldered. There are no obvious cracks visible, it is overgrown with scale, and sometimes it starts to leak, especially after use. The hand doesn’t go through and it’s a bit deep, otherwise I would have found a way to fix the leak - a small 3-liter samovar. Can anyone tell me what can be done if you have experience. Maybe you can fill in something so that this crack will heal.
hohot
21-05-2009 18:52
IMHO, it's better to trust the professionals. Of course, it will cost money, but if the thing is expensive......
Micro
21-05-2009 20:27
You need to solder. The downside is that the place is difficult to access... Either put up with the leak, or look for the guy “I’m puddling, I’m soldering, I’m fixing pots.”
Escarabajo
21-05-2009 21:22
And solder with food grade solder
hohot
21-05-2009 21:56
The following problem may arise: Samovars are usually nickel-plated. White shiny coating on top of a brass samovar. If you solder, the nickel plating will be damaged in places where the metal is very hot. Therefore, usually restored samovars have a brass shine. The nickel plating is removed from them, then tinned, then polished. Naturally, this doesn’t come cheap because it’s done by professionals in factory conditions. Finding a guy, IMHO, is also expensive, but there are fewer guarantees or no guarantees at all, it depends on your luck. Although there are certainly guys with really “golden hands”, it will be more difficult to find a handicraftsman than, for example, to order a restoration from a factory in Tula. The question is financial, unfortunately no one is looking for and digging information on their samovar
zavarow
21-05-2009 21:57
I believe that self-repair should be carried out in two stages: 1. Remove scale 2. Soldering The first stage - you can use a solution of citric acid (boil it in a samovar or pour boiling water over it and let it sit for a while). Topicstarter is concerned about the safety of the tin on the walls (when removing scale, for example, with “anti-scale”), I believe that citric acid will not do anything bad to the walls. Personally, I clean the kettle by boiling a vinegar solution - it removes scale well, but I don’t know whether the tinning on the walls will remain intact, so I don’t discuss vinegar. As for the second stage - soldering - I’m not very good, unfortunately. In your mind, you should probably heat the ENTIRE samovar (with pieces of tin in the right place), and the tin will disperse there. It may be possible to heat it locally (for example, with a blowtorch), but there is no experience... Solder seems to be not needed here - it leaks at the old solder joint, maybe just heat this place, it will be sealed. That's what I think, I will be glad to criticize, You also need to study, maybe it will come in handy.
Pan horunji
07-06-2009 19:15
They posted the photo, maybe then they would have heard more practical advice.
fabokon
19-06-2009 12:26
Vague memories from childhood. Tula samovar, with a bunch of medals. The leak seemed to be in the same place as yours. One of the handy relatives literally melted a tin block in a crucible and carefully poured the entire seam through the upper neck. Subsequent many years of operation showed that the option was the only correct one, nothing leaked.
What is most often repaired in samovars?
Samovars living life to the fullest are like children. Something is always happening to them - either the handle will be broken, or the lump will fall off (the lump in a samovar is the wooden “pimples” that are used to remove the lid from the samovar). Samovars differ from children only in that when they fall with their foreheads on the floor, they do not fill with bumps, but acquire bulges. What do samovars most often bring in for repair:
The samovar is missing handles
The shortage of handles can be dealt with in the following ways - either by supplying a normal version of four turning parts, or a simplified one - from one screwed on with a self-tapping screw. A simplified version, like on modern samovars, will last a year and fall apart, the full version will last 100-150 years. That makes all the difference. The photo shows the full version of the pen, it will cost 2000 rubles. I always adhere to this principle - to restore parts in all their beauty, in full functionality - in all restorations.
Complete restoration of the samovar handle will last another hundred years
Diagnostics and determination of the type of heating element
Before purchasing and replacing a heater, make sure that it was the one that caused the malfunction of the samovar. To do this, it is enough to visually inspect the spiral.
Most often, the following external changes indicate burnout:
- appearance of a crack
- tube swelling
- color change border
Next, in order to select the required set of tools and sequence of actions, we determine the type of heating element. To do this, unscrew the bottom cover (bottom), remove the leg and look at how the heater is attached to the body. Heating elements are divided into 2 types, which differ in the type of fastening:
- with nut connection
- with pin connection
Thick layer of scale
Scale forms or does not form depending on the hardness of the water. In St. Petersburg, for example, the water is soft - but this only applies to tap water. Water extracted from a well can vary from soft to very hard. When heated in a samovar, hard water releases a layer of scale, which is deposited on the walls, the jug, and primarily on the jug (sometimes called the pipe). Scale also settles on the walls, only more slowly. The samovar is heated many times - and each time scale is added. The only way to get rid of it is to pour drinking water from a bottle into the samovar. But this is not always possible.
A thick layer of scale must be removed with hydrochloric, orthophosphoric acid or caustic soda
The scale itself is not terrible. But it accumulates. You can get rid of it by simply boiling the samovar with anti-scale agent. And rinse. But old scale does not disappear and can only be removed in a workshop using hydrochloric acid. But, firstly, acid is not available for free sale, as it is a very dangerous, toxic liquid. It needs to be diluted. Water. In a certain proportion. The thicker the scale, the longer you need to keep it. in solution. Only experts with many years of experience can determine this by eye. Often the samovar has to be disassembled for this. You can easily strip a samovar of its protective layer of tin. Then you will have to tin the samovar.
Scale is also removed with orthophosphoric acid. It is found in Coca-Cola. Try boiling a samovar with Coca-Cola. A particularly thick and durable layer is removed with a solution of caustic soda (only with an extract, this is a particularly toxic liquid). It’s easier, of course, to have it repaired - descaling costs from 1,500 to 3,000 rubles.
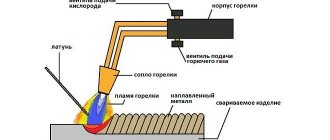
How to solder brass: methods, review of materials, instructions
An alloy of copper and zinc, known since ancient times, is widely used in our time. Brass has high strength, is resistant to corrosion, and is ductile. Thanks to these properties, it is used to make parts of mechanisms and structural elements that are forced to constantly come into contact with aggressive environments.
Despite the reliability of the material, brass products sometimes develop various defects that require repair - breaks, holes, cracks. One way to restore elements is soldering. This process is not very complicated, but it has its own characteristics, so it is extremely important to know how to solder brass.
Familiarity with soldering technology will allow you to successfully carry out such work even at home.
What are the features of the technology?
This method of producing permanent joints is not as popular as welding. The reason is lower solder strength.
Seams are formed by melting a filler material called solder. The most important difference between soldering is the melting temperature, which should be lower than that of the elements being connected.
They do not change the state of aggregation, which makes it possible to reliably fasten dissimilar materials.
The low-temperature effect on the surface to be soldered has made soldering indispensable, and in some cases the only possible: for example, when it is necessary to obtain a permanent connection of dissimilar metals.
The integrity of the processed parts is the main advantage of such a technological operation, since it allows you to work with the smallest elements without fear of their deformation or change in structure.
Soldering is especially relevant in electronics, where you have to work with miniature, very fragile microcircuits, and in electrical engineering, when there is a need to connect or extend conductors.
Classification of brass alloys
Brass can be double or multi-component. In the first case, the composition includes only copper and zinc, which increases the hardness of the alloy.
Other components that improve its physical and chemical characteristics include aluminum, iron, silicon, manganese, nickel, tin, lead and other elements.
For this reason, it is necessary to know exactly the composition of brass in advance; this will help determine the method, as well as the specifics of soldering.
Brass is classified according to its chemical composition:
- Two-component (double, simple). It consists only of copper and zinc. The percentage of these components may vary. These compositions are marked with the letter “L” and a number, which always indicates the amount of copper. For example, L90 contains from 88 to 91% copper, zinc accounts for 8.8-12%. There are impurities, but their amount is minimal - about 0.2%.
- Multicomponent (special). This brass has a large number of ingredients that increase the corrosion resistance of the alloy, its strength, and hardness. It is marked differently: another one is added to the letter “L”, meaning the alloying element, and another number appears - the percentage of alloying metal. For example, LA77-2 is aluminum brass, it contains 77% copper, about 2% aluminum, and the rest is zinc. All such alloys are named after the alloying element: ferrous, silicon, nickel, manganese, lead, etc.
Brass is used to make various products. According to the degree of processing, these alloys are divided into:
- deformable, they are used to produce bolts, nuts, car parts, brass strips, sheets, wire, pipes, pipes;
- foundry (fittings, bushings, instrument parts, bearings, car hydraulic system fittings).
Based on the percentage of zinc, brass is divided into:
- Red (tompak), containing 5-10% of this component. Such alloys are ideal for jewelry, figurines and similar artistic products.
- Yellow, here the percentage of zinc is 21-36%.
The reason for the popularity of brass is its durability, reliability, resistance to temperature changes and mechanical stress.
Therefore, parts made from this alloy are widely used in water supply systems, sewerage systems, and in mechanical and instrument making.
Brass products have a long service life, but this is only true if their operating rules are not violated.
Efficiency and obstacles
There are several technologies that allow you to easily weld parts or products made of brass, but they are not simple, promise significant costs, and require certain work skills from the master. Soldering is an alternative that is technologically simpler, which means this option is also suitable for a home craftsman, since there is no need for a highly qualified performer.
If the zinc content in the alloy is not too high, then there are no insurmountable obstacles on the way to the goal: simple soldering using ordinary rosin can cope with the task. When the percentage of this metal in brass exceeds 15, special fluxes are required.
The reason is strong evaporation during soldering of copper and zinc; it leads to the formation of a strong oxide film on the material, and it is quite difficult to remove it. Therefore, without special solders and neutralizing fluxes, an ideal result cannot be achieved.
Selection of optimal materials
Before looking for the best option for soldering brass, you need to determine its brand. Only in this case can an acceptable result of the operation be guaranteed.
Choosing the right solder
This is the material, usually an alloy, that is used to solder the elements. its peculiarity is its melting point, which must be lower than that of the metals being joined. Typical examples of alloys are tin and lead, pure tin.
However, the quality, mechanical strength of such a clutch and appearance are very far from ideal. The reasons for poor quality are pores that appear as a result of zinc evaporation.
To ensure reliable contact, the melting temperature of the material must be significantly lower than brass, and the solder must have excellent adhesion to this alloy.
- For soldering brass containing a large amount of copper, it is better to take compositions related to copper-zinc solders, since as a result of the addition of zinc, the melting point of these alloys is reduced. For example, PMC54 and PMC-48 solders melt at a temperature of 880°, PMC-36 - at 800-825°.
- For the same alloys, you can use silver solders - grades from PSr12 to PSr72. If brass has a higher zinc content, then similar solders are recommended, but not lower than PSr40.
- Relatively inexpensive copper-phosphorus solders are MF-1, MF-2, MF-3. They are plastic, but have good electrical conductivity. If the mechanical and vibration loads are high, then it is better to purchase solders with silver.
- If it is necessary to guarantee special strength, then hard copper alloys are chosen: for example, the universal L-CuP6.
The latest brand of solder has a temperature range of 710-880. It is designed to work with bronze, red bronze, brass, as well as copper, when installing pipes, radiators, and heating systems. When using silver or phosphorus solders, it must be taken into account that brass dissolves rapidly, so the processing time (heating and soldering) must be reduced.
Fluxes: homemade or ready-made
Fluxes clean the surface of metals from grease and also prevent the formation of an oxide film. They are also selected depending on the composition of the alloys.
For copper compounds, rosin alone is sufficient, but for brass a more aggressive agent is already needed. The simplest flux option for soldering brass is a mixture of borax and boric acid (1:1).
It is poured with water (5 mm per 1 g), boiled, stirring, then cooled. However, the best characteristics are possessed by “professionals” - purchased compounds.
- Borax flux. He has been known for a very long time, but since then he has not lost his fans. The reason for its popularity is its high-quality work.
- Other brands are no less effective: PV-209 (from 700 to 900°), PV-209X (from 650 to 850°).
Popular imported brands are German powders FELDER Cu-Rosil, Chemet FLISIL-NS-Pulver, flux paste Chemet FLISIL-NS-Paste. There are many fluxes on the market designed for soldering brass - both imported and domestic, so there will be no problems with the choice.
Two methods for soldering brass
As already noted, the biggest difficulty in working with brass is the formation of an oxide film when heating the alloy, which rosin (even in combination with alcohol) cannot cope with.
Using a soldering iron
To solder this alloy, you need a powerful device - at least 500 W, maximum - 1000 W. This requirement is associated with the high melting point of both the alloy and the solders.
However, there are exceptions: these are brass alloys that have a lower melting point (a large percentage of copper). The best option is a soldering station, which makes it possible to regulate the heating of the soldering iron tip. The optimal setting is 350°.
This equipment will avoid overheating of the soldering area.
If copper predominates in the alloy, then in this case you can use a tool of modest power - 100 W. Phosphoric or soldering acid is used as a flux: before soldering, the surfaces of brass products are carefully treated. POS-60 (tin-lead) is used as solder.
Soldering with a torch
The same problem can be solved using a not too large burner. But in this case there is a main requirement for the working surface: the brass part must be placed on a heat-resistant material.
For example, on a small asbestos plate, in an iron bucket with small pebbles. The parts to be joined are combined with each other, the surfaces are wiped with flux and a brown base.
A small amount of silver solder shavings are sprinkled on top, then a gas burner flame is introduced into the soldering zone.
Warming up is carried out in stages. First, the area is heated slightly so that the solder can adhere to the surfaces of the alloys. The second stage is heating the area until redness appears, during which the solder spreads evenly over the surface, filling the gaps. At this moment, a temperature of 700-750° is reached.
The burner is turned off. After the soldering area has cooled, it is washed, removing flux residues - sagging, glassy drops: first, the product is immersed in a hot solution of sulfuric acid (3%) for several minutes, then placed under running water.
These methods differ from the traditional joining of other elements with tin, since brass is not as easy to solder. The best results are guaranteed by using a gas burner. If you perform all stages of the operation correctly, you can obtain high-quality and reliable products.
The following video addresses this burning issue:
The pipe is leaking
Water seeps into the inner pipe, soaking the wood burning inside it. There are only two reasons. Or 1 - they forgot the samovar, it burned out, all the water evaporated, the wood continued to burn and the samovar broke down. Reason 2 - the grate rusted, swelled and burst the jug from the inside. Usually the grate worked for 50-100 years before this, but its time passed and it fell apart. We received samovars without a grate at all in our workshop - the fragments of their former luxury spilled out. This problem is solved in the same way - the pipe is desoldered and soldered again. This is if the grate is alive (5000-6000 rubles). The operation is called desoldering, reassembling, soldering. If it is necessary to change the grate, then a new one is inserted and rolled into the pipe from below. The samovar is soldered (2000-2500 rub.) If cracks have formed in the pipe, they are all sealed (1500-3000 rub.)
The new grate is made of steel, which greatly reduces rusting.
DIY repair methods
Restoring a samovar is a painstaking and difficult process. If you are not interested in the appearance of the product, you can eliminate some of the causes of broken dishes at home. Only specialists can restore a samovar without losing the beauty of its body. The following tools and additional materials may be needed to restore the product yourself: tin, hammer, abrasive, sandpaper, tow.
Stages of repair at home:
- restoration of the hull (patching cracks, eliminating leaks, straightening (removing corrosion);
- cleaning the product from the inside (descaling, tinning);
- replacement of parts (if necessary);
- improvement of appearance (polishing).
Hull restoration
If there are dents on the samovar, you can straighten the product yourself. To make it easier to correct unevenness, it is recommended to unsolder the free pipe. This simple technique allows you to freely place your hand, as well as tools, inside the samovar. In this case, a wooden block will perfectly play the role of an anvil. To level the body, you need to use a rubber mallet and measure the impact force so that the dent is straightened. It is better to straighten the product by weight, so the pressure will not be transferred to the body of the samovar.
Cracks in the housing can be soldered if a torch is available. Often the samovar splits from the bottom of the flame tube and, as a result, begins to leak. Restorers recommend soldering the body of the product from the inside - this way the seam will be barely visible.
Faucet repair
Grinding in the faucet is quite possible at home. If it leaks from the bottom of the product, it means that the key is located high in it. Conclusion: it needs to be lowered lower, having been treated with lapping paste beforehand. Next, the samovar is filled with hot water. Use smooth circular movements to turn the key in the tap until the liquid stops dripping. If it does not open at all, the mounting hole can be treated with a “liquid key”. After the time specified in the instructions, you need to lightly hit the stuck part of the structure with a hammer.
After the repair work has been completed, it is advisable to rinse the samovar several times with diluted citric acid so that the remaining abrasive does not get into the tea.
Lubricate the samovar key with lapping paste
Then insert the key into the faucet. Fill the dishes with hot water
You need to turn the key several times
Ready
Replacing internal elements
There is a large assortment of faucets for samovars on sale, so replacing this accessory is quite simple. An important step in this matter is to correctly measure the parameters of the part. After purchase, you should lubricate the faucet with vegetable oil or Vaseline. This technique increases the service life of the product.
The grate bars in the samovar often fail. Before replacing the part, it is necessary to desolder the pipe. Its lower part should be checked for cracks. After these steps, a new grate is placed in the pipe and the body is cleaned. Next, the remaining parts of the samovar are installed in their places.
Replacing the faucet
Soldering the pipe
We mount the grate and solder the pipe back
Tinning does not cover the entire interior
The food-grade tin layer does not cover the entire internal surface, but it does cover it partially. Among the internal cavities there are parts not coated with tin. Direct contact with metal, from which, most often, the samovar itself is made. But copper or brass should not come into contact with water. This causes them to become covered with toxic corrosion. This is a rare defect, but possible. Tinning a samovar from 4 to 10 liters costs 5000-6000 rubles. Tin itself, of the required purity, costs about 4,000. Tin most often comes from Indonesia and is traded on the London Stock Exchange. It is also used for soldering samovars. In stores, most often there is 40-60 percent tin - it is not suitable for tinning samovars.
Tinning a samovar involves removing the leaky tin and replacing it with a new one
Sample No. 1
The samovar is a symbol of home comfort, warmth and prosperity, known since the time of Peter the Great. Modern products that run on electricity do not provide much value. Heating devices (coal and kerosene) are of much greater interest. The restoration of samovars will help you feel the life and mood of your ancestors, which will breathe a second life into your grandmother’s dishes. However, prices for this service are not always affordable, since craftsmen consider such items to be antiques. Armed with tools and patience, you can repair your family heirloom yourself.
The main problems that may require restoration are: the appearance of dents, distortions, scale, loss of shine, the need for tinning or replacement of parts. If you purchase a tea maker second hand, you should carefully examine its internal condition. Even with no external defects, the samovar can leak. The cause is barely noticeable microcracks. In this case, restoration work on the metal product should be carried out immediately.
The brass alloy releases oxides that are harmful to the body. To prevent them from getting into the water, the internal cavity of the device must be coated with special food-grade tin (cleansed of lead and other metal impurities).
In addition, a leaking samovar is dangerous because indelible rust appears in place of the cracks. Its pores contain a large number of bacteria harmful to the human body. Iron is also present in high concentrations in water with rust. Regular consumption of such liquid will affect the functioning of the kidneys and liver. Metal in large volumes is poorly excreted from the body, so poisoning is inevitable.
In the old days, they did not know how harmful lead was to the body. The craftsman soldered dishes using this metal, without thinking about the consequences.
Lack of ash pan in the samovar
Another equally common defect is the absence of an ash pan. If you turn the samovar over in place of the ash pan, you will most likely see a gaping hole. Ash from the firebox directly pours onto the snow-white washed tablecloth. Despite its simple name, the ash pan is an important and complex technical detail. The thing between the grips in the photo consists of two halves, a rotating rod and two figured nuts. Restoring the ash pan - with a lid, a rotary hinge, a lock, costs (only!) 2,500 rubles. When the samovar boils, this valve releases steam, opening slightly and whistling melodiously. From the hanging rigging - this is a burner on which a brewing kettle is placed (2000 - 4000 cast as in the photo).
The folding ash pan of the samovar will indicate readiness with a melodious whistle.
How to solder a brass samovar. Methods for restoring a samovar, useful tips for beginners
Despite the variety of shapes, samovars are designed the same.
Each samovar consists of the following parts:
- Wall (the main part of the samovar, where water for boiling is poured)
- Jug (inner tube in a samovar where fuel is placed: pine cones, branches, wood chips, coals)
- Circle (cast ring that is located on the top of the wall)
- Neck (bottom of the samovar)
- Pallet (base of the samovar)
- Pens
- Repeek (shaped plate attached to the wall of the samovar, into which the tap crashes)
- Branch (faucet handle, which can come in a wide variety of shapes and decorations)
- Cone valve
- Donyshko
- Dushnichok (hole on the lid of the samovar for releasing steam when boiling water)
- Bearings (nails for attaching wooden cones)
- Burner (device for installing a teapot and for carrying out air flow if the burner is closed with a lid)
- Plug (cap to close the jug)
So, a samovar is a solid thin-walled vessel, which is pierced vertically by a pipe, from the firebox to the burner. Fuel is added through the pipe. The pipe expands at the bottom. The firebox is attached to the bottom of the samovar at some distance from the table surface. This ensures stability and fire safety.
Air passes through the grate into the pipe and naturally rises, creating draft in the firebox. A tap is located at a short distance from the bottom. In village huts, the samovar pipe was connected using an L-shaped pipe to a chimney, which provided draft.
In cases where the fuel or weather was damp, the samovar had to be inflated. This can be done through holes in the walls of the firebox, or using a boot, the so-called “peasant method”, which was put on the samovar pipe. When the water begins to boil, a teapot is placed on the burner. The thrust slows down.
The water slowly comes to a boil while brewing tea.
(Source Wikipedia)
Repairing samovars at first glance may seem like a simple thing, but this is only at first glance. We carry out almost any work on repairing samovars, from ordinary soldering of cracks in the body (walls) to complex work such as replacing grates and repairing the internal pipe (jug).
Sample No. 1
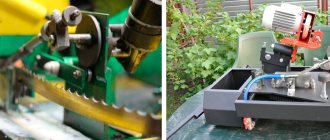
Sample No. 1 required complex repairs, since its jug was rotten at the bottom and had a lot of damage on the walls in places where the metal was drawn, where the walls are very thin. We weld all heat-heated parts using 800-degree solder. Also in sample No. 1 the spout and handles needed soldering.
Sample No. 2
Sample No. 2 was, dare I say it, torn into pieces by some “specialists” (it was in this form that it came to us). The samovar initially had a rolled neck and base, which were simply torn off (it is not clear why, because the reason for the customer's request was simple - the jug was leaking).
We had to weld all the torn parts using PSr-45, since the burning temperature of the wood can heat these parts well above the melting point of the tin solder.
The inner pipe (jug) was sealed with carbide tin solder, and then covered with food grade POS-90 solder for health safety.
Photos in the album
"Samovar Nickel"
Hookahs
Hookah (pers. قلیان - ghalyân, ghalyun) is a smoking device that allows you to filter and cool inhaled smoke. The role of a filter is played by a vessel with water, wine or other liquid.
A smoking cup is inserted into the vessel, connected to a pipe, the end of which goes under water. Above the water level, another tube extends from the vessel, to which a stem is attached.
When smoking, a vacuum is created in the hookah vessel, due to which the smoke rises through the liquid and enters the smoker’s lungs through the pipe with the shank.
Hookah was invented in India and quickly spread throughout the Muslim world, from Indochina to Morocco. In Europe, it gained a certain popularity in the 19th century, due to the fashion for oriental exoticism. In Russia, hookah is easy to purchase in any oriental souvenir store.
Source Wikipedia
Replacing parts
The samovar may be missing all sorts of different parts - the crown (burner), plug, handles for the plug, burdock (connects the tap to the body), the base of the neck. They are either crooked to the point of impossibility or lost. Instead of these parts, new or old ones are installed. Typical body parts are mostly cast from brass according to old models - they cost from 2000 to 6000 (if you have a samovar of a rare shape, all the parts need to be cast).
When the samovar boils, the steamer releases excess pressure
To be continued - the story about the main breakdowns of the samovar and repair methods will be expanded
I restore not only samovars. In my workshop we can restore, patch, and solder virtually any piece of decorative and applied art or household utensils made of non-ferrous metal. If you have a firm goal of repairing an antique or simply dear to your heart metal product and you are interested in the technical details of the order, welcome to the Samovar Repair in St. Petersburg page. There is complete and specific information about opportunities, prices, and deadlines.
Alexey Oreshkin
Bringing back the shine
Both during storage and with regular use, samovars become darkened and become dull. Restoring their presentability is not a difficult task, although it is painstaking.
- Metal Polish polish from the German company AUTOSOL is suitable for samovars made of aluminum, brass, copper and stainless steel. In addition to cleansing from everything foreign, it forms a film that protects against the appearance of new traces of the effects of time. True, it is quite expensive.
- For samovars made of cupronickel, the Israeli “Metal Cleaner” is more suitable. However, this polish is also suitable for any non-ferrous metals. In addition, it costs much less than the German offer. The only drawback is that it will require finishing with GOI paste, which costs a penny.
If the layers are too thick, no paste may help. In this case, you will have to resort to grinding, which is not very encouraging: the strength of the metal decreases somewhat, and excessive diligence will lead to the appearance of a hole in the side.