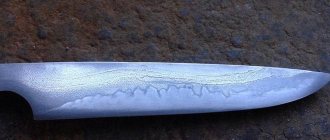
Experts in the knife craft manage to make blades out of anything. There was a piece of iron lying around in the barn - a couple of days of work, the blade was ready. Not being surprised by such people is simply nonsense. Invariably, individual products turn out to be works of art. And the knife made from springs looks unique in its own way. Let us sanctify the theme of the painstaking work of the master.
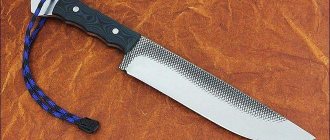
Homemade knife made from springs.
What is special about a knife made from a spring?
The reason for the popularity of such a product as a spring knife lies in the properties of the metal. High wear resistance and strength combined with high ductility have allowed many generations of craftsmen to use springs as the main source of raw materials.
Characteristics of spring steel
The springs are made from spring steel 65G, but other grades can be used: 50HGSA, 50HGA, 50HFA. These are also spring steels - it is possible to determine which of them was taken as the material for the blade only through chemical analysis. Or according to the nuances of the behavior of the metal during processing, but only experienced craftsmen can handle this. For a novice manufacturer, the difference between the listed materials will be almost invisible.
Subsequent release technology
As already indicated, to obtain the sorbitol structure, products made from 65G steel are subjected only to high tempering at temperatures of 550...600 °C, with cooling in still air. For particularly critical parts, an additional low holiday is sometimes carried out. Its temperature range is 160...200 °C, followed by slow cooling in air. This technology avoids the accumulation of thermal stresses in the product and increases its durability. For tempering, you can use not only flame, but also electric furnaces equipped with devices for forced air circulation. The holding time of products in such furnaces is from 110 to 160 minutes (increased time standards correspond to parts with complex configurations and large cross sections).
It is not recommended to use water and aqueous solutions of salts as working media when hardening 65G steel. The acceleration of the cooling process caused by water is often accompanied by uneven calcination.
The final quality control of hardening consists of assessing the macro- and microstructure of the metal, as well as determining the final hardness of the product. The surface hardness of products made from 65G steel should be within 35...40 HRC after normalization, and 40...45 HRC after quenching with high tempering.
If you find an error, please select a piece of text and press Ctrl+Enter.
Application of spring steel
65G is considered one of the cheapest spring steels. At the same time, it has a number of unique properties that make it indispensable for creating springs. Spring steel for a knife contains chromium, nickel, manganese, and silicon. These elements provide the properties for which manufacturers choose this particular material:
- good flexibility;
- high impact strength;
- hardness;
- wear resistance;
Heat treatment plays a big role in improving the qualities of the material. The steel becomes stronger and its hardness increases. Unfortunately, it is not resistant to corrosion and tends to rust. But the advantages outweigh the disadvantages and it is often used as a material for a blade.
Such knives are used in a variety of fields. First of all, as kitchen utensils - strong, durable, durable - what else is needed for daily work in the kitchen and, for example, for cutting meat? The same considerations forced hunters, fishermen and tourists to try to get this high-quality “homemade product” into their arsenal. Therefore, many craftsmen made tourist and hunting knives for sale.
Due to the good characteristics of the steel, these knives were popular among the military. Conscripts who had access to tools for metalworking made army knives in makeshift conditions. Over time, manufacturers began to aim at more serious products: axes, swords, machetes, katanas. Due to their good toughness, spring steels are excellent for forging. Forging can be used to make a blade of any shape, even the most bizarre.
Heat treatment of steel 65G
Structural high-carbon steel grade 65G, supplied in accordance with the technical requirements of GOST 14959, is a steel of the spring group. It must combine high surface hardness (for which up to 1% manganese is added to its composition) and increased elasticity. All these characteristics are ensured as a result of proper heat treatment of products made from the steel in question.
Initial chemical composition of steel and requirements for parts made from it
Belonging to the category of sparingly alloyed steel, 65G steel is relatively cheap, which makes it widely and effectively used. Among its main components are:
- carbon (within 0.62...0.70%);
- manganese (within 0.9…1.2%);
- chromium and nickel (up to 0.25...0.30%).
All other components are copper, phosphorus, sulfur, etc. – refer to impurities, and are allowed in the chemical composition of this material in quantities limited by the state standard.
With sufficient hardness (for example, after surface normalization it should be at least 285 HB) and tensile strength (not lower than 750 MPa), 65G steel has a fairly high impact strength for its class - 3.0...3.5 kg∙m /cm 2. This makes it possible to use the material for the production of critical parts of lifting and transport equipment (in particular, running wheels of overhead cranes, rollers), as well as spring washers and springs for non-critical purposes.
It is worth noting that spring parts made of 65G steel are poorly welded and cannot withstand periodically occurring tensile stresses (relative elongation does not exceed 9%), and therefore cannot be used in one-piece structures of machines and mechanisms. When carrying out cold plastic deformation processes, steel becomes very low-plasticity even at small (up to 10%) deformations, therefore, if it is necessary to manufacture large-sized springs from it, it is necessary to use heating of the original blanks, even for sheet stamping. However, even in the hot state, the maximum degree of deformation of 65G steel does not exceed 50...60%.
Chemical composition of steel 65G
Despite the fact that during strain hardening the ultimate tensile strength of the material increases to 1200...1300 MPa, these indicators are not enough to give the final product (for example, springs) the necessary operational strength. Therefore, quenching and tempering of 65G steel is mandatory.
How to make a knife from a spring
Making a knife from a spring can take a lot of time and effort, especially if a person is doing it for the first time. But spring steel lends itself well to processing and will “tolerate” the mistakes of a beginner, so it is best to create your first knife from it.
Typically, the material is found outdoors: on the street, in car depots, next to garages, in car dumps and other similar places. Therefore, the spring may be covered with dirt and rust and must be thoroughly cleaned before work. If it is necessary to straighten a bent spring, then it is heated until red-hot, and then allowed to cool under normal conditions - at room temperature.
Cleaning method for large areas of rust. Rusty, wobbly table saw
1980s Craftsman table cutter purchased at church auction for $80
An iron cutting machine that will be placed in an unheated garage, store or barn will sooner or later rust. Condensation settles specifically on iron and metal parts because they are cooler than the surrounding air.
Rust makes it difficult for a piece of plywood or wood to slide on a table that should be smooth and non-abrasive. This makes it more difficult to position the blade or adjust its tilt. This 1980s Craftsman table, purchased at a church auction for $80, is about to get a second life. Oh, so they will resuscitate him.
First, the saw table top was removed from the bed. Then they loaded her into a Ford F-150 and took her to a warm workshop for the upcoming work.
INSTRUMENTS GET tarnished, and when they become dull, they are put aside, and when they are put aside, they begin to rust.
Next, we began dismantling the old tools: we unscrewed the cast-iron wings on each side of the saw and removed the engine.
The excellent news was that the engine turned out to have 2 capacitors: one to start rotating the motor, and the other to provide an additional push to start the winding. It's more reliable. The electric motor itself, the motor shaft and pulley were in good shape. Before the rust work began, all dirt, sawdust and net were removed from the nooks and crannies of the saw.
The work for which everything was started has begun.
Next on the agenda was removing surface rust from the saw table top and fenders.
To do this, the rusty surface was first moistened with kerosene - it acted as a solvent and coolant (cutting water). After leaving him alone for an hour, the restorers returned with a drill.
In order to clean off the rust , an abrasive nylon brush with 240 grit aluminum oxide was clamped into the fists of the drill. At low speeds of about 500 (the drill must have an adjustable rotation speed), moving forward and backward, the brush cleaned off the rust without much difficulty without damaging the iron surface.
Be prepared for the fact that the removed parts may not fit back into place. Specifically, it came out with wings that expanded the tabletop - it was impossible to align them with the plane of the tabletop. They had to be carefully tapped until they fit into the grooves in the required position. The main thing here is not to rush.
Don't forget to put all the parts back when reassembling. In the case of a saw, we are talking about an electric motor, a brand new saw blade and other small elements that have been put in their rightful places.
The method of getting rid of rust is not for everyone: hydrolysis in the fight against rust from video blogger Mizantrop
How to make a knife from a spring using forging
All spring steels, including 65G, have one quality in common: they are perfectly forgable. Knives made of spring steel, made by forging, will be more reliable and durable, because during the processing process the metal is strengthened due to plastic deformation and changes in the macrostructure.
Before forging the spring, it is necessary to cut out the profile of the future blade from it. Then the workpiece is securely fastened and heated until red hot. Forging creates a point and blade. This method makes it easy to give the blade the required shape, as well as set its width. Spring forging is good for making axes and various exotic things, such as a machete or sword.
The blade is allowed to cool to ambient temperature after the job is completed.
How to harden steel over an open fire
As mentioned above, you can harden steel at home, using an open fire for heating. Naturally, such a process should begin by starting a fire, in which a lot of hot coals should form. You will also need two containers. You need to pour mineral or synthetic oil into one of them, and ordinary cold water into the other.
In order to remove hot iron from a fire, you will need blacksmith tongs, which can be replaced with any other tool of a similar purpose. After all the preparatory work has been completed, and a sufficient number of hot coals have formed in the fire, objects that need to be hardened can be placed on them.
The color of the formed coals can be used to judge the temperature of their heating. Thus, coals whose surface has a bright white color are hotter. It is also important to monitor the color of the fire’s flame, which indicates the temperature regime in its interior. It is best if the fire flame is colored crimson rather than white. In the latter case, indicating that the flame temperature is too high, there is a risk of not only overheating, but even burning the metal that needs to be hardened.
Heated steel colors
The color of the heated metal must also be carefully monitored. In particular, black spots must not be allowed to appear on the cutting edges of the tool being processed. Blue discoloration of the metal indicates that it has softened greatly and become too flexible. It cannot be brought to such a state.
After the product has been calcined to the required degree, you can proceed to the next stage - cooling. First of all, it is lowered into a container with oil, and this is done often (every 3 seconds) and as sharply as possible. Gradually the intervals between these dives increase. As soon as the hot steel loses its brightness, you can begin to cool it in water.
Steel tarnish colors
When cooling metal with water on the surface of which droplets of hot oil remain, care should be taken, as they may burst into flames. After each dive, the water must be agitated to ensure it remains cool at all times. A training video will help you get a clearer idea of the rules for performing such an operation.
There are certain subtleties when cooling hardenable drills. So, they cannot be lowered flat into a container with coolant. If you do this, then the lower part of the drill or any other metal object that has an elongated shape will cool sharply first, which will lead to its compression. That is why it is necessary to immerse such products in coolant from the wider end.
For heat treatment of special grades of steel and smelting non-ferrous metals, the capabilities of an open fire are not enough, since it will not be able to heat the metal to a temperature of 700–9000. For such purposes, it is necessary to use special furnaces, which can be muffle or electric. If it is quite difficult and expensive to make an electric furnace at home, then with muffle-type heating equipment this is quite feasible.
How to sharpen a knife from a spring with your own hands
It is necessary, first of all, to decide on the appearance of the future product. The shape depends on the purpose of the knife: kitchen, hunting, souvenir or some other. As a result, the blade can be anything - this is influenced only by the imagination and capabilities of the manufacturer. If the choice is made, then you need to take a ready-made template or make it yourself from cardboard or thick paper.
Next, to make a knife from a spring with your own hands, you need to be ready to start working with metal. First, the template must be attached to a metal workpiece and traced with a marker, pencil, scriber (GOST 24473-80) or other marking tool. According to the contour obtained using the template, it is necessary to cut out the profile of the product. The following tools are suitable:
- band-saw;
- an angle grinder, also known as a grinder - it is important not to overheat the workpiece when cutting;
- drilling machine or drill - in this case, holes are drilled along the contour, then the partitions between them are broken or cut out;
- you can use hand tools;
The processing process itself is quite simple, although it requires a certain concentration to cut the workpiece in accordance with the markings. When the processing is successfully completed and the workpiece begins to correspond to the template, you can begin to form the blade. The main task is to make bevels. The blade is again marked, determining the size of the bevels. During further processing, you should strictly adhere to the markings.
Electric sharpener
For work, it is best to use an electric sharpener. A belt sander and an angle grinder are also suitable, but in the case of the latter, good command of the tool is required. You can sharpen the bevels by hand - with a file. At this point, the metal work should be completed, because then the blade will undergo heat treatment, after which it will be very difficult to do anything else with the workpiece.
Selection principles
When purchasing, you need to pay attention to a number of criteria:
- Shape, size of the blade. Kitchen tools should be sharp, thin, without additional elements. The throwing blade must have a sharp end, a balance point in the middle. Hunting and camping knives should have a wide blade.
- Purpose (kitchen, marching, combat, throwing, folding). The choice depends on the scope of use of the blade.
- Legally permitted dimensions, presence of prohibited elements. Information can be obtained from government documents.
Warblade (Photo: Instagram / sturmoff)
Advantages and disadvantages
Positive sides:
- strength;
- durability;
- reliability;
- wear resistance;
- attractive look.
Flaws:
- high price;
- large mass.
Manufacturers and cost
Manufacturers of forged knives:
- "Don Arms Factory";
- "Iron Brothers";
- "Russian Knight".
The average price is 20,000 rubles.
Blade hardening
The main type of heat treatment is hardening. It is needed so that the blade is durable and can remain sharp for a long time after sharpening. There are different methods:
— hardening, with heating only the cutting edge;
— hardening of the cutting edge by heating the entire product;
— hardening and tempering;
— full hardening;
In the first case, only the outermost part of the blade is heated to a non-magnetic state, after which it is placed in oil and kept until the oil stops bubbling. The second method is more complicated: the entire knife is heated, but it only needs to be immersed in oil by a third - so that the cutting edge is covered with liquid.
Quenching and tempering is a method in which the workpiece is cooled in two stages: first at an elevated temperature, but below the quenching temperature, then at room temperature.
The simplest method of hardening is to completely harden the blade, but with this method there is a chance that the blade will lead. Then it is necessary to straighten the damaged workpiece. This can be done either by preheating the blade or in a cold state.
Optimal technological processes for heat treatment of materials
The choice of heat treatment mode is dictated by production requirements. In most cases, to impart proper physical and mechanical characteristics, the following is used:
- normalization;
- hardening followed by tempering.
The temperature-time parameters of heat treatment and the choice of its type depend on the initial structure of the steel. This material belongs to the hypoeutectoid type steels, therefore, at temperatures above the lower point of the austenitic transformation - 723 ° C - by 30...50 ° C it contains austenite in the form of a solid mechanical mixture with a small amount of ferrite. Since austenite is a harder structural component than ferrite, the quenching temperature range for 65G steel will be significantly lower than for structural steels with a lower percentage of carbon. Thus, the temperature range for hardening steel of this grade should be within the range of no more than 800...830 °C.
Approximately the same temperature range is used to carry out normalization - a technological heat treatment operation, which is used to correct the structure of the material of the product, to relieve internal stresses, and during subsequent mechanical processing of the semi-finished product - to improve its workability.
Since the impact strength of hardened steel 65G is reduced, after hardening, products made from it, in particular springs, must undergo a high tempering. The martensitic-austenitic transformations that occur during tempering reduce the level of internal stresses arising during hardening, reduce brittleness and slightly increase impact toughness.
The transition to high tempering is excluded from the mode only when the workpiece undergoes isothermal hardening. As a result of high tempering, 65G steel acquires a sorbitol structure, the characteristic features of which are the fine dispersion of the structure while maintaining initially high hardness values, which fully meets the operational requirements.
Making the handle
A handle can be made from almost any raw material, but wood, plastic, leather, and bone are especially popular. Inlaid handles with alternating layers of, for example, leather and birch bark look beautiful.
Bone is a traditional material for making a variety of trinkets and household items. Having the skill of bone carving, you can make a unique, beautiful handle. But the easiest way is to take two wooden or plastic pads, place them on both sides of the shank and secure them together with rivets, and for greater strength, also with epoxy glue. Sometimes screws and nuts are used for fastening, but if appearance is important, then it is better not to use them.
The handle should be comfortable, so great attention must be paid to its processing. To do this, use files first and then sandpaper. If the overlays are wooden, then they must be impregnated with oil to ensure the durability of the wood. Impregnation emphasizes the structure of the wood and gives the product an attractive appearance. After fixing the handle, its final grinding is carried out.
How to return rusty old tools (three methods)
To save old instruments you will need patience, durable abrasives and good eyesight.
A forgotten instrument has an unusual power of attraction. He beckons, attracts. Take it in your hands, and the next thing you will do is scrape off a layer of rust with the nail of a huge finger, trying to discern the name of the manufacturer of this instrument.
You vaguely remember how it came into your hands: either you picked it up at a sale, or your father-in-law gave it to you, or maybe a compassionate neighbor left it as a souvenir during the move, just so as not to throw it away.
“Everyone has these little lost gems,” a friend of mine, a handsome carpenter with a penchant for collecting miscellaneous tools, once said, thoughtfully looking at a rusty hammer lying in the corner of my balcony. Planes, chisels, chisels, hammers, pliers and a whole heap of rare and strange devices for working with materials of different hardness from different countries and eras decorated his workshop.
But here’s what’s curious: all these production tools were in impeccable condition, there wasn’t even any rust on them, and the sharpening, if provided, was as if it were a new tool. They were waiting for their turn to work, their oiled sides sparkling, each in his own place. It constantly amazed me. How does he keep such old instruments in such perfect order...? I decided to find out his secret.
“It’s quite simple to return them,” said a friend, “but, unfortunately, I’m leaving early tomorrow morning on a business trip, so I won’t have time to tell you all the details. You better read about this somewhere on the Internet. You will find a huge number of good methods there.”
And indeed, I found it. I will give excerpts from one such article in this material. In my opinion, it will turn out to be a good {instruction} for the practical restoration of old instruments that have long been abandoned to the mercy of fate.
Interesting read: Is it possible to line a potbelly stove with bricks?
“We took a bunch of old instruments with us and went into the studio (a former church in North Salem, New York) to clean them up. We realized that all that was required was some basic chemistry and little effort to salvage tools that looked like they had been sitting on the ocean floor for centuries,” began an article on restoring old, rusty junk. But is it really rubbish?
The round head of this figured hammer (in the larger photo) looked deader than dead. But as soon as the rust was removed from the alloy, the rusty steel was polished to a shine, a thin layer of machine oil was applied to the alloy and a new handle was added to the hammer, and life returned one hundred percent to this narrow tool for luxurious work.
How to Clean Up Corroded Hand Tools
You can clean any iron tool from rust and oxides. It’s even unimportant how much rust has seeped into the structure of the alloy.
Here's a good example:
To get back a pile of hammer heads and a couple of hatchets, first remove all the excess from them. Half-rotten parts of handles and old handles will no longer be useful to them. Usually, in order to remove the handle, it is most convenient to hold a hammer or hatchet in a vice and knock out the remaining part of the handle with a suitable object across the diameter. Or split rotten wood with a sharp object.
Corrosion can be removed using white vinegar. Place the alloy to be processed in a plastic container, pour into it a sufficient amount of white vinegar to immerse the parts.
Depending on the degree of oxidation, leave the parts for several hours or a day.
For the second cleaning step, you will need iron wool. Please note that steel wool has eight abrasiveness classes: from the gentlest - 0000# to the most coarse - 4#. The thicker the layer of rust, the harder the version you should use, generally decreasing the abrasiveness as the rust is removed.
When there is no more rust left, carefully wash the workpieces in clean water to remove any traces of vinegar, finally wiping the parts dry.
A surface scratched during rust cleaning can be sanded using a 100-grit abrasive on a sanding disc.
Finally, the tools were wiped down with mineral spirits, primed with anti-corrosion iron primer and painted with a high-gloss alkyd enamel.
The cutting edges of the axes were sharpened by hand on a series of aqua stones used for woodworking tools.
The assembly process was completed by installing the handles and then jamming them.
Restoring a not very rusty knife
Common media for self-heating
For hardening steel at home, the following cooling media are usually used: air, water and aqueous solutions, mineral oil. 10-15% sodium chloride (table salt) is usually used as aqueous solutions, and mineral oil in home workshops is most often used as a regular engine oil. To harden individual parts of a product with different hardness, hardening with sequential cooling in two environments is used. Each of these quenching media is characterized by its own cooling rate, which directly affects the structure of the metal being processed. For example, air cools steel at a rate of 5÷10 °C per second, oil - 140÷150 °C, and water (depending on temperature) - 700÷1400 °C.