Modern products bring their owners a lot of disappointment. Ergonomic new products from popular brands are distinguished by excellent design. However, in terms of their consumer properties, they are often not much superior to cheap consumer goods. A similar disaster has not escaped the knife market. The blades of newfangled knife models quickly become dull, and the fragile cutting edges become jagged. The complete opposite would be a knife made from a bearing, which is made using especially strong steel. According to reviews from owners, the tip of such a homemade knife can scratch glass, while the metal blade cuts meat with bones without forming nicks.
Pros and cons of a bearing knife
There are a variety of ways to make knives. Springs, piston valves of ship engines, railway spikes, steel cables, saw blades, files, and drills are used as metal blanks. Fans of high-quality cutting tools will not be disappointed by a homemade knife made from a bearing.
Do not forget that according to Russian laws, according to Art. 223.4 of the Criminal Code of the Russian Federation prohibits the illegal production of bladed weapons. A special license is required for its production and sale.
Isn't it easier to cut a steel sheet from a strip of suitable thickness than to bend and flatten a thick-walled bearing ring? However, the whole point of this choice is to use a particularly strong grade of low-alloy steel. The large labor costs during the processing process are justified by the extraordinary properties of the resulting knives. The secret lies in the special chemical composition of the ShKh15 “bearing” steel, which can be judged from the table.
| Name | WITH | Si | Mn | Cr |
| % content | 0,95 — 1,0 | 0,17 — 0,37 | 0,2 — 0,4. | 1,35 — 1,65 |
You should pay attention to the fairly low percentage of chromium, which allows Cr to remain in the cementite composition. If we talk about the structure of the metal itself, it is homogeneous, which increases the ductility and toughness of the bearing metal. This allows the steel to show high resistance to crushing in products and to hold the edge of a knife perfectly. A distinctive property of steel is the ability, as a result of heat treatment:
- significantly improve strength indicators to 61-64 HRC;
- acquire high wear resistance.
Due to its high contact endurance, the knife is sharpened no more than once every six months. It is better to harden a knife made of “bearing” steel in the temperature range from 810 ºС to 850 ºС, and temper it at 160–200 ºС. The disadvantages of knives made from bearings include decarburization of the metal due to improper heat treatment and the appearance of rust spots when stored in a damp room.
Profile options
Design diagram
Steel ШХ15: what is it?
Steel ШХ15 is a carbon low-alloy chrome steel. The alloy includes main and additional components. Moreover, the latter comprise no more than 2.5% of the total.
The main components influencing the quality of ShKh15 steel are the following:
- carbon - the alloy contains quite a lot of it. Thanks to this, the steel acquires additional hardness;
- silicon - helps improve the properties of other components. Positively affects hardness;
- manganese is an auxiliary substance that simplifies the steel processing process;
- chromium - in large quantities increases resistance to rust. However, in this type of alloy its content is low. Therefore, steel is considered susceptible to corrosion.
The combination of all components makes ShKh15 steel very hard and wear-resistant. That is why initially it was used only in the production sector. It was used to make balls for bearings (the letter Ш in the name denotes this application).
Nowadays different types of knives are made from it: from hunting to kitchen. They hold an edge for a long time and do an excellent job of cutting bones and meat.
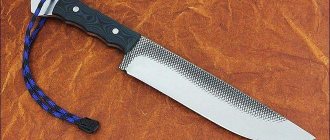
Knife “Lynx” 24 cm - 6000 rub.
Required material and tools
In addition to the bearing itself, in the process of making a knife you will need:
- wooden handles;
- brass pins for rivets;
- epoxy resin with hardener;
- oil, antiseptic impregnation for wood;
- consumables: paper, plastic tape, marker.
The oil for hardening is mineral or vegetable oil; old transformer oil or automotive waste oil is suitable. You will need copier paper in A4 or A3 format, wrapping paper for clamping the blade in a vice, and sanding paper of different grain sizes for sanding metal and wood.
It is necessary to have the appropriate equipment and tools available, as well as stock up on the following equipment:
- grinder with an abrasive disc and grinding wheel;
- an anvil or an analogue from an I-beam trim;
- hammer 4 kg, hammer 1 kg, blacksmith pliers and clamps;
- bench vise, chisel;
- furnace or forge;
- household oven;
- tabletop drilling machine;
- polishing machine;
- belt sander (grinder);
- Dremel;
- jigsaw and chisel.
Special requirements are placed on the stove; it must heat up to 1100 ºС, which is unattainable in the combustion zone of a conventional hearth. A thick-walled metal stove fired with charcoal is required. A conventional hood must be retrofitted with a supply fan.
It is best to use an abrasive disc to make it easier to cut the bearing race. A diamond coated bit will do. You should not try to use a milling cutter in the grinder - it will only slide along the surface of the hardened metal bearing.
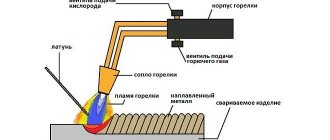
Additionally, if you do not have sufficient experience working with forging tongs, electric welding will be required. With its help, reinforcement is welded to the workpiece, which will become a convenient holder for the knife workpiece when forging metal with a heavy hammer.
If you follow the recommendations of owners of bearing knives, it will not hurt to make or purchase a special device for sharpening the tool. It will allow you to maintain a high level of cutting properties of the knife during subsequent operation.
Varieties of the Yakut knife "Sakha"
In different regions of Yakutia there are different variations in knife making. But in general terms, it is a product with a length of 11 to 17 cm and a wooden handle, all made of the same birch. They call him simply and briefly - “Sakha”. There are twelve varieties. Their names will be presented in purely Yakut language “Sakha Rear”, in brackets there is a literal translation and a small transcript:
- “Oluy bygychcha” (small blunt knife) is a blade for applying patterns on wooden products, its length is 3-5 cm.
- “Otohut bygychcha” (very small) is a tool of a doctor, a healer, with a very thin and sharp end of the blade, the length of the blade is 3-7 cm.
- “Uol oko kychchahar bygychcha” (knife for a boy) - a knife for a boy, length 7-11 cm.
- “Die bygychcha” (house knife) is a home helper with a length of 9-14 cm.
- “Tabakhyt bysaga” (for a reindeer herder) - for cutting a deer carcass, the edge of the knife is very thin and beak-shaped, the blade is thin, “delicate”, its length is 9-12 cm.
- “Kyra bult bykhaga” (small for hunting) is a small hunter’s knife, length 9-14 cm, soft hardening.
- “Balyksyt bykhaga” (fishing tool) is an equipment for a fisherman; it is quite wide, the butt is thin, the tip is slightly bent upward. The handle is made of birch bark.
- “Bult bykhaga” (for hunting) is a hunting wedge, its length is 15-18 cm.
- “Mas үүһүн byһychcha” (wood knife) - designed for woodworking, its length is 12 cm. Designed for cutting shaped parts of furniture and other wooden products.
- “Mas үүһүн byһаҕа” (large knife for wood) is a blade for working with wood, but larger in size than the previous one. Provides processing of large parts with a wide, thin blade. Strongly hardened.
- “Badaai” (large heavy knife) is a large wedge, its length is up to 25 cm.
- “Bolot byhakh” (knife-sword) - even larger and heavier, blade length up to 30 cm.
Varieties.
Small handmade blades.
Small knife.
Medium blade.
Original blade.
Large knife.
The last two types of knives are long, designed for heavy work. For example, for butchering large animals, for cutting through ice, for cutting willows, overgrowth, etc. I had to use a translator, now I can show off my new skills to my friends.
Machining the bearing and preparing the part for forging
An outboard bearing for a car driveshaft or any other with a diameter of 100–150 mm is suitable as a knife blank. For example, it is allowed to use copies of the required sizes from the axial mechanism and drive equipment of machine tools and moving units. The direct source is the most massive part of the product, called the outer race of the bearing. It is made of structural steel grade ШХ15.
There are different methods for disassembling a bearing. Since you won’t need anything other than the outer shell, and you can’t split the shell under any circumstances, we’ll use the most “humane” method - sawing the metal with a grinder. It is better to clamp the bearing in a vice and, if possible, saw the inner ring. It is better to saw the outer ring diagonally, thereby forming the nose of the knife. After cutting with a chisel, the separator is destroyed and all the insides are removed along with the balls. If required, the cut area is opened with a metalwork tool. The circumference should be 1–2 cm longer than the knife, so the extra centimeters of the workpiece are sawed off.
Making a drill
You need to select a ball that matches the diameter of the required hole. It can be taken from a new or old used bearing. To quickly remove the bearing, it is better to wrap it in cloth and break it with a hammer. The rag will prevent the balls from flying around the workshop.
A regular black wood screw will be used as the base of the drill. The main thing is that its length is enough for the required drilling depth. The screw head is ground down so that its diameter becomes slightly smaller than the ball.
A small nut is clamped in a vice and the ball is placed on it. The nut is used as a temporary stand, so the quality of its thread and the condition of the edges do not matter.
The head of the screw is attached to the ball and they are welded together.
The weld protruding beyond the diameter of the ball must be sanded off. In this case, it is important to turn the self-tapping screw in order to obtain a cylinder without corners.
The ball is then ground for a twist drill. If you need to drill a tile, then it is given the shape of a feather.
Having received the desired shape, the drill is hardened. After welding and grooving, the ball loses its hardness, so it needs to be restored. To do this, the tip of the drill is heated with a gas burner until it turns orange and is immersed in oil for a few seconds. At the same time, the screw itself and the welding do not need to be cooled so that they do not become brittle.
After hardening, the drill tip is finally sharpened. This should not be done on tempered metal before hardening, since then the quality of the cutting edge will be worse.
The resulting drill drills well into almost any hard metal, be it a bearing race or a file. The main thing is not to overcool it. If you don’t have oil on hand, you need to add at least water into the hole.
When drilling very thick steel plates, so as not to suffer from constant cooling, you can put a rubber ring around the punched point and add water to it. The liquid will be held by surface tension and constantly cool the drill.
Watch the video
sdelaysam-svoimirukami.ru
Annealing and forging of the workpiece
The steel is alloyed with chromium, so it must be annealed before forging. You must first heat the part red-hot in the oven and, without allowing it to cool, straighten it with a hammer on an anvil. The steel becomes ductile and, after cooling slowly in a furnace at a rate of 20–40 degrees per hour, is ready for forging.
The most critical stage of forging bearing steel should be carried out in the temperature range from 800 ºС, which corresponds to a cherry-red color of heat, and up to 1100 ºС, accompanied by a dark yellow glow. If you have a non-contact pyrometer, the temperature of the metal surface can be determined with an accuracy of ± 1.5 ºС.
You should first practice heating and forging metal on a regular rod. In order not to break the workpiece under hammer blows, it is better to heat the metal one more time than to continue processing it when it is cooled. It is easier to control the temperature by looking at the glow color; when a dull cherry glow appears, you should immediately place the part in the oven.
After heating, the knife part is placed on an anvil and flattened with hammers to the required thickness. If you have no experience working in a forge, you can limit yourself to straightening the workpiece, replacing the forging operation with stripping the workpiece. A correct knife forging technique is considered to be one in which:
- forging is carried out by shifting the metal from the middle of the blade to the edge of the blade, gradually becoming thinner;
- rounding of the tip is carried out with simultaneous drawing of the knife blank along the length;
- After final rolling of the plate, an allowance of no more than 2 mm remains.
The workpiece is heating up
We saw the cooled workpiece along the grooves with a grinder
The straightened workpiece is heated and hammered to a flat shape.
We stretch the resulting tail in length so that at the end it measures 5 mm by 5 mm.
Roughing and grinding the forging, transferring contours from the template
After this, the part is peeled using a sharpener or belt sander. During the processing process, excess layers of metal and unevenness are removed, and the surface becomes perfectly smooth and shiny.
At the next stage, a template of the cutting tool is prepared on paper on a scale of 1:1. A paper copy is cut out with scissors and traced with a marker on a sanded plate. It happens that the outline transferred to the workpiece is difficult to distinguish or is erased during subsequent cutting. In this case, you should duplicate the contours of the knife by scratching lines on the metal with a scriber. Instead, any bench tool with a tool steel tip will do.
The plate is clamped in a vice and cut using a grinder according to the template. In the most curved areas, many cuts are made, small fragments of metal are cut out in “steps”. In order to remove the remaining pieces and nicks, the semi-finished knife is ground with a grinding attachment.
Using a marker, draw the shape of a knife on the workpiece and cut it out
We refine the corners and make a smoother line
Sharpening and polishing the blade
Let's move on to such an important point as sharpening the knife. When doing this, symmetrical sharpening on both sides of the blade is important. It is also necessary to create the required bevel angle of the knife blade, which for ordinary knives is 15 - 25º. On razors, the smallest angle is 8–15 degrees, on tourist knives 25–30º. Manually sharpening a knife blade on a whetstone is unproductive. This is done simply and efficiently on a belt sanding machine called a grinder.
If you need to sharpen a knife to razor sharpness, special sharpening devices with replaceable abrasive bars are used. With the help of such equipment, it is not a problem to create any angle of descent from the butt of the knife or descent of the cutting edge of the knife.
Once the rough shaping and sharpening of the knife is complete, it's time to fine-tune the metal using a grinder and Dremel attachment. Through holes are drilled for the pins for attaching the knife handle. In order to better bond the wooden plates to the metal, about a dozen blind holes are made on both sides of the knife shank.
Blade hardening and tempering
Heat treatment is carried out in order for the steel to achieve the required parameters and is carried out in two stages. At the hardening stage, the metal acquires high hardness, strength and wear resistance. The blade should be heated in an oven to 830 ºС and immediately placed for one hour in a cuvette with oil heated to 50–60 ºС.
How to harden a knife from a bearing without a pyrometer? There are two ways to determine whether the product has reached the required temperature in the oven:
- sprinkle the instrument with table salt and note the moment of NaCl melting, it occurs when t = 800 ºС is reached;
- the magnet stops “sticking” to the metal at the temperature of the restructuring of the crystal lattice of the material, which occurs before melting.
Heating the oil is required to liquefy it so that it better envelops the homemade tool. During processing, the product should not be turned over; the hardening substance should not be added or shaken. You should be especially careful with oil. When hot metal is immersed, it tends to ignite.
At the tempering stage, an optimal combination of strength, ductility and toughness of steel is achieved. At the same time, the internal stress of the material is relieved. The instrument is placed in an oven heated to a temperature of 170–200 ºС, where it is kept for two hours.
Cooling of the handmade semi-finished product to ambient temperature occurs naturally in the switched off oven.
You can check the quality of hardening using a needle file. If, when running along the edges of the blade, it slides, hardening the knife from the bearing has achieved results. Also, the testing method involves trying to cut a glass bottle; the blade should leave scratches on the glass. This blade is used to shave the hair on a hand and plan a suspended sheet of paper.
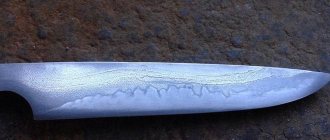
After hardening, an interesting pattern appears on the blade
Features of the Yakut knife
An important feature of the Yakut knife, which distinguishes it from other products, is its asymmetry. On one side there is a groove, quite large in size, which runs along the entire blade. And the opposite side has a convex shape.
According to contemporaries, the quality of today's knives is in no way inferior to European manufacturers. And most importantly, the Yakuts do not lose the ancient methods of forging and making their products, but pass them on to their children.
There are several explanations for such interesting forms:
- in the old days, blacksmiths tried to save metal in this way, gradually drawing out the blade;
- Since the Yakuts live in extreme conditions, at -50 °C, -60 °C, it is almost impossible to sharpen a solid product. And with such a fuller, the blade became thinner and more pliable;
- when skinning a carcass, especially when skinning, the recess in the blade prevented it from “sticking.” And due to the small contact area and air space, the work became much easier;
- the sheath was made from oxtail, removed like a stocking. And wooden inserts were made inside so that the knife would not break. They were also made from birch bark or sewn together with animal skin.
Clearly visible gutter.
Another important point is that the blade is sharpened on one side. But the handle was and is still being made from birch rhizomes.
It is quite reliable and has good grip on the shank.
Cleaning and pickling
Unsightly scale and traces of burnt oil on the forged blade are removed with a grinder and a 240–320 grit sanding belt. Scratches remaining after machine processing are removed manually using 320-400 grit abrasive paper. Processing is carried out by straight-line movements of sandpaper directed at an angle of 90 relative to the direction of the grinder scratches.
From grinding with a P400 zero polish, they move on to polishing with a material with a grit of 600–800. Wetting the abrasive paper with water allows you to polish the product more effectively. A mirror shine appears after treatment with GOI paste or other polishing compound applied to a piece of leather.
In an additional etching operation, inscriptions, ornaments, and drawings are applied to the metal surface of the knife. Typically a technique is used in which a stencil is glued to the image area, and the surface around it is sealed with masking tape. Then a mordant is applied for a certain time, after which the knife is washed in water.
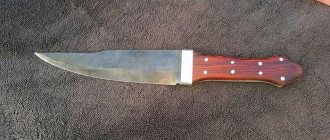
Preparation of overlays
The ergonomics and overall perception of the knife depend on the correct choice of material for making the handle. Metal alloys, plastics, genuine leather, and elastomers are used as the starting material for the manufacture of knife handles. Hard and valuable wood species are irreplaceable for this purpose.
The overhead handles, most suitable for the shank of the bearing knife, consist of 2 identical halves. You will need to stock up on scraps of metal rod for the knife handle pins. In the case of using wood, the following sequence should be followed:
- the antiseptic-treated block is clamped in a vice and sawn into 2 identical parts;
- to eliminate gaps, thoroughly sand the sides in contact with the metal;
- the contour of the knife handle is drawn, two dies are cut out with a jigsaw;
- the halves are placed on the shank, the holes for the pins are marked and drilled.
Handle preparation
Assembly
You need to dilute the epoxy glue. Marks should be applied to the dies being joined or shallow dents should be pressed for better adhesion of the epoxy layer. Be sure to degrease the metal part of the knife, which will be located inside the handle. Assembly is carried out in the following sequence:
- Epoxy glue is applied to the surface of the overlays from the scratch side;
- the halves are placed on both sides of the shank, pins are inserted into the holes, the assembled handle is wrapped in paper and tightly compressed with a clamp;
- after the epoxy has hardened, use a wood cutter to remove chamfers from the edges of the knife pads;
- Using sandpaper on a fabric base with a grit of 80, rough processing of the wooden dies of the knife handle is carried out;
- Polish the handle clean with strips of sandpaper.
The polished surface is covered with linseed oil heated to 50–60 degrees. After absorption, the procedure is repeated 2-3 times. There is no need to varnish the knife handle later. Under the influence of ultraviolet rays, the oil polymerizes, turning into a hard elastic substance. It fills the smallest pores of the wood, protecting the knife handle from moisture and external influences better than any varnish.
How do knives differ from each other?
Nowadays, there are knives of completely different, sometimes even intricate shapes, depending on where they are used. The handle and blade are given the necessary aesthetic and practical appearance. But the deciding factor that differentiates one knife from another is what it was made from. Specifically, we are talking about the chemical composition of the steel from which the blade itself is made. Not everyone is able to choose exactly the knife steel they need, since there are a huge number of different variations of this alloy, the chemical composition of which determines their properties, advantages and disadvantages, strengths and weaknesses. But to choose a knife, it is not necessary to study the entire periodic table; it is enough just to know what properties a particular grade of steel has.