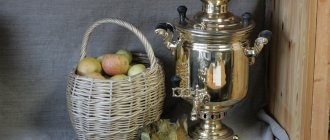
The samovar is a symbol of home comfort, warmth and prosperity, known since the time of Peter the Great. Modern products that run on electricity do not provide much value. Heating devices (coal and kerosene) are of much greater interest. The restoration of samovars will help you feel the life and mood of your ancestors, which will breathe a second life into your grandmother’s dishes. However, prices for this service are not always affordable, since craftsmen consider such items to be antiques. Armed with tools and patience, you can repair your family heirloom yourself.
When may restoration be required?
The main problems that may require restoration are: the appearance of dents, distortions, scale, loss of shine, the need for tinning or replacement of parts. If you purchase a tea maker second hand, you should carefully examine its internal condition. Even with no external defects, the samovar can leak. The cause is barely noticeable microcracks. In this case, restoration work on the metal product should be carried out immediately.
The brass alloy releases oxides that are harmful to the body. To prevent them from getting into the water, the internal cavity of the device must be coated with special food-grade tin (cleansed of lead and other metal impurities).
In addition, a leaking samovar is dangerous because indelible rust appears in place of the cracks. Its pores contain a large number of bacteria harmful to the human body. Iron is also present in high concentrations in water with rust. Regular consumption of such liquid will affect the functioning of the kidneys and liver. Metal in large volumes is poorly excreted from the body, so poisoning is inevitable.
In the old days, they did not know how harmful lead was to the body. The craftsman soldered dishes using this metal, without thinking about the consequences.
Conditions and scope of soldering
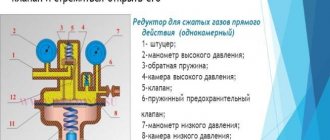
Before understanding the question of how to solder brass, you should thoroughly study all the features of such a technological process. When performing soldering, which is one of the methods for producing permanent connections, molten solder is introduced into the gap located between the parts being connected, which acts as a fastening element.
An important condition for soldering is that the solder, which is melted using a gas burner, must melt at a lower temperature than the material used to make the parts being joined. This technology (in some cases it is the only possible way to obtain a permanent connection) allows even dissimilar metals to be reliably soldered together.
Brass soldering diagram using a gas torch
It is completely wrong to compare soldering with a technological process such as welding, which assumes that not only the special solder wire will melt, but also the metal of the parts being connected. It is precisely due to the fact that when performing soldering, the solder is exposed to the main temperature effect, the characteristics of the parts being connected and their integrity remain unchanged. This feature allows this technique to be successfully used for joining metal parts that are even very small in size.
Kinds
Restoration of samovars can be complete, partial or museum. In the latter case, the appearance of the product is restored, but its further use for its intended purpose is impossible. Partial repairs involve subsequent use, but not much attention is paid to restoring the original appearance of the item. When a samovar is completely restored, the internal parts of the product and its outer body are updated.
Partial
Most often, in order to restore the basic functions of the samovar, it is enough to polish the device, nickel plating, tinning, replacing handles, fittings, or eliminating faucet leaks. To polish the samovar, ordinary dishwashing detergent will do.
You can thoroughly clean plaque using tooth powder. This abrasive material will not scratch the surface.
If the key to the samovar tap cannot be turned or removed, then to eliminate this problem you will need special anti-corrosion agents that reduce the adhesion of metal to rust. After treating the part with lubricant, you should carefully remove it from the tap. You can repair the elements of a vessel with your own hands using nickel plating - this is the process of building up a layer of metal on a damaged area. The procedure is simple to perform, but is not applicable for tin, lead and zinc items.
Comprehensive
A service such as the complete restoration of a samovar is not cheap from specialists. However, some problems can be fixed on your own. For example, dents can be easily smoothed out using a rubber hammer. Tap the protruding part of the dent using gentle movements. You can also correct unevenness using mandrels. A metal hammer leaves impact marks. It is not suitable for straightening dents.
A comprehensive restoration necessarily includes such procedures as replacing worn-out fittings, removing plaque, lapping, polishing, tinning, and plating the product with nickel or silver. You can also solder a samovar at home. An important step is to find out exactly where the water is leaking from. To work, you need to get a blowtorch or a propane-oxygen torch and copper-phosphorus solder.
The procedure is as follows:
- Before sealing the dishes, they must be thoroughly cleaned of dirt.
- Next, prepare the flux: take 1 tablespoon each of borax and boric acid, dilute them in 1 glass of boiling water.
- Cracks are treated with prepared flux.
- The problem area is then heated using a torch. The metal should take on a reddish tint. If overheated, it will be much more difficult to solder.
- Touch the solder to the heated area of the samovar. The metal will slowly begin to spread, falling into the cracks.
Soldering must be done on a heat-resistant stand. Good materials for this are brick or asbestos plate.
Necessary tool
If you have decided what to solder with, then you should also decide what to cook. When soldering brass, you will need the following tools and accessories:
- soldering iron with a power of 100 W and 0.5-1 kW;
- gas burner complete with gas cylinder;
- crucible;
- scales;
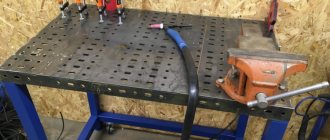
- vice;
- knife;
- scissors;
- file;
- pliers;
- clamp;
- sandpaper;
- brush;
- brush.
Brass is very often used in various household devices, so when they break, the question arises of how to solder brass. Such soldering is quite possible, but requires certain conditions and rules to be met.
Soldering brass, which allows you to obtain high-quality and reliable connections, is a technological process that involves the use of a gas torch, as well as special solder. The latter is wire, the material of which can be tin or an alloy of this metal with lead. If you thoroughly study the features of such a process, as well as prepare all the necessary equipment and consumables, then you can successfully perform it even at home.
Brazing process for brass parts
Tinning the samovar
In order to protect metal products from oxidation, their inner surface is coated with tin. This method of processing dishes is called “tinning”, and the applied layer of metal is called “half-dish”. To reduce tin costs, bismuth is additionally used. Lead impurities, as well as poisonous salts, are prohibited from being used in the process of preparing poluda.
Tinning a samovar is a simple procedure that prevents the formation of corrosion on metal surfaces. The step-by-step instructions are as follows:
- In order for the tin to lay down better, the inner surface of the dishes must be well cleaned. It is advisable to use an iron brush - it will quickly remove dirt and oxidation.
- Next, the metal product is thoroughly washed with running water.
- The dried internal cavity of the samovar is treated with ammonia.
- Next, a little tin is placed in the heated dish. The metal should evenly cover all the walls of the vessel. After this, you need to wait for the half to dry completely and set.
It's better to tin on the street. If this is not possible, be sure to turn on the hood and open the windows. During restoration work, a lot of smoke will be generated.
Sample No. 3
Hookah (pers. قلیان - ghalyân, ghalyun) is a smoking device that allows you to filter and cool inhaled smoke. The role of a filter is played by a vessel with water, wine or other liquid. A smoking cup is inserted into the vessel, connected to a pipe, the end of which goes under water. Above the water level, another tube extends from the vessel, to which a stem is attached. When smoking, a vacuum is created in the hookah vessel, due to which the smoke rises through the liquid and enters the smoker’s lungs through the pipe with the shank.
Hookah was invented in India and quickly spread throughout the Muslim world, from Indochina to Morocco. In Europe, it gained a certain popularity in the 19th century, due to the fashion for oriental exoticism. In Russia, hookah is easy to purchase in any oriental souvenir store.
Source Wikipedia
DIY repair methods
Restoring a samovar is a painstaking and difficult process. If you are not interested in the appearance of the product, you can eliminate some of the causes of broken dishes at home. Only specialists can restore a samovar without losing the beauty of its body. The following tools and additional materials may be needed to restore the product yourself: tin, hammer, abrasive, sandpaper, tow.
Stages of repair at home:
- restoration of the hull (patching cracks, eliminating leaks, straightening (removing corrosion);
- cleaning the product from the inside (descaling, tinning);
- replacement of parts (if necessary);
- improvement of appearance (polishing).
Hull restoration
If there are dents on the samovar, you can straighten the product yourself. To make it easier to correct unevenness, it is recommended to unsolder the free pipe. This simple technique allows you to freely place your hand, as well as tools, inside the samovar. In this case, a wooden block will perfectly play the role of an anvil. To level the body, you need to use a rubber mallet and measure the impact force so that the dent is straightened. It is better to straighten the product by weight, so the pressure will not be transferred to the body of the samovar.
Cracks in the housing can be soldered if a torch is available. Often the samovar splits from the bottom of the flame tube and, as a result, begins to leak. Restorers recommend soldering the body of the product from the inside - this way the seam will be barely visible.
Faucet repair
Grinding in the faucet is quite possible at home. If it leaks from the bottom of the product, it means that the key is located high in it. Conclusion: it needs to be lowered lower, having been treated with lapping paste beforehand. Next, the samovar is filled with hot water. Use smooth circular movements to turn the key in the tap until the liquid stops dripping. If it does not open at all, the mounting hole can be treated with a “liquid key”. After the time specified in the instructions, you need to lightly hit the stuck part of the structure with a hammer.
After the repair work has been completed, it is advisable to rinse the samovar several times with diluted citric acid so that the remaining abrasive does not get into the tea.
Lubricate the samovar key with lapping paste
Then insert the key into the faucet. Fill the dishes with hot water
You need to turn the key several times
Ready
Replacing internal elements
There is a large assortment of faucets for samovars on sale, so replacing this accessory is quite simple. An important step in this matter is to correctly measure the parameters of the part. After purchase, you should lubricate the faucet with vegetable oil or Vaseline. This technique increases the service life of the product.
The grate bars in the samovar often fail. Before replacing the part, it is necessary to desolder the pipe. Its lower part should be checked for cracks. After these steps, a new grate is placed in the pipe and the body is cleaned. Next, the remaining parts of the samovar are installed in their places.
Replacing the faucet
Soldering the pipe
We mount the grate and solder the pipe back
Video
It all started with the fact that for one of my projects I needed a miniature samovar. I'm afraid that this samovar is never destined to be finished, so I'm showing the unfinished work. This is more of a prototype on which metal working technologies were tested.
Material:
In the bins I found a copper plate about 0.8 mm thick in quantities sufficient for work. After releasing the plate, it was a surprise to me that it was copper-plated brass. Well, brass is brass, I decided; to develop the technology, it didn’t matter what metal to use. This is what I thought at the beginning, until the brass ran out... But more on that below.
In order to eliminate unnecessary soldering work, I used copper pipe wherever possible. It turned out to be easier to find a copper tube than silver solder for soldering brass, and even brass itself. Having searched all the local collection points for non-ferrous metals, I did not find any plates or tubes. The assortment included only copper wire and brass plumbing taps. I had enough of my own wires, and plumbing brass is not particularly distinguished by quality, it is thick, and even hard.
As a result, in the construction market, a copper tube with a diameter of 3/4 inch (about 17 mm) was taken for the body; for the burner, neck and top of the lid - 10 mm tube; The jug consists of two tubes with a diameter of 6 and 10 mm.
For the tap I took copper wire with a diameter of 3 mm, which also ended up in the bins.
All semicircular and flat elements are made from the same 3/4 tube, tempered, cut lengthwise and unfolded.
Additionally, I also bought soldering acid and copper-phosphorus solder.
Tool:
The only special tools I bought were a solder torch, good metal scissors, and a pipe cutter. Everything else was already there: Dremel engraver, drill, files, needle files, sandpaper, soldering iron, vise, hammers, pliers and round nose pliers.
Technologies:
Well, first of all, about processing brass. “First on the list” was the manufacture of a crane. For the spout, I took a brass tube from an old indoor TV antenna with a diameter of 2.5 mm. We have a plumbers’ “point” in the basement of our house, and I saw that they had a special machine for bending pipes. Since I don’t have an industrial production of samovars, I didn’t bother making such a device for our scale. And of course, I immediately got a “positive experience”: the tube folded in half and didn’t look like a faucet at all... But “our locomotive is flying forward”, we immediately cut off the bent end, let it go, after a short search for a steel cable, we give up this activity and take a stranded copper wire . We insert it into the tube and bend it with pliers. We get something more or less similar to a tap.
For those who follow me, a little advice on how to bend a tube without problems - 1) tightly fill the tube with coarse salt, solder or clamp the ends of the tube, bend the tube, then wash the salt; 2) fill the tube with water, freeze it, bend the tube, and defrost the water; 3) wind a spiral of wire turn to turn according to the size of the inner diameter of the tube, insert the spiral into the tube, bend the tube, pull out the spiral.
Having decided to more or less follow the technology for making samovars for the body, I bent a brass plate into a tube and soldered PIC (tin-lead solder). To remove the “scar” I tried to forge it on a steel pipe. But as I said, the brass was hard and it did not flatten, but tore. Therefore, the body was then made from a copper tube.
Three attempts to make the top cover failed, or rather broke. Even after the holiday, the brass did not want to bend according to the template. The template was sharpened from wood with a file on a drill. The copper was softer, but thick enough for my health. Without a lathe, bending according to the prepared template turned out to be quite difficult. Therefore, the sphere at the bottom of the body, the lid and the tray were forged from copper plates.
A jug is soldered inside the tray, which is assembled from two tubes 6 and 10 mm. Moreover, the smaller one is flared with a core to match the inner diameter of the larger tube. It took so much solder to connect the tubes and the tray that it then had to be melted and poured out of the body. As a result of this action, the inside of the samovar turned out to be tinned, like a real one. The only difference is that my solder cannot be used for food purposes.
It seems to me that the most time was spent on making the lid. Since it consists of three elements, which tended to “scatter” when soldered. The first version of the lid was even soldered with copper-phosphorus solder. But since I had no experience working with hard solders, there were SUCH sagging inside the lid that even a Dremel was difficult to remove. The second option turned out better, but when fitting it to the body I had to redo the side several times.
In the absence of a hole with punches, I made the sphere for the bottom on a wooden matrix, and used a round file handle as a striker. Next, I drew a plane on the sandpaper and soldered it to the body on the PIC.
The tray is made from the same 3/4 tube, cut lengthwise and unfolded. Here I used 2 hammers. One was used as a matrix, the second was used for its intended purpose - knocking. Forged twice. The first option, after being processed with a file, turned out to be too small in size and was discordant with the other parts.
The relief for the burner and neck was extruded by hand on a round file. The holes on the burner and neck were drilled without further ado with a 1 mm drill. But in the original versions of the samovar, the design on the burner and neck is more intricate. I think it was possible to use LUT, but this is quite difficult to do on corrugated surfaces. Most likely I will use it in the next model or try a similar technique.
We return to the tap. At that time it was not possible to find a capillary copper tube, so the tap was made of 3 mm copper wire. Soldered into the body with a pipe. It could have been threaded, but by the time I got around to it, the body had already been drilled exactly to the diameter of the tap.
A hole is drilled in the tip, simulating that the tap is working (by the way, in the Yasnaya Polyana souvenir samovars the tap is also a fake one). A turnkey insert is soldered and drilled onto the tap. The key is also made of 3 mm wire, which was clamped into a drill chuck and sharpened with needle files. Two copies were made, I liked the last one better. The branch for the key is made from a piece of copper plate, soldered with copper-phosphorus solder. The only thing that worked in this project the first time :)
I sharpened all the wooden handles by holding an apple tree block in a drill. When attaching handles made of wood, there is one problem - they fall apart when the ends of the rods on which they are mounted are riveted. I tried sharpening it out of copper and it worked. But then there will be no real authenticity. The problem was solved as follows: 1) We make 2 rivets with a common length like a handle. We place the handle and place the rivets on the glue, each on its own side. 2) Take a wire with a diameter of 1.5 to 1 mm, leave space for the length of the handle and grind the ends for rivets up to 0.5-0.8 mm in diameter. Next, we place the handle on the glue, insert it in place and rivet it. The metal reserve will prevent expansion and will preserve the handle. I hope to show it in the next model or if I still finish this one.
The problem that took me out of the rhythm of work was how to attach the handles to the body. In the original, each handle is mounted on a screw and soldered. I chose simple bracket style handles and decided to solder them. Making the handles was not difficult—forged, bent, turned, drilled holes, and sanded them. I wrote about the problems with wooden handles above, but a new one that was UNSOLVABLE at that time arose. About 20 times I tried to solder the handles to the body, using both rosin and soldering acid, and even drilled holes so that the tin would flow and hold, I used both a soldering iron and a torch... The result is the same - the handles fall off!!! In addition, the wooden handles became charred after experiments with the burner. It didn’t work to fit the handle bluntly onto the rivet. Firstly, you can’t really crawl inside, the jug is soldered, secondly, the rivet breaks the handle, thirdly, you can’t knock too hard, the body changes shape.
The solution was obvious, but we couldn’t solve it so quickly. For a very long time I could not find a set of dies and taps for threads less than 3M. As a result, I bought 3 sets (for 1.4, 1.8, 2.3) at inflated prices at the Hobby Fair. Now I'm looking for drills for these threads.
Without a special tool (lathe, anchor, punches, hour taps and dies) it is possible to make a model of a samovar on your knee. True, this will require much more time.
LUT technology allows you to make more delicate things (for example, a key, holes on the burner and neck, handles, inscriptions), which you cannot reach even with a needle file or an engraver. I'm thinking about using it.
Despite the variety of shapes, samovars are designed the same.
Each samovar consists of the following parts:
- Wall (the main part of the samovar, where water for boiling is poured)
- Jug (inner tube in a samovar where fuel is placed: pine cones, branches, wood chips, coals)
- Circle (cast ring that is located on the top of the wall)
- Neck (bottom of the samovar)
- Pallet (base of the samovar)
- Pens
- Repeek (shaped plate attached to the wall of the samovar, into which the tap crashes)
- Branch (faucet handle, which can come in a wide variety of shapes and decorations)
- Cone valve
- Donyshko
- Dushnichok (hole on the lid of the samovar for releasing steam when boiling water)
- Bearings (nails for attaching wooden cones)
- Burner (device for installing a teapot and for carrying out air flow if the burner is closed with a lid)
- Plug (cap to close the jug)
So, a samovar is a solid thin-walled vessel, which is pierced vertically by a pipe, from the firebox to the burner. Fuel is added through the pipe. The pipe expands at the bottom. The firebox is attached to the bottom of the samovar at some distance from the table surface. This ensures stability and fire safety. Air passes through the grate into the pipe and naturally rises, creating draft in the firebox. A tap is located at a short distance from the bottom. In village huts, the samovar pipe was connected using an L-shaped pipe to a chimney, which provided draft. In cases where the fuel or weather was damp, the samovar had to be inflated. This can be done through holes in the walls of the firebox, or using a boot, the so-called “peasant method”, which was put on the samovar pipe. When the water begins to boil, a teapot is placed on the burner. The thrust slows down. The water slowly comes to a boil while brewing tea.
(Source Wikipedia)
Repairing samovars at first glance may seem like a simple thing, but this is only at first glance. We carry out almost any work on repairing samovars, from ordinary soldering of cracks in the body (walls) to complex work such as replacing grates and repairing the internal pipe (jug).
Descaling using traditional methods
To get rid of scale, you can use special products containing organic acids. They effectively remove stubborn limescale deposits without scratching the inside surface of the cookware. If you don’t have a special powder on hand, you can use improvised means, such as vinegar. It is diluted in water in a ratio of 1:5, the resulting mixture is filled with a vessel for some time (until the scale is completely dissolved).
Baking soda is an excellent remedy for removing hard deposits. For 1 liter of water you need to take 3 tablespoons of loose powder, boil the resulting mixture in a samovar for about 20 minutes, then pour everything out and repeat the procedure, but by adding vinegar essence (1/2 cup of the product per 4 liters of liquid).
Potato peelings are faithful helpers in the fight against scale. The samovar needs to be filled one-third full with them and covered to the top with water. After boiling, the vessel should be left filled with cleaning fluids for several hours. After this, the samovar must be thoroughly rinsed with soda solution. Regular descaling of the product increases its thermal conductivity.
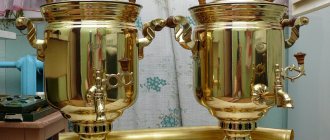
Sample No. 2
Sample No. 2 was, dare I say it, torn into pieces by some “specialists” (it was in this form that it came to us). The samovar initially had a rolled neck and base, which were simply torn off (it is not clear why, because the reason for the customer's request was simple - the jug was leaking). We had to weld all the torn parts using PSr-45, since the burning temperature of the wood can heat these parts well above the melting point of the tin solder. The inner pipe (jug) was sealed with carbide tin solder, and then covered with food grade POS-90 solder for health safety.
Photos in the album
"Samovar Nickel"
How to restore shine
To improve the condition of the body of the samovar, you can use special polishing agents. They will not only return the shine to the dishes, but also cover them with a protective film that will prevent the surface from tarnishing. When purchasing a polish, you must read the instructions. It is important to find out whether the chosen product is compatible with the metal from which the samovar is made. To treat nickel silver vessels, it is recommended to use Metal Cleaner. You can add shine to dishes using traditional methods, for example, by rubbing them with sand, soda or chalk.
Sample No. 1
At the very beginning of the samovar movement, they were created from copper, tombak, and brass using hand forging. To add sophistication, they were silvered and gilded. Handles and taps were made in the form of curlicues, animals, and fish. A wide variety of samovar forms existed in Rus'. The sketches were brought to life by great sculptors and artists. Therefore, each samovar was a masterpiece. It is not for nothing that this follower of sbitennik (sbiten was prepared in it) became a symbol of Russia. Despite the variety of options, the basic elements are the same.
Nowadays, only true connoisseurs use a hot samovar in everyday life.
There are two types of samovar restoration:
- museum,
- repair.
In the first case, it is restored to its original appearance. This model can no longer be used for its intended purpose.
A simple repair involves further drinking tea together. Such a samovar does not always remain in its original form after restoration. Some elements are replaced with suitable modern analogues.
If the samovar is leaking, you will quickly notice it. A puddle will definitely begin to appear during the heating process. Moreover, this can happen with an electric samovar. The metal from which the samovar is made is very thin. Boiling water every day can cause this type of damage.