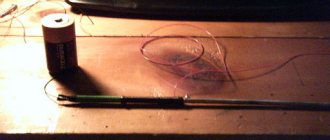
I apologize in advance for the jackal photos, but what are they rich in, and what came to hand at one in the morning before work.
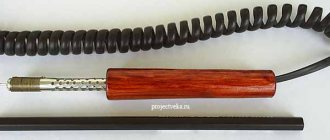
Having joined the fuchai 213 box mod recovery environment, I realized that although it is possible to dismantle fetas and shimki with a soldering iron, it is quite difficult.
So the idea arose to assemble a soldering (and on the edge, usual for heat shrinking tubes and bottles, soldering plastics) hair dryer.
The power supply from the laptop, generously customized by a friend, seemed to me to be a very suitable power supply, 20V 4.5A = 90 watts.
After experimenting with different cross-sections of kanthal, I chose 0.4, because it heated up to red-yellow when winding, consuming those same 4.5 amperes. Power supply specifications are usually written with a reserve, so I wasn’t afraid to push the maximum declared power.
The wire with the end of the spiral is fixed with a screw and washers for rigidity and contact.
The Chinese regulator, supposedly rated at 8 amps at 24 volts, died very quickly, so everything is connected directly to the power supply.
Impeller for 3D printer 24 volt
Using cold welding, I formed a thread for the body of the flashlight, and a hole was drilled in it for the wire outlet from the heater.
The plug from the flashlight, where the button was, was drilled out to fit the housing from the battery into it. The nozzle is made of light fire on the nipple of a car/bicycle wheel. It is all metal and maintains temperature.
A sheet of mica, generously sent by the Chinese for 40 rubles per piece of 10*15 cm, was cut to the size of the tube and many notches were made with a knife to roll it into a tube.
The base for the spiral was made from the same mica; the notches were made with a diamond wheel on a Dremel, because I got tired of notching with a knife. very efficient and smooth!
The yellow wire is simply wound around the nut to make contact with ground.
The second end of the spiral is hammered behind a mica tube for the sake of contact with the metal of the tube from the egoshka.
These connections were made as amateurishly as possible, because this is more of an experiment, and I followed the simple path, without coming up with anything easier to implement.
And all this stuff is simply connected through a switch directly to the power supply wire.
A supply of wires has been made for the heater for servicing the heater.
The flashlight body does not heat up at all! It is cooled by an air flow, and part of the tube with the heater is placed outside it.
The focus has completely gone crazy, and the camera turns red or yellow into the glow of a supernova.
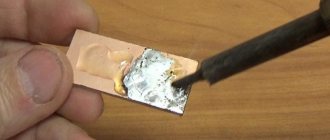
Efficiency: more than visible in the photo. Even a mikruha with a soldered belly was removed in 10 seconds.
I didn’t apply flux, I didn’t dilute the solder!
Overheating of parts: not noticed. The same micro-USB that can be melted was not damaged at all!
Cost: specifically, only mica was purchased for 40 rubles, a fan for a buck, a power supply was almost a freebie, the rest was from junk stocks.
Bottom line: to be honest, I didn’t expect anything really useful from this project, especially with such a small spiral, because when I first removed the microscope, I simply screamed with joy.
I think that I will need it more than once not only for repairing box mods, but also for other minor electronics repairs.
Possible alternatives/upgrades: take a power supply from a PC, it has many more amperes on the 12V line, attach PWM, install a thermocouple.
But, of course, I won’t do this. Friendly.zhpg
Source: pikabu.ru
Homemade hair dryer for soldering small parts
Due to the improvement of assembly technologies for various types of products assembled from small metal parts (electronic microcircuits), their manual soldering is causing more and more difficulties.
A homemade soldering gun will allow the operator to cope with the difficulties that arise in these situations without any special complications and eliminate the risks that arise.
So, with the help of a self-assembled soldering station, anyone can install and dismantle parts without the threat of damaging fragile electronic elements located near the soldering site. One of the possible solutions to this problem allows you to make a hot air gun from a soldering iron, which is available in the household kit of any home craftsman.
Principle of operation
The operating principle of a typical soldering station with a hair dryer is quite simple and is as follows.
The air accelerated by a fan or compressor is pumped into a special channel made in the form of a tube with an electric spiral. Passing through this channel, the flow is heated to the required temperature (from 100 to 800 degrees) and immediately enters a plastic calibrated nozzle, which directs the hot jet onto the workpiece.
In most industrial models of soldering guns, the main parameters of the heated jet (its temperature, direction of movement, and power) can be adjusted within certain limits.
Design and design drawings
The basic design of a hair dryer is similar to the design of a household hairdressing device. The main nodes are:
- Housing with handle, air inlet and nozzle.
- Electric heater.
- Fan.
- Diagram and controls.
The operating principle is also very simple:
- Cool air is drawn in by a fan through openings in the rear.
- Next, the air is forced through an electric heater. There the air heats up.
- The heated air is released under pressure through the nozzle. The nozzle gives the heated flow a given shape.
- The control system maintains a constant heater temperature and engine speed.
The construction dryer diagram includes the following main blocks:
- voltage transformer;
- electric motor control unit;
- electric heater control unit.
The performance of the device is determined by the engine power and is in the range of 120-650 liters per minute.
Construction hair dryer design
Construction hair dryers offered on the modern market, depending on the configuration of a particular model, are equipped with some additional functions, such as:
- Performance management system.
- Stepwise adjustment of heating power.
- Smooth temperature control.
- LED and liquid crystal display of main operating parameters.
Most of these additional functions are only worthwhile in highly specialized applications.
Turbine and compressor type
The circuit diagram of a DIY soldering station can be presented in the form of a main module and a terminal device (thermal hair dryer) that provides heating of the air in the soldering zone.
Before its manufacture, you need to know that according to the method of forming a forced air flow, such devices are divided into turbine and compressor type soldering devices.
In turbine units, air is supplied to the treatment zone by means of a small electric motor with a fan built directly into the hair dryer body. In products of the second class, the air flow is formed using a special compressor located in the main module (controller for a soldering gun).
When choosing the required type of station for soldering small parts, one usually proceeds from an assessment of the following multidirectional factors:
- fan soldering stations are capable of generating a more powerful air flow, which is an obvious advantage of the hair dryer built into them. However, the flow created with their help hardly passes through nozzles that are too narrow;
- compressor hair dryers, on the contrary, are more effective when working with relatively narrow nozzles used when soldering parts located in hard-to-reach places.
The choice of the optimal version of a soldering gun capable of working with a given set of plastic nozzles is carried out taking into account the specific conditions of its operation.
How does a hair dryer work?
Any mounting hair dryer has the basic elements that you cannot do without to obtain a hot air flow:
- Thermal insulating casing with heating element.
- Nozzle.
- Electric motor.
- Fan.
- Power button.
- Hair dryer body.
- Power cable.
The main elements are enclosed in a housing
From the button the wires go to the motor and heating element. Therefore, after switching on, the engine starts and the coil heats up. The fan rotates and directs hot air into the nozzle. The thermal protective casing prevents the plastic case from melting.
Cooler based
The easiest way to make a hairdryer with your own hands at home is to use the turbine principle of air injection, implemented using any small-sized fan suitable for these purposes.
A soldering hair dryer can be made with your own hands using the cooler that comes with the power supply of any desktop computer.
In this case, the fan is built into the handle of a thermal element made of a fireproof tube with an electric spiral, passing through which the air will heat up and then enter the soldering zone.
The outer part of the soldering gun body must be made airtight, which eliminates the possibility of air being sucked into the surrounding space. To assemble the heater, you will need nichrome wire wound in a spiral on a ceramic tube.
The total length of the winding is selected so that the resistance of the entire wire segment is about 70-90 Ohms.
The individual turns of the spiral wound on a ceramic base should be located at some distance from one another. For safe operation of the heater, this removal should be about 1-2 mm.
What does it take to make a hair dryer yourself?
- Old hair dryer housing. Plastic will not work, only ceramic.
- Metal blades for a fan. They can be made from a sheet of tin.
- Nichrome spiral.
- Power cable. The wire in it must have a cross-section of at least 4 mm, otherwise it will not withstand the load.
- A piece of rubber pipe placed on a future hair dryer will reliably protect your hands.
- Metal nozzle, flattened on one side for easy melting and heating.
- Straight round tube for soldering and cooking.
- Personal protective equipment – gloves.
Return to contents
From a soldering iron and a dropper
To make a soldered hair dryer with your own hands, you can use a simple soldering iron with the protective casing removed from it.
When taking it as the basis for a future heater, it is necessary to modify the design, which consists of the following:
- First, the tip is removed from the working part of the soldering iron, after which the mica tube with the nichrome winding placed underneath it is completely pulled out of the wooden handle-holder.
- Then the power wires suitable for the heating element are disconnected and also pulled out of the wooden holder, but from the other side.
- After this, a hole of the required size is drilled in the side of the handle, into which the previously disconnected network wire is threaded (towards the working part).
- At the next step of making a soldering gun, take a dropper, from which the tip is cut off in the area where the rubber skirt is located. Then the exposed part of the tube is inserted into the network hole of the wooden handle.
- Next, the rubberized seal (skirt) of the dropper is pressed with force against the end part of the holder, ensuring reliable sealing of the docking area.
- Upon completion of these actions, the ends of the drawn power wire are reconnected to the nichrome winding and reliably insulated.
- A piece of telescopic antenna of suitable diameter is inserted into the hole where the soldering iron tip was previously located and carefully clamped with a locking screw.
The tightness of the inlet hole in the handle will ensure effective inflation with cold air coming from the compressor station.
At the final stage of assembling the soldering gun, you should return the heating tube with the nichrome winding to its place, having previously wrapped it with several layers of aluminum foil.
Then the heater prepared in this way is recessed into a wooden handle and securely fixed using a flexible copper wire wound along the entire length of the protective coating.
Self-installation and its features
So, let's build a hair dryer design. First, the old body of the future construction hair dryer is disassembled, and the plastic parts are removed from there. If this is not done, then, in addition to the pungent odor, you can ensure that the wires short out when the plastic melts and gets on the electrical elements.
Then a nichrome spiral is wound onto the heating element, and the denser the turns, the higher the heating temperature. The ends of the wire must be brought out. When winding, you must strictly maintain the distance so that the turns do not touch. A short circuit is also possible.
Now the ends need to be connected to the cord. To do this, they simply wind it, since nichrome cannot be soldered, and insulate it.
There are the following types of attachments: focusing, flat, welded mirror, reflective and gear.
Next, the rubber tube must be placed on the handle of the hair dryer so that the heated ceramic does not burn your hands. An old cloth corrugation from a vacuum cleaner is best suited for this purpose; the inside is rubberized, and the outside material will not heat up.
Now the wires need to be connected to the transformer, after setting the almost finished hair dryer to fan mode. You need to remember the rule: turn on the air supply first, then the heat, and turn it off vice versa.
By the way, for additional air supply, if you are not satisfied with the old device, you can use an aquarium compressor, but it must be powerful enough.
First, the hair dryer is checked at a safe distance. If the device works correctly: the coil heats up red-hot, air flows in, then you can test it on the product. It's better if it's something of no value.
Such a hand-held device is limited in movement, because the wires with the transformer are quite difficult to carry, so you can make a holder on a stand.
When working with any handicraft product, you need to remember safety rules.
Return to contents
Self-repair of industrial designs
Before repairing a soldering gun, first of all, you need to familiarize yourself with the connection diagram of the fan and heater to the electrical network (its other name is pinout).
Knowledge of this circuit allows you to check the correctness of the power supply to each of the main elements of the thermal module and make sure that they are in good condition.
Direct repair of a non-working soldering device comes down to replacing failed or damaged parts, which can be detected by the presence of characteristic burn marks.
When operating a soldering gun, sudden changes in operating modes (heater temperature jumps, in particular) should be avoided. In addition, it is strictly forbidden to touch the working thermal element, as well as the replaceable nozzles.
Otherwise, the operator risks serious skin burns from the hot air. Changing plastic attachments is allowed only after the soldering gun has been completely turned off and all its working parts have cooled down.
Source: svaring.com
Electrical circuit for an INTERSKOL hair dryer on a DB230V board
Hairdryer Interskol FE-2000. DB230V board with triac and optocoupler. Photo in analysis.
DB230V board. Closer photo.
Hairdryer Interskol FE-2000. DB230V board. Connection diagram
DB230V board_connection diagram. Option 2.
DB230V board_electrical circuit diagram. In the circuit, there is an underdrawing - between the point Gx and the connection point of the spirals R1 and R2 - a thermal fuse is turned on (see the table with the list of parts above). In addition, the thermocouple output is connected incorrectly, see comments.
03/04/13: I am posting for public use the electronics diagram of the DB 230 V board, which was sent to me by a reader who wished to remain anonymous:
Interskol FE-2000 hair dryer circuit on DB-230V board
Soldering hair dryer from a regular soldering iron (life hack)
In this instruction you will learn how to make a soldering gun with your own hands using a very ordinary soldering iron. Of course, there is no temperature controller or other bells and whistles, but the homemade product can be assembled quickly, simply at minimal cost.
Materials and tools used by the author:
List of materials:
— soldering iron 60-150 Watt; — homemade pump (or purchased); - self-adhesive foil; - rubber hose; — metal tube (nozzle); - electrical tape.
List of tools:
- screwdriver; - scissors; - skillful hands.
Soldering gun manufacturing process:
Step one. Disassembling the soldering iron
First of all, you will need to take a soldering iron and remove the tip from it. Usually you need to unscrew 2 screws to do this.
Step five. How does the pump work?
The author’s pump is homemade, but today you can buy a ready-made one. The pump is very simple to make; you will need a small motor, a plastic gear, a bottle cap, a syringe and other little things. Thanks to the crank, the motor makes the membrane work; it is made from a balloon. The syringe has homemade valves, one for inlet and one for outlet. As a result, the pump works.
Step six. Connect and test
You can connect the pump to a soldering iron and try soldering. The author’s soldering gun works quite well, easily melting tin, shrinking heat-shrinkable tubing, and so on. The harder the pump works, the lower the temperature of the soldering iron will be, since the air will not have time to warm up. Well, with a weak flow, the air will be hot, but the flow may be weak. Here it is necessary to select the operating mode experimentally. That's it, the soldering iron is ready, good luck!
Source: usamodelkina.ru
Video for those who don't have time to read
If you don’t have time to read tedious texts, go straight to the video. It shows the manufacturing process of individual parts, the assembly process, and the final tests of the homemade product. For people with disabilities, subtitles will now be added to each video.
Attention! The article omitted a description of some aspects of making a hair dryer, since it is present in the video report, and vice versa.
In the past, for all sorts of “thermal technologies” (of course, except for soldering and dismantling radio components), I used a small lighter with a nozzle. But a gas burner, in terms of producing a hot stream of air, has a number of disadvantages. With its help, it is impossible to smoothly regulate the temperature, the size of the torch depends on the amount of gas in the tank, an open flame can cause a fire, and finally, you need to buy gas in cans.
So, it was decided to make a small hairdryer from all sorts of rubbish that can be found in the bins of a DIYer. An additional incentive to produce this device was the price of a factory-made hair dryer, which starts at about $30.
I note that during the assembly and testing of the subject, I built another, still speculative, model of a hair dryer with higher power. So, if you need a more serious unit, stay tuned for new publications.
What are the effects and consequences of a hair dryer?
Some people are interested in the question: how does it “pret” and how long does the hair dryer work (action time)? The drug retains its euphoric effect for quite a long time. Even a small dose of powder can give that same narcotic “high” for a day or even two. All signs of using a hair dryer occur due to an increase in the level of norepinephrine, as well as the hormone dopamine. How long does it take for a hair dryer to start working? As a rule, after 30-40 minutes there is an increase in strength and mood, which is narcotic intoxication. What does "under the hairdryer" mean? What is the “gain” from a hair dryer? Is there a hair dryer addiction?
Drug effect
“Coming” is the first stage of intoxication. How does a person behave under a hairdryer? After using the hairdryer, he feels a surge of strength and energy, an increase in mood, and fun. A person becomes more sociable, liberated, and fearless. He does not feel the desire to sleep or hunger, and can lead an active lifestyle for days without feeling tired. The addict feels that he can move mountains, he is resilient, strong, talented, and feels how his mental abilities are increasing. It is thanks to this effect that the powder causes addiction almost from the first use. A person wants to experience this effect again and again.
At the second stage, a person becomes weak, the effect of the drug begins to subside, and apathy replaces fun. Soon the person becomes aggressive, nervous, irritable. The only thought in his head: “turn up the hairdryer” (buy and use a new dose).
The third stage is drug withdrawal. Without another dose, the drug addict begins to “withdraw”, which is expressed in a sharp deterioration in health, headaches, poor health, drowsiness, and weakness throughout the body. The addict cannot eat because food makes him sick. Paranoia and mental disorders often occur. Withdrawal syndrome may well lead to suicide without timely provision of drug treatment. If you see that your loved one has side effects and consequences from using a hairdryer, call our center, we will help not only in a hospital setting, but also at home around the clock and anonymously.
Signs of a hairdryer addict
How to identify a hair dryer drug addict? After using a drug, the signs and consequences for each person are quite individual. It all depends on the addict’s body, its health and characteristics. The drug stimulates the central nervous system, causing a reaction comparable to stress. What happens from a hair dryer?
Common symptoms of use:
- dilated pupils;
- increased heart rate;
- increased heart rate;
- accelerated reaction;
- incoherent speech;
- constant movement;
- impaired coordination of movements;
- muscle twitching;
- spasms;
- tremor of the limbs;
- confused rapid speech.
It is by these signs that one can recognize the effect of a hair dryer on the body. As soon as you see these symptoms in a loved one and suspect that he is “addicted to a hair dryer,” you should not delay, contact the Center for Healthy Youth for help before it is too late. If addiction treatment is not started in time, irreversible changes will occur in the human body and brain.
Long-term dependence leads to addiction; as a rule, after 2-3 weeks tolerance sets in, the person no longer feels the former euphoria from the drug. To get it back, he increases the dose and frequency of use, which most often leads to an overdose or switching to intravenous injections.
Drug addiction is largely psychological. A person longs to experience the effect of a narcotic substance again and again. Therefore, it is pointless to treat a drug addict with medication; comprehensive psychosocial rehabilitation in a drug treatment center is necessary.
Main parts and materials
I've had this fan lying around idle for a while now. These 40mm fans used to be widely used in PC 486 and video cards.
This unit will require minimal modification. You will need to re-insert the wire into the attachment point.
I didn’t have a tube of a suitable diameter for the heater air duct, so I borrowed it from a ten-watt resistor type C-5-5. To free the tube from the insides, I sawed off one of its rolled edges with a file.
Drawings of a homemade soldering gun
This is an assembly drawing of a soldering gun. I was too lazy to draw isometric projections, but you can see the soldering gun from all sides by watching the video posted at the beginning of the article.
And this drawing shows the attachment point for the electrical terminal block. The M3 screw securing the terminal block is isolated from the tin body using a small piece of cambric (polyvinyl chloride tube) and an M4 fiberglass washer. An M3 fiberglass washer is placed between the screw heads and the nylon handle of the hair dryer. This washer prevents heat transfer from the electrical terminal block to the hair dryer handle through the M3 screw.
A drawing of the body of a miniature soldering gun in A4 format and 300dpi resolution is located under the thumbnail. If you print it on a printer and stick it on a tin from a tin can, then you can easily make the most complex part of this homemade product.
Why is it better to remove amphetamine in a hospital?
Drug addiction treatment in a specialized clinic is always more effective. Among its advantages:
- 24-hour patient monitoring;
- the ability to conduct diagnostic examinations;
- effective relief of withdrawal symptoms;/li>
- minimizing the likelihood of disease relapse;
- powerful psychotherapeutic support;
- selection of an individual drug control plan.
If you have used amphetamine, be sure to visit a doctor. Then your chances of recovery will be much higher.
Small details
Let's look under the fan to see how the coil is connected to the cable. The design turned out to be very repairable. It is enough to unscrew just a few screws to replace the spiral, for example, in order to adjust the resistance of the spiral to the voltage of an existing power source.
I soldered the petals to the heater cable, but it was possible to roll the ends of the conductors into rings and tin them, just like we do when we change a collapsible power plug.
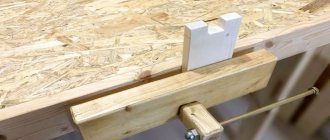
Most of the things I intend to do with a soldering iron require both hands free. Therefore, I made this stand for fixing the hair dryer on the table. A clamp with an open perimeter allows you to securely hold the hair dryer and, if necessary, easily remove it from the stand.
This is how the soldering gun turned out.
Overdose
Exceeding the dose leads a person to excessive stimulation of the cardiovascular system. This causes a risk of increased blood pressure, strokes and heart attacks. Due to the strong effect on the human psyche, psychosis and suicide are often observed. Symptoms of overdose can be recognized by the following manifestations:
- excessive sweating;
- increased body temperature;
- the presence of hallucinations, both visual and tactile;
- convulsions;
- causeless anxiety and panic;
- headaches;
- repeated vomiting, diarrhea;
- increased blood pressure;
- cardiopalmus;
- dilated pupils;
- pain when urinating;
- pallor of the skin.
In cases of overdose, you must immediately call an ambulance: severe cases lead to unpredictable consequences for a person. Cardiac arrest and renal failure are common.
Technical data
The hair dryer fan is powered from a 12 Volt DC source.
The heating element of the hair dryer is powered by an alternating current source of 0...12 Volts. With its help, you can change the temperature of the air flow, from room temperature to 600°C.
Mini-hair dryer parameters at temperature limits.
The diameter of the nichrome wire of the heating element spiral is 1.2 mm.
The heater supply voltage is 9 Volts.
The heater current is 11 Amperes.
Heater power - 100 Watt.
Air flow temperature - 600°C.
The time it takes for the hair dryer to reach the selected temperature mode is 1 minute.
I didn’t make a special power supply for my hair dryer, so I have universal sources of different power at my disposal.
If you do not have a suitable power source, then you can adjust the resistance of the spiral to one of the output voltages of the ATX computer power supply or make the simplest power supply from the ballast of a burnt-out CFL (Compact Fluorescent Lamp). For a detailed description of the modification of the power supply based on CFLs, see here>>>
In the picture, a circuit of a switching power supply for a miniature soldering gun, assembled on the basis of a CFL ballast. Additional elements are highlighted in red. Pulse transformer TV2 has two secondary windings. One of them powers the fan, and the other powers the heater coil. To adjust the temperature of the coil, switch S1 is used.
Possible tool failures
Regardless of whether the hair dryer is made independently or purchased ready-made, the possibility of its breakdown cannot be ruled out. It can be repaired without outside help. To do this, it is important to study its design and accurately determine the breakdown.
There are several possible options for equipment failure. Among the most common are the following:
- No power. The reasons for such a breakdown may be a lack of power directly at the outlet or a violation of the integrity of the electrical cord. To check for these faults, use an indicator socket or multimeter.
- If there is power in the outlet, but the tool still does not work, it is recommended to check the electrical cable. The weakest points of the cord are considered to be the points where it enters the housing and connects to the electrical plug.
To eliminate this breakdown, you will have to disassemble the hair dryer body by unscrewing all the fasteners. If you find a broken cable, you need to strip it and twist or solder the wires. After this, the breakage area must be insulated.- If no cable faults are detected, it is recommended to ring the entire chain of working elements of the device using a tester. A hair dryer circuit can be of great help with this. Quite often the cause is a broken fuse. It needs to be replaced with a fuse of the same characteristics.
- The on/off button is broken. To detect it you need to use a tester. With its help, contacts are checked and cleaned to the color of metal. If the fault cannot be eliminated in this way, the switch will need to be replaced. In the same way, you can repair a hair dryer if you do not switch the speed of its operation.
- The fan has stopped rotating. To fix this problem, you will also need to disassemble the housing and inspect the fan blades. It is possible that it stopped spinning due to the accumulation of dust or dirt in it. Simply cleaning the blades is enough.
- The air does not heat up. The reason for such a breakdown may lie in the fact that the hair dryer coil has burned out. To repair the instrument, it is recommended to disassemble the device body and ring the spiral with a tester. It is possible to replace a burnt-out section of the spiral, but in this case the possibility that it will burn out again cannot be ruled out. To avoid this, it is better to replace the spiral completely.
- The electric motor of the hair dryer burned out. This malfunction can only be determined by using a tester. Obvious signs of breakdown may be the burning smell that occurs when using a hair dryer. You won't be able to fix the problem yourself. It's better to contact specialists.
- The simplicity of the design of this tool makes it possible to repair various types of breakdowns without the help of a specialist.
About the heater temperature and the choice of material for its body
The operating temperature of the nichrome spiral should not exceed 1000°C. The temperature of a hot coil can be approximately determined by its color. The table shows temperatures in degrees Celsius.
This table shows the melting points of some metals.
As you can see, copper, brass or steel are best suited for making the heater body. But, copper and brass quickly oxidize at high temperatures. Therefore, it is better to choose steel or nickel-plated steel.
If you have defective lithium-ion batteries at your disposal, you can make a tube from the body of one of the cans. The housings of the cans of any lithium-ion batteries and lithium-ion batteries are made of stainless steel.
The picture shows a disassembled laptop battery. The diameter of the can body is 16mm, length – 65mm. How to disassemble a laptop battery is described and shown here>>>
And this photo shows a disassembled “EN-EL1” battery from Nikon cameras. Can diameter 14mm, length – 48mm.
The contents of lithium-ion battery cans and lithium-ion batteries are extremely toxic! Therefore, cans should be disassembled outdoors, and the extracted products should be sealed in a secure container and taken to a battery recycling point. Such items are usually available in large supermarkets and specialty stores.
Source: oldoctober.com
Appearance
It is almost impossible to find amphetamine in its pure form. Drug traffickers mix it with different mixtures to reduce the cost of production and extract maximum profit from the trade. Because of this, the concentration of the active substance in the drug always varies. Sometimes completely different mixtures are sold under the guise of a “hair dryer”.
The composition can be recognized by the following properties:
- Available in the form of capsules, tablets, crystals, powder;
- odorless (a subtle sour aroma can rarely be detected);
- color can be purple, white, yellow, beige-brown;
- it is packaged in polyethylene, foil or paper.
Basic methods for making a soldering gun at home
High-quality professional equipment for soldering microcomponents costs a lot of money, and inexpensive hot air guns are not suitable for most tasks. Many repairmen and radio amateurs from time to time encounter low-quality hot air guns for soldering.
To avoid such misunderstandings, it makes sense to make a soldering gun with your own hands. This option is perfect for repairmen and radio amateurs who have specific equipment requirements and a very limited budget.
Hair Dryer Basics
Before you start designing a homemade soldering gun, you should familiarize yourself with the basic methods of using this tool.
A hot air gun for soldering, as a rule, may be needed in the following cases:
- Soldering very small parts in SMD packages. Most small radio components cannot be soldered with a soldering iron. To install such components, it is necessary to tin the landing site, lubricate it with flux and position the microcircuit. After this, you can safely start heating the mounting contacts using a hair dryer until the solder under the component melts and it sits on the printed circuit board.
- Lack of free space to use a soldering iron. With a very dense arrangement of elements on a printed circuit board, using a soldering iron is significantly difficult. In this case, a hot air gun is the best option for a radio amateur.
- Repair work related to mobile phones or tablet computers. Most modern gadgets are almost impossible to disassemble without using a heat gun. For example, replacing the screen on any phone requires pre-heating the old matrix using a heat gun. Serious heat neutralizes the adhesive and allows the screen to separate from the device body.
- Removing BGA chips from pads. Work on reballing and warming up modern video chips is carried out using a soldering hot air gun.
The soldering process using a soldering hot air gun involves the following steps:
- applying solder or soldering paste to the intended installation site;
- installation of the microcircuit on the seat;
- warming up the mounting contacts using a soldering hot air gun.
In order to protect nearby components from heat, special screens made of aluminum foil should be placed on them.
After carrying out the work, you should check the quality of soldering of all contacts using a needle.
Removing the element using a hair dryer is even easier. To remove a faulty microcircuit you must:
- heat all contacts evenly;
- Carefully remove the element using tweezers or a suction cup.
When heating the surface with a hot air gun, it is necessary to make circular movements. This technique allows you to avoid local overheating of the board and disruption of its geometry.
Self-assembly of the structure: step-by-step process
To produce a full-fledged construction power tool from a household model of a hair dryer, the device must be appropriately modernized by changing its design.
First of all, the hair dryer body is disassembled, and all plastic parts are removed. During operation, they can not only melt and emit a pungent odor, but can also lead to short-circuiting of wires as a result of melting and liquid plastic entering the structure of electrical elements. It is advisable to replace them with textolite or ebonite parts.
After this, the no longer suitable heating element is replaced with a ceramic part. A nichrome spiral must be wound onto the installed ceramic element. In this case, the turns should be arranged as tightly as possible, since their number determines the heating temperature of the tool - a denser arrangement provides greater heating. During the process, it is important to consider some aspects:
- The ends of the wire must be brought out.
- There should be no contact of the nichrome turns with each other, as this may cause a short circuit.
- Excessively dense laying of turns on a home-made household appliance is also unacceptable, since electrical equipment in a residential area is not intended for serious industrial loads.
To make a heating element, you can use the housing of powerful halogen lamps and nichrome spirals. Lamp glasses have good resistance to high temperatures. The twisted wire should be placed in the glass housing structure. Since solder is not possible for nichrome, the connection is made by securely screwing the ends of the nichrome wire to the transformer wiring. After which everything is carefully isolated.
You should also wrap the finished heating element with foil. In this way, reflected radiation is created, which increases the power of the power tool and minimizes its heat loss. An alternative to using a lamp body is fiberglass, which can be wound on a nichrome spiral, and a durable steel tube placed on top to vent hot air out.
After this, a rubber tube is placed on the handle of the product, which will protect the hand from overheating of the ceramic. The optimal solution may be to use fabric corrugation. For example, it can be taken from vacuum cleaners. It has a rubberized structure, which prevents it from heating up from the outside.
Then the wire should be connected to the transformer, initially setting the almost finished product in fan mode. It is important to follow the rule: first of all, the air supply is turned on, and then the heat; when turned off, the actions are performed in the reverse order. It is noteworthy that in order to provide additional air supply, it is recommended to use an aquarium compressor with sufficient power.
The disadvantage of such a device is limited movement, since the wiring and transformer are quite difficult to drag, therefore it is recommended to make holders on stands. When working with homemade devices, you must always remember the safety rules.
equipment requirements
The basic requirements for a hot air gun for soldering microcircuits with your own hands are:
- Compliance with soldering temperature conditions. Most soldering work is carried out within 190 – 250 degrees Celsius. The bottom bar is for lead-containing solders, and the top bar is for factory lead-free solders. The soldering hot air gun must produce an air flow of a strictly specified temperature in order to protect the microcircuits from overheating and failure.
- Stable air flow. If the air flow is uneven, working with soldering equipment becomes seriously difficult.
- Safety and ease of use. The heat gun should not overheat and pose a danger to the technician. Ideally, a powerful DIY soldering gun should be designed based on a transformer power supply.
The soldering equipment must contain exclusively safe elements. When making a homemade compressor power supply, special attention should be paid to the reliability of the design and its safety for others.
Safety during production and operation
A construction hair dryer is a rather complex electrical appliance. Its production and further operation require compliance with a number of safety regulations:
- It is unacceptable to use an electrical appliance, especially a homemade one, in conjunction with gas equipment. It is used with special care in the kitchen area. Improper use and sparking may result in an explosion.
- When carrying out any work with a construction hairdryer, it is necessary to prepare fire extinguishing means in advance.
- Do not place a hot electrical appliance on an unprotected surface: there is a risk of damaging the coating.
- If you plan to use a hair dryer to work with paint, you should equip an additional source of ventilation. Otherwise, the volatile components of the paint will spread through the air and have a negative impact on health.
- The finished construction hair dryer must be checked in operation. Initially, the device is turned on at a safe distance. Only when you are convinced of its normal operation (red-hot nichrome spiral, air intake and output), can you try it on a low-value product.
When working with any construction hair dryers, you need to remember one rule: first of all, the air supply is turned on, then the heat. Switching off occurs in the reverse order, otherwise overheating and melting of parts is possible.
Hairdryer from a soldering iron
Before you make a soldering gun with your own hands, you should:
- think over a device for air supply;
- assemble a special heating element;
- equip the equipment with thermocouples;
- think over a system for monitoring the current temperature of the equipment.
When considering how to make a soldering iron from a regular soldering iron, you should take into account all the subtle points so as not to expose yourself to excessive risk.
The main criteria that a soldering iron-based thermal device must meet are:
- temperature adjustment;
- normal heater power;
- safe compressor.
What do you need to create a hair dryer from a soldering iron?
When creating a hair dryer for soldering with your own hands, you should prepare:
- a regular old soldering iron running on AC power;
- a quartz tube to create a hair dryer air flow heating chamber;
- a halogen lamp for spotlights for heating the air and melting flux with a hairdryer;
- nichrome wire up to 0.7 millimeters thick;
- thermostat;
- soldering gun fan.
All equipment must be connected to specially prepared connectors at the soldering station, the pinout of which depends on the manufacturer of the soldering equipment.
The process of assembling a hair dryer from a soldering iron
A homemade hair dryer for soldering microcircuits from an old soldering iron is assembled in several stages:
- Laying a homemade spiral of nichrome wire inside a quartz tube.
- Connecting the spiral to the power wire.
- Threading a thermocouple wire to regulate the temperature of the filament.
- Insulation of the device using a layer of tube wound on a quartz tube.
- Installing a tube in the handle of a soldering iron instead of a tip.
- Centering the tube by wrapping it with asbestos cord.
- Clamping the front tube outlet using a clamp.
- Threading a hose to supply air flow.
- Connecting a compressor that creates an air flow.
It is better to place the temperature regulator of the heating source on the body of the heat gun.
The operating principle of a hot air gun based on a soldering iron is as follows:
A small current is applied to the nichrome thread, causing it to become hot. The air coming from the compressor is collected in a special insulated chamber and heated under the action of a spiral and insulating foil. After this, the air leaves the heating chamber and goes directly to the printed circuit board.
Unfortunately, this method of making a thermal hair dryer has a lot of disadvantages.
The disadvantages of a hot air gun made from a conventional soldering iron include:
- difficulties with temperature calibration;
- The air flow force is adjusted by pinching the air duct;
- the inability to adjust the heating intensity in most conventional soldering irons;
- labor intensity of work;
- poor thermal insulation of the device.
In most cases, making a heat gun from a soldering iron is not justified. Remaking an inexpensive construction hot air gun is a much more efficient method of making a hot air gun for soldering micro components.
Safety precautions when working with a hair dryer
- The device cannot be used with gas equipment. This is especially true for kitchen areas, where open air and flexible hoses coexist. Misfortune cannot be avoided.
- Do not use a hair dryer to work with paints without a source of ventilation. When heated, volatile components quickly pass into the air and thereby be harmful to health.
- During any process using a heat gun, it is important to have fire extinguishing agents readily available.
- Do not place a hot device on a surface without protection: you can damage the decorative coating.
- In order to remove paint from windows, you will need a special nozzle to protect the glass, which is not provided in the homemade device. Therefore, it is better to use the services of masters or scrape it with something. Otherwise, there is a risk that the glass will simply shatter and cause injury.
- When working with such a device, the presence of children and animals in the affected area should be excluded.
- Before removing paint, it is worth finding out the origin of the coating, in case it contains toxic lead.
- And, of course, such a hair dryer cannot be used on hair.