A blade made by yourself is not only a guarantee of good quality, but also a certain “prestige” among friends. Making a knife from a file at home may seem like a daunting task. But with some skill and careful study of this material, almost anyone can cope with this. You need to take the process seriously and everything will work out.
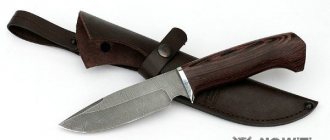
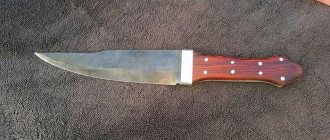
A knife made from a file.
Required tools and materials
The process of making a knife involves many difficulties, including the selection of materials. For manufacturing, you need to select a file more than 3 cm wide; it is advisable to look for a Soviet-made tool. The cross-section of the file surface should be flat or diamond-shaped; if the latter is found, this will be the best option, since the shape of the steel is stronger and will withstand loads.
The manufacturing process will require the following tools and items:
- Rivets made of brass alloy.
- Etching is performed with ferric chloride.
- Magnet for checking the degree of hardening.
- To process surfaces you will need sandpaper.
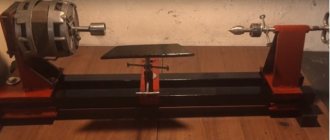
Processing is carried out with a grinder or grinder. You also need to decide on the material of the handle of the future knife. A file knife can have a metal or wooden handle, its weight and purpose depend on this. Before manufacturing, it is worth preparing a sketch of the future product; usually it is drawn on paper.
The process of making a knife from a file
Assembly
The parts of the future knife are assembled from a file without forging using rivets. Special rivets are sold in specialized stores. They are often made from steel, less often from brass, copper, and aluminum. Rivets look like a metal rod with a cap. To connect the parts, you need to drill holes in them equal in diameter to the rod. The rivets are inserted into the holes, the head resting on the anvil, the sharp end is flattened with a hammer. The connection of the handle with rivets is strong and inseparable. It is best to use blind rivets that can be worked without the use of a hammer. You can build fastening elements yourself, using spacer sleeves and nails as the starting material.
Firing the workpiece
The files are made from U10 steel, which is enriched with carbon; a file made from this steel is fragile and can easily crack under load. In order for the metal to be hard and not crumble when struck, it must be hardened. Usually the procedure is carried out in a special oven, the temperature of which reaches 700 °C.
To harden a knife made from a file, which you made yourself, you can use a regular gas stove.
The combustion temperature on the stove is not high, reaching no more than 300 degrees. To achieve the required heat, you need to use a kind of screen. In the absence of a special thermometer, you can use ordinary table salt, its melting point is equal to the hardening of knife steel.
Knife hardening
Hardening of the file is necessary only in the cutting part. Checking for uniform hardening occurs visually; after reaching the temperature, the knife should be uniformly reddish in color. The product must be kept at maximum temperatures for at least 4 hours. Cooling is done smoothly; if you cool the part right away, it will simply crack. Cooling of the part occurs through a gradual decrease in temperature; heating decreases every hour by a quarter of its initial intensity.
Finishing the blade and handle - how to do it right?
After all these manipulations, you can begin finishing the blade. You can use all available tools that are intended for grinding: sandpaper, metal brushes, felt, vulcanite wheels, a grinding machine, etc. There is no need to be zealous - there is still an etching process ahead. Your task is to give the blade smoothness and bring its surface into a neat appearance.
Before etching, you can attach linings to the handle from the material we have planned, or wrap the metal with a strip of leather, it’s a matter of taste. In the first case, the finishing treatment must be carried out after etching, but leather can be wrapped already at this stage. You will need at least a half meter solid piece. First, do a simple wrap to see how the knife will look in this design, whether the piece of leather is long enough, and how the knife will feel in your hand. If you are happy with everything, unwind the handle and apply special leather glue to the back of the leather strip, carefully wrap the handle, this time trying as hard as you can.
A wooden handle will take longer to process. The holes for the rivets should be filled with epoxy resin, then the handle should be fastened with rivets and clamped in a vice until the resin has completely cooled. Two rivets will be enough. Once the resin has hardened, you can shape the handle, but do not rush into the final processing.
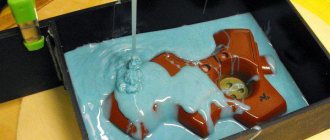
First - etching! If there is a radio store nearby, you can buy ferric chloride, in which the blade is etched until it obtains a gray, matte tint.
The film that forms on the blade will protect it from corrosion, so try not to remove it. If ferric chloride is too rare for you, pickling can be done with improvised means: vinegar, lemon juice or even ground raw potatoes! It is very important to clean the blades of any type of contamination, because when etching, even your fingerprints may appear on it, and then you will have to clean off the oxide film and start all over again.
How to harden a knife from a file
After firing, you can begin to form the future product. The workpiece is secured in a vice, the parts are processed with a grinder and all excess slag and layers of metal are removed. The sharpening machine is used with a coarse-grained abrasive wheel. The degree and shape of sharpening is carried out according to the prepared sketch. On the handle compartment you need to drill one or two holes to attach the handle.
After the tool is hardened from the file, it is necessary to treat the entire surface except the handle. A burner can be a tool for hardening, since the temperature is higher and the knife will harden faster. Uniform tempering of a knife from a file will give strength to the future product. The correct hardening of a knife made from a file can be determined with a magnet; if there is no reaction with the metal, then it is suitable for further use. After the process, the metal needs to be cooled, just put it in a bucket of water.
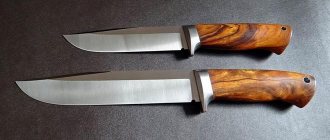
File knife and drawing for it
There is such a thing as metal stress. With this action, the metal crumbles and crumbles. To avoid adverse consequences, it is necessary to heat the instrument in the oven at the maximum temperature for several hours.
Forming, hardening and tempering is an important sequence!
In the workshop, holding the workpiece in a vice, we cut off and cut off unnecessary pieces, or grind it on a coarse-grained abrasive disk, giving the file a completely different shape - the shape of the future knife. If the knife is decorated with wood or other plates, do not forget to drill holes for rivets in the handle or cut a groove with a grinder.
Hardening is the next stage after formation. Many people make a big mistake, basing their assessment of the degree of hardening on the glow of the heated metal, but only an ordinary magnet can show the real picture - if the hot metal does not react in any way to its presence, then the hardening has been brought to the required degree. The future blade should be heated evenly, with the exception of the handle area; only a small area of 3-4 cm at the base of the blade should be heated. For this, it is best to use a burner that produces a higher temperature.
Also prepare a container of water in which you will cool the metal. When you achieve a uniform glow of the metal and the magnet stops reacting to it, warm the workpiece for a few more minutes, and then sharply plunge it into water - just like in the movies! If the process has been followed in every detail, the metal will be able to scratch the glass - this is the best sign of good tempering.
But due to the high internal pressure, hardened steel tends to break, crack and crumble when sharpened, so you need to temper it - a process through which internal stress is relieved while the hardness of the metal decreases slightly.
This is exactly what metal drills do! There is absolutely nothing complicated in the process itself - you just need to put the workpiece in the oven and bake it for an hour and a half at a temperature of about 200 ° C. The workpiece must cool down together with the oven!
Making the handle
Before making a handle for a product, you should decide on the appearance, materials and shape. You can use any material that is at hand. A wooden handle is considered a harmonious option.
File knife handle
The process includes several stages:
- Selection of materials, it is possible to use different types of wood for a unique design.
- It is necessary to make a bolster, the lower part of the knife. The remainder of a file or other metal is used.
- Wooden pieces are placed on top of each other and glued together with epoxy glue.
- To glue the pieces together better and faster, you need to use a press.
- The excess parts are trimmed with a saw, after which they are processed with sandpaper to the required shape.
- When finished, the handle is varnished for greater preservation; it is possible to use stain to darken it.
It is important to understand that all knives, regardless of category, are considered edged weapons. However, a cutting product whose blade length is no more than 90 cm and whose thickness is more than 6 mm can be removed from the category of edged weapons.
Sharpening is done in the usual way on a grinding machine.
The handle can be made of leather, deer antler or other materials. Installation depends on the form; each type requires an individual approach. The leather belt is tightly placed over the handle area, glued with special glue.
The nuances of making a handle
When making knives, many people do not pay attention to the quality of the handle, although it should be durable and comfortable. At the time of drawing up the sketch, a suitable material is selected:
- tree;
- leather;
- metal;
- textolite
Wood is most often chosen, as this material can last for several years, is well processed and inexpensive. Step-by-step creation of the handle is carried out as follows:
- Based on a pre-prepared sketch, two halves of the handle are created. This can be done on a machine or manually.
- The lower part of the converted file is prepared.
- The two halves are correctly applied to each other, gluing is carried out with epoxy glue. You can speed up the process and make the connection more durable by using a press.
- The two halves are secured with rivets, for which holes were previously made in the lower part.
The surface of the wooden handle is varnished. Due to this, the material receives protection from moisture. If desired, you can cover the surface with leather or tarpaulin. Stacked handles made from pieces of different materials tightly strung on a shank turn out to be beautiful.
Homemade knives are not included in the category of edged weapons, provided that the cutting part has a length of no more than 90 cm and a thickness of less than 6 mm.
Proper processing
The initial processing of the knife blade is performed with any available tool. Sharpening a knife from a file can be done on a grinding machine, which will speed up the process and make the blade more uniform across the plane. The initial sharpening does not require ideal parameters, since the etching process occurs after it.
Etching the blade in citric acid
Etching occurs chemically using ferric chloride, which can be purchased at radio components or hardware stores. It is necessary to completely lubricate the product with the solution, or lower it into a flat container with it. The process will give the blade a film formed on the blade, which will provide protection and it is highly not recommended to remove it. At home, you can use citric acid mixed with vinegar for etching.
After all the processes carried out to process and produce a knife from a file, it is necessary to carry out final processing. The blade is carefully sharpened on a grinding machine to give it sharpness. The handle is polished with a solution of wax and turpentine or varnished.
Tips for assembly and sharpening
Initial sharpening can be carried out using various tools. Most often, a grinding machine is used for this, which speeds up the process and makes the blade more uniform. At the first stage, etching is carried out, so there is no need to strictly adhere to the rules.
Ferric chloride is often used for etching. It covers the entire surface of the blade, after which a protective film is formed. You can carry out this procedure at home using citric acid, which is mixed with vinegar. The final stage is to give the blade the desired shape. To do this, careful sharpening is carried out using a grinding machine. After the procedure, the homemade knife can be used for its intended purpose.
The process of manufacturing a device from a file is quite complicated; mistakes made significantly reduce the service life of the product. Homemade knives made from a file, the pros and cons of which are related to the peculiarities of production, do not have the proper flexibility. If a lateral load is applied, the blade may shatter. Most often, DIY production is carried out to master the techniques of firing, hardening and metal processing. The resulting products are inexpensive and can last on the farm for a long time.
What kind of throwing knives should there be?
If you look at it, you can understand that any knife can be throwing, but some models can serve as throwing only once. I have repeatedly met cadres who love to throw any knives that come their way. And all this happens without the slightest doubt and with complete confidence in your professionalism. These comrades especially love to throw other people's penknives, which usually break on a tree trunk or other target.
Throwing something like a folding knife, which usually hits the barrel with the handle and breaks, you can hear that this blade is bad, since a normal knife should stick into the target regardless of the skill of the thrower. Having entrusted knives to such comrades a couple of times, I realized that this could no longer be cured. After reaching a certain condition, even the most peaceful office worker turns into a seasoned special forces soldier who considers it his duty to demonstrate to everyone around him his non-existent skills.
What I wanted to say by this is that folding models should not be thrown at all if you do not want to lose your knife. I'm sure that circus knife throwers are capable of throwing anything, and these objects will stick in them as they should, but you won't find such people on the street.
Is it possible to make a throwing knife with your own hands?
If you look at it, you can turn any knife with a fixed blade into a throwing knife. Although real models intended for these purposes must have a number of features. I personally learned to throw knives on simple Soviet kitchen utensils, and after a couple of days of intensive training, they stuck in me eight times out of ten at a distance of three meters from the target. But they had to be thrown using a revolving technique, since they were too light for non-revolving throwing.
Well, in general, simple knives, not originally intended for throwing, quickly fall apart, crumble and break off. The most interesting thing is that many people believe that the more expensive the blade, the more versatile it should be. And for throwing it should be suitable by default. But in fact, everything happens exactly the opposite. Even zone hardening does not save expensive knives with high blade hardness from chipping the cutting edge and breaking off the tip.
In general, throwing knives have a number of differences from conventional blades:
- The tip of a throwing knife should be thickly tapered;
- The handle of the throwing model is devoid of pads and any stops; all this is completely unnecessary. The stop prevents you from throwing the knife, and the pads often break when hitting the target. We won’t talk about knives with slide-in or through-mounting at all, since they have a completely different balance.
Most often, throwing knives are simple skeletons, i.e. they are cut from a single plate of metal. The model does not have a handle as such, so it is not very convenient to use as a combat knife.
Modern industry produces many models of throwing knives, but not all of them are suitable for practicing throwing, since the balance often leaves much to be desired. On the other hand, with regular training you can learn to throw any knife, but it takes time.
Don't think that by learning to throw knives, you will automatically turn into a super warrior who can kill enemies with one throw of a knife. This only happens in movies, but in reality only a few people can kill with one throw of a knife. During combat operations, not a single saboteur will risk throwing his knife at a sentry, since with a 99 percent probability he will have time to raise the alarm. All these stories about taking down a sentry with one throw refer to knife stories.