Aluminum is often used to make parts. Sometimes pieces of aluminum are melted to repair a defect and castings are made. You can melt duralumin fragments and unnecessary radio components. The review presents ways to melt aluminum at home, and what you will need for this. Experts will share their experience and tell you what properties of light metal need to be taken into account in order to melt the metal yourself.
Technology for melting aluminum at home
The essence of melting consists of several stages:
- Preparation of scrap. The raw materials used are aluminum profiles, wire (preliminarily crushed with pliers), and used parts. The pieces should be small. Paint and inclusions of other metals are not removed from them; all this will be part of the slag.
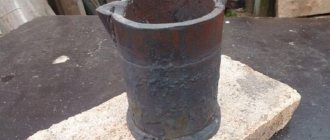
- Selecting a container in which to melt aluminum. A durable vessel made of steel (melting point 1300°C) or cast iron (1100°C) is suitable; use ready-made refractory crucibles.
- Preparing the mold for the melt. At home they are made independently. The manufacturing procedure is presented below.
- Melting scrap. The heat source is first determined.
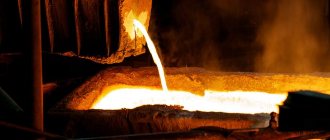
- Slag removal, casting production. The easiest way to melt is to carefully pour liquid aluminum into a prepared container or mold; the slag remains on the walls of the melting vessel. To prevent it from sticking, you need to cool it quickly.
In principle, the technology of industrial and artisanal casting is no different. The scrap is melted until it becomes fluid. After this, the melt is separated from the slag and poured into prepared forms. After the castings have cooled, they are broken. It is important to determine what should be obtained from liquid aluminum as a result. Even if you decide to melt metal for the sake of experiment, the container or mold for casting still needs to be prepared. Then it will be possible to examine the resulting ingot, check it for porosity, cleanliness, and uniformity of structure.
Brief description of muffle furnace
The main purpose of a muffle furnace is to heat metal. Using such a device can help melt metals such as aluminum or copper, as well as other non-ferrous materials. In addition, with its help you can successfully carry out the operation of firing ceramic products and drying them. Cremation can also be carried out. It is worth noting that there is a wide variety of muffle furnaces. They can be electric, gas, air and some other types. They also differ significantly in the type of construction. They are standard vertical or horizontal, as well as tubular.
The main difference between a muffle furnace and a conventional furnace for melting aluminum with your own hands is that it has a special section called the muffle. This area allows you to protect the metal that is being processed.
Equipment and methods of smelting
Before melting aluminum, choose a place and method for heating the metal. Two commonly used options:
- In garages or households, aluminum is melted, a smelter is built, it is made of bricks without the use of a binder mortar. A metal frame is convenient as a support; it should have a hole for air injection; for this, use a vacuum cleaner or hair dryer. A homemade stove is lined with coal. The melting container with the crowbar is placed inside. To better retain heat, the bricks are covered with a sheet of metal on top.
- At home, to heat up a small amount of scrap, use:
- gas burner;
— blowtorch;
- with a gas stove, you can melt a small amount of scrap, but the melt yield will be low.
The casting is melted in a steel vessel. To increase the heating rate, a design of two containers is used; they are inserted into one another with a gap of 1 cm. The bottom of the large container is perforated, it serves as a flame divider. When there is a gas burner, combine bottom heating with top heating. You can melt metal faster.
Optional equipment
For small portions of scrap, tin cans are sometimes used. But this container is unreliable, and the tin may burn through. It is safer to use a ceramic or metal refractory crucible for muffle furnaces. A good option is a cut-off fire extinguisher glass. For convenience, a gutter is made through which molten aluminum will flow. When working, use long tongs. You will need a spoon with a long handle to collect the slag.
Step-by-step manufacturing instructions
Do-it-yourself muffle furnace for melting metal - the best type of fuel for such a device is electricity. It can be used to heat metal to its melting point. Let us analyze in detail the stages of work on the independent production of a heating unit.
Manufacturing of the muffle structure
Depending on the material and configuration of the case, we begin to make a compartment for heating the metal. You can make a stove without a steel frame, but then you will need to lay the stove in a layer of thermal insulation. We use materials that can withstand high temperatures. But it is better to make a box from sheet metal or from an old barrel or even a refrigerator. Stages of work:
- We begin to prepare blocks for lining the fireproof chamber. For a small chamber you will need 7 large fireclay bricks. With their help, you can build a rectangular or cylindrical chamber for heating and hardening metal. If you want to build a round compartment, you will need to use a grinder to cut out trapezoidal blanks and first place them in the structure, outlining each detail.
- Having trimmed the edges, we place the parts on a flat surface and lightly tighten them with wire. We check the tightness of the edges of the blocks and the absence of large gaps. If necessary, we cut the blocks and reassemble the entire structure on the wire.
- Having ensured that the parts fit tightly, we lay them out in an even row and use a long ruler to mark the grooves for laying the heating elements of the furnace - spirals of nichrome wire. Depending on the diameter of the homemade or purchased spiral, we mark the rows so that they do not touch each other. If this happens, it threatens with a short circuit and tripping of the machine, and this is in the best case. The minimum gap is 20-30 mm.
- We select the grooves with a drill with a cutter or a drill or a grinder. It is better to make the furrows at a slight downward slope so that the spirals cannot fall out. The work is painstaking and requires attention, we don’t rush.
- After checking the accuracy of the cuts and correcting inaccurate joints of the grooves, we proceed to assembling the muffle structure. We fix the blocks using heat-resistant glue or mortar. We prepare a homemade mixture from equal parts of fireclay clay and sifted quartz sand.
To make a small muffle, you can use simple clay. To do this, we perform several additional operations:
- We make formwork from cardboard or thin plastic for pouring a liquid clay solution, or you can use a trimmed barrel. We take into account the wall thickness and dimensions of the furnace body.
- Soak the solution for 2-3 days so that it dissolves and swells. This mixture becomes plastic.
- After this, pour the solution into the formwork. Wall thickness – 50-70 mm. Be sure to compact it and pierce it with a thin rod to remove air bubbles and make the structure solid.
- Leave the part until the clay dries completely. We make grooves for laying spirals or holes for installing gas burners and exiting wires.
- We must harden the finished clay muffle in a furnace and only after that install it in the body.
Such a monolithic fired structure will be durable and will not be inferior in characteristics to a fireclay brick muffle.
Preparing and installing the heating coil
The spiral can be purchased at the store or wound yourself (the wire thickness needed is 1.2 mm):
- You will need a supply of wire made of nichrome or another alloy and a simple rod of suitable cross-section. We clamp the end of the rod and wire in a vice and begin to wind the spiral tightly.
- The coils can be laid closely, but without overlap. After winding, stretch the spiral a little in length so that there is a certain gap between the turns.
Further:
- We place the finished spirals into the prepared grooves in the muffle body and secure them with nichrome brackets. When installing the brackets, make sure that they do not bridge the turns with each other. For fastening, they also use a mortar for laying bricks made of clay and sand. This material does not conduct electricity.
- The power-calculated spirals will ensure a high temperature in the oven. To increase productivity and save energy, we recommend making several heating circuits that can be turned on separately. This way we can maintain the required temperature at the beginning of firing the metal and gradually bring it to the maximum.
- At the points where it exits the housing, we cover the wire with ceramic fuses, and immediately after exiting, we connect a large-section copper electrical cable. We run the cable into the electrical panel and connect it to a separate circuit breaker. The furnace must be reliably protected from short circuit currents; for protection, we must ground it and connect it to a separate RCD.
Important! For a home stove, it is better to use nichrome. This material is able to withstand high temperatures and prolonged exposure to aggressive environments. The minimum cross-section of spiral turns is 1 mm.
Gas burners can be used to heat parts.
Work on installing a gas burner into the muffle
It is better to purchase a gas heating element in a store, although craftsmen can do this work with their own hands. But we advise you to think about safety and go to a specialized store.
If you have experience in manufacturing analogues, we make such a design according to a certain scheme:
- To make the burner body, we will prepare a piece of steel, preferably copper, tube. Diameter 8-10 mm. Workpiece length – 150 mm;
- near one end we drill a through hole to connect to a gas pipe or hose;
- Mark and drill several holes on the side wall. We make a hole on one side only. These holes serve to ignite the torch;
- We cut threads at both ends of the burner;
- We drill a non-through hole in the middle of the burner, it will serve to release gas;
- close the end side. Screw on the plug. We connect the hose from the gas cylinder to the 2nd side.
The burner is installed using clamps. Don’t forget to install an anti-kickback valve on the supply hose.
Final works
Do-it-yourself muffle furnace is almost ready. All that remains is to assemble all the parts into a single structure. We fill the cavity between the muffle device and the body with insulation.
If you need a furnace for melting a small amount of metals, we make a small cutout on the top part according to the dimensions of the crucible and tighten the edges with a rod or corners. Now, after turning on the furnace, you can install a crucible with copper or aluminum and melt the metal.
After completing all the work, we check the correctness of assembly and turn on the device to the alternating current network. At first the oven will smoke a lot, don’t be alarmed - it’s the grease, paint or dirt burning off. After the first switch on, the smoke will decrease significantly.
How to make a casting mold
Before melting aluminum, prepare a blank for casting. There are several ways to pour liquid melt. The open and closed methods are most often used. Each one is worth telling in more detail.
Open form
When aluminum is melted using an open method, after melting the melt is poured into a prepared container, for example, a tin can. The aluminum casting is removed from the can while hot, when the hot melt has set slightly on top. Just tap the container lightly. If an ingot of a given geometry is not needed, the molten metal is poured onto any flat refractory surface; it holds well, does not spread, and looks like mercury.
Housing assembly
Even a simple furnace for melting aluminum - such as a muffle furnace, for example - requires a housing. In this case, it can be made from a piece of unnecessary sheet metal, the thickness of which will be from 1 to 1.5 mm. It is worth noting that a layer of rust will be needed here. Another important point concerns the height of the bucket. This parameter should be with a certain margin, since the working chamber will be mounted on a layer of bricks plus thermal insulation. Next you will have to roll the metal sheet into a pipe. This process is quite problematic, and therefore it is recommended to use special rings made of reinforcement.
Read also: Connecting Internet wires by color
Useful tips
- The melt must be hot so that the mold is filled evenly. It is poured when it acquires the consistency of mercury.
- Castings with complex configurations are made quickly; they try to fill the molds right away so that the metal does not have time to set and no partitions or voids are formed.
- Metal can be poured into plaster over wax or foam; high temperatures cause the wax and foam to burn out. The surface of the casting will be smooth.
- To cool the casting, do not immerse it in water; the casting will crack.
- When melting pure aluminum, the technology of using protective fluxes is used; they protect the metal from oxidation.
Fire safety must be observed; the casting process involves the use of an open flame. It is important to use personal protective equipment: gloves, goggles.
Completion of oven assembly
To complete the construction of a furnace for melting aluminum with your own hands, you need to do the following:
- The prepared rings are put on a twisted sheet of metal and connected around the circumference.
- The bottom for the furnace body can be assembled from the same sheet of metal that was already used for the pipe. It is mounted by welding to the lowest ring.
- It is necessary to make a special hole in one of the bricks through which an electric heater can be placed directly inside the working chamber.
- For ease of laying out, you should immediately number the bricks, and then start laying them out. It is necessary that they fit very tightly to each other. The resulting design of a furnace for melting aluminum, made with your own hands, must be very stable.
- A heating coil must also be attached to the bricks.
- To install a spiral heater, you need to make several grooves and install bricks along them.
- You can also cut grooves in the right places using a grinder. It is recommended to use eye and respiratory protection during operation.
- Most often, the material for the spiral is either nichrome or fechral.
- The spiral must be wound very carefully and in such a way that the turns are close to each other. The distance is necessary to avoid short circuiting.
- The entire structure should be coated with the solution.
In this way, you can make a muffle-type furnace for melting aluminum with your own hands.
Design Features
Thanks to the special internal structure of the oven, it heats up quickly and retains heat for a long time. Historians claim that the Pompeian oven appeared on the Iberian Peninsula and was initially used specifically for preparing an open cheese pie, where the structure was not needed to heat the room.
Decoration of a Pompeii oven
Later it spread throughout the world. It is also called Neapolitan, Italian oven, tandoor.
The Pompeian oven will not only be an ideal design for preparing pizza, pies and bread, but will also decorate any countryside area. In combination with a gazebo or barbecue, it becomes a real landscape decoration, becoming a favorite vacation spot for the whole family.
Stove in the yard
Basically, such a stove is installed in suburban areas on the street, in a barbecue area, in an outdoor garden, but if desired and some technical modifications are made, a Pompeii stove can be built in the house. To do this, of course, you will have to provide not only a reliable, solid foundation, but also a chimney.
In this article we will look at the classic option for building an Italian oven in the open air. Before proceeding with the step-by-step instructions, I would like to warn you that laying a Pompeian stove is a very difficult and expensive undertaking.
But if you do everything correctly, then such an oven will delight you for decades, giving you an authentic look to your dacha and helping you prepare delicious homemade baked goods. Thanks to our clear and simple instructions, even a beginner can master the laying of a Pompeian stove with his own hands.
The structure of the Pompeian stove is somewhat similar to the design of the ancient Slavic stove.
Construction of a Pompeii furnace
But, unlike a traditional Russian stove, it heats up much faster. You can cook pies in it literally 30 minutes after heating, while a Russian oven will take at least 3-4 hours before reaching the optimal temperature for cooking.
This heating rate in the Pompeii furnace is achieved due to the lower thermal mass. The layer of brick that is heated is only 12 cm. Within 45 minutes after kindling, the temperature in this oven reaches 260 degrees, and after an hour - 370 degrees.
How is the temperature distributed in a Pompeian oven?
| In 30 minutes | In 45 minutes | In 60 minutes | In 90 minutes | |
| Outer part of the vault | 150 | 260 | 370 | 370 |
| Inner part of the vault | 315 | 370 | 370 | 370 |
The peculiarity and main advantage of the Pompeian oven is that you can cook almost any dish in it in a short time. Thanks to the high temperature that is reached inside the vault, pizza and bread are perfectly baked in it. Smoke adds a special piquancy to baked goods.
Muffle material and a few questions about calculations.
Muffle material and a few questions about calculations.
1150 degrees with nichrome is unrealistic. Maximum 900. To increase inertia, it is necessary to increase the mass of the muffle; to increase efficiency, increase the thickness and reduce the thermal conductivity of the insulation. But in my opinion, the less inertia the better. There are more possibilities; sometimes fast cooling is also needed. And smooth cooling is easily implemented by a thermostat.
The question of the power-temperature-volume relationship is posed somewhat incorrectly. It is not the volume as such that is important, but the surface area and thermal insulation properties. And power affects the heating time and the temperature achieved, through the surface area and thermal insulation properties. If you manage to make almost perfect thermal insulation, you can heat it to high temperatures with 100 watts, albeit slowly.
You can try refractory clay as a muffle material, but the issue of mechanical strength is relevant here. If the clay is too fat or too thin, the result will be negative. And you still need to burn it. In principle, you can burn it the first time you turn on the stove, but I can’t quite imagine how to wind nichrome without breaking the muffle.