In order not to rent equipment for earthworks, many people want to assemble a mini-excavator with their own hands, but not everyone achieves this dream to its logical conclusion, since the manufacture of a home-made excavator requires free time, drawings and funds to implement the plan.
Despite their small size, homemade mini-excavators are in no way inferior to factory-made equipment. They even have some advantages: light weight, low fuel consumption, ease of transportation, etc.
The size of the mini-excavator makes it possible to work in almost any area, even indoors. Such mechanisms are often used on a farm or country house for digging holes and laying underground communications to premises.
Before making a mini-excavator, you need to decide on its type. The options could be:
- Excavator based on a mini-tractor or car. The equipment will be mounted. The simplest way would be to remake it on a car basis. You can create a completely autonomous model (wheeled or tracked), which moves independently or is transported with the help of auxiliary means. The main advantage of the attachment is that it can be dismantled at any time to use the equipment for its intended purpose.
- Another option is to make a homemade mini-excavator from scratch. But this option is quite labor-intensive, as it requires specific knowledge and a huge number of spare parts.
The simplest and cheapest option is a mini-excavator based on a trailer, consisting of a supporting frame with a wheel pair, on which an autonomous internal combustion engine, hydraulic drive and specific equipment are installed.
Where to begin?
Of course, with visualization.
So that problems associated with the further operation of a mini excavator created by yourself do not bury your time and work forever, you must approach its creation with a clear understanding of what and how to do. After all, having bought a lot of spare parts, having spent countless amounts of time and effort, it is unlikely that anyone will want to eventually realize that their “craft” turned out to be more expensive than a production copy, but at the same time less effective. After weighing all the pros and cons, the first thing you need to arm yourself with is a drawing. You can either buy it on foreign websites, or spy on the Internet. If you search for the necessary information on foreign sites, remember that, for example, the American measurement system uses inches, not meters. Don't forget to convert some values to others!
Next, to all this you need to add your ingenuity, skillful hands and a set of necessary parts. But first things first.
Photo source: exkavator.ruMini excavator. Let's visualize
Preparatory stage: where to get the drawing
You need to choose a specific, clear and understandable diagram for assembling your earthmoving machine. There should not be any difficulties with the choice. Can be used:
- Reduced to scale factory diagrams of large Belarus-type excavators.
- Ready-made drawings from the Internet, posted by folk craftsmen. Interesting working options can be found not only in RuNet, but also on foreign resources.
Having selected the optimal drawing, you need to draw up an estimate and roughly determine the costs of consumables and parts.
From general to specific
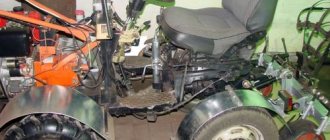
There are two most common methods for creating a mini excavator with your own hands: you can install attachments on a small tractor or build an autonomous homemade mini excavator that can move independently or with the help of other vehicles. The second option is more labor-intensive. You need to make your own frame, install at least the rear axle (can be used from an old car), and the engine. If you feel technically savvy, you can combine engine parts or use Chinese motors from different manufacturers. Just keep in mind that if you assemble parts from different machines, you will have to constantly adjust these parts and make modifications to them.
Photo source: exkavator.ru The main thing is to make a start
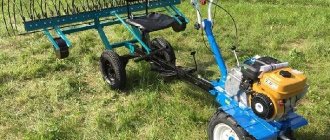
Make a mini tractor, a tractor from a walk-behind tractor with your own hands
It is very difficult to work on a plot of land without the help of agricultural machinery. A mini tractor made from a walk-behind tractor, assembled with your own hands, can greatly simplify your life. It can do many different jobs and save you a lot of time. This is an extremely important thing on your plot of land, which you won’t have any trouble making with your own hands using a motor from a walk-behind tractor. The main step in such a change is to choose the right model for you.
Choosing a walk-behind tractor
A very important aspect at the beginning of design is the choice of the desired type of walk-behind tractor.
There are several selection criteria:
- power;
- weight;
- fuel type;
- price;
- manufacturer.
All these nuances need to be taken into account. The main thing is to know what area of land you will be cultivating with it: if it is a large area, then the motor must be powerful. The mass of the unit also plays an important role. Depending on the type of soil and the complexity of cultivation, a walk-behind tractor with more weight is purchased.
It would be optimal to choose a walk-behind tractor model that runs on diesel fuel. Such engines will cope with all the tasks without any problems. And fuel consumption is several times less than in gasoline.
Not everyone has the opportunity to buy a walk-behind tractor from a good manufacturer, but there is no need to do this, because you are making a mini-tractor based on a walk-behind tractor yourself to save money.
Kit for converting a walk-behind tractor into a mini tractor
To simplify the conversion mechanism, you can purchase a ready-made kit for converting a walk-behind tractor into a mini tractor. This set will give you the opportunity to convert one type of equipment into another in a short time. Often this kit for converting a walk-behind tractor consists of:
- finished frame;
- front beam;
- hinges;
- levers;
- pedals;
- steering wheel;
- wings;
- driver's seat.
This kit will be very useful to those people who are interested in how to make a mini tractor from a walk-behind tractor in a short time.
But those who like to do everything themselves and have the necessary elements at home can construct everything with their own hands. A prerequisite is to completely adhere to the drawing.
Schemes for constructing a mini tractor
At the very beginning of work, you need to disassemble the diagrams of your planned mini tractor. You can create drawings and calculate dimensions yourself; this does not require any special skills, just a pen, pencil and logical thinking. The main thing in this is to maintain a clear balance so that no emergency incidents occur in further work.
Converting a walk-behind tractor into a mini tractor step by step
If you still decide to do without a ready-made kit, then to convert a walk-behind tractor into a mini tractor you will need the following elements:
- frame;
- driver's seat;
- levers;
- steering;
- wheels;
- wings;
- hubs;
- optional equipment.
It is important to have the right tools at hand:
- welding;
- drill with drills;
- tool for cutting metal;
- a set of keys;
- screwdrivers;
- lubricant
If all this is ready, then we proceed to making a tractor from a walk-behind tractor.
Step 1: Frame Construction
For this, if you do not have a ready-made base, you will need both corners and pipes. Having cut all the parts to the required size, you should connect the future frame using bolts or welding. This will be the basis of your future technology. You can also immediately attach an attachment to the frame, with which you will attach additional equipment for different types of work.
Step 2: Steering Wheel and Seat
These two components can be taken from an unwanted car. You need to choose a comfortable chair, since a homemade mini tractor made from a walk-behind tractor does not have shock absorbers. After attaching the driver's seat, you can install the steering wheel. It will need to be installed at the optimal height so that you can work comfortably in the future.
Step 3: Wheels
To save money, you can also use car wheels. To attach the wheels to the front of the frame, the easiest way is to purchase ready-made hubs with brakes in advance. The choice of wheels also plays an important role. If you take larger ones, the tractor will become difficult to control. And if they are very small, it will simply dig into the ground.
Step 4: Levers
To make your mini tractor easy to operate, you should install levers responsible for the clutch and brake. One popular method is a cable drive.
Step 5: Engine
The heart of your tractor is usually mounted on the front frame for better balance during working hours. They are installed using a floating fastening system. It is also very important to follow safety rules. When the entire structure is assembled, you just have to go through a short run-in and only then start working. Your “homemade product” will become a faithful assistant for any work and will delight you.
pro-motobloky.ru
One horse, two horse
What about “horses”? The question is reasonable, and the answer to it lies in the purposes and in the work that you will carry out on a mini excavator made by yourself. The calculation of the forces on the hydraulic cylinders for raising and lowering the boom and turning the handle depends on what exactly you are digging, then the speed of movement of the links and the movement of the pistons in the cylinders is determined. Typically, a power of 8-13 horses is more than enough.
Finding the necessary equipment or spare parts has become even easier - leave a request and they will call you back.
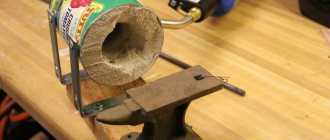
We make a wood splitter
Among other things, you can make a wood splitter from a walk-behind tractor. To do this, you will need to grind a cone on a special machine, as well as a thread. After this, the finished cone must be mounted on a shaft that has suitable bearings. Then you need to install a flange at the end of the shaft, as well as a sprocket. It can be taken from a motorcycle wheel.
You can fix the cone on the shaft using a bolt. After this, between the motor and the shaft itself, you need to install a spacer made of pipes, as well as a pair of nuts. This will help tension the chain. In order to make supports for the shaft, you can take supports from Zhiguli cars. The motor must be taken from the walk-behind tractor. With the help of such a redesigned design, you can easily cope with splitting firewood.
Hydraulics. Ours can do this too
In fact, American colleagues in the workshop prefer to install ready-made hydraulics. The option is not the cheapest, but requires the least labor. But our people are not looking for easy ways! Armed with theoretical knowledge, you can try to make hydraulics with your own hands. But we warn you: this process is quite complicated.
So, the hydraulic system of a full-fledged excavator consists of 4 sections (this is the minimum): a rotary platform, a bucket, a boom and a handle. As for the rotary platform, you can refuse it, since complex work, as a rule, is not performed on a homemade mini excavator. We install 4 hydraulic cylinders (this is quite enough to turn and raise the boom and handle, and control the bucket). Hydraulic cylinders from the MAZ or KAMAZ cab lifting mechanism are perfect.
Photo source: exkavator.ruAnd here is the basis of the machine
Mini excavator design
Most homemade models have the same layout as a factory automobile excavator. The main structural elements consist of the following components:
- a supporting frame on tracks or a motorized excavator;
- a motor that drives the hydraulic system;
- rotary support system;
- hydraulics (hydraulic pump, oil filter, tank, manual control lever, hydraulic cylinders, hoses);
- two-section boom with bucket.
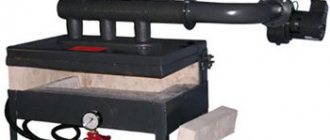
A good solution would be to install a homemade excavator on a T 40 or to make a trailer yourself from components on which to install: an engine, a tank, a wheel axle from an old car. To create stability during operation, it is advisable to provide additional reinforcement in advance, consisting of a pair of support “shoes” that will eliminate the possibility of tipping over, that is, the excavator on a vehicle chassis will stand securely during operation. The engine used is often compact Japanese or cheaper Chinese internal combustion engines, the power of which reaches 15 kW.
Working equipment: ready-made or made?
The simplest option is to install a finished boom along with a hydraulic system. You can also install a boom on your homemade mini excavator, for example, from an old front-end loader. If, of course, you have access to it. In addition, it will need to be adapted for earthmoving purposes. Another “simpler” option is to make an arrow from a square pipe with your own hands.
Photo source: exkavator.ruArrow of a homemade mini excavator
How to make a mini tractor from a walk-behind tractor video diagrams
World of Repair | Topic author: Alexey
Mini tractor from a walk-behind tractor: giving a new life https://miremonta.ru/minitraktor-iz-motobloka-svoimi-rukami.html Anyone can make a mini-tractor from a walk-behind tractor with their own hands If your walk-behind tractor is no longer satisfied with the comfort of its use when performing work on the site, you can try give it a new life by making a mini tractor miremonta.ru
Tags: How to make a mini tractor from a walk-behind tractor video diagrams
I took all the spare parts for this mini tractor from ZHIGULI Earn money on You Tube media network VSP Group: ...
Walk-behind tractors
walk-behind tractor 105. disassembling walk-behind tractor https://www.youtube.com/watch?v=Y88pL8CKUTsEngine repair. Assembling a 9 hp diesel engine https://www.youtube.com/watch?v=7vLEVI-Tukg Oil, fuel pumps and speed controller for a walk-behind diesel engine https://www.youtube.com/watch?v=h4R1aHdiQiIChanging torque fuel injection of a walk-behind diesel engine https://www.youtube.com/watch?v=a4riTb38tNkAdjusting the valve clearance of a walk-behind engine https://www.youtube.com/watch?v=LQZ_wuZ4lR4Motor-block clutch https://www.youtube.com /watch?v=At_4yrAgyYQEngine repair. Cut flywheel key https://www.youtube.com/watch?v=VN0Lyts7frsRiding on a walk-behind tractor. Attaching the adapter. https://www.youtube.com/watch?v=PCtic8AhIGQ&feature=endscreen&NR=1homemade forte mini tractor - general view https://www.youtube.com/watch?v=JgS1SaurNP0Fragment mini tractor https://www.youtube.com/watch ?v=97CDzJ0SQRIMini tractor. Front axlehttps://www.youtube.com/watch?v=InKYAP40xwEHomemade all-wheel drive mini tractor (snow removal) https://www.youtube.com/watch?v=ttHVfnTbetoDo-it-yourself mini tractor from a ZUBR HT-135E walk-behind tractor https://www .youtube.com/watch?v=a9yvEkb7k4QMini tractor from NEVA walk-behind tractor - Pskov version https://www.youtube.com/watch?v=8eh46zTqQ1gModernization of a self-propelled tractor https://www.youtube.com/watch?v=h6AbsuzWvhAMard milling https://www.youtube.com/watch?v=f_EfuhLhrkAHarrowing the garden after digging up potatoes https://www.youtube.com/watch?v=HD_kJICr080Vacuum seeder_05.11.2011.mpg https://www.youtube.com/watch ?v=mUyAUlVsRE0
How to make a mini tractor from a Neva, Zubr, Agro walk-behind tractor: photo...
How to make a mini tractor with your own hands. Many of... Another option is to choose a design scheme in which... Detailed video lessons, photos and drawings of a mini tractor made from a walk-behind tractor can be found on the Internet.
swistun.info
Bucket: the stronger the better
The bucket is the direct component of the machine that will come into contact with the working surface. In order for your DIY mini excavator to serve you (let’s not guess how long!) it is recommended to use durable metal. The minimum set is: 2 sides and a bottom. The bottom, which is used as a rectangular plate, is attached to the vertically installed sidewalls by welding. Already tacked to the sidewalls at one edge, it is heated by a burner and gradually bends along the contour of the sidewalls. Don't forget to use pot holders. It is recommended to additionally reinforce the upper edge and bottom with steel plates. After all this has been done, you can weld the teeth.
Photo source: exkavator.ruBucket. Still toothless
Photo source: exkavator.ru And someone has already “cut” their teeth
homemade trailed mini excavator
Good day. I want to assemble a trailed mini excavator with my own hands, but after searching the forums I haven’t found anything useful ((In particular, I’m interested in help in terms of “materials”
I want to assemble a trailed mini excavator with my own hands,
The guys made mounted ones. It makes no difference whether you hang it or screw it onto a cart.
The guys made mounted ones. It makes no difference whether you hang it or screw it onto a cart.
There is a difference if there is no tractor
It might be cheaper to hire. and there is less hassle. manually is also quick. An excavator must move: how else can you work on it? We once had to make 2-meter holes for stepchildren at a transformer substation. You can't get in with the equipment. So 3 men dug these holes for us in a day. I couldn’t believe my eyes!
It might be cheaper to hire. and there is less hassle. manually is also quick. An excavator must move: how else can you work on it? We once had to make 2-meter holes for stepchildren at a transformer substation. You can't get in with the equipment. So 3 men dug these holes for us in a day. I couldn’t believe my eyes!
1) moving around the excavation site will be done manually (or using a bucket), transportation on a tow bar 2) I don’t want to hire and don’t want to waste my nerves. It’s better to do it myself. My construction site isn’t on fire. There’s bare earth on the site! There’s nothing yet! Imagine a foundation for a fence around 10-15 acres? + dig a trench for water + house foundation + sewerage + cesspool, etc. + garage foundation + place to work (I do auto repair) + unforeseen plans = ? 10000?20000??30000. I don't think. + his brother has another plot
Pump. It can be this way, or it can be that way
When installing a pump, you are guaranteed to ask yourself the question: axial piston or gear? Let's just say that the choice is yours. The first is more expensive, but also more effective. Of the gear types, NSh-10 has proven itself well. You can borrow the experience of Russian enterprises: two NSh-10 pumps and two R-16A distributors, which are connected in parallel. Based on the performance of the pump and hydraulics, the displacement of the fuel tank is selected.
Photo source: exkavator.ruGear pump NSh-10
Getting to the bottom of the philosophical grain
How your DIY mini excavator will dig is a rhetorical question. But, you see, assembled by you yourself, it will definitely have the right to claim even if not the title of a reliable assistant in the household, then certainly the subject of your, now unshakable, pride. So, go for it! And you can rejoice at the successes of others on numerous forums, both Russian-language and foreign.
Photo source: exkavator.ru Your work has every chance of becoming something similar
Photo source: exkavator.ru Or this. Far from the visualization object in the first photo, but still
In detail
Future!
Model selection
A properly assembled mini-excavator is in no way inferior to models created according to all the rules in the factory. It has some advantages for private use: minimal fuel consumption, easy transportation, adaptability to specific needs, low weight. You can work in any area, including warehouses and other enclosed spaces. Typically, such equipment is required at dachas, near country houses, used in digging holes and ditches, for shallow communications, etc.
Types of homemade models:
- An excavator made from a walk-behind tractor, based on an existing mini tractor or just a car. It uses attachments. Autonomous vehicles are assembled on tracked or wheeled vehicles, capable of moving around the site independently. Another option is a machine that can be moved using aids. If necessary, all attachments can be easily dismantled, and the used base can be used again for its intended purpose.
- Mini excavator from scratch. A labor-intensive option for the most experienced craftsmen. It is impossible for a beginner to cope with such a task; time and money will be wasted. You will need specific skills or qualified assistants, a good amount of technical knowledge.
- A simple budget solution is a trailed excavator on a T40 trailer with a frame and a wheel axle.
An autonomous engine, hydraulics and specific equipment are installed.