When there are many types of ready-made lining made of plastic and wood on sale, does it make sense to manufacture panels yourself? The fact is that if there is a large number of inexpensive straight boards, then setting up your own production will be justified. All you need is a milling machine and cutters for the lining.
Moreover, it is not at all necessary to buy a machine; you can rent it daily along with the cutters. If you want to constantly do this kind of work, then it will be cheaper to purchase equipment.
And, do not forget that the lining is not sold from all types of wood, but if you have any high-quality boards, you can make original slats from them, which are definitely not in the store.
We make lining at home
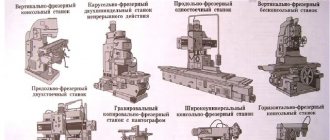
Existing types of tools
In order to make wood panels yourself, you will need bearing cutters; other types of tools require additional equipment, which means they are not suitable for us;
Cutting tools for hand work
- Mills for making lining for a manual router come in a wide variety. Before you start work, you need to decide what tools you will need to make wood panels. Do not forget also that some cutting tools can only be used for manual work, but it is undesirable because of the inconvenience;
Universal models
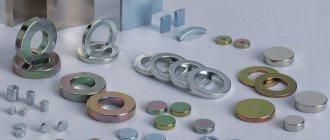
Note! The lining cutter shown in the photo above is universal because it is convenient to use both on a machine and in a manual milling machine. The diameter of such parts can range from 35 to 59 millimeters, depending on the length of the shank
Mounted models
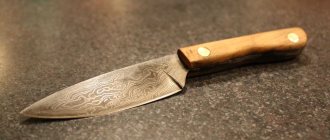
The cutter for making lining, which is shown in the photo, will help you make a panel with any tongue
It is important to set up the machine correctly, namely to select a cutter by diameter and depth.
Self-manufacturing process
Important! In order for the process of processing boards to be simple and straightforward, without problems, it is necessary to take material whose length does not exceed two meters. Such boards are convenient to work with and easy to process.
If the boards are very short, then their processing is easier if this process is carried out with a manual router.
Methods for connecting boards
Remember! When you cut down a wane, there is often quite a lot of material left behind that should not be thrown away. From this waste it will be possible to make small connecting strips.
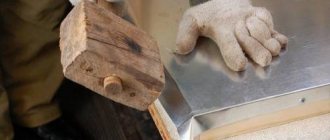
The photo shows the process of cutting a groove
In the case when the board has already been processed, you only need to make a tenon and, of course, a groove. We install the table so that it is convenient for you to work on it and tongue and groove the board. Do not forget that it is constantly necessary to adjust the depth of the groove and the workpiece must always be pressed tightly to the table;
We process the board using a surface planer
You probably understand how to make lining with a hand router, but you will still need to talk about the details and nuances of this matter, because each business has its own characteristics that you need to know. Remember that if you need a calibrated board, you will need a surface planer to make it; a manual machine will not work for this;
Router operation
- When working with a hand router you need to be extremely careful. Because this device is considered dangerous. Sometimes even experts in their field make mistakes and get injured, so beginners need to always be on their guard. Do not forget about safety precautions, and also monitor the thickness of the product so that your material is even;
- Even a beginner can make lining with a hand router, if he or she becomes familiar with all the rules for working with this device before starting work. Don’t forget that high-quality equipment guarantees your work safety; you shouldn’t skimp on it.
In the construction market today you can find any types and sizes of building materials. Do not forget that the price for them is much higher than the cost of the material from which you will make the lining yourself. In this video you can see the individual stages of making wood panels with your own hands on a machine.
Manufacturing eurolining on a milling machine
This is more complex work; you will need solid experience working with woodworking machines. We will tell you about the technology, and select the dimensions of the lining and the profiles of the front surfaces yourself, taking into account the availability of tools and personal preferences.
How does eurolining differ from regular lining?
- The tongue/groove connection is deeper. Due to this, the risk of seams showing through during a significant reduction in the width of the boards is eliminated, and installation of the sheathing is simplified. It is easier to insert hardware for fastening into a deep groove.
- The reverse side has one or two slots - the wall surfaces can breathe, static forces are reduced when changing the linear dimensions of the lining. It is as a result of strong static forces that the cladding of a house can warp.
As the initial data, we assume that the boards of the required sizes have already been prepared, the material is sorted and folded in the proper place.
Step 1. Install a cutter on the machine to make a groove and a side decorative chamfer, adjust the depth. To do this, release the ruler, place the end of the board against the knife and, moving the ruler closer or further, find the desired position. Fasten the milling head and ruler with great force.
In order to correctly align all the knives on the head, you need to plan a section of the board as a test. Next, place it again on the cutter and, slowly rotating the head in the opposite direction, check that all the knives are working. You can recognize this by the sound; if everything is normal, then the number of minor touches on the board should correspond to the number of cutters. For example, if the head has four knives, but you only felt three touches, then this means that one knife is not working. Find which one and adjust its position. This is quite difficult to do and will take several attempts. Make sure that the spacer wedges of the knives are pressed firmly against the head.
Step 2. Attach the top and side clamps, set the desired distance. Such stops greatly facilitate the milling process, improve quality and increase labor safety. Pass all the boards on one side.
Step 3. Replace the cutter with a new one; it should cut the groove and remove the decorative chamfer. There is no need to re-adjust the clamps; the width of all boards is the same and did not change during the first pass.
Step 4. Remove the side cutter and release the ruler and clamps. Install a cutter to make recesses on the inside of the lining. The size and number of grooves do not matter; select them at your discretion.
Making lining with your own hands
Safety precautions are the first thing worth mentioning. Under no circumstances is it recommended to wear clothing with decorative details. A comfortable, simple robe without unnecessary elements is the best option. Wear safety glasses if possible. The saw should be in a special casing with a riving mechanism, which will make cutting easier for you and at the same time protect you when using the machine. Monotonous work often lulls the worker's vigilance, and in this case there is a possibility of accidentally sawing something that was not required. Therefore, be careful about overheating of the motor.
The process itself begins with drawing straight lines along which the sides of the boards will be sawn in the future. It is recommended to use green or blue pencils, this is necessary so that the lines are clearly visible in case the wood is damp and begins to turn blue. To cut the board, place it on the table top of the machine so that the previously marked lines are straight. Place your body on the end of the board and push it straight onto the saw blade. Many people purchase a saw wheel in order to simplify the cutting process, giving preference to circles with a large diameter.
To cut the other side of the board, the machine must be reconfigured. To do this, set the ruler to the required width. It is common practice to use two clamps for fixation during processing. Then the second side of the board is sawed according to the adjusted ruler; when cutting the side without using a ruler, the output will appear sawn under the ruler. Put them in a separate place, we will need them for slats.
Preparation of wood in production
The production of lining with a milling cutter in production is carried out in several stages:
- Sawing logs lengthwise into boards of the required thickness. All logs are previously examined and sorted. Only the best logs with the fewest defects are sent for sawing.
- Drying lumber. In this case, the raw materials are dried in autoclaves or using infrared radiation to a final moisture level of no more than 12%. At the same stage, the wood is treated with antiseptics to protect against pests and microorganisms.
- Profiling and cutting boards. After running the lumber through special machines, the lamellas acquire the required profile of the appropriate length and width.
- Sorting of finished raw materials. In this case, the panels are carefully inspected for defects and divided into four classes.
After all operations, the lumber goes on sale.
Milling cutters for lining - creating a production line
It's time for a renovation and you've got some interesting ideas for decorating a new interior? Do walls on which the wallpaper is worn out in some places or torn off in some places - plunge you into a feeling of melancholy? There is an excellent option for finishing the room - paneling.
And making panels using a router will allow you to make products the way you want, rather than using ready-made, standard models offered by manufacturers.
What is needed to make panels manually?
The production process is not as complicated as it initially seems. What is needed for this?
The boards must be processed on a jointer to remove all unevenness, roughness and cracks from them. If such equipment is not available, planed boards can be purchased ready-made in the store.
A hand router is a tool with which you can easily chamfer a board, mill holes and grooves. With its help, the lining takes on a finished look.
Hand-made panels look no worse than those that are sold, and the feeling of pride from the fact that everything was done by hand will only add positive emotions from the completed repair.
Milling cutters for making lining are presented in different versions:
- Bearing cutters are used for the main work, during which the finished panel is obtained. Bearing-free cutters will be needed when you need to make a separate part or process it. For those without bearing blades, you will need to purchase additional equipment.
- The diameter of the knives must have a certain ratio with the radius of the groove on the board: 12.7-6.35 mm, 9.5-4.8 mm, 15.8-7.9 mm.
- If the cutters for the lining have a diameter of 35 mm. and 50 mm with a shank whose diameter is 8 mm, then they can be used with a machine equipped with collets or a device for manual work.
Milling is used primarily for the production of wood products, but if you purchase additional special knives, you can even process plastic and metal.
The good thing about this tool is that, despite its compact size, you can use it to perform numerous jobs.
The machine is used for making panels and for milling small holes for door handles and hinges. It can be used on door edges, window frames, chairs and other wooden objects.
Manual is available in three main types:
The cutters for the lining are installed under the casing of a powerful engine equipped with handles. The struts, fixed to the base plate and support plate, allow the motor to move up and down.
Its weight is compensated by return springs. Therefore, the knife is in a raised position on the frame even before the workpiece is taken out of use. The shank is secured using a lock nut into a collet clamp.
The rotation speed of the knives can reach 30,000 rpm. Handles on the side allow you to easily operate the machine. The set of cutters includes removable side rulers for processing edges, for making grooves, as well as a special sleeve for working with templates and copiers.
Manufacturing on a machine
- Milling cutters for the production of lining will be needed after work with jointed boards begins. An even cut is made on one side, after which it is necessary to determine the future width of the product.
- Before doing this, it is advisable to inspect all the boards so that they do not turn out to be of the already chosen width. Usually the size of the board is medium - from 7 to 10 cm.
- If you count the number of passes over the knives, you can achieve equal thickness on all boards.
- When the wane is removed, wood remains, which can then be used as slats.
- The next step is to tongue and groove the board around the perimeter. The tenon and groove are cut out. When raising and lowering the table, you can adjust the groove depth. The ruler must always be pressed against the edge of the panel.
Don’t be afraid to experiment, because what you make with your own hands is much more expensive and better than what you buy at the best prices in the store.
Panels made by yourself will not only decorate the house, but will also “nourish” it with the energy of a person who strives to turn his home into a cozy hearth. You just need to prepare the necessary materials and tools - and the new business will definitely be mastered.
Anyone who brings something new into their life, masters other crafts, and is not afraid of failure will easily interest people and teach them what they know. This is how true masters of their craft emerge.
Wood cutter sets
Buying cutters individually is expensive; it’s easier to buy a whole set. Of course, it is more expensive than one cutter, but if you buy the same cutters separately, it is much cheaper to buy a whole set. We will talk about such sets today.
What sets of wood cutters exist and how much do they cost - video
offers a variety of carbide cutter sets. We'll talk about five.
- Includes six edge cutters with radii of 3, 4, 5, 6, 8 and 10 mm, which are equipped with a lower support bearing. Shank - 8 mm.
- This set includes 12 cutters:
- two edges with radii 6.35 and 9.5 mm and with a support bearing; one figured with two radii 4 mm and with a support bearing;
- three end diameters of 6, 12 and 16 mm; one end with a diameter of 12.7 mm; one angled (90 degrees) with an outer diameter of 12.7 mm;
- one groove with a radius of 6.35 mm;
- one end radius with a radius of 6.35 mm and a support bearing;
- one end angular (45 degrees) with support bearing;
- one grooved (dovetailed) with an end diameter of 12.7 mm and an angle of 14 degrees. This set of cutters will be useful for a novice carpenter, as they can perform many jobs on the manufacture of simple pieces of furniture.
- The third set consists of 16 items and is similar to the reinforced second one. Added end mills with a diameter of 3 and 12.7 mm; groove with a radius of 3.2 mm and a special drill with a diameter of 6.3 mm.
- The set is aimed at professionals - it consists of 12 cutters of a reinforced design with all the functions of the second set.
- Finally, the fifth set is similar to the fourth, but consists of 20 cutters of a reinforced design with a greater variety of parameters and the addition of a 9.5 mm wide and 32 mm diameter groove end mill. It is also aimed at the “pros”. In addition to those indicated, Diold has 10 more sets, which are equipped with cutters in various combinations.
Details of working with panel cutters.
Types of power tools
The cutter can be installed on manual or stationary milling machines. A hand router is very suitable for processing small amounts of material - it can be used indoors, it is a simple tool that requires an average level of training. The tool often comes to the rescue in cases where there is a small section of the wall left to sew up, but the finishing material has already run out.
The disadvantage of hand tools is that the board must be processed twice, changing the blades. For the tenon and groove of the lock, different cutters are used to make lining - they differ in the shape of the blades, the depth of the cut, and the distance between the washers.
Milling machines are a difficult tool to master, which allows you to process both sides of the board at a time. The machine is good for mass production of lining, but it is not suitable for use at home: large dimensions, high energy consumption, high price per unit, unprofitability of mass production of lining at home.
The cutter for making lining can be used in both hand-held and stationary tools.
Stages of preparatory work
We begin work by installing the sheathing. To do this, you will need 20x40 mm wooden slats, self-tapping screws and dowel nails, a building level and a screwdriver. The slats must be fixed to the wall, while positioning them strictly perpendicular to the subsequent direction of the lining. Before fastening, check the evenness of the wall surface using a building level. If the wall is not completely level, place a piece of plywood under the batten and check for evenness again.
Installation of sheathing under the lining
The pitch of the slats is no more than 50 cm. The bottom rail is attached at a distance of 5 cm from the floor. The top rail is installed at the level of fastening parts and ceiling elements. They also attach slats in all corners and around windows and doors.
After installing the sheathing, we proceed to heat and waterproofing. To do this, you will need thermal insulation building material (mineral wool), waterproofing building material (vapor barrier), an installation stapler and polypropylene twine. You can install the vapor barrier before installing the sheathing, and then put a second layer on top after filling it with mineral wool.
When assembling and installing a vapor barrier, attach it with the rough side to the insulation. Make a waterproofing or vapor barrier overlap of 10 cm and be sure to secure the joints with tape along the entire length. The waterproofing is fastened using a mounting stapler in 15 cm increments. To prevent the mineral wool from slipping or deforming over time, it must be secured with polypropylene twine. The polypropylene twine is also fastened using a mounting stapler.
Installation and installation of lining
Installation and installation of lining. For this work you will need panels, finishing nails, a building level, a hammer and a small piece of lining. Before proceeding with installation and installation, it is necessary for the unpacked lining to lie for some time in the room in which it will be installed (at least 48 hours). When installing the first wooden panel, always start from the corner. Attach to the sheathing using finishing nails or clamps. If you use clamps during installation, then in the future the lining can be dismantled quite easily by yourself. After which you can use this material for installation and installation in any other place.
Hidden fastening of lining with nails
After installing the first panel and securing it, insert the tongue of the second panel into the groove and secure it again. The second and subsequent linings will be quite difficult to insert by hand, most likely they will be difficult to enter. To make this process easier, there is no need to buy a special tool. You can do it yourself. To do this, take a small piece of sawn-off wooden panel and, inserting it with a comb into the groove of the subsequent installed lining, gently tap it with a hammer. This must be done along the entire length of the lining until it fits tightly enough. Additionally, you can secure the boards with nails at the top and bottom.
Measure every sixth board with a building level to ensure installation without deviations. There must be a gap of at least 2 cm between the lining and the load-bearing wall. This is necessary so that in the future the wooden wall remains perfectly level without any serious deviations.
After we have installed all the panels, we begin installing the fittings. At the penultimate stage, the following tools and parts will be needed: a hammer, plinth, finishing nails and a dumbbell. We continue to build with our own hands. In order for the lining to take on a beautiful, well-maintained appearance, it is necessary to attach all the corner joints and cover all the gaps between the ceiling and the floor. For corner joints, use a narrow plinth; for lower and upper gaps, you must use a plinth with dimensions that close these gaps. The plinth is secured using finishing nails.
Wall treatment
And the final stage is processing the walls. What remains is the final and very important repair procedure: treating all mounted wooden walls with a special fire-retardant compound or impregnation. This must be done at least three times every subsequent day. After this treatment, your walls will serve you for a very long time. In winter you will be very warm, and in summer it will be cool.
This completes the installation and installation of the lining! We hope that thanks to our article you will not have any difficulties installing and assembling the lining with your own hands! Good luck with your renovation!
Trusted manufacturers
Today, there are hundreds of small and large firms in the construction industry. Experts recommend carefully studying all the nuances before contacting any of them.
The company has established itself as a reliable manufacturer of professional tools. End mills are designed for the manufacture of such products as lining, block house, eurolining. The kit includes two combined elements, a complex profile. This kit is good because it allows you to make a full-fledged eurolining strip in two passes, which can significantly reduce the cost of time and labor.
At all levels between the bearings, discs and nut there are installation spacers, thanks to which it is possible to easily adjust the gap between the discs. This will help adjust the gaps or tension of the tongue-and-groove connection. The carbide solders are soldered to a very high quality, without sagging or leakage of brass, and are made neatly.
"Inveld"
The company has been manufacturing carbide-tipped wood cutters for more than 20 years. One of the company's latest developments is a kit for making eurolining or simply lining. The set consists of two elements. One cuts out the front part, and the second makes the counter part.
The set is supplied in two types of configuration. The first variety is with an 8 mm shank. The second one has a 12 mm shank. This was done in order to work both on low-power milling machines and on more powerful equipment - milling machines. The design is collapsible. You can unscrew the fastening nut and remove the components, replace the bearing or sharpen the knives. Carbide knives, VK8 alloy. Soldered to the shaft using brass. They are easy to sharpen yourself with a diamond tool on the back of the knife.
"Slavic Courtyard"
This manufacturer produces options for four-sided and milling machines.
The Slavyansky Dvor enterprise supplies a wide range of models. They are intended for the production of all types of cladding boards (beams, linings, eurolinings, American boards, block houses). You can choose the type that suits you, either as a set or separately. With replaceable or brazed knives.
Types of tools for equipping a hand router
When choosing a tool to equip your hand router with, you must first decide what tasks you are going to solve with its help. In addition, you should take into account the characteristics of the material that will be processed (wood cutters, for example, are made of a softer material than stone cutters).
Working heads of cutters can have different profiles
On the modern market, as mentioned above, there are many different cutters designed to equip hand-held power tools. If we talk about the most popular types, we should highlight:
- cutters for lining;
- cutters for panels;
- tools for performing stone work;
- spiral cutters designed for woodworking.
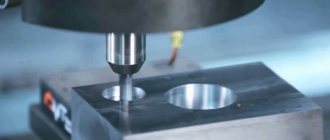
Milling cutter - appearance, application, features
It is difficult to come up with a more perfect tool for wood shaping. A milling cutter is a fairly easy-to-use tool, which is a washer (with several blades of a certain shape) with a shank that is clamped into a machine chuck. The number of blades varies from 2 to 6, depending on the area of application of the tool, the material it processes, and the power of the power plant.
A standard cutter washer has 2 knives that remove material from the board. A durable shank with a diameter of 8-12 mm ensures transmission of torque to the knives. The board processing process is quite simple, but seriously penalizes for mistakes. It is quite easy to spoil a board, not only at the stage of removing the material, but also after it: improper drying, insufficient impregnation with chemicals can put an end to the finished sheet.
Milling cutters suitable for making lining using a hand router
Regardless of the class of the tool, that is, professional or amateur hand tools, it uses exclusively end-face cutters. At one of its ends there is a collet (shank) with a diameter of 8 or 12 mm for rigid grip by the chuck, and at the other there is a directly profile cutter up to 50 mm wide. The manufacturing quality of the cutters themselves and the service life of the cutting tool depend primarily on the grade of cutter steel and the manufacturer. Models from well-known brands are always equipped with only durable grades of tool steel.
Important! When worn out, the cutting part of the cutters in most cases must be resharpened, but no more than four times. Cutters and failed bearings are sold in specialized stores. All cutters for cutting wood are usually divided into two main groups: edge and groove
They are sold both individually and as part of sets. Edge cutters can be easily distinguished from others by a characteristic feature - the presence of a bearing in front of the cutter. There are universal cutters - this is useful to keep in mind for similar operations - for example, in the case of making lining. They cost a little more than single models, but will allow you to save more time on production by reducing the number of passes
All cutters for sampling wood are usually divided into two main groups: edge and groove. They are sold both individually and as part of sets. Edge cutters can be easily distinguished from others by a characteristic feature - the presence of a bearing in front of the cutter. There are universal cutters - this is useful to keep in mind for similar operations - for example, in the case of making lining. They cost a little more than single models, but will allow you to save more time on production by reducing the number of passes.
Industrial production technology
You will need this knowledge in order to independently make the best decisions when making lining at home. The process of industrial production of lining consists of several stages.
- Making boards. The logs are sawn on band or disk sawmills into edged boards of specified parameters. The thickness of the board is in the range of 15-25 mm, width 100-150 mm. Specific dimensions depend on the type of lining.
- Drying lumber. The process takes place in chamber drying, which reduces the amount of waste and minimizes the risks of torsion and cracking of boards.
- Sorting. Lumber is sorted depending on quality. For the manufacture of lining, boards of at least second grade are selected.
- Manufacturing of lining. The process takes place on a powerful four-sided planer. By selecting various cutters and knives, four planes are processed in one pass, and the desired profile is immediately created on them.
- Quality control and product storage.
That’s all the technology is, there is nothing complicated, modern equipment allows you to automate production to the maximum. It is impossible to achieve this at home; you will have to waste much more time making the forcing.
Table. Classes of lining and their description.
| Class or variety | Description |
| Free from cracks, knots and other defects. The surface is perfectly smooth and even. | |
| The surface is smooth or slightly rough. There is 1 healthy knot per 1 linear meter (knot diameter no more than 1.5 cm). There may be cracks: hairline cracks - no more than ½ of the panel in length, non-through cracks - less than 9.5 cm in length (the exit of the cracks is directed towards the end of the panel), which appeared during drying - no more than the width of the panel. There may be tars and resin pockets of 2 pcs. at 1 m p. | |
| There are many knots, of which no more than 2 can fall out. per 1 m p. There may be through cracks up to 1 mm wide and up to 15-30 cm long, hairline cracks are allowed along the entire length of the board. The presence of wormholes (3 pieces per 1 square meter) and rot (no more than 1/10 of the panel) is allowed. Grade B lining is suitable for painting. | |
| The quality is low. Many different defects. This lining is suitable for upholstery of technical rooms or rough work. |
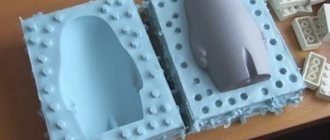
Figurine cutters
Using cutters for paneling (or figurine), thin planks of a certain configuration are made, which are used to frame various decorative elements. Panels are most often used for the manufacture of decorative frames, as well as for the design of furniture facades. A paneled element used exclusively for decorative purposes can be cut along the contour of the product. Using milling cutters for panels, it is possible to produce products that simultaneously perform two functions: they act as a decorative element and fix the connected elements together using the “tenon and groove” principle.
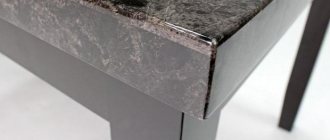
Processing the edge of the tabletop with a figurine cutter
On the modern market, various cutters for infill are offered, which involve the production of such a decorative element in one or several passes. When making a panel in several passes, at each stage of the technological process, a layer of material is removed for which the tool used is designed. As a rule, in such cases, not one paneling tool is used, but a whole set of them.
Panel cutters can work in vertical and horizontal planes. Vertical cutters for infill are used to process baseboards and the edges of cornices, which involves processing to a greater depth. Horizontal cutters for infill are distinguished by a larger diameter of the cutting part. They are used to process furniture facades, shelves and door panels. Although cutters of this type can improve processing productivity, they are significantly inferior to vertical cutters in terms of cutting depth. It should be noted that almost no production can do without panel-type cutters.
Figurine cutters are divided into single-sided and double-sided
Production of linden and aspen lining
The basis for the production of lining is natural wood (its lower parts). Deciduous woods (ash, alder, linden, aspen) with a rich range of colors are ideal for interior decoration. Coniferous trees are more suitable for exterior decoration of houses, saunas, baths.
Linden and alder are especially interesting as materials for lining. Their advantages:
- They have low density.
- More fire resistant.
- They do not turn blue over time.
- Does not emit resins.
- Practically do not heat up.
However, they require varnishing. Due to the strength of the raw material, cutters for making moldings from hardwood must be sharpened.
How to use lining cutters at home
Everyone spends their leisure time in their own way, but it is best to do it usefully. We suggest you make your own material for finishing your house or apartment. To do this, first of all, you will need cutters for lining on a manual router. Imagine how convenient it is to make materials for repairs at home, you will agree that it is not only exciting, but also useful.
The photo shows cutters for making lining using a manual router
We make lining at home
Existing types of tools
In order to make wood panels yourself, you will need bearing cutters; other types of tools require additional equipment, which means they are not suitable for us;
Cutting tools for hand work
- Mills for making lining for a manual router come in a wide variety. Before you start work, you need to decide what tools you will need to make wood panels. Do not forget also that some cutting tools can only be used for manual work, but it is undesirable because of the inconvenience;
Universal models
Please note! The lining cutter shown in the photo above is universal because it is convenient to use both on a machine and in a manual milling machine. The diameter of such parts can range from 35 to 59 millimeters, depending on the length of the shank
Mounted models
The cutter for making lining, which is shown in the photo, will help you make a panel with any tongue
It is important to set up the machine correctly, namely to select a cutter by diameter and depth.. Independent manufacturing process
Self-manufacturing process
Important! In order for the process of processing boards to be simple and straightforward, without problems, it is necessary to take material whose length does not exceed two meters. Such boards are convenient to work with and easy to process.
If the boards are very short, then their processing is easier if this process is carried out with a manual router.
Methods for connecting boards
Remember! When you cut down a wane, there is often quite a lot of material left behind that should not be thrown away. From this waste it will be possible to make small connecting strips.
The photo shows the process of cutting a groove
In the case when the board has already been processed, you only need to make a tenon and, of course, a groove. We install the table so that it is convenient for you to work on it and tongue and groove the board. Do not forget that it is constantly necessary to adjust the depth of the groove and the workpiece must always be pressed tightly to the table;
We process the board using a surface planer
You probably understand how to make lining with a hand router, but you will still need to talk about the details and nuances of this matter, because each business has its own characteristics that you need to know. Remember that if you need a calibrated board, you will need a surface planer to make it; a manual machine will not work for this;
Router operation
- When working with a hand router you need to be extremely careful. Because this device is considered dangerous. Sometimes even experts in their field make mistakes and get injured, so beginners need to always be on their guard. Do not forget about safety precautions, and also monitor the thickness of the product so that your material is even;
- Even a beginner can make lining with a hand router, if he or she becomes familiar with all the rules for working with this device before starting work. Don’t forget that high-quality equipment guarantees your work safety; you shouldn’t skimp on it.
In the construction market today you can find any types and sizes of building materials. Do not forget that the price for them is much higher than the cost of the material from which you will make the lining yourself. In this video you can see the individual stages of making wood panels with your own hands on a machine.
What determines the quality of homemade lining
Working with lumber is much more difficult than working with metal. In nature, no two boards are completely identical, not to mention the different properties of soft and hard woods. Metal does not have knots, does not absorb moisture, does not have developmental defects, etc. And these indicators influence the processing technology. Industrial equipment makes it possible to greatly simplify the process due to the large mass of machines, precision adjustments, stable mechanical feed and strong pressing.
At home, all cutting parameters must be observed independently and quickly changed depending on the characteristics of the board and the capabilities of the machine. What should you keep in mind?
Pay attention to the location of the grain; never process lumber against the grain. Monitor the condition of the bearings. The slightest beating will certainly affect the roughness of the surfaces. As soon as it is discovered that the machine shaft is a little wobbly, the bearing must be urgently changed or, if possible, adjusted. Tenths of a millimeter of vibration significantly degrade the final quality. The serviceability of cutting tools is one of the important components of surface cleanliness. Saws and cutters must be sharp. If you make cutters yourself, then use only durable grades of tool steel. The geometry of all cutters must be the same. Otherwise, some of them will not work, and this is a very undesirable phenomenon. Position the cutters accurately, do not rush. It is very difficult for an inexperienced master to set all the cutters at once, do not be discouraged. Lose more time, but achieve the desired result. The lost time will be more than repaid in the future.
The more cutters, the better. If the head allows you to install four, then do so, do not work with two. Four cutters slightly increase the installation time, but then the machine works longer – they become less dull.
Always use exactly the same wedges to secure the knives. Even small differences in mass cause head vibration. Vibration not only degrades the quality of processing, but also causes rapid wear of bearings and increases the risk of injury. Observe cutting conditions for lumber
This is a very important condition. Cutting modes include the number of shaft revolutions, the number of cutting planes, feed speed and sharpening angle
We can talk about this topic for a very long time; cutting modes have a huge number of options. Beginning craftsmen need to become at least a little familiar with the theory, and in the future everything depends on the ability to learn practically and the desire to work with woodworking machines. Before feeding the board to the machine, inspect it, select the optimal cutting direction, taking into account the characteristics of the surfaces, the presence and type of knots and other defects. Place the finished lining in even stacks, do not place it vertically, and do not scatter it throughout the workshop. Cleanliness and order are evidence of the professionalism of the master.
If you have little experience, then the input/output of the board may be defective due to a slight change in the direction of movement and non-parallelism with the ruler. Keep this in mind when determining the length of the lining, make a reserve in length.
If you follow the above recommendations, there is no need to use sandpaper for final adjustment of surfaces. Remember that only amateurs make lining in such a way that it then has to be sanded by hand for a long time and tediously.
Milling cutters for the manufacture of lining, panels and for stone work using a manual milling cutter
Purchasing a hand router is a good opportunity to do many useful things around the house, improve its interior and exterior, and carry out repair and construction work. However, in order for a hand router to turn into a useful and effective device, it must be equipped with the appropriate tools - such as cutters for lining or paneling, for working on stone, metal and other materials. You can easily find and purchase such products on the modern market, but before making a choice, you should understand what such cutters are and what parameters they are characterized by.
Making lining with a manual milling cutter is a task that is quite feasible at home
How to choose
Any purchase on the market may lead to different results. When cutters for the home are purchased outside of a tool store, the quality of a hand cutter for lining will be difficult to determine.
But there is a way to avoid buying a very “raw” alloy. If the seller does not object, you need to run a file along the side of the cutter, when marks remain on the surface, this means that the hardness of the material is low. It should be 58-62 HRC (Rockwell method for determining the hardness of materials). This value may be indicated on the shank; if it is not there, then suspicions should already arise.
A product that is made at a serious factory will have a good appearance, without burrs on the surface, pleasant packaging, information about the features of the product should be present, and so on.
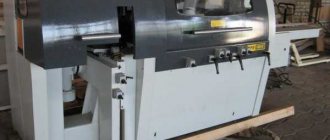
Block house machine
One of the varieties of lining (by the way, in enormous demand) is a block house. The material imitates rounded logs and is widely used for external and internal decoration of premises. It makes sense to cover houses with a block house, because such lining has a solid appearance, is durable and environmentally friendly, as it is made of natural wood. The panels are characterized by a complex shape, so the elements are connected using the “groove-tenon” principle. Making them manually is difficult and is fraught with “inconsistency” of individual “logs” in the future, so it is advisable to use specialized equipment:
- band sawmill;
- drying chamber;
- lining manufacturing machine.
When processing workpieces on machines, you can perform a number of operations:
- cutting prepared raw materials to the required size;
- surface milling;
- formation of recesses (grooves and tenons).
Lines based on milling machines make it possible to produce material from edged boards. At the same time, the cost of a block house is higher than when produced using automated lines with circular saws. At the same time, the latter are much more expensive. In combination, it makes sense to use additional equipment designed to impregnate the block house in order to increase the service life with fire retardants / antiseptics.
For home production, it is enough to produce 350-450 m3 of finished products (70%-50% level of normal productivity). The annual revenue of home production exceeds $10,000 (depending on costs and sales volumes). The recommendations given will help novice entrepreneurs implement an interesting and effective project.
How to make a lining from an edged board
Master class from the YouTube channel “Samodelkin“.
Choosing edged boards
In a home workshop, it is not possible to make lining from every edged board. For this, as a rule, 1st or 2nd grade lumber with dimensions of 100x25x6000 mm is used. This is a standard board size that is in demand at all stages of home construction.
There are certain requirements for edged boards for lining. The lumber must have natural humidity, but not more than 16%. The boards should not have mechanical damage, signs of rot or wormholes.
Cinder board for lining
The type of wood for the lining is selected depending on what will be sheathed: the outside of the house, the interior, the bathhouse. For homemade lining, inexpensive types of wood are usually used, which are often found in the retail chain:
- pine - pronounced texture, high strength, good thermal insulation properties;
- spruce - light texture, a large number of knots, easy processing, does not warp, not moisture resistant;
- alder - the texture has many shades, high moisture resistance and thermal insulation;
- linden - beautiful texture, easy processing, resistance to temperature changes.
Making lining with a milling cutter
First of all, the edged board, processed on a jointer, is planed with a thicknesser. With its help, the geometric dimensions of the future lining are formed.
Processing boards on a thickness planer
The edged board can be processed in another way. For example, it is enough to go through it with a plane and then sand the surface.
Before milling, the ribs of the workpieces are planed, and the wane is removed with a sharp knife.
Removing the wane
Since the surface of the boards is rough after the thicknesser, they have to be sanded.
View of boards before milling
For milling, a manual milling machine with a power of 2100 W is used.
Manual frezer
The profile is milled using combined cutters included in a set of two cutters. If you use separate cutters, the work will take much longer.
Milling profiles
The set of cutters is suitable for processing wood of all types. The set contains one large-diameter cutter, which forms a joining tenon, as well as an edging on the front part of the workpiece. A smaller diameter cutter forms the joint groove and edge on the other side of the board.
Set of cutters
The cutter for the docking tenon is clamped in the router spindle and the milling depth is selected.
Installing the cutter on the router
Install the parallel stop included in the router kit.
Assembled router
To facilitate the processing of edged material, the boards are laid on racks with the wane down. A special rail holds the board and prevents it from moving during milling.
Holding the board on stands
The first cut is made using a milling cutter to create a joint tenon. This cutter is used to process all the boards one by one. The back and front sides of the treated boards have different appearances.
Back side of the treated board Front side of the treated board
On the router, they change the cutter to a docking groove, and make cuts on one board that has a docking tenon.
Sawed groove of the lining
Check the correct installation height of the cutter for the joining groove by checking the presence of a gap between the two joined linings.
If the cutter is installed incorrectly, there will be a gap after joining. It is enough to recess the cutter and the gap will disappear.
Gap in the boards after joining
After adjusting the installation height of the cutter, all remaining boards with tenons are milled into the joint groove.
The quality of the lining made by a milling machine is assessed by the assembled panel.
Front part of the panel made of clapboard View of the panel from the side of the wane
Before installation, the lining is stored indoors. If you leave the material outside, it will move and the slats will be unsuitable for cladding.
The lining, made by a milling cutter, is distinguished by a reliable lock.
Castle view
This material is used for cladding not only indoors, but also for cladding the exterior of the house.
Indoor cladding Exterior cladding
Master class video:
Independent production of lining
Step-by-step instructions for performing the work.
- First you need to prepare or purchase even boards of the size you need. It is better to choose a length of no more than two meters in order to make working with the material more convenient. The width must be selected and calculated independently (usually it is 8-10 cm). When cutting boards, the remaining material does not need to be thrown away; connecting slats can be made from them.
- Then you need to properly process the board, preparing it for work.
- Once the board is completely processed, you can begin cutting out the tongue and groove. During this work, everything must be done clearly and measuredly, since the likelihood of doing something wrong at this stage is quite high. The board must be secured well and tightly, the table on which the work will take place must be in a stable position. The depth of the groove and the width of the tongue must be constantly adjusted, since even with minimal displacement the board will be damaged.
- In some cases, you won’t be able to get by with a hand cutter, since when producing, for example, a calibrated board, you will need more complex equipment - a thickness planer.
Lining using a circular saw
A situation often arises when it is not the aesthetics of the material that comes to the fore, but only its practicality, for example, it is necessary to decorate the walls or ceiling of a utility room, cellar, or workshop. For these purposes, a simple and reliable lining made with your own hands using a circular saw is perfect.
The first step is to prepare the lumber. You will need boards 15-20 mm thick and 8-10 cm wide. It is reasonable to assume that the wider the board, the less it will be needed, the faster the work will be completed. This is true, but only partly. A large width plus a primitive connection, the grooves for which can be made with a circular saw, are guaranteed to lead to warping of the board, thereby making the coating fragility.
The workpieces must be aligned in width. To do this, the side stop of the circular saw is set using a ruler and fixed. Each board is processed in turn, bringing the width to a single value.
After the planks are leveled, they are scraped. A jointer is best suited for this, but factory-made circular saws can also perform this function. Of course, you can process the board with a hand or electric planer.
Next, you need to create a groove and tenon for attaching the lining. The easiest way is to make mirror samples at opposite ends of the board. Their accuracy and symmetry is achieved by adjusting the height of the blade exit and the distance from the saw to the stop.
With a board thickness of 20 mm, the disk output should be 10 mm, the distance to the ruler should also be 10 mm. The first pass is made flat. Pressing the board against the side stop, make a groove in it half the thickness. Next, the board is placed on its edge and the operation is repeated. The same actions, but in mirror image, are performed from the other end.
As a result of the described actions, a rough version of the lining is obtained, which is easy to install and creates an attractive, flat surface.