Not long ago I decided to buy a dacha for my soul and relaxation. A couple of weeks ago I chose a country plot, negotiated a deal and bought it. The site is far from ideal - it is completely empty, but who stopped that? I will redo everything, and in particular, I will pour concrete for a new one. There are a couple of places on the site where it will be difficult to pour concrete, and the concrete mixer itself is not very mobile. Therefore, I decided to design a simple tray for pouring concrete with my own hands and share my experience with you.
Source znaybeton.ru
How to make a concrete tray with your own hands?
Building codes require that volumetric concrete structures be poured simultaneously, preferably during daylight hours. One of the components of the rapid pouring of a structure is a concrete tray, which you can quickly and easily make with your own hands.
- Concrete tray: where to start assembling?
- Materials, tools, procedure
- Operating procedure
Types of gutters
There are several types of gutters for pouring concrete:
Return to contents
Hanging device
It is used when transporting concrete mortar over a short distance with a shift to the site of the future foundation. To build this mechanism, you need to take a rope and attach a tray to it using cables threaded through a couple of blocks. One end of the rope is tied to a column or pole. A weight is attached to the other and left on the ground. The load should also be hung on the edges of the cables so that it is convenient to adjust the degree of inclination of this mechanism.
If a massive foundation is being laid for a large project, a fixed angle of inclination of the concrete conveyor should be installed. This can be achieved by increasing the height of the tower or installing additional columns. Actually, the mixture from the central tower will be transferred to these additional pillars.
Return to contents
Gutter structures with jibs
Diagram of a trench for pouring concrete. Such a device is a mechanism in which the lower edge of the tray is attached to a jib - a lattice structure made of metal, one edge of which rests on the lower slide, the other is connected to the upper ones by means of a lifting cable. To maintain stability of the angle of inclination of the gutter, the lower edge of the structure is attached to the ground using cables. This device is used when delivering concrete composition to the formwork at a distance not exceeding 60 meters.
Return to contents
Truss-type concrete mix tray
The simplest mechanism for delivering concrete to the foundation site of all those listed. It is a design in which the lower edge of the concrete conveyor is attached to a support.
Return to contents
Concrete transport chutes
Gutters are a structure for draining or mechanically transporting liquid to the desired location. Such a device is a useful, effective assistant both in everyday life and in industrial conditions, in the road system, and the construction industry. It is the construction type of gutters that will be discussed. A construction gutter for concrete is a simple design that you can actually make with your own hands. With such a gutter it is possible to ensure high-quality, uniform placement of concrete mortar during the construction of the foundation for a building.
How to do it yourself?
The gutter is made of iron or wood. For personal use, preference is given to wood as a lighter and more pliable material. The optimal size is the width of a shovel (20-30 cm) and a length of about 3 m. Stages of creation:
- The wide board is processed with a plane from the side where the concrete passes in order to remove roughness and irregularities that will slow down the movement of the solution. An alternative option is to upholster with galvanized iron or tin.
- Prepare the sides of the structure at least 20 cm high. If the width or length of one plank is not enough, they are extended with the help of a second one, connecting from below with scraps of plank and self-tapping screws.
- Screw the sides to the bottom board with self-tapping screws.
- The side boards are fastened together with 40×40 bars every 80-100 cm so that they do not separate under pressure.
- Installation of the device on supports, which can be either improvised means (boxes, bricks, blocks, etc.) or sawhorses specially put together for this purpose. Angle measurement.
Some builders recommend covering the inside of the gutter with roofing felt or polyethylene. But these materials quickly tear and complicate the passage of the solution.
Types of supply channels
There are several systems for gutter placement:
The suspended arrangement of the structure makes no sense when the solution supply point is very close to the mixer.
- Hanging. Supply of mixtures at close distances. It consists of hanging the tray using cables on a rope, one end of which is fixed to a pole, and the other is equipped with a load and pulled to the ground.
- With a jib. Transportation of the solution no further than 60 m. Installation on a metal truss with a load at the ends to create a counterweight and maintain the angle of inclination. The device is fixed on a slide, which simplifies changing the direction of material supply.
- Shprengelnaya. Used for structures over 10 m. The lower edge is attached to a support, and the second link is supported by trestles.
How to prepare a surface for pouring
The technological process begins with surface preparation. Excavation work is being carried out, the volume of which depends on the type of future structure. At the next stage, drainage is arranged to remove moisture. This is a two-layer bedding made of sand and crushed stone of medium or fine fraction. The layers are well compacted.
To prevent the solution from spreading, formwork is installed. Use any flat material. To make tracks with a curved profile, plastic sheets are used. The structure is installed along the edges of the site, trenches, and secured with bars driven into the ground. The formwork determines the contours of the future product.
At the stage of preparation for pouring, waterproofing is arranged. It is necessary so that moisture from the soil does not penetrate into the concrete, and liquid from the solution does not go into the ground. Use plastic film, roofing felt or waterproofing material.
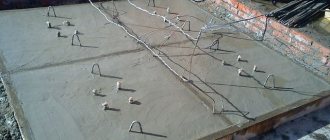
Next, they begin laying the reinforcement, which gives the structure strength. A metal mesh made of wire with a diameter of 6 mm or more is used. The size of welded cells is not less than 100×100 mm. Lay sheets overlapping. Instead of mesh, they are reinforced with rods with a cross-section of 8 mm or more, which are connected to each other.
Preparation of materials and tools for creating a gutter
When producing a transport mechanism for a concrete composition, pay attention to some points:
- This device must be in close contact at one end with the mixer, at the other with the formwork, thus connecting them.
- Install the device with a certain angle of inclination so that it is easier for the concrete under its own weight to flow down the gutter into the formwork.
Tools that may be needed at work.
To create such a mechanism, you will need the following tools:
- hacksaw;
- roulette;
- hammer;
- screwdriver;
- square;
- Bulgarian.
To do this you will need to prepare the following materials:
- board measuring 2.5/12 cm;
- a piece of polyethylene, linoleum or tin;
- timber or block as a support;
- nails (you can use screws).
Return to contents
Tools and materials
Start making your gutter with the following tools:
- Sharp saw;
- Square;
- Measuring tape;
- Screwdriver;
- Hammer;
- Using metal scissors or a grinder.
If you decide to save on galvanized iron, plan the wood until you achieve maximum smoothness. Then a plane will be added to the list of tools.
Prepare your materials in advance. You will need:
- Nails of 25 mm, 70 mm and 100 mm, wood screws;
- Edged board size 25×150 mm;
- Beams 40×40 mm and 50×50 mm - will be used to strengthen the box;
- Roofing iron.
If you are tempted to take polyethylene or linoleum instead of metal, think about the fact that even the densest polyethylene will tear upon contact with a shovel, under the influence of the solution, and buying linoleum will cost more than a sheet of roofing iron. And metal will last less and is not suitable for reusable use.
Layout diagrams
Attachment system
It is used in this case if the supply of concrete for pouring the structure (it is the foundation itself) is carried out over a small distance with an offset. To create such a structure, a rope is useful, to which the gutter is suspended using cables passing through two blocks.
One end of the rope is attached to a pole or column, and a load is hung on the other end and lowered to the ground. The load is also hung on the ends of the cables in such a way that they can be used to adjust the angle of inclination of the system.
If you plan to build such a system as a foundation for a huge structure, then to maintain a constant angle of inclination you need to install a higher tower for the rope or install additional pillars. Specifically, concrete will be supplied to the auxiliary pillars from the main tower.
Gutters with jibs
This arrangement is appropriate in this case if the concrete for the foundation is supplied at a distance of less than 60 meters.
The lower end of the gutter is suspended and attached to the jib.
The jib is an iron lattice truss, one side of which rests on the lower skid, and its upper edge is connected to the upper skid using a lifting cable.
In order for the slope of the gutter to remain constant while the concrete solution passes through it, its lower end is attached to the ground using cables.
Sprengel groove
A more common design that involves hanging the lower end of the gutter from a support.
The process of creating a trough conveyor for concrete mass
It is not at all difficult to build such a mechanism with your own hands. This is a simple process that does not require professional skills and abilities. First, use a saw to cut the board, adjust it to the dimensions of 2.5 by 15 cm, and knock down a shape resembling the letter “P.” The sides of this structure must be high so that the concrete solution does not stagnate during transportation.
To facilitate the flow of the solution along the tray, the entire inside of the structure must be covered with smooth materials: polyethylene, tin or linoleum. This will ensure better sliding of the solution and reduce its adhesion to the bottom and walls of the conveyor.
After making the trench device for pouring the foundation, it is placed in the required place, supported by four supports. The role of such supports can be perfectly fulfilled by gas silicate or other monoliths that can protect the means of transporting the composite from collapse.
You should know that inside elongated open-type structures, a specific percentage of moisture evaporates from the concrete mixture, thereby disrupting the homogeneity of the solution. Therefore, such transport mechanisms are used only at private construction sites.
When laying foundations for industrial purposes, gutters are used, constructed in such a way that at the bottom of the device, before entering the formwork, the concrete passing through the tray is constantly mixed. This is done with the help of a special trunk pipe, reminiscent of a funnel, through which the solution passes.
Device requirements
Formwork diagram for the foundation.
In order for the supply of concrete mass during the construction of the foundation to be as uniform and homogeneous as possible, the gutters must meet certain requirements that apply to them:
The slope of the gutter must remain unchanged throughout the entire period of work during the construction of the foundation of the house. If this condition is not met and the angle of inclination, for example, decreases, then the speed of passage of the concrete mass will also decrease.
This, in turn, would lead to a buildup of solution and blockage of a certain area of the gutter. With an increase in the angle of inclination, and therefore the speed of passage of the mass, the concrete surface will be divided into separate parts, which is completely inconsistent with the existing technology. The foundation will be of poor quality.
The angle of inclination of the gutter relative to the horizon must have a certain size, an increase in which will lead to the concrete mass being divided into parts. The reason for the change in the size of the angle of inclination may be the consistency of the concrete and the degree of its delivery distance.
Some features
Maintaining uniformity of concrete transportation directly depends on the shape of the gutter. A narrow and high chute makes it possible for individual particles to come closer together during the movement of the mixture. In addition, it is necessary to ensure that the concrete mass does not overflow over the sides of the device during feeding.
- A narrow-shaped accessory has one advantage, which is that it is the most durable and stable in a vertical position. This is very important, since its design must withstand not only its own weight, but also the load from the entire concrete mass.
- The very narrow element must be reinforced with horizontal bracing to prevent it from buckling in the event of a blockage.
- To increase rigidity, it is reinforced with corners in the transverse direction. The length in each specific case may be different and depends on the type of future structure.
- On an industrial scale, when creating a foundation, systems with a length of 3-15 meters can be used.
It should be remembered that the longer the gutter, the greater its mass should be in order to prevent it from bending during the supply of concrete solution. The connection of such products is determined by the peculiarities of pouring the concrete mass, more precisely, by whether the gutter is supposed to rotate in a certain direction or not.
In order for the movement to be circular, it is necessary to connect its parts with a rotating head. If there is no need to rotate the gutter in a horizontal plane, it is quite enough to use hinges that allow you to adjust the angle of inclination.
Tips for making troughs for pouring concrete mortar
Before starting the production of a concrete delivery tray, it is worth paying attention to some conditions regarding setting the correct angle of the structure. The degree of the established inclination must be stable and the same throughout the entire working process. As the slope decreases, the flow of the concrete solution slows down . The consequence of this may be premature hardening or clogging of the mixture.
Pouring concrete through a chute into the formwork.
If the angle of inclination of the gutter, on the contrary, becomes even greater, the speed of transport of the solution inside the formwork will increase. This is fraught with the disintegration of the mixture into different parts, which can lead to a significant deterioration in the quality characteristics of concrete. The foundation will lose its performance qualities, become fragile, vulnerable and short-lived.
The angle of inclination for installation of the gutter structure is selected taking into account the level of supply range of the concrete mixture and its density coefficient. For liquid solutions conveyed over a shorter distance, a small level of inclination is permitted. If the composition is sufficiently dense or it is delivered over a long distance, the angular degree of the tray should be increased as much as possible in order to speed up the pouring process and not deform the structure due to the weight of the concrete mass.
The uniformity of the concrete composite is influenced by the shape of the gutter structure. A long, narrow tray, made with your own hands, during the delivery of the solution contributes to a closer connection of its grains. At the same time, the trench should be made quite deep to prevent the concrete solution from overflowing over the edges of the tray while pouring the foundation.
If the manufactured device transporting concrete from the mixer to the formwork turns out to be too narrow, it must be strengthened with horizontal crossbars. This will protect the structure from deformation during the thrombotic process of the concrete mass. If you want to give the structure greater strength, you can increase its hardness by means of corners attached to the tray perpendicularly. The length of such fasteners must correspond to the width of the gutter.
Today, similar mechanisms for laying foundations are produced from 3 to 15 meters in length. Such devices, as a rule, are used for more global purposes - in the construction of large-scale commercial, often multi-level structures.
Under private construction conditions, shorter (up to one and a half meters), convenient gutters are suitable, which are quite possible to make with your own hands. Its weight also depends on the footage of the tray. The longer the structure, the heavier it should be. This will protect the solution conveyor from bending under the weight of the mass entering it.
Manufacturing process
The gutter manufacturing technology is not particularly complicated. The principle of operation resembles the construction of a form for a foundation.
- We assemble the bottom of the gutter, connecting the boards with end plates from the same boards, nailing the material from below;
- In order to add strength, we fix it across the board with reinforcing bars in increments of 0.6-0.8 m, also from below;
- We nail the sides or screw them with self-tapping screws, creating a U-shaped model;
- We cover the bottom of the element with roofing iron if the boards are not planed;
- We strengthen the walls with beams in increments of 80-100 cm;
- Install the gutter in the right place;
- We support it with gas silicate blocks and measure the angle.
From the ground level the device is 5-15 degrees for a thin solution and 20-30 degrees will be needed for dense concrete. Then the solution from the mixer or concrete mixer, when it gets into the tray, will move along the riverbed on its own.
Forms for filling
Industrial molds are used to make tiles, facade stones, and paving stones.
They are expensive, so for their own needs they make homemade ones from flexible plastic. The durability of the molds is affected by the type of material and thickness.
If large products are cast (piles, curbs, pillars), wooden formwork from boards and plywood is knocked down. Before use, the wood is well moistened with water. If you need many small products of the same type, this method is also used.
In some cases, the mold is made in the ground. Sand is poured into the holes, heavily moistened, and filled with concrete. The surface is leveled, covered with film, and moistened with water until completely set.
Stencils for stone or tiles can be created from any materials, even from children's molds or dishes. To cast the ring, take old tires that are suitable in size.
For disposable forms, foam is used. A blank is cut out of it and filled with concrete. To remove the product, the mold will have to be broken. But the most unimaginable configurations are created from the material.
Stage three: preparing the solution
Preparation of cement mortar is the most labor-intensive step. The ratio of mixture ingredients (cement/sand/crushed stone) varies. The main thing is that the solution is at the same time viscous, but not thick. The optimal ratio is 1:2:4. This type of concrete is the most durable. Sometimes they use another, more economical option with proportions of 1:3:5, but its reliability is noticeably lower.
How to pour concrete mixture technologically correctly
To produce a high-quality concrete structure, it is important to choose the right technology and stick to it.
For floors
To install a concrete floor in an apartment, beat off the old screed with a hammer drill. Clean the surface and begin pouring.
In a private house, the floor is laid on an earthen base.
- mark the floor level;
- level the soil surface, add more if necessary;
- lay waterproofing;
- insulated in a suitable way;
- reinforced if increased loads are provided;
- create formwork from beacons, dividing the area into separate sections - maps.
Concrete is prepared from cement, sand and crushed stone in a ratio of 1:2:4. Concrete is placed from the corner that is furthest from the door. The solution is poured into the card, leveled with a shovel, pierced many times with a rod, and stretched over the entire area.
Better compaction is carried out with a vibrator. When cement laitance comes to the surface, stop shrinkage and move on to the next card.
After completion of the work, the filling is left for 4 days. Spray with water daily to prevent cracks from appearing. Then cover with film and leave for 3-4 weeks until completely set. Periodically moisten with water.
A screed is made over the frozen surface: liquid cement mortar or self-leveling mixture is applied. Allow to stand for 2-3 days, spraying with water daily.
For the foundation
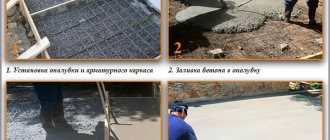
The technology for pouring any foundation is the same. After the preparatory work, a concrete composition is mixed or ordered. When the volume is large, it is better to buy with delivery - this is the only way to create a monolithic base.
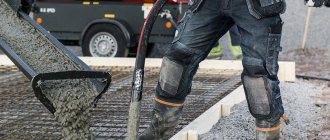
If the mixer can approach the object, one of the workers holds and directs the trench, and 2 more people straighten the solution in the trench. They start pouring from the corners, then fill the space around the entire perimeter.
Compaction is carried out using a vibrator or improvised means. The concrete is leveled in the filled trench until it hardens.
The construction of a columnar foundation has some features. This is not a continuous ribbon, but pillars connected by a grillage.
First, holes are made for the supports and reinforced, releasing rods 20 cm above the level of the pillar. Filled with concrete. Then they make the formwork for the grillage, which connects the pillars, lay the reinforcement, and pour it.
Into the formwork
If the solution is delivered by a mixer, it is poured immediately to a given height over the entire area. When using a concrete mixer or manual preparation, it is not always possible to prepare enough mixture to cover the entire volume of the structure.
Therefore, there are technological methods for laying the foundation in parts.
There are 2 options. In the first case, the formwork is filled in layers, but not too thin. In the second method, the space is filled along the entire height with separate blocks, forming a beveled sidewall to reliably connect the individual parts. If the break in work is more than a day, wait until the previously poured solution dries. Before new concreting, it is necessary to wipe the joints with a brush and rinse with water.
Air is removed from the freshly poured mixture using a vibrator or rod. They hit the formwork with a heavy hammer - the concrete settles and compacts. Then the surface is leveled.
In water
In industrial construction, 2 methods of pouring concrete into water are used: pile and caisson. When building a private house, 2 options are also used. The first one is similar to a coffered one. A concrete mixture is made, poured into bags and lowered into a pit above the water level. The bags sit for a month until the composition hardens. Then the formwork is erected and poured according to the generally accepted method.
The capillary version is more complex. A liquid solution without crushed stone is prepared, which is fed into the pit with a prepared cushion.
The work is performed using the following technology:
- Metal pipes with a cross section of 40-100 mm are installed in the trench at an equal distance. A layer of crushed stone is poured above the groundwater level.
- A liquid cement mixture is poured into the pipes, which flows out of them and fills the space between the crushed stone. The pipes are gradually raised so that the solution disperses evenly throughout the entire volume of the structure.
Preparing to make a gutter
When manufacturing a device for transporting concrete, the following must be taken into account:
- The structure must connect the concrete mixer container with the formwork of the future foundation.
- It must be at a certain angle, which will allow the mixture to flow freely under the influence of its own weight to the desired location.
To make the structure you will need the following tools:
- Hacksaw or saw.
- Yardstick.
- Bulgarian.
- Hammer.
- Square.
- Screwdriver.
Materials to be prepared:
- Edged board 25x120 mm.
- Nails or screws.
- Linoleum, tin or plastic film.
- Blocks or timber for supports.
In addition, when starting the manufacturing process, you should take into account several basic rules that impose special requirements on devices of this type. Thus, the manufactured gutter along its entire length must have a constant level of slope. If the slope decreases, the flow of the concrete mixture may slow down, which will then lead to clogging or premature hardening of the concrete. If the slope of the device, on the contrary, increases and pouring begins to be carried out faster, the concrete solution may disintegrate into separate parts, which will inevitably lead to a deterioration in the quality of the mixture. The base of the foundation will lose its reliability and will be short-lived.
Design description: basic requirements
Essentially, a concrete conveyor is a board inclined at a certain angle with high sides that connects the mixer to the pouring site. Arranging a gutter is similar to creating formwork and must take into account some requirements:
- Same angle of inclination along the entire length. Otherwise, premature hardening of the concrete or blockage of the channel is possible. The angle is calculated depending on the range of concrete supply - for long distances, as well as for thick mixtures, the slope is 20-30 degrees, for short distances and for liquid solutions - an angle of 5-15 degrees.
- High sides so that the solution does not overflow beyond the gutter as it passes.
- Access to all parts of the structure after installation to clear obstructions.
- Reinforced with supports, the structure must support its own weight and the weight of the supplied mixture.
Self-installation
Installing a drainage system with your own hands is not as difficult as it might seem. The most crucial moment is the calculation of all values and the selection of products with the required parameters, and their installation is relatively easy.
Preparing the trench
Often concrete channels are laid under drains in the form of a concrete layer at the bottom of the pit and side supports. The channels are made with a slope to ensure self-drainage of water. In this case, the length of the trench should be equal to the length of the entire system, the width should be 20 centimeters greater than the width of the drain. The depth is made equal to the height of the gutter with the grate plus a concrete layer and a 5 millimeter distance to the surface.
The location of the trenches can be marked with cords. After the trenches are ready, they are covered with sand in a layer of 10-15 centimeters, then thoroughly compacted. Concrete mortar is poured on top of the sand in a layer 10 centimeters thick. Only after this can the trays be installed.