When repairing the steering and chassis, almost every car owner is faced with a problem (tire rod ends), which is quite problematic to solve without a special tool.
The reason is the design features of the named elements: their fingers have a cone-shaped shape, with which they enter the mounting sockets; over time, the place of this entry becomes dirty, oily, rusty, making the connection of the surfaces too dense, almost uniform, that is, one that cannot be separated by simple physical force . You need an assistant - a ball joint remover - a tool that greatly simplifies pressing out.
It is not difficult to become its owner: to do this, you need to go to the nearest auto store and purchase it there, or make a ball joint remover with your own hands using any of the methods presented below, which we have grouped depending on how the force is created in them.
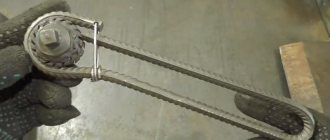
Lever pullers.
Lever pullers are a tool consisting of a pair of levers connected to each other in the middle. They also have a coupling bolt on one side. In the process of acting on the ball joint, this bolt is unscrewed, bringing the ends of the levers together, one of which is located between the support and the eye, the second - under the finger.
Read also: Chainsaw Shtil 180 starts and stalls reason
Such pullers are also quite effective, but they are larger in size, so they may not be applicable everywhere.
Classification of door hinges
Modern door hinges, the types of which are widely represented on the construction market, are classified according to several defining characteristics:
- Installation location;
- Detachable mechanism;
- Method of attachment to the box;
- Material of manufacture;
- Construction type.
It should be clarified that the need to independently select door awnings affects entrance and interior doors made of wood or MDF. Doors made of other materials (steel, aluminum and plastic) are supplied already equipped with the appropriate fittings and hinges. Only for wooden door leaves there is a need and opportunity to independently assemble and install hinges at your own personal discretion. Therefore, the classifying characteristics of door hinges will be considered in terms of their use in wooden doors.
Wedge type puller.
The simplest in its design, however, it also copes well with the task assigned to it. To make it you will need:
- take a small metal plate (enough size for a matchbox);
- using a grinder (angle grinder)/machine with an abrasive wheel, give it the shape of a wedge, the resulting workpiece in profile should take the shape of a triangle;
- Using the same grinder, starting from the upper corner of the triangle, you need to make a vertical cut in it at 2/3 of its height, a width slightly larger than the diameter of the ball joint pin;
- To make working with the tool easier, it is recommended to weld a metal rod to the middle of the base of the wedge, although you don’t have to do this if you don’t have such a rod at hand.
This is the kind of bracket you should end up with.
Then it's a matter of technique:
- insert the wedge you just made between the ball body and the eye;
- Hitting the rod (the base of the wedge) with a hammer, hammer in the homemade support puller until the finger pops out of the socket.
IMPORTANT!
When using this type of puller, there is always a risk of damage to the boot, so this tool can only be used in the event of a planned replacement of tips or supports. If the repair of the steering mechanism or suspension does not require such a replacement, it is better to abandon the “wedge” type puller.
Types of furniture hinges
Nowadays, on store shelves, consumers encounter a wide range of products in this area. Mounts may vary in:
- structural features,
- installation method,
- intended purpose.
The fittings create a certain style. Thanks to it, the design level of any household item is determined.
By paying attention to such points, you can choose the most functional options that satisfy a specific request. Depending on the method of application to the base, the components have different names.
One of the most important parts of the fittings are the hinges.
Overhead and semi-invoice
One of the most common among specialists are overhead four-hinged structures. This option is used when the door completely covers the walls of the box on which it is installed. It is popular for installation on any furniture: kitchen, dressing room, office. The product makes it possible to completely close the cabinet by tightly pressing the movable front panels to the base.
The mechanism allows you to open the door 90 degrees. It also supports the sashes in the chosen position and prevents misalignment.
If the side of the niche is covered simultaneously by two door panels, semi-overlay parts are used. Their distinguishing feature is the bending of the base. Thanks to this feature, it is possible to obtain a small gap between the components of the facade placed on the same area.
Most often, this type of hinge is included in kitchen sets.
Inverse and piano
Inverse fastenings allow opening 180º, forming a single line with the side of the box. Such components are most often used to equip built-in spaces.
This option is used for bedside tables and cabinets. It allows you to securely fasten the side part.
The piano mechanism is an obsolete type of product. It is very simple and understandable even to an inexperienced master, but still cannot boast of reliability. The design consists of two identical metal strips connected by steel wire in the middle. Most often this type is found on samples from past years. But sometimes it is still used today, for example, in making a kitchen corner with folding seats.
This view is considered obsolete. That is why it is rarely used and included in modern designs.
Internal and corner
The internal structure is taken when it is necessary to place doors inside a niche. That is, the sash does not overlap the ends of the walls, but is located directly between them inside.
The hinge is often included in pencil cases and cabinets that have heavy doors.
In most cases, it is necessary to provide a rectangular opening. But sometimes you need to attach the facade at an angle that differs from the standard by several degrees in one direction or another. In this case, special fasteners are used, which are marked accordingly:
- “plus” if an opening with a value above 110º is expected;
- “minus” when the opening level is below 90º.
Most often, such hinges are purchased for corner cabinets.
The hinge accepts any angle and provides the system with the necessary strength. It is also possible to supplement the system with closers.
Note! Products in this group on the market have a pitch of 5º. If the obtained value is not a multiple of this indicator, then additional overlays are used
These devices allow you to set the correct parameters yourself.
Card loops
Representatives of this group are in many ways reminiscent of their piano counterparts. It also consists of two metal plates that are connected by one hinge. Most often, this thing is used in furniture design to give things an antique effect. Card elements are often made in the form of various figures with wavy, rounded or pointed edges.
With its help, retro-style interior items are most often added.
Gallery and card shops
The adit components allow you to attach the sash not to the sidewall, but to the blank wall of the cabinet located in front. Often this type of accessory is also called “blind” because they attach the door to the adjacent false panel.
If the fittings are of high quality, then with its help it will be possible to secure a door of any weight and size.
Card auxiliary ones are used to attach folding elements. This part is installed on the cabinet from the ends, which makes it possible to move the sash 180º.
The holder can also be used as part of folding parts of furniture.
Puller directly for ball joints.
Used for cars (Citroen, Peugeot) whose ball joint is screwed into the lever. And since it is screwed in and not pressed in, it is impractical to use the above tool options; you need a special puller, which we suggest you make from an 8-centimeter thick metal pipe for 2”.
- At one of the ends of this pipe, equidistant from each other, using a grinder or a hacksaw, make 4 rectangular tenons 5x7 mm.
- At the second end, using the same tool, again, cut slots equidistant from each other to a depth of 3 cm so that you end up with 8 petals.
- Use a hammer to slightly bend these petals towards the center of the circle, thereby reducing its diameter.
- Take a 24mm nut and weld it to the narrowed side of the workpiece. The DIY ball joint remover is ready.
It’s simple to use: put it on the support so that the spikes fit into the existing grooves of the ball body, then use a 24mm wrench to turn the welded nut, thereby removing the suspension element you need.
Main types of garage hinges
The building materials market offers a wide variety of hinges for swing doors. Each variety has individual parameters and advantages of use. The first thing you need to do when choosing is to select an installation option. The following installation methods are available:
- welding - the hinges are fixed on the door leaf and frame;
- installation using bolts - used when working with wood material;
- fastening with self-tapping screws - suitable for structures made from profiled sheets.
Based on placement, clamps are divided into hidden and internal. Their main differences lie in the installation method and decorative characteristics. When choosing garage hinges, the weight of the door is of great importance. Incorrect calculation of the expected load provokes skew of the canvas and difficulties with opening. For dense sheet steel with a large mass, it is recommended to purchase reinforced clamps.
With support bearing
Hinges equipped with a support bearing are the basic type of cylindrical type fasteners. The support bearing and swivel joint are reliably protected from external influences by the main body made of metal alloys.
Models with support bearings are intended for lightweight swing structures. The maximum permissible load is 100 kg. The clamps with support bearings are attached to the sashes and frame using a welding machine.
Cylindrical with additional reinforcement
Reinforced clamps are equipped with additional plates, which helps distribute the load over a large surface of the sashes or pillar. It is recommended to use cylindrical hinges with improved plates for thin profile structures. The parts are fixed to the swing gate leaves and frame by welding or screw connection.
Depending on the side of location, cylindrical reinforced hinges are divided into right and left. The diameter of the element is 50 mm. The maximum total load reaches 600 kg.
End-to-end
If it is not possible to secure the hinges by welding or screwing to the frame, a through type is used. For installation in the gate frame, mounting columns are drilled along the entire length, into which part of the retainer is threaded. For final fastening, nuts of the appropriate size are used. Thanks to a special fastening scheme, through-type fasteners can withstand loads of up to 200 kg.
Three-section invoices
For massive swing gates, it is necessary to increase the number of latches and choose a type with increased wear resistance. The best option is three-section models that can withstand the load of a heavy structure. The main advantages of overhead three-section hinges are:
- smooth sliding when opening and closing the gate;
- no creaking;
- reliable protection against burglary;
- preventing the sash from warping and sagging.
Boom loops
Garage boom hinges are suitable for attaching large swing doors, gates and thin-profile structures. The main distinguishing feature is the increased area of the clamp, due to which it provides additional strength and prevents distortions.
At the connection points, the arrow loops are able to withstand increased stress. This is facilitated by uniform distribution along the entire length of the sash. The range of dimensions of the clamps varies up to 700 mm, which makes it possible to find the optimal option for any gate design. The fastening parts are made from durable sheet steel, which ensures a long service life.
Invoices
Despite the ease of installation, overhead types of hinges are highly reliable. The fasteners are made from durable materials, including steel alloys, brass and stainless steel, which significantly increases the variability of their use. Inside the housing there are 2-4 ball bearings necessary for smooth opening of the gate.
To fix the overhead hinges on the frame, you need to mark their exact location and secure it with self-tapping screws. The clamps are included in the universal category and are not divided into left- and right-handed ones. If after installation it becomes necessary to remove the canvas from the hinges, you will need to unscrew the screws.
Design and purpose of the node
The ball joint is designed for reliable movable fastening of the wheel hub to the suspension arm. The ball joint consists of a ball pin, a housing and a plastic insert. The body of the ball joint is either spot welded from two halves with stamped, spherical recesses with a hole for a finger in one of them, or it is a thick-walled metal cup into which an insert with a finger is inserted, after which the bottom is placed, and the edge is rolled so that the structure does not disassemble. Sometimes the liner is not made, but the gap between the body and the ball is filled with softened polyamide plastic. An extruder is usually used for this. It is also used as the main equipment in companies for the restoration of ball joints. To protect the mating surfaces of the hinge from water and dirt, put a rubber boot on top.
As long as the boot is intact, the ball joint practically does not wear out. Intensive wear of the ball begins after the boot becomes unusable, with dirt getting inside. Therefore, keep an eye on the boots, since timely replacement of an unusable boot will extend the life of the unit.
True, the joint of the welded body is not airtight, so water gets into the body through it, even with a whole boot. Therefore, if the assembly body consists of two parts, it is advisable to fill it with lithol through a grease fitting.
What is a swivel joint?
A device by which two parts are connected to each other while maintaining mobility around a common axis is called a hinge joint. It consists of a pin and a holder. The device has received extensive development and modification. It is used in various fields of industry and national economy.
In a cylindrical hinge, the trunnion usually has the form of a rod. It is pressed into the holes of another part, which is called a holder. The simplest example of a hinge connection is door hinges. Looking at them carefully, it is easy to understand the principle of operation of the device. Both hinge parts are equipped with hollow cylinders, which serve as joint holders. The pin (usually pressed tightly into one of them) is the pin.
The parts connected in this way move around a common axis. The cylindrical hinge is found in simple and complex mechanisms. It is present even in a regular office stapler.
Diagnostics
If you hear knocking or creaking noises from the suspension while driving your car on rough roads, these sounds may be coming from worn ball joints. It is better to determine the source of unpleasant sounds together: one person goes down into the inspection hole and puts his hand on the ball, and the other rocks the car. When you feel the sound with your own hands, remove the support, clamp it in a yew, and check the hinge play. The finger should not move from slight efforts, but it should not bite either, otherwise the unit will require repair or replacement.
Read also: KME 1210 connection diagram
This check must also be carried out in the following cases:
- Creaking sound when turning the steering wheel.
- Spontaneous wobbling when driving in a straight line.
- Tight steering wheel.
Video.
When carrying out repairs to the chassis and steering, there is almost always a need to remove ball joints or tie rod ends.
The peculiarity of these structural elements is that the support pin or tip has a conical shape, with which it fits into the seat.
During operation, the fit density increases so much that the surfaces of this joint practically stick to each other.
Additionally, moisture can get between the finger and the socket, causing pockets of corrosion that further seal the connection.
Therefore, to remove ball joints or tips, special pullers are used that allow you to press out the pin with minimal effort.
Removal & installation
- Ball joint remover.
- Jack.
- Car stand.
- A set of keys.
- Pliers.
- Mount.
The ball puller is usually not universal. If you do not find a suitable puller, it can be successfully replaced with a hammer. You just need to know where to hit. There is no need to knock your finger out of its seat. The blow should be perpendicular to the finger, and it should be hit on the eye (since the conical finger, a slight landing pressure will squeeze it out of the eye). Hammer is a universal puller. It should not be too heavy or too light; 600 grams will be just right.
Removal: Loosen the wheel. Raise the car on a jack. Remove the wheel. Turn the steering wheel so that it is convenient to work. If the pin nut becomes cotter, remove the cotter pin using pliers. Unscrew the nut. Take a puller and squeeze your finger out with it. Unscrew the ball housing fastening. Using a pry bar, press down the lower arm and remove the ball joint. Removing and repairing tie rod ends and ball joints is no different, you just need to use another puller. The recovery methods are identical.
Installation: Attach the hinge body to the lower arm, tighten the fasteners, use a pry bar to press the lower arm, insert the pin into the seat. Screw the nut onto the pin and tighten it. If the finger rotates, pull the lever upward (the pin with the seat is conical, so when the finger is pressed in, it stops turning in the seat). Don't forget to tighten the nut. No puller is needed for installation. The next replacement of supports will not force you to fiddle with cotter pins if you change the nuts to self-locking ones.
Insertion of overhead loops
Tools needed
Before installing kitchen hinges with a closer, you should properly prepare your workplace. Such fittings require insertion, so you will need the following tools:
- Ruler and pencil.
- Drill with a cutter of the required diameter.
- Screwdriver and set of screws.
- Building level.
With such a modest set of tools, hinges with a closer are installed.
Preparing for installation
The first step is to make the correct markings for the loops. In order to do it correctly, you must follow the following rules:
- The hinges should be no more than two centimeters from the edge of the door.
- The distance from the top and bottom edges to the outer loops is no more than 120 millimeters.
- If there are more than two loops, the middle ones are located strictly in the middle between the neighboring ones.
- There should be no shelves or other obstacles in the places where hinges are marked and future installed.
In accordance with the specified conditions, attach all the loops with closers to the surface, then circle. Don't forget to double-check all distances after marking.
Installation of door hinges with a closer
Let's start the installation
Each furniture hinge with a closer is installed according to the instructions indicated:
- Place the cutter on the drill, then place it at the position marked with a pencil.
- Make a hole for the exact size of the installed fittings with a closer.
- Install the loop into the socket you made, making sure it is firmly secured in it.
- Drill holes for the screws using a drill (you must remove the cutter).
- Secure the loop in the socket using screws, making sure it is in the correct position.
These steps must be repeated with all hinges that you plan to install. After following the instructions, the installed furniture fittings are ready for use.
Recovery
- Emery or grinder.
- Extruder.
- An electric drill with a large chuck (so you can hold your finger in it to sand the ball with sandpaper).
- Metalwork yews.
- Welding machine (preferably semi-automatic).
- Compressor.
Restoration of supports can occur in two ways:
- Converting a non-separable hinge into a collapsible one, grinding the pin ball and replacing the liners.
- Repair by injecting softened plastic into the gap between the ball and the body using an extruder.
Of course, you shouldn’t buy equipment for a one-time repair, but you can quickly make a simple extruder with your own hands from an old brake master cylinder by attaching a lever to it to press the piston. You can heat it to soften the plastic with a torch or blowtorch.
Carrying out work
Repair and restoration in the first way begins with dismantling the supports. To disassemble a body welded from two cups, you need to drill out welding points on one of the cups and separate the cups using a chisel and hammer. On a body with an inserted bottom, grind off the flared edges using emery or a grinder, and knock out the bottom with a hammer to the end of the finger. An insert with a finger is inserted into the body of two cups, the halves are pressed against each other and several tack welds are made, trying not to overheat the insert. For a case with the bottom removed, measure the outer and inner diameters and make a steel ring in accordance with these dimensions, about 10 mm high with a thread inside and a plug screwed into it. Weld the ring to the body, cool, insert the insert with the pin into the body, screw in the plug, press the liner with it, drill a Ø 2 mm hole in the ring close to the plug and secure it with a cotter pin.
Do-it-yourself repair and restoration using the second method usually takes place without disassembling the unit.
A hole with a diameter of about 6 mm is drilled in the bottom of the body, its size depends on which extruder is available to you. The gap between the ball and the liners is cleared of dirt and blown with compressed air to remove sand and chips. Through a hole drilled in the bottom, using an extruder, softened plastic is injected into the gap between the pin ball and the body. Let it cool and the repair is ready. The disadvantage of this method is that you cannot see whether the geometry of the ball has been preserved and you cannot polish it to remove traces of corrosion, so the restoration results will be short-lived.
Buying a hinged head or making your own knife sharpener
Initially, I did not plan to write a review, but after asking the opinion of the Muskovites, I decided that it would be useful and published it. At the time of writing, the part was already installed in the unit. Therefore, there will be no separate weighing or photographing of the purchased part. I can only say that its quality is quite worthy for this venture. By the way, in Russian it is called a hinged head (as the review progresses, I will call it that). Further, all photographs will be already installed in place. I will not remove the photos as spoilers, since they are a direct part of the review. All sizes are arbitrary, so I won’t post them. Anyone who likes to make things with their own hands or who is just interested is welcome.
This design was taken as a sample:
Review of this sharpener here:
The reason for writing this review, as well as for the production of the described device, was the numerous reviews of various types of sharpeners posted on this site. Of course, you could simply buy one of the reviewed devices and use it, but the quality of the Chinese clones leaves much to be desired, and the prices for good devices exceed all reasonable limits. All these circumstances pushed me to make a more or less high-quality sharpener myself.
The criteria for the future craft were the following: low cost and availability of consumables (abrasive materials), minimal financial costs, reliable design, the ability to easily disassemble the sharpener for convenient storage and quickly bring it into working condition. In order to fulfill the first point, it was decided to make a device using sandpaper as an abrasive. Yes, many will say stones are better and so on, but for home purposes sandpaper is quite enough for me, especially since you can buy it at the nearest hardware store. Plus, if you prefer stone, you can easily modify the design to use it.
I will say right away that minor turning work will be necessary during production. There is no complicated turning in the manufacturing process, so any turner who just has hands can cope with this task. Although I myself am a turner, I don’t have a machine and I don’t work by profession. Therefore, I had to contact the nearest turning shop. I think in almost any city there is an organization that has a turner, and if not, then it’s sad.
I decided to start manufacturing by selecting steel rods that will serve as a rod and a stand (the photo below will clearly show it). To do this, we purchased (for 100 rubles) two front struts from a VAZ 2109 at the nearest car disassembly. We cut them with a grinder and remove the rods from them, as shown in the figure below. Be careful of the oil inside the racks. Everything else except small springs can be thrown away (I’ll show you below where we’ll use the springs).
You don’t have to use exactly the racks, you can come up with your own version, I just didn’t find anything else inexpensive. We measure the diameter of the rods, go to Aliexpress and, based on the diameter of our rods, order a hinged head. While the Chinese are packing and sending our parcel, while it is traveling through sorting points, we are making the remaining parts.
We make the first modifications using the extracted stocks. We simply cut off one rod on one side, and cut an M10 thread on the other (this will be a stand). In the second rod, we cut an M8 external thread on one side, an M8 internal thread on the other, both threads are approximately 10-14 millimeters long (this will be a rod). All these elements are ready.
Next we make a holder for sandpaper. Many people recommend using an aluminum square for this. I didn’t find anything suitable at home, and it turned out to be too expensive to buy. So I decided to do it differently. We take and cut a piece of cuttings from a shovel, rake, or simply buy it at a hardware store. It is desirable that the wood be hardwood (oak, beech).
At both ends of this workpiece we drill holes for cutting M8 threads. It is worth noting here that this procedure must be performed in a lathe, otherwise it will not be possible to achieve alignment with our rod. And this is a necessary condition for this design (it will be clear below). When the holes are ready, we give our workpiece a square shape so that the holes are in the center. Here you can use a planer, plane or circular saw. I used the last method. The end result should look something like this:
We cut an M8 thread in the holes and screw the pins into it with glue. We will screw a handle onto these studs on one side of the holder and a rod on the other. The next step is to cut out strips from thick glass (5 millimeters), the width and length of which correspond to the width and length of our block. I had leftover glass, so I did it myself. I understand that not everyone has thick glass at home, so you can go to a glass shop and ask them to cut out the strips you need. I think they won’t charge much for such trimmings. We glue these strips to the timber.
The sandpaper holder is ready. We will glue it to glass.
Now let's make the base.
Here, too, you can give free rein to your imagination in terms of choosing the material; it can be plastic, wood, steel and much more. In general, we use what is available. I chose to go 3mm thick (I just had some extra). We cut out the platform we need and attach (screw, weld) one support to it rigidly, and make the second removable.
I made the legs from scraps of tubing and a hexagon, and the platform is shown with the holes already prepared for the stand and knife clamp. That's it, the base is ready.
Next, we make a mechanism for adjusting the angle, combined with a hinge for the rod. For this purpose, the following were purchased: nuts, a bolt and a coupling. The threads of the nuts, bolt and coupling must match the threads of the joint head (indicated on the order page). Various types of wing nuts were also found at home.
Now we take the coupling, screw the bolt into it a little (for better retention when drilling) and drill the middle of one of the faces with a drill whose diameter corresponds to the diameter of the stand. It is best to carry out this procedure in a vice, but if you don’t have one, you can clamp the workpiece between two bars. Like that:
When the hole is ready, cut off the screwed in bolt and lock it in any convenient way. I made goujon, but you can also boil it.
Now in the center of the resulting part we drill a hole and cut the thread. This thread must match the thread of the wing bolt (purchased or taken from the bins).
Yes, I forgot to say - while we were fiddling with all this stuff, our parcel had already arrived and was lying nearby. We take the articulated head out of it and screw it into the free side of the coupling, shortening the thread a little if necessary. The result should be a design like this:
This is our hinge joint. Now almost all the parts are ready, all that remains is to make the limiters and the clamp for the knife. I won’t describe the manufacture of the limiters, I’ll just say that purchased nuts were used and I’ll attach a picture, then everything will become clear:
It was decided to make the mount for the knife in the form of a clamp. Some people may find it more convenient to use magnets for this, but I tried it and didn’t like it. If you shape the cutting edge of a knife that has never been sharpened or is very dull, then you have to remove quite a lot of metal and apply a lot of force. Magnets don't always cope with this. Although this is my personal opinion. Unfortunately, the process of making the clamp was not filmed; I can only say that it was made from an old plane blade. It turned out like this:
When all the parts are ready, we’ll start with aesthetics – clean and paint. And finally, let's put it all together:
For better stability, we put rubber bands on the legs; I used cuttings of an oxygen hose. The springs under the stops are the ones that were inside the disassembled racks. Well, for compact storage we make a box from plywood scraps:
We putty it (optional) and paint it
To prevent the contents from rattling inside, you can cover it with foam rubber.
Let's calculate the costs: Articulated head at the time of purchase (I don’t remember how much it cost in dollars) - 357.47 rubles. Nuts, coupling, bolt – 38 RUR. Welder services – 100 rubles. Turner's work - 100 rubles. Old racks - 100 rubles. Total – 695.67 rub. Everything else was found at home.
Results:
Pros: cheap, convenient, you can give free rein to your imagination when making it. Disadvantages - it is quite labor-intensive, although I think those who like to do something with their own hands will appreciate the idea. Criticism is welcome. If you forgot anything, ask.
Useful tips
- Do not undertake restoration of the hinge if the pin is removed from it without disassembly; repair will not help such an assembly, but only replacement. The hole for the finger in the body must be smaller than the diameter of the ball in order to. If the liner wears out, the finger cannot fly out of the body, causing an accident.
- When restoring a hinge with your own hands, disassemble it completely and grind the ball of the finger, no matter how you intend to restore the assembly. Then the fruit of your work will not need replacement so soon. Even if you are planning to use an extruder for restoration, do not be too lazy to disassemble the hinge to see if the pin needs replacement. If you don't need it, then just polish his ball.
Read also: How to calculate taper in a drawing
DIY gimbal joint for Steadicam
About choosing a joint for a Steadicam, about making a universal joint from threaded wings, and about adjusting the universal joint fork.
Screw L-shaped
The third type of removable mechanism, which you can make yourself, is also a screw mechanism, but it has shown itself to be excellent and allows you to work on any car.
To make it you will need a round metal rod with a diameter of at least 10 mm and a length of 15-17 cm.
From it you need to make an L-shaped blank with a shoulder length of 5 cm. That is, we take a rod, measure 5 cm on it, clamp it in a vice and use a hammer to bend it 90 degrees.
We cut a thread on the long part of the workpiece and select a nut.
All that remains is to make the thrust bar. It can be made in the likeness of the wedge described above. That is, we take a plate, but 0.5 cm thick. On one side we make a cut for the support pin.
If necessary, you can reduce the thickness of the plate on the cut side by grinding off the metal layer. The main thing is that the plate fits into the gap between the support body and the eye, but it is not too thin, otherwise it will bend during the pressing process.
On the other hand, from the cut we make a hole for the L-shaped workpiece. All that remains is to put the plate on the long part of the rod. If the thread is not long enough to squeeze out the finger, you can place several washers under the nut.
This puller works like this: Unscrew the nut almost completely, install the plate in the gap between the support and the eye, and turn the rod so that the short arm rests against the finger.
Then we simply tighten the nut, while the plate will act as a stop, and the short arm of the rod will squeeze out the finger.
Choosing a hinge design for a Merlin-type steadicam
The design of the Merlin type steadicam allows the use of two types of joints, ball and gimbal.
The ball joint greatly simplifies the design of the steadicam, but it is not capable of transmitting rotation from the handle to the moving part of the steadicam.
Such a hinge is easier to manufacture, but more difficult to reduce the friction that occurs between the ball and the heel. There are, however, ball joints that have less friction. The heel of such hinges is filled with small balls. But I couldn’t get such a hinge.
During the experiments, I still tried to make a ball joint from a ball from the telescopic antenna attachment point and a caprolon heel. But the friction in the hinge turned out to be too great, even after using a fluoroplastic gasket. So, I had to think about making a more complex cardan joint.
A universal joint is easier to reduce friction, but much more difficult to manufacture. But, if I got something into my head...
CV joint
A peculiar mutant, obtained by crossing a ball joint with a Hooke cardan, represents a completely new type of connection of elements. It is a deformed ball bearing, where the inner race has taken the form of a sphere with slots, and the outer race has taken the form of a sphere with grooves on the inner surface. Both rings are splined onto the drive shaft. The balls placed between them are held by a separator.
The constant velocity joint undergoes heavy loads at significant angles of rotation. “Turned wheels” at nominal speeds are fraught with damage to the unit.
CV joints are subject to mandatory sealing with anthers. Their place of operation allows dust and moisture to get inside the hinge, which quickly disables it. Abrasives and corrosion destroy grooves, balls, and kill the separator. Modern cars use a very reliable articulated joint, sealed in a casing, which facilitates full use of its resource.
The swivel joint requires periodic inspection of the rubber boot. Maintaining its integrity protects the unit from contamination. If a violation of its tightness is detected, it is advisable to replace the entire hinge.
Screw made from angle
Another screw puller can be made from a metal angle and a welding machine.
To do this, take a corner with sides 7-8 cm and the same length, and a thickness of 0.3-0.5 cm.
We make a cut in one of the sides to secure the mechanism to the eye. From sheet metal 0.3 cm thick we cut out two triangles that will act as braces. They need to be welded on the sides to the corner. This will significantly increase the strength of the structure.
We take a 17 nut and a long bolt for it. We weld the nut itself perpendicular to the cut so that its hole faces the cut.
So that in the future the bolt can be easily positioned on the same axis with the pin, before securing the nut by welding, a spacer must first be welded onto the corner.
All that remains is to screw in the bolt and the puller can be used.
These are the simplest types of removable mechanisms that you can make yourself.
In general, there are a lot of options, and with a little imagination and basic knowledge of plumbing, you can easily come up with and make your own puller.
We offer some drawings for viewing.
Why choose homemade ones?
Many people refuse industrially manufactured fittings in favor of homemade ones for several reasons. Such products:
- Withstands significant loads. What is relevant for garage doors and solid doors;
- They have the required size. If the parameters of those manufactured in industrial conditions are standardized, then when producing in-house, the size that is required is chosen;
- They have a high level of reliability, since the fittings produced for themselves have a high level of strength compared to those produced in the factory. You can always choose a material with high mechanical properties and greater thickness.
Preparation of tools, materials, idea of the doll and drawing of the sketch
Tools need to be prepared in advance so as not to end up in a hopeless situation later and ruin the work. You will need your manicure kit, or better yet, your dental kit. You will need tiny drills, files, needle files, an awl, wire of different thicknesses, rubber (round), sandpaper of different textures, and brushes. You need a set like this. And most importantly, plastic is a self-hardening material that is capricious - it does not tolerate drying out!).
Even before starting work, you need to come up with the image of your doll down to the smallest detail: age, gender, physique. We advise you to sketch everything . For a natural body look, you need to study the anatomical structure . Of course, you can do it easier - just take a sketch from the Internet , but then the doll will be devoid of individuality. But for starters, you can do this. Also take the optimal size : 15-20 cm - small and requires special painstakingness and skill, 50-60 cm - large and will take a lot of time and expense, 25-30 cm - just right!
So, you can take this sketch
Alternative method
Finally, we note that it is possible to press out the support pin or tip even if it is not possible to make a removable mechanism. But this method should be used only in extreme cases. To remove the finger you will need a pry bar and a hammer.
The pry bar is used as a lever and must be installed in such a way as to create a force to press the support or tip, for example, place it between the steering rod and the rack eye.
After creating force with the mount, it is necessary to apply powerful blows to the body of the eye with a hammer. If everything is done correctly, then after 2-3 hits the finger will pop out.
The disadvantage of this method is that the eye can be damaged due to shock loads, so it is advisable to use pullers rather than knock out the support.