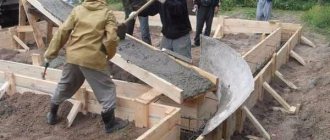
Most builders are faced with volumetric screed on large areas - such coverage is most often needed outdoors, although sometimes these can be large premises such as warehouses or some kind of sports complexes. I will say right away that work on such a scale is most often undertaken not by private contractors, but by construction companies, for which a homemade vibrating screed is simply not needed, since all power tools are purchased from top manufacturers.
Source ligotex.com.ua
Another thing is for single builders or small teams working privately, or even just a person building his own house - for such people it is not entirely profitable to purchase expensive power tools of this type. The fact is that they are needed extremely rarely in relation to other cycles of work, if we talk about premises, because the main labor costs are pouring the foundation, laying walls and their cladding, installing a roof, ceiling, electrical communications, plumbing, heating, etc. . But for landscaping a personal plot, concreting of various blind areas, paths, platforms and entrances may be provided. In this case, you should think about how to make a vibrating screed for concrete with your own hands.
Design and principle of operation of a vibrating screed
A tool such as a vibrating screed is considered narrow-profile, as it is used for certain work - leveling concrete pours . The design consists of a rigid frame and a vibrator, which causes the working element to move asynchronously after starting the engine.
For convenient control, the device is equipped with handles that look like the handlebars of a bicycle or motorcycle. The vibration motor is powered by electricity or gasoline.
Reference! The frame (usually) is made of a thick sheet of aluminum or high quality alloy steel.
Operating principle of the device:
• by pressing the start button the unit is started;
• the engine transmits rotational movements to the frame system that reach the frame (rules);
• under the influence of the moving frame, the concrete solution also becomes mobile, as a result of which air bubbles come out of it, and high-quality compaction of the concrete is achieved.
The parameters of the vibrating screed working element vary (from 0.3 to 10 m), which largely depends on the type of installation being performed.
When comparing the gasoline and electric units, it was concluded that the first option is more powerful. Therefore, it is used in large-scale construction. Gasoline units have a peculiarity - they emit harmful impurities into the atmosphere during operation, which are formed as a result of fuel combustion. This gives grounds to limit the use of the installation, allowing work only on open construction sites. The electric model is used for both external and internal installation.
Reference! The main functions of a vibrating screed are to compact the concrete solution and expel air bubbles from it. A good idea is to use a device for leveling the concrete surface (screed, floors, etc.).
Construction stores offer a wide range of vibrating laths, but their prices are quite high. The simple design of the unit allows it to be installed at home using available materials.
What is a vibrating screed?
Scheme of a vibrating screed for making it yourself
So, what exactly is called a vibrating screed? The vibrating screed itself is made of a special frame, which in turn can be made of materials such as steel or less durable aluminum.
Apart from all this, a rather important area is that the vibration installation itself sets this rack in motion. This is really quite a convenient invention.
All its work is based on the engine . Moreover, it can be either electric or gasoline, in principle. The essence and principle of operation is as follows, namely, that the motor area itself transmits the moment of the rotational category to the installation of the vibration direction. And it also organizes all the movement of the frame made of steel or aluminum.
Preparatory process before assembling the vibrating screed
Those developers who have previously had experience working with concrete should take on the task of assembling a vibrating screed. It is impossible to create a unit without an idea of how the solution behaves during pouring and what difficulties arise in the absence of compaction of poured concrete. In addition, to perform the installation you will need skills in using a welding machine. Therefore, novice builders are recommended to acquire a factory-made device or rent one.
Before starting assembly, it is important to decide what type of structure is needed for the job. There are several of them:
• vibrating screed for concrete – the device is large in size, this makes it possible to exert the necessary force on heavy mortar;
• vibrating screed – performs the function of a rule, the model is lightweight, it is very easy to work with;
• vibrating mop – a lightweight installation used to level a thin layer of cement mortar over a working surface.
DIY vibration screed
For small jobs, you can use a homemade vibrating screed.
Manufacturing
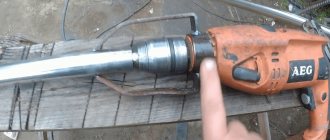
The simplest option is to assemble a vibrating screed from a board, timber and drill.
First, the surface of the board must be sanded, all irregularities must be removed. It is this material that will serve as the basis.- Next, a drill is attached to the board, about 25 cm wide and about 30 mm thick, with self-tapping screws. The drill should lie lengthwise on one of the sides.
- Also, a meter-long beam is attached to the board using self-tapping screws.
The vibration screed is ready.
Usage
It is easy to use.
You insert a curved drill into the chuck of an electric drill and connect it to the mains, thereby creating vibration movements of your board.
Don't forget about safety rules! Wet concrete can be a good conductor of electrical current. Wear gloves and boots.
Flaws
There are no shortcomings in a homemade vibrating screed. They are as follows:
- No matter how you sand the board, it will not have the same smooth surface as an aluminum screed.
- The power of the drill is not sufficient to work with a larger board, and accordingly, the work will be performed in small sections.
- Disposable vibration screed, because After the first use, the board will become unusable.
- It is impossible to regulate the speed.
Vibrating screed option with aluminum profile
It will be more difficult to make a vibrating screed with a metal lath with your own hands. In addition to the monetary costs, you also need to have technical knowledge.
Instead of a board, in this version an aluminum profile will be used. This design will last you longer. The function of the handle will be performed by a pipe, and, of course, a vibration motor.
We do not recommend using welding in this option. For safety reasons, cover the handle of such equipment with insulating material.
Adviсe
- Your homemade design will be reliable if you secure all its components properly . The bolts must be tightly screwed. The wire should not dangle.
- After you have made a vibrating screed with your own hands, test it . To begin with, a small surface will suit you. Test your homemade tool first, otherwise you may ruin the entire screed. Do the work without rushing.
Unit assembly steps
• make handles from reinforcement, giving the blanks a curved shape and welding them to the profile using a welding machine;
• strengthen the fixation by welding with self-tapping screws;
• equip the upper part of the handles with insulating material, this can be rubber tubes or a dense layer of electrical tape;
• attach an electric motor to the profile with handles; this must be done exactly in the center in order to obtain an even distribution of vibration throughout the entire rule (2 metal corners are used as fasteners);
• weld the rule to the profile and strengthen the connection with bolts (in 3-4 places);
Vibrating plate assembly algorithm
To make your own vibrating plate for soil compaction, you will need the following materials and parts:
- steel sheet measuring 50 by 80 cm with a thickness of at least 8 mm;
- an area vibrator with an electric motor, for example, IV-98E;
- 2 pieces of channel 45 cm long;
- fastening: M10 and M12 bolts with nuts, washers;
- shock absorbers;
- 1.5 m metal pipe (diameter 20-25 mm).
Tools you will need:
- welding machine;
- hammer;
- grinder with cutting wheels;
- electric drill with a set of metal drills;
- spanners;
- tape measure, marker or chalk.
It is recommended to carry out the work of assembling homemade equipment while protecting your eyes with goggles and your hands with gloves.
A homemade vibrating plate with an electric motor is assembled in the following sequence.
- Using a grinder, make cuts about 5 mm deep (so that the metal can be bent) at both ends of the steel sheet. 10 cm depart from the front edge, and 5 cm from the rear edge.
- The edges are bent at an angle of approximately 20-30 degrees with a hammer, after which the bend is welded.
- Two channels are welded parallel to the curved edges at a distance of approximately 5-10 cm from the center line of the workpiece made.
- A vibrator is installed in the center, along the legs of which marks are made for fasteners.
- Drill holes in the channels using an electric drill.
- Mount the vibrator, attaching it with bolts, nuts and washers.
- Shock-absorbing cushions are attached to the slab.
- Bend the tube into a U-shape to make a handle.
- Holes are drilled at the edges for bolt fastening.
- The handle is attached to the sole through metal corners and shock absorbers.
- Connect the power cable and install the start-up protection equipment.
- Check the functionality of the created unit.
The mass of the assembled vibrating plate will be approximately 60 kg. To make it convenient to transport, a piece of pipe is welded to the plate, which will serve as an axle for the wheels.
A more complex option for creating a vibrating plate involves using a separate engine, for example, from a walk-behind tractor. In this case, to assemble vibration equipment, you will need a homemade or factory vibrator. The rotation of the motor will be transmitted to it using a belt placed on pulleys.
The diameter of the latter must be selected so that the vibrator eccentric rotates at a frequency of approximately 180 rpm.
The entire process of assembling the vibrating plate is shown in the photo below.
After painting, the final mechanism will look like the photo below.
If necessary, you can increase the mass of a homemade vibrating plate. This is done by additional welding of metal sheets or reinforcement rods. A vibrating tool created with your own hands is quite capable of competing with factory-made analogues.
Tips/Tricks
• Experts advise securing the vibrating screed frame at three points. This will make the connection stable and reliable.
• You should not use a home-made installation in work where a heavy load is expected that is not designed for the engine power. This will shorten the life of the unit.
• The ideal solution is to assemble the structure from 4 separate parts. This will help, if necessary, to disassemble the tool, transport it to another construction site, and eliminate the impact of some units on others.
• When compacting concrete pouring, you should move slowly, evenly passing through all zones of the treated area.
• The thickness of the concrete layer must correspond to the engine power of the unit. Otherwise, high-quality compaction cannot be achieved.
• If during the passage of the vibrating screed in some places the concrete shrinks below the intended level, it is worth adding another portion of the solution.
The key to a long service life of a home-made unit is compliance with the rules of its operation.
Manufacturing options for basic elements
The design of the vibrating plate is quite simple. It consists of four main nodes:
- engine;
- slabs;
- frames;
- vibrator.
Engine
The following can be used as a drive for a homemade vibrating tool:
- electric motor;
- gasoline or diesel internal combustion engine (ICE).
It is recommended to choose an electric motor for the vibrating plate that you plan to assemble with a power of 1.5 to 2 kW. In this case, the rotation speed should be from 4000 to 5000 rpm. If the power of the electric motor is less than the specified value, then this will affect the performance of the created unit in the direction of its reduction.
The electric motor is the most expensive part of a homemade installation. For home use, it is better to buy single-phase modifications of electric motors, for example, as part of IV-99E or IV-98E vibrators, operating at a voltage of 220 V. The electric motor can also be removed from old unused equipment, for example, from a drilling machine. It is only necessary that it matches the power and speed.
If you equip homemade equipment with an electric motor, then to increase the safety of the work, it is recommended to install separate protection, for example, a differential circuit breaker or a residual current device (RCD).
The automatic device, in addition to preventing electric shock to the operator, also turns off the equipment in case of overload or short circuit in the circuit.
A homemade vibrating plate can also be equipped with an internal combustion engine. If you buy it, it is recommended to give preference to single-cylinder three-stroke engines from Honda. An internal combustion engine from a chainsaw or walk-behind tractor is also suitable.
Plate and frame
From the engine, movement is transmitted to the vibrator by a belt - it is mounted on pulleys. By changing the dimensions of the latter (diameter), you can set the required speed of the vibrator. A car belt is suitable for a belt drive. The plate is made of steel or cast iron sheet with a thickness of 8-10 mm. The rest of the structure is located above it. To make the frame, use metal corners 5 by 5 cm or larger.
Vibrator
A vibrator for a vibrating plate can be purchased factory-made or made independently in various ways. One of the options for a homemade vibration unit will be discussed in the next paragraph.
Additional structural elements
Light (up to 75 kg), universal (75-90 kg) and medium-heavy (from 90 to 140 kg in weight) models of equipment without remote control are equipped with handles made of metal pipes. With their help, the operator sets the direction of movement.
For ease of transportation, the units are also equipped with wheels. They can be removed if necessary. To move a homemade stove, you can take wheels, for example, from an old wheelbarrow.
How to make a vibrating screed for laying concrete mortar
The reliability of a concrete coating depends not only on high-quality building materials and the correct proportions of the mixture. Maximum strength and durability of the screed is given by thorough compaction. Air cavities and voids in the frozen mass will reduce the quality and shorten the period of use.
Vibrating screed application
When pouring a small platform or formwork for an outbuilding, air is released by piercing the cement mass with a pin (for example, a piece of rebar).
But when installing a floor in a room, laying a road surface, concreting a parking lot or other similar areas, using the manual method is problematic and the high quality of the foundation is not guaranteed.
A special bar with a small amplitude of intense vibrations helps to compact the surface on your own faster and easier.
Structures of any power and complexity are effective if concrete is laid and leveled in a layer of up to 20 cm. Screed of greater thickness is compacted layer by layer.
Operating principle and structure of the rack
The vibration screed consists of two elements:
- Rigid, durable frame. Consists of two parallel slats or wide strips made of high-quality alloy steel or thick aluminum. Lightweight aluminum does not corrode, is easier to maintain and lasts a long time. Steel planks are cheaper.
- Vibration system. A gasoline or electric engine drives the frame into asynchronous motion.
The device moves along the plane manually. When the motor starts, a rotational motion is transmitted, causing translational vibrations of the rack. The vibration of the frame compacts the solution, releasing air from the voids.
A vibration screed with a gasoline engine is more powerful and efficient than an electric one.
But a gasoline-powered unit emits harmful waste products into the environment, so it is recommended to compact concrete indoors using an electrically driven device.
The length of the planks reaches 10 meters, which allows the structure to be used for leveling surfaces of any size. On large areas it is more convenient to compact with an autonomous gasoline engine. The marks left behind are removed with a grinding machine while the cement screed hardens.
Types of vibration devices
Divided into 3 types:
- Floating, non-retractable. The simplest ones, intended for private use. Their power does not exceed 1.2 kW. The area of the compacted surface is limited by the length (no more than 3 meters) of the floating rigidly fixed strip.
- Telescopic, sliding. The devices are practical and versatile, allowing you to compact concrete screeds of any size. When extending, the slats increase the length to 10 meters. The leveling frame of such units consists of two bars. Designed for use by professional builders. Structurally more complex, they cost more than floating models.
- Sectional. The working part is increased by adding additional triangular frames to the rule. Functional, with convenient adjustment.
Precautionary measures:
- Before starting, the tool is carefully checked: the bar must be clean, the fasteners are securely tightened;
- the operating engine must not be touched;
- after turning off the device, the rack is washed with water;
- if necessary, work with a gasoline model indoors, ensure good ventilation;
- The electric motor must be grounded.
Prices for vibrating screeds
The table shows the cost of some popular vibrating screed models:
| Brand | Nutrition | power, kWt | Weight, kg | Price, rubles |
| Impulse M35 | Gasoline 0.71 l/hour | 1,3 | 18 | 38 500 |
| TSS-MSD | Gasoline 0.73 l/hour | 1,2 | 13 | 69 400 |
| Masalta MSD4 | Petrol | 1,5 | 12,7 | 54 300 |
| RUSA VMAX (telescopic 4-7 m) | Petrol | 3,9 | 106 | 82 700 |
| TCC BP 2 (2 m) | 380 V | 0,34 | 39 | 13 500 |
| TCC BP 6 (6 m) | 220 V | 0,34 | 61 | 26 500 |
| TCC BP (telescopic) | 220 V | 0,34 | 48 |
Assembling a basic vibration screed with your own hands
To compact a concrete surface in a small room in 30 minutes, a disposable device is assembled from scrap materials. For production you will need:
- A smooth, strong board 3-3.5 cm wide, 25-28 cm long, 50-60 cm long.
- Handle made of a block or pole up to 1.5 m long.
- Drill with button lock.
- Aluminum mounting plates.
The tool is assembled in the following order:
- The surface of the board must be smooth; for this it is cleaned and sanded.
- The drill is fixed with aluminum plates and self-tapping screws on a wooden plank in the middle so that the axis of rotation of the chuck and the center of the board coincide.
- The handle is filed at an angle and similarly secured to the board with an oblique cut.
- A rod with a shifted center of gravity is installed in the drill chuck: a piece of reinforcement, a crooked drill bit, or a clamping key to the chuck.
The button of the drill connected to the network is clamped and fixed. The vibration created by the displaced center of gravity of an object inserted into the chuck is transmitted to the board.
The metal profile is more even and smooth than the board. And the weight and power of the units sold make it possible to use long slats and cover a large area, but for a single use such a vibrating screed will do.
Assembling a metal rail
For many craftsmen, the main difficulty is the lack of a welding machine and skills in handling it. In this case, welding of parts is replaced by a bolted connection.
For production you will need:
- steel channel, profile pipe or aluminum rail of the required length (1.5-2 meters or more);
- 2 corners 4x4 20x25 cm or channel sections;
- 2 pieces of pipe or fittings for handles of a convenient length;
- vibration motor, electric motor or internal combustion engine (for example, from a chain saw or walk-behind tractor, together with a clutch).
Unit assembly:
- Corners are welded on top of the center of the channel across the strip. The distance between them is determined by the size of the engine. Holes for mounting the motor are drilled and it is installed. The fasteners are tightened thoroughly so that the vibration is transferred to the frame and the motor does not come loose.
- Handles made of the selected material are welded on both sides of the engine. When working with an electrical device, they are isolated and the motor is grounded. Having the appropriate knowledge in electrical engineering, a speed controller is installed on the handle.
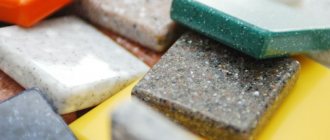
Gartsovka for paving slabs ratio of sand and cement
Gartsovka for paving slabs
Modern street improvement involves the widespread use of paving slabs. To install it, a prancing agent is used - a special two-component mixture consisting of a filler and a binding mass. Thus, it is a lime-sand or cement-sand mass mixed in various consistencies.
Dry laying mixture for tiles stands out among other compositions due to the proportions of the components and the technology of use. The method of its application differs significantly from the finished liquid solution.
You can make a pliers for installation yourself, but purchasing a ready-made composition will significantly save time.
Laying mass composition
The use of a plier allows you to achieve a reliable connection of paving products with the base. After laying the tiles, the dry mixture takes on the role of a load-bearing layer and takes on the main load.
A building mass of cement and sand is used in the construction of small pedestrian paths that require a low mechanical load. For roads with traffic or intense pedestrian traffic, granite screenings or fine crushed stone are added to the cement-sand layer.
The proportions of cement and sand vary depending on the type of work - from 1:4 to 1:8. In some cases, due to insufficient cement, grass may grow between the tiles, whose roots will gradually destroy the pavement. If there is an excess of cement, the coating can crack severely and, again, collapse.
The optimal ratio is considered to be 1 to 5.
How to cook prance
The simplest type of mortar is a lime-cement mixture. Before cooking, it is necessary to sift the sand, which will clear it of pieces of clay, stones and shells.
Several buckets of sand are poured onto a flat area. Lime and cement are added, and then everything is thoroughly mixed. For 8 buckets of sand there is one bucket of the remaining components.
The mixture is used dry. In rare cases, it is diluted with water when a concrete base has already been prepared for masonry. In this case, the laying layer can be made thin, and the ratio P:I:C will be 5:1:1.
A cement-sand mixture without adding lime is also used. The mass is prepared in a ratio of one to four, five or six, depending on the required strength of the masonry. The main thing in such cases is not to overdo it with cement, so that cracks do not form.
If you decide to prepare such a solution yourself, we recommend using a concrete mixer.
Gartsovka for paving slabs
Gartsovka is the general name for a group of two-component mixtures that are widely used in the repair, construction and household sectors. It consists of a filler and a binder. Traditionally, this is a lime-sand mixture in various proportions; it can also be made with cement, gypsum, expanded clay, calcium and other components.
Gartsovka for paving slabs differs from other types of dry mixes in composition, method of application and consumption. Its features are related to its purpose. Paving slabs can be subject to significant pedestrian and traffic loads, moisture and other factors. Its foundation must be strong enough.
You can prepare the prance yourself, but experts recommend buying ready-made ones. Only a professional can correctly calculate the composition, proportions, and consumption of the dry mixture. Moreover, the quality depends on the raw materials and the uniformity of the ingredients. The manufacturer takes all this into account when preparing the mixture.
Composition of the mixture for laying tiles
The use of a hook ensures good adhesion of the paving elements to the base. It acts as a load-bearing layer and takes on the bulk of the load. Therefore, the correctness of its preparation and installation is extremely important.
The paving slab compound, which includes sand and cement, is suitable for paths and paths with light loads. For areas with intense pedestrian and transport traffic, fine crushed stone is added to the load-bearing layer instead of sand.
The proportions of the binder and filler will also differ depending on the intensity and operating conditions.
The ratio of cement and sand can vary from 1:4 to 1:8. If you take a composition without cement or with insufficient cement content, vegetation may appear between the tiles, the root system of which will lead to the destruction of the surface. If there is too much cement component, the coating may crack.
Advantages and disadvantages
Not only beading can be used as a supporting layer when laying tiles. They also simply use sand, cement screed, and adhesives. The sand base is easy to restore and repair, but does not secure the tiles well; sand can be quickly washed out. Cement and adhesive compositions can withstand the loads of heavy equipment, structures and a large flow of pedestrians, but the tile coating cannot be restored if damaged. Gartsovka is a universal option - a fairly strong, durable and repairable base that you can make with your own hands.
Technology for laying a layer of grout under tiles
- The mixture is poured dry onto the prepared base. In rare cases, it is allowed to be diluted with water, at the discretion of the master.
- The prancing layer is 4-7 cm. The tiles laid on top of it should rise 0.5-1 cm above the curb.
- The mixture is compacted and leveled over the entire area with a board with cutouts or a rule. It is advisable to compact the layer using tampers or vibrating plates. The quality of the compaction directly affects the durability and reliability of the foundation.
- Before laying the tiles, the surface of the supporting layer is slightly moistened to increase viscosity and bondability.
- After laying, the seams between the paving elements are filled with dry grout to the top.
- The laid tiles are watered with water for several days.
The consumption of the sealant also depends on its composition and layer thickness. On average it is 1.4-1.8 kg/sq.m. with a layer thickness of 1 mm. Only a specialist can calculate the consumption at the planning stage, since the indicator will be different for each component of the mixture. The indicators of each ingredient are taken into account, as well as the total area and thickness of the base.