When making furniture from available materials, chipboard (chipboard) or laminated chipboard (chipboard) is often used. It is impossible to cut it accurately without using a special machine. By making a format-cutting machine with your own hands, a worker can not only save significant money, but also manufacture equipment taking into account his own requirements.
To make a format cutting machine with your own hands you need:
How to make an edge trimming machine with your own hands
First of all, bolt the folding stops 600 mm long to the lower ends of the racks with a cross section of 40x90 mm. At the bottom of the racks, make 12 mm holes with a pitch of 200 mm for the dowels that secure the adjustable stop blocks. At the top ends of the posts and in the three wall brackets, drill 38 mm holes for 1 inch steel pipe. Make holes for cotter pins at the ends of the pipe. The pipe is threaded through the holes of the brackets and racks, and then secured with cotter pins. To work, position the stands to provide support for the outer edges of the workpiece. If you need to cut a whole sheet crosswise, place it with its end on the floor and press it with clamps to the posts above the cutting line so that the clamps do not interfere with the saw. To cut a smaller piece, or when you need to saw a whole sheet lengthwise, place it on stop blocks to position it at a convenient height, and secure it to the posts with clamps.
To accurately install the guide bar for a circular saw, secure a clamp at one end below the marking line and place one end of the guide on it, fixing the second end, move on to the first and finally align it.
For this purpose, you can even assemble industrial equipment yourself - a cutting machine.
Making a homemade format-cutting machine
1) A main support frame is formed on which the canvas will rest. You can make it yourself from metal corners or profiles, or take a ready-made one, for example, from an old sawmill or other installation.
A blade with a cut for the movement of sawing discs is laid on the finished frame. The surface of the canvas must be flat and smooth to ensure normal sliding of chipboard sheets.
2) Then we make the carriage from sheets of durable chipboard or similar material. It will allow you to securely fix two saws and move them freely along the guides. The sheets are connected to each other at four corners by means of a conical shaft at such a distance that the shaft moves clearly along the guides.
An automatic sawmill start is mounted on top of the carriage. The first and second saws with front-mounted disks are firmly fixed under the carriage. The discs should be covered with a special screen. The best option would be a transparent material.
3) To make guides you will need two large diameter pipes. They are connected to each other by means of a metal strip. The surface must be smooth without defects.
There is a stop at the edge of the rack. The height of the stop should easily support the leaned sheet or part. A metal ruler is placed next to the stop, the zero of which should be located at the cut of the blade. It will allow you to calculate the size on the spot.
4) A clamping mechanism is placed perpendicular to the stop. The pre-clamping mechanism is made of a metal profile. Fastened with bolts.
5) A flexible corrugation is attached to the top of the screen of the movable carriage, and its other end, together with the drive, is attached to the wall near the ventilation hatch. An automatic starter is mounted on the wall under the hood.
The machine is ready for start-up and cutting work. Before turning on the saw, be sure to turn on the hood to maintain cleanliness in the room.
Video: homemade format cutting machine
A panel cutting machine is the main type of equipment used in the manufacture of furniture.
The machines cut chipboard, laminated chipboard, MDF and fiberboard. Their main property is the accuracy of cutting, which determines the quality of the finished furniture and the creation of a beveled edge.
Purpose of the equipment
Making a format-cutting machine with your own hands is the optimal solution for a person who decides to start producing cabinet furniture at home.
Using such a device, you can process veneer, wood, chipboard, and panels made of plastic material. In a factory version, it is quite expensive, but it is possible, using available materials, to make the equipment yourself. To do this, you will need several basic elements:
- base in the form of a bed;
- movable and fixed working areas of the table;
- additional surface on which the trolley or carriage is installed;
- sawing unit.
Exploitation
We used the same principle in this design. The saw blade comes close to the carriage plate
The gap between the plywood of the carriage and the disk is minimal - this way we avoid large chips
The back side of the sheet will definitely have a perfect cut, but the front side may chip. The task is simple - the sheet that we will cut must be pressed against the sheet of the formatter carriage. We will cut plywood 4, 6 and 10 mm. Therefore, we set the gap between the plane of the inclined “table” of the formatter and the carriage itself to 20 mm, so that several sheets could be cut simultaneously (5 sheets of 4 mm, three sheets of 6 mm, or 2 sheets of 10 mm).
Therefore, when you need to saw off only one sheet, we place a piece of the required thickness under it.
The material must be pressed against the carriage sheet to prevent chipping. We use linings from scraps
Also on the inclined table I made markings and stops for standard plywood sizes for us.
Now the process of dissolving the plywood has noticeably accelerated, and the cut turned out to be very good
Sawing rules
First you need to choose a cutting method.
Be sure to carry out the following preparation (cutting):
- To protect the laminated surface of the board from damage during operation, you need to prepare masking tape or tape;
- for marking workpieces - a ruler and a pencil;
- From the ends of the slab, mark future cutting points with a pencil;
- in order to prevent chips from appearing, you need to stick masking tape or adhesive tape to the cut area;
- after gluing the tape, connect the preliminary marking points with a pencil;
- prepare sandpaper to finalize the cut lines.
The following rule applies not to preparation, but to actions after cutting, but is general for any method: if irregularities are found on the edges, then they need to be processed with a file or rasp. The ends resulting from cutting are covered with veneer with a pattern similar to the pattern of the laminated coating.
What not to saw
Chipboard cannot be sawed using an angle grinder, which is also called a grinder. When working with this tool, there is a high risk of injury, especially when using large diameter discs. Injury can also occur when the tool guard is removed from the tool.
Useful tips
To ensure safe operation, it is recommended to have good exhaust ventilation in the room where it is installed. In this case, wood particles will not be able to accumulate and ignite from an accidental spark that may arise from a working motor.
It should be remembered that the rotation speed of the saws is quite high, so you must act carefully when working
It is best to press the sheet material with a special paw, turning the eccentric, which is moved manually by the operator. Instead of a measuring scale, you can use a ready-made ruler from old equipment or a tape measure. The stop is fixed with an eccentric or a screw with a large thread. To comply with safety regulations, all moving parts of the equipment must be covered with removable steel shielding. The saw unit must be located at a safe distance from the operator's location.
To come in
Already registered? Sign in here.
There are currently 0 users on the page
There are no users viewing this page.
This device is intended for cutting slabs in furniture production. Structurally, it consists of a sawing section and a base. The saw unit is represented by a pair of disks with axes of rotation located at the same level. In this case, the diameters of the disks are different, rotation is performed in opposite directions - towards each other.
Content:
Chip removal
After the first launches, another unpleasant feature was revealed - when you start cutting the sheet from above, all the shavings fly in a beautiful fountain directly onto the operator’s head. Therefore, they quickly began to solve the issue of chip removal, while the operator had to wear a technical jacket with a hood and glasses.
By that time, it was time for us to purchase a chip extractor in order to extract dust from 2 CNC milling machines, a circular machine, a sanding area with a sander, and from the future format machine. Since there are a lot of devices, we took a Jet 2300 2.2 kW chip ejector with 2 bags for 35 tr (a similar one for 1 bag costs 25 tr).
Chip ejector, without which the worker’s head was constantly covered in sawdust from sawing
In principle, if I had only one format machine, I would attach a vacuum cleaner with a long hose to it. In this option, it makes more sense to choose a circular saw with a connection for the vacuum cleaner hose. It’s better to take a vacuum cleaner with a large bag and a built-in socket for hand tools (connect the formatter through it). Then, when you turn on the formatter, the vacuum cleaner will turn on automatically and also turn off after turning off the saw (I use a Karcher vacuum cleaner with fabric bags, but I would prefer a larger bag). But in my case, the choice in favor of a chip extractor was obvious - you can’t install a vacuum cleaner on every machine (the money will be the same, but it will be very noisy and there will be a large load on the network). I assembled air ducts under the ceiling from sewer pipes, taped them inside with aluminum tape to remove static, and routed them to all the machines.
This is not a sewer under the ceiling))), but air ducts for removing chips to the chip suction
In order not to have to run to the chip ejector every time to turn it on, the power button was taken out and hung from the ceiling in the middle of the room.
To connect it to the formatter, I made a small casing from the same plywood and a small casing from the air duct (bought at a hardware store), which fits over the circular. It fits tightly, so no fastenings were required. You can easily remove it at any time to change the disc. I admit, it looks collective farm, but I had no time for beauty - I needed to resolve the issue as quickly as possible, and there was no time for beauty. As usual, everything temporary becomes permanent. Maybe I'll change it somehow.
The nozzle was made by the collective farm in a hurry, but it was necessary to quickly resolve this issue
The nozzle fits elastically, so there was no need to come up with any fastenings
By the way, regarding changing the disk, my circular saw has a submersible design, that is, the disk can be pulled out completely without removing the circular saw from the machine. This again simplifies operation.
How to install the saw correctly
The next step is to properly position the saw on the top surface of the saw table. To do this, the contractor must perform the following actions:
The work of making a machine requires great concentration and concentration. The slightest mistake can lead to having to start all over again.
After securing the structure to the table, you need to install a block to turn the circular saw motor on and off. A hole is cut in the housing, the switch is secured with bolts and universal glue. There should be two separate cables coming from the unit. One - to the instrument, the second - to the nearest electrical outlet.
When assembling such a unit yourself, it is worth taking into account the performance of the motor, as well as the highest power of the electric motor. In this case, experts recommend suspending your choice on an engine whose power does not exceed 1000–1200 W; otherwise, operation can be dangerous. Well, a more powerful saw requires a heavier and more stable table.
What shortcomings were discovered and what would I change?
- Shaft diameter 20 mm. Professional formatters use 40 mm shafts, so it is difficult to bend them when cutting. Why didn't they take 40 mm? To be honest, it was strangled by a toad - one shaft 2 meters with a diameter of 40 mm costs almost 10 thousand rubles. And you need 2 of them (let me remind you that the entire format set cost 10-11 thousand rubles, including the circular). If you decide to assemble it on a furniture rod (for hangers), I don’t recommend it right away - our solid 20 mm shafts bend a little, and the rods will simply bend.
- Wooden frame. The tree tends to “walk” and dry out. Therefore, some bars may bend a little due to changes in humidity. An aluminum frame made from a machine-made profile would cost 30-40 thousand rubles. Simple square aluminum tubes are about half the price, but their bending rigidity is lower than that of a machined profile. In theory, key places can be strengthened with metal corners (we are talking about molded products, not corner fastenings of parts at an angle of 90 degrees). But again, the frame is attached to the floor and wall, and the problem of bending is solved by periodically adjusting the position of the shafts.
- It is still preferable to take laminated plywood rather than simple FC. This will make the sheets travel more fun. Why didn't we use laminated? Because in our warehouse there was only FC, and there was no desire or time to order a laminated sheet separately. Perhaps we will fix it in a future modification.
- The polypropylene bushings for sliding the movable carriage sometimes jam a little and they whistle. Now I would do it a little differently, but I’m showing you exactly how it was during the manufacturing process.
- Instead of shafts with a counterweight, it’s better to look for a cable with a “reverse traction tape measure” (I’m sorry, I didn’t look for the exact name of this unit). It should be no more expensive than my version, but it will be easier to assemble such a design. Plus, the extra resistance in the rollers that I used above the machine will disappear.
PS If you are new to our website and are interested in carpentry, then take a look at what cool things our CNC burner machine Pyroprinter does (this is not paint - it is BURNING):
You can read about the PYROPRINTER machine itself here
Do-it-yourself format cutting machine: drawings, videos, photos
As the Pyroprinter project develops, our team has to optimize some processes. We have long needed to make some kind of machine or device for quickly and accurately dismantling plywood for subsequent milling. I won’t bore you, I’ll immediately show you the result we got:
We made such a format-cutting machine with our own hands. Let me clarify right away - we are not a furniture manufacturer, where the format machine is one of the main tools.
And it comes with the requirement to have a scoring saw blade for cutting without the slightest chips and high productivity.
For us, cutting plywood (and other sheet materials) is an auxiliary production process that does not require high quality cutting.
Those who have ever encountered cutting sheets of plywood (1.5 * 1.5 m) know that sawing is accompanied by a number of difficulties:
- The sheet is bulky and requires a lot of space if cut horizontally;
- When cutting across the grain, many chips appear;
- Maintaining an even line from edge to edge by simply sawing along the drawn line is not easy - the cut floats a little.
The initial requirements were simple: you need a budget version of a format-cutting machine that you can assemble with your own hands. The cut should be straight and without chips. When cutting, spend a minimum of time setting dimensions. The formatter should take up minimal space.
Purpose of the format cutting machine
The main functions of a format-cutting machine are to form an even cut on the surface of laminated chipboard or fiberboard. This places special demands on edge quality.
Externally, the structure resembles a simple sawmill. The difference lies in the rigid fixation of the workpiece relative to the cutting components. To increase quality, there are two discs of different diameters. One of them is larger than the other and rotates in the opposite direction. This makes it possible to reduce the likelihood of chips on the end of the wooden surface.
When making a homemade structure, the following points should be taken into account:
- equipment stability during operation;
- availability of measuring tools for preliminary cutting of wooden sheets.
- desktop dimensions. They directly depend on the dimensions of the workpiece;
- security measures. This applies to equipment and operating personnel. To remove chips, there must be an exhaust mechanism; the cutting components are located under a special cover.
An important factor is the preliminary calculation of all structural elements. It must perform its functions depending on the degree of load. One of the disadvantages of a format cutting machine is the inability to form shaped cuts. This requires other types of equipment.
When analyzing factory models, the thickness of the material being processed and its specific density should be taken into account. This will affect the choice of saw blades.
Why did you decide to make a format-cutting machine with your own hands, rather than buying a ready-made one?
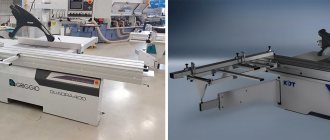
The cheapest ready-made formatter with a horizontal sheet arrangement costs 220 thousand rubles. (Jet brand).
An example of a finished horizontal formatter. With a sheet of plywood it takes up a lot of space
This design has a scoring saw. And in theory, it was possible to assemble something similar yourself from a ready-made circular (sawing) machine or a hand-held circular saw. The simplest cheap circular saw costs 7 thousand rubles, something more serious will cost 30 thousand rubles.
And free space in our workshop is problematic (let me remind you that cutting plywood is an auxiliary function for us). Therefore, only a vertical format cutting machine was suitable for us.
The simplest vertical formatter will cost 230 thousand rubles.
A budget version of a vertical format that we didn’t really like
The one we liked costs about 300 thousand rubles (moreover, it is a budget one, since serious format devices cost from 500 rubles to 1.5 million). True, I found a homemade version on Avito on a metal frame with a simple hand-held circular saw attached to it for 100 thousand rubles. (+delivery).
Yes, there is also a simple ready-made solution - sawing along a special bar (if your circular saw model provides grooves for the bar and a bar for your saw, in principle, exists). This way the cut will be even.
But there are some inconveniences associated with the bus: it takes a long time to mark and position, your hands are under tension from the weight of the circular saw, you will have to unravel it either in a horizontal position of the sheet or somehow fix it at a distance from the floor, it is not convenient to use a long tire for cutting short pieces plywood, etc.
Recommendations from professionals
Now you know how to make a machine from a hand-held circular saw, so let’s consider the advice of the masters:
- Before using an electric saw on a machine, check the saw blade with a square, because some unscrupulous manufacturers do not place the blade exactly at a 90-degree angle, which causes the cuts to be beveled.
- If during work you plan to use a table to store tools on it, then the size of the tabletop should be larger than 1 m2.
- To create the machine, use durable and high-quality materials, because otherwise it will not last long.
- The table can be supplemented, for example, craftsmen sometimes manage to attach a special vacuum cleaner or a riving knife with protection for disks to it so that the remains from cutting wood and shavings do not fly all over the place.
- You should choose a place to mount the table in advance, and also make sure that the floor where the table will stand is perfectly level.
- If you have the skills and desire, you can make a folding tabletop, but this will require spending more effort, time and materials.
- If the table vibrates or sways during operation, you should adjust the height of the legs using rubber.
Since the circular saw is an electrical device, it should be operated by specialists. Moving the switch to another location should also be trusted only to specialists.
Making a homemade format-cutting machine
1) A main support frame is formed on which the canvas will rest. You can make it yourself from metal corners or profiles, or take a ready-made one, for example, from an old sawmill or other installation.
A blade with a cut for the movement of sawing discs is laid on the finished frame. The surface of the canvas must be flat and smooth to ensure normal sliding of chipboard sheets.
2) Then we make the carriage from sheets of durable chipboard or similar material. It will allow you to securely fix two saws and move them freely along the guides. The sheets are connected to each other at four corners by means of a conical shaft at such a distance that the shaft moves clearly along the guides.
An automatic sawmill start is mounted on top of the carriage. The first and second saws with front-mounted disks are firmly fixed under the carriage. The discs should be covered with a special screen. The best option would be a transparent material.
3) To make guides you will need two large diameter pipes. They are connected to each other by means of a metal strip. The surface must be smooth without defects.
There is a stop at the edge of the rack. The height of the stop should easily support the leaned sheet or part. A metal ruler is placed next to the stop, the zero of which should be located at the cut of the blade. It will allow you to calculate the size on the spot.
4) A clamping mechanism is placed perpendicular to the stop. The pre-clamping mechanism is made of a metal profile. Fastened with bolts.
5) A flexible corrugation is attached to the top of the screen of the movable carriage, and its other end, together with the drive, is attached to the wall near the ventilation hatch. An automatic starter is mounted on the wall under the hood.
The machine is ready for start-up and cutting work. Before turning on the saw, be sure to turn on the hood to maintain cleanliness in the room.
Video: homemade format cutting machine
Exploitation
We used the same principle in this design. The saw blade comes close to the carriage plate
The gap between the plywood of the carriage and the disk is minimal - this way we avoid large chips
The back side of the sheet will definitely have a perfect cut, but the front side may chip. The task is simple - the sheet that we will cut must be pressed against the sheet of the formatter carriage. We will cut plywood 4, 6 and 10 mm. Therefore, we set the gap between the plane of the inclined “table” of the formatter and the carriage itself to 20 mm, so that several sheets could be cut simultaneously (5 sheets of 4 mm, three sheets of 6 mm, or 2 sheets of 10 mm).
Therefore, when you need to saw off only one sheet, we place a piece of the required thickness under it.
The material must be pressed against the carriage sheet to prevent chipping. We use linings from scraps
Also on the inclined table I made markings and stops for standard plywood sizes for us.
Now the process of dissolving the plywood has noticeably accelerated, and the cut turned out to be very good
Cutting parts in a sheet of chipboard using online and offline computer programs
On the Internet, in the public domain, there are many chipboard cutting programs that offer several cutting options at once.
You can search for such programs on specialized furniture forums or simply by entering the request into any search engine: “Free chipboard cutting program.”
The search will return three main options:
1 Download the cutting program to your computer - the most common and most convenient program for cutting laminated chipboards for beginners is Cutting. A simple interface, clear layout and many options for cutting sheets.
2 Create chipboard cutting online - here you won’t need to load your PC with programs that may not be useful in the future.
3 Cutting and ordering chipboard cutting online on the furniture company’s website is an ideal option if the production workshop is geographically convenient for you.
In this way, you will “kill two, or maybe more, birds with one stone” - you will select chipboard on the website, which is available in the required quantity, make economical cutting, see the cost and immediately, sitting at home, order chipboard cutting in a furniture workshop.
I will repeat the important points once again.
Features of choice
If the buyer has already decided on the type and configuration of the equipment, then finally he should also pay attention to the following characteristics:
- Engine power
. Lightweight machines have a motor with a power of 1.5 - 2 kW. This is sufficient for sawing thin plywood and fibreboards. In the case of wood chips, the cutting speed will be low. For cutting a single layer of large format, machines with a power of up to 4 kilowatts are suitable. Industrial units operating from a three-phase power supply allow cutting material in batches and stacks, and their power reaches 6 - 8 kW.
- Disk size. The frames and attachment points for the equipment are made in such a way that it is possible to fasten the disk in a certain range of sizes. A 200 mm disc is considered the minimum standard, and 550 mm can be installed in heavy and some medium-sized devices. The maximum thickness of the material being cut depends on this parameter.
- Speed. The cutting speed and equipment performance depend on this number. Some models have speed control. To work with wood and wood-based materials, a frequency of 2500 to 6000 rpm is usually used.
- Carriage mechanism. Can be made using ball bearings or roller rolling devices on aluminum guides. Ball carriages are less susceptible to contamination, but roller carriages are able to withstand greater weight of sheets laid on the cutting table and have a long service life.
A cutting machine is a necessary piece of equipment for manufacturers of cabinet furniture and has a high degree of versatility.
When choosing and purchasing machines, pay close attention to warranty service and repairs, since any breakdown can lead to downtime
Kinds
A format circular saw is a professional device for cutting sheet materials. Therefore, it is customary to classify such machines in terms of production capacity:
- Lungs. Such machines have a simple modification; there is no additional equipment. They are distinguished by their small overall dimensions and lightweight design. Such mini format-cutting machines are intended for small craft workshops or unique productions, the work of which lasts no more than 5 hours.
- Average. These usually include machines for operation for 8-10 hours. Such format-cutting machines are installed in mass production conditions, where work takes place during one shift. The sawing working body forming the machine is equipped with a movable table, dust extraction and other additional functions that simplify the production process.
- Heavy. They are industrial units capable of operating more than two shifts. It is advisable to operate an automatic format-cutting center in multifunctional production environments. CNC cutting machines are also used to produce multi-format milled products. Such mechanisms have a robust design and an electronic control panel with a programmed operation system.
Format machines for cutting sheet products have different technical parameters that determine their production capacity, cost, availability of additional equipment and design features.
Slitting machines for chipboard processing: overview of models
Italian company ITALMAC (Omnia-3200BR). Each cutting machine comes with a one-year warranty. The middle class model can work for 8-10 hours. Excellent for furniture production. The presence of additional tables and adjustment of the saw speed made this machine universal. Suitable for sawing different sizes of chipboard.
Bulgarian company Brassa. The cutting devices are suitable for use throughout an entire work shift.
Brassa S315 – designed for large-sized workpieces. Ideal for cutting parquet, chipboard, MDF. The machine is equipped with an additional metal support, which allows you to process large and heavy workpieces.
American company HighPoint. All devices have additional options and accessories.
Format saw Brassa S 315
HighPoint STS3200. Business class representative, designed for a full work shift. The device allows you to adjust the rotation speed of the saw blade. Thanks to this function, materials of varying hardness can be processed. A warranty is given on the carriage (3 years) and on the saw unit (2 years).
PROMA PKS-315F. Equipped with durable guides made of chrome-plated steel. There is a degree scale on the miter gauge, which allows sawing without preliminary marking. to menu
to menu
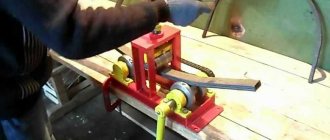
DIY cutting machine
The main working component is the cutting block. It consists of two saw blades, an electric motor and a bell (connection to a chip vacuum cleaner). Do-it-yourself assembly of machines involves using a factory model of the unit (homemade equipment may have operational problems).
Components for a do-it-yourself panel saw:
- bed – tubular structure with adjusting knives;
- the desktop must have a perfectly flat surface, without defects;
- clamps;
- carriage (in manufacturing, an I-beam or two round pipes are used);
- protective covers.
Required tools:
- welding machine;
- Bulgarian;
- electric drill;
- measuring device.
First you need to make a frame (we use pipes with a square or round cross-section).
Homemade format-cutting machine
We cut them according to the diagram and attach them to each other with a clamp. Then we start welding. To make the structure more rigid, you can install profiles between the legs of the frame.
Stages of making a machine with your own hands:
- Movable carriage. We install the guides. You can use a beam or two pipes with a round cross-section. The carriage design must be equipped with rollers for smooth movement.
- Desktop. The base is a 3 mm steel sheet. We make the working surface from a sheet of chipboard.
- Clamps are lever mechanisms with a relatively large area.
At the end of the assembly, we connect the cutting unit to the chip ejector.
data-full-width-responsive=”true” data-ad-client=”ca-pub-8514915293567855″data-ad-slot=”8040443333″>
With the help of panel saws you can:
- cut chipboard, fiberboard, wood, plywood, laminated, veneered and film-lined materials, MDF, plastic and plexiglass;
- perform high-quality cuts without chips;
- some machines can simultaneously saw several sheets of chipboard, which is important for large-scale production.
Computer numerical control
Before processing, a 3D model of the future furniture is loaded into the program. CNC models equipped with a laser beam function are able to show the route of the unit's cutter. Unlike the operator, the presence of a CNC system makes it possible to speed up production and improve quality:
- thanks to the program, there is no need to set up the machine to produce each part;
- utilities ensure savings in material used;
- optimizing the movement of the working tool reduces the time required to complete a task.
The product layout is presented as a file. The files are loaded into the device memory. Depending on the contents of the file, the device is configured. The person is required to download the files and start the unit, after which the production of components will begin.
What shortcomings were discovered and what would I change?
- Shaft diameter 20 mm. Professional formatters use 40 mm shafts, so it is difficult to bend them when cutting. Why didn't they take 40 mm? To be honest, it was strangled by a toad - one shaft 2 meters with a diameter of 40 mm costs almost 10 thousand rubles. And you need 2 of them (let me remind you that the entire format set cost 10-11 thousand rubles, including the circular). If you decide to assemble it on a furniture rod (for hangers), I don’t recommend it right away - our solid 20 mm shafts bend a little, and the rods will simply bend.
- Wooden frame. The tree tends to “walk” and dry out. Therefore, some bars may bend a little due to changes in humidity. An aluminum frame made from a machine-made profile would cost 30-40 thousand rubles. Simple square aluminum tubes are about half the price, but their bending rigidity is lower than that of a machined profile. In theory, key places can be strengthened with metal corners (we are talking about molded products, not corner fastenings of parts at an angle of 90 degrees). But again, the frame is attached to the floor and wall, and the problem of bending is solved by periodically adjusting the position of the shafts.
- It is still preferable to take laminated plywood rather than simple FC. This will make the sheets travel more fun. Why didn't we use laminated? Because in our warehouse there was only FC, and there was no desire or time to order a laminated sheet separately. Perhaps we will fix it in a future modification.
- The polypropylene bushings for sliding the movable carriage sometimes jam a little and they whistle. Now I would do it a little differently, but I’m showing you exactly how it was during the manufacturing process.
- Instead of shafts with a counterweight, it’s better to look for a cable with a “reverse traction tape measure” (I’m sorry, I didn’t look for the exact name of this unit). It should be no more expensive than my version, but it will be easier to assemble such a design. Plus, the extra resistance in the rollers that I used above the machine will disappear.
PS If you are new to our website and are interested in carpentry, then take a look at what cool things our CNC burner machine Pyroprinter does (this is not paint - it is BURNING):
You can read about the PYROPRINTER machine itself here
Do-it-yourself format cutting machine: drawings, videos, photos
As the Pyroprinter project develops, our team has to optimize some processes. We have long needed to make some kind of machine or device for quickly and accurately dismantling plywood for subsequent milling. I won’t bore you, I’ll immediately show you the result we got:
We made such a format-cutting machine with our own hands. Let me clarify right away - we are not a furniture manufacturer, where the format machine is one of the main tools.
And it comes with the requirement to have a scoring saw blade for cutting without the slightest chips and high productivity.
For us, cutting plywood (and other sheet materials) is an auxiliary production process that does not require high quality cutting.
Those who have ever encountered cutting sheets of plywood (1.5 * 1.5 m) know that sawing is accompanied by a number of difficulties:
- The sheet is bulky and requires a lot of space if cut horizontally;
- When cutting across the grain, many chips appear;
- Maintaining an even line from edge to edge by simply sawing along the drawn line is not easy - the cut floats a little.
The initial requirements were simple: you need a budget version of a format-cutting machine that you can assemble with your own hands. The cut should be straight and without chips. When cutting, spend a minimum of time setting dimensions. The formatter should take up minimal space.
Purpose of the format cutting machine
The main functions of a format-cutting machine are to form an even cut on the surface of laminated chipboard or fiberboard. This places special demands on edge quality.
Externally, the structure resembles a simple sawmill. The difference lies in the rigid fixation of the workpiece relative to the cutting components. To increase quality, there are two discs of different diameters. One of them is larger than the other and rotates in the opposite direction. This makes it possible to reduce the likelihood of chips on the end of the wooden surface.
When making a homemade structure, the following points should be taken into account:
- equipment stability during operation;
- availability of measuring tools for preliminary cutting of wooden sheets.
- desktop dimensions. They directly depend on the dimensions of the workpiece;
- security measures. This applies to equipment and operating personnel. To remove chips, there must be an exhaust mechanism; the cutting components are located under a special cover.
An important factor is the preliminary calculation of all structural elements. It must perform its functions depending on the degree of load. One of the disadvantages of a format cutting machine is the inability to form shaped cuts. This requires other types of equipment.
When analyzing factory models, the thickness of the material being processed and its specific density should be taken into account. This will affect the choice of saw blades.
Sequence of work
First, a strong metal frame is prepared that can serve as the basis of the machine. For this purpose, it is best to use a channel. The blanks are selected so that the result is a unit 6.5 - 6.7 m long, 2.5 m wide, and a height of eighty to one hundred and ten centimeters.
The main guide of the cutting equipment and the floor guide are designed and mounted on the bed. For them, it is best to use pipes whose dimensions are 6 cm in diameter, 6.5 m in length, and wall thickness - 5 mm. The moving part of the desktop should be made movable along guides. During the work process, it will be used to feed sheet material. This section can be moved manually or an additional CNC motor can be installed. Cutting lines along the length should be provided from three meters. This parameter can be increased or reduced by simply changing the size of the guides.
Read also: Screwdriver attachment for drywall screws
A pair of saws are hung on the bed - for the main cut and trimming. They are mounted on a saw unit so that rotation occurs in the opposite direction from the movement of a pair of asynchronous motors. It is recommended to provide the ability to tilt the block by forty-five degrees, for which you should use a rotating device on the sawing block.
You should choose electric motors carefully, because they will be intended to rotate the saws. Their power must be at least 2.9 kW. The motor must rotate the main saw at a speed of at least 5,000 revolutions per minute, and the scoring saw must produce three thousand revolutions more.
When creating equipment, it is best to use saw blades with a diameter of twenty-five centimeters, which will make it possible to cut not only laminated chipboard and trim sheets, but also to use a machine for sip panels.