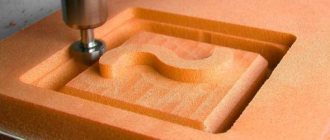
There are often cases when you need to carefully process the edge of a board, create a connecting groove, or cut out a part of a rather complex shape. This operation is done using a milling cutter. You can buy such a tool at an electronics store or make it yourself. The article will give detailed instructions on how to make a router from a drill.
Homemade router
What is a homemade drill machine?
In this case, a hand drill (or screwdriver) will act as a drive for all equipment. You will need to clamp a drill or cutter into the chuck, which will be used to process the wood. The body of the drill on a homemade device is mounted on a base or a special mechanism, with the help of which the cutting part of the device can be positioned in the desired direction relative to the workpiece.
The operating principle of a homemade product will differ little from the factory version. The home design resembles the elements of a standard device, not made in handicraft workshops. The only exception is that the drill mounting parts are made independently, and the design of the unit itself will depend on the material that needs to be processed.
If you have to perform simple operations with a milling cutter, then there is no point in making a complex device, so you can use a minimum number of components.
For reference! If the need arises, you can always modify the unit by making a more complex design. It all depends on the capabilities of the master, as well as his needs.
Electric car
To produce an electric car you will need:
- Frame made of metal profile pipe. There is an option to do it yourself .
- Wheels can be used from a garden cart with rubber wheels.
- Of course, take the body from an old pedal car, as it is also called, and come up with some creative solution. For example, soldering from plastic pipes.
- As an electric drive, you need to use two motors from screwdrivers and a gearbox from the same power tool. They make separate housings in which the output shaft is mounted on 201 bearings.
- Battery. An ordinary 6ST60 car is used.
When all that remains to be done is for our client, the components are prepared, all that remains is to assemble the electric car. The myth is an easy process and is possible for every man who has even a superficial understanding of plumbing.
Design of a milling cutter from a drill
A drill is not the most powerful tool, and therefore at home you can only make a lightweight machine for milling.
In order to process wood efficiently, it is necessary to securely fix the drill on the tabletop, as well as the workpiece itself: it should not move during operation. If you create a structure with an overhead drill, you can process fairly durable wood and create a complex configuration.
Important! You can make different types of milling cutters from a screwdriver. More on this below.
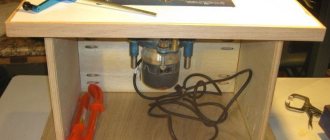
Table with router
If you have to mill regular grooves or form a tenon-mortise, then it is advisable to use a design with a protruding working element (cutter). This is a fairly simple assembly diagram to install on a small workbench.
The cover must be turned over during operation, a hole for the tool cutter is cut there. The size is approximately 5 mm larger than the diameter of the cutter used. It is necessary to install a strong strip perpendicular to the tabletop so that the spindle axis coincides with the created hole.
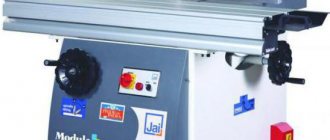
One of the possible forms of a milling machine
Using stops and clamps, the power tool is attached to the workbench. In working condition, the chuck is located under the cover, and the drill protrudes. As soon as the processing of the wood surface begins, the part will move along the table, without leaving a certain area, which is limited by the template.
You can use any other fastening method - it all depends on the available tools and the imagination of the master. In this situation, the main thing is that the axis of the cutter used exactly coincides with the center of the hole.
Important! All parts of the machine must be securely fastened; if distortions appear, the equipment needs to be modified.
Simple machine
How to make a milling machine from a drill - three main parts:
- Sole.
- Rack.
- Kerchief.
All this is made from plywood. The parts must be perpendicular. You need to make a hole under the sole through which the cutter will come out.
The stand should be equal in width to the body of the electric drill and be approximately 20 mm longer. The drill is fixed to it with clamps (just above the chuck). It is advisable to use an additional stop for more reliable fixation. Thus, the back side of the housing on the opposite side of the spindle will be securely fastened.
The gusset is necessary to increase the rigidity of the device. One part of it is adjacent to the sole, the other to the counter.
The sole is the base of the structure. To manufacture, you first need to make a drawing: draw (or print on a printer) a square, where the sides should be equal to the body of the electric drill. Next, add one strip at a time (on two adjacent sides), which are equal to the thickness of the plywood. Mark the center on the sole so that you can later make a hole there with a drill.
The sole is cut along the contour. It is advisable to round the corners so as not to hit them during operation. On the reverse side you need to make a 4 mm hole, as well as several recesses into which the countersunk heads of the screws will fit.
Important! A piece of rubber or linoleum is attached to the bottom of the sole to achieve smooth gliding.
If necessary, the stand can also be assembled from metal.
The stand is placed in the selected location and screwed in place. The gusset must be placed in such a way that on one side it rests against the base, and on the other against the stand. Thus, the structure will be as rigid as possible. It is necessary to fix the position of the drill when it falls below the sole. For this purpose, a stop and a clamp are used.
Machine with vertical movement of the cutter
In this case, the sole must be lengthened. You need to screw a large board with a U-shaped vertical profile (2 pieces) to it. They will serve as guides.
A drill will be installed on the bar on one side, and two slats in a metal profile on the other. It is necessary to screw a screw into the base from below, which will act as a stop when moving the body of the drill used down.
The router can be placed on the side cylindrical stands. And attach a spring to the bottom, which will return the tool to its original position. For fixation, metal corners, screws or staples are used. The milling depth can be changed using stop screws.
Step-by-step instruction
Before the master begins the direct assembly of a homemade router, he will have to spend time making the components and parts of the frame. To do this, the wizard:
- cuts a steel sheet and cuts out a rectangular blank from one part - the sole is made from it. A central axis is outlined on it between the two lateral (short) sides. Then a semicircular hole with a diameter of 1-3 of the length of the side is drawn with the center of the circle located on the axial perpendicular, at a distance of 1.5 cm from the end of the side. Along a line parallel to the side side, from the points of the semicircle diametrically distant from the center, two segments of 1-1.5 cm are drawn to the sides. Then from them another segment is drawn at an angle of approximately 60o to the side. The result should be a figure resembling a dome resting on a flat trapezoid.
- The workpiece is clamped in a vice and, using a grinder, cut along the drawn lines. The sharp edges are then sanded down for safety. The sole is ready.
- Now a hanging “braid” for the grinder is being designed. Using a drill and a special ring attachment, a circle is drilled out of a metal blank based on the shape and size of the grinder - it will lie on this braid, fixed from below with a chuck with a cutter.
- Then, before cutting out the part, it is recommended to prepare a stencil from cardboard. In shape it resembles a “circle with triangular ears”, which are then ground off at the circle and along the edges. After this, the stencil is applied to the metal of the workpiece, so that the hole for the grinder cartridge is located in the center of the circle. After this, the metal is cut according to a stencil.
- From one profile (a section with a smaller height), supports of the same height are cut out, which are welded parallel to each other at an equal distance from the central axis of the sole.
- From the second profile (whose cross-sectional height is greater) “sled cubes” of equal size are cut out, which freely “slide” along “rails” welded to the sole.
- The “ears” of the workpiece are filed down and welded to the sliding cubes so that it can slide down and up along the guides on them.
- In the upper part of the workpiece circle, another 2-3 mm slot hole is sawed, after which it is welded onto it: on one side of the resulting arc there is a nut, and on the other, a screw. This is done in such a way that when screwed in, the circle decreases in diameter, and the grinder with the cartridge is tightly fixed horizontally in it.
- To fix the grinder on the “carriage” obtained from the blank, additional oval “ears” are cut out of metal, in the upper part of which holes are drilled, the same size as the side bolts on the grinder. The lower part is bent at an angle of 90 degrees in a vice. After this, the ears are welded to the carriage. For ease of use, instead of a bolt, you can screw a double-sided holder into one of the “ears”, onto which the handle from the grinder will be screwed.
- A hole is also drilled in each of the cube-sleds and a nut is welded onto it, which, in combination with the fasteners, will lock the carriage at the desired height.
- Making collets using a milling cutter. Take an old drill cartridge and, using a tap, cut a thread for the angle grinder axis in the hole along the shaft. The thread of the tap is selected according to the pattern of the nut that secures the grinding disc to the shaft.
- The parts of the resulting structure are polished and blown. It is recommended to paint the frame for aesthetics and to protect components from dust.
After the assembly is completed, the angle grinder is placed on the carriage and secured with a disk clamp. Then the chuck is installed, the cutter is mounted in it, and the installation is fixed in height with clamps on the “sled”.
Thus, having used this model and made a milling bed in a home workshop, the master has at his disposal a specialized attachment for an angle grinder, which will perform all the necessary work on wood and is in no way inferior to industrial, often expensive models.
Materials and tools
List of tools and materials required for assembly:
- Chipboard or a sheet of plywood approximately 12 mm thick is suitable for making a tabletop (the exact dimensions are selected individually).
- Boards of suitable thickness.
- Several wooden blocks.
- Self-tapping screws, screwdriver or screwdriver.
- Ruler and pencil for marking.
Important! If the design should ultimately be as reliable as possible, you can use metal (pipes, corners) instead of wood.
It is advisable to coat the wood with construction glue or PVA. To secure the moving units, studs or bolts with a diameter of 8 mm are used. You need to select nuts for them (regular and wing nuts).
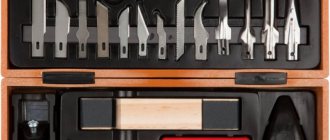
Main types of nozzles
For milling work, end mills with a shank diameter of 6.8 or 12 mm are used.
They are sold individually or in sets that include the most popular types of cutters.
There are sets with 7 mm shanks, but it is difficult to find a collet for them. Depending on the purpose and shape of the cut, there are edge and groove cutters. Edges include:
- Profile;
- Conical;
- Moulded (moulded, quarter-rolled);
- Disk;
- Fillet.
A common feature of edge cutters is the presence of a bearing that acts as a stop. Groove cutters include:
- Rectangular (straight);
- Filling;
- "Dovetail";
- V-shaped.
Groove cutters do not have thrust bearings and allow you to cut both on edges and on faces. There are straight cutters with a bearing at the top, just above the cutting edges. Usually its diameter corresponds to the size of the cutting part, which allows you to cut curved shapes according to a template. Such cutters are called turning cutters. They are not included in standard kits; if necessary, they must be purchased separately. Almost all cutters are available in several standard sizes. To make a recess of the required size, you need to select a cutter of the appropriate diameter or profile.
Manufacturing process
A simple design option
How to make a router from a drill or screwdriver? For household needs, you can assemble a vertical router; it has a fairly simple design and is easy to make at home.
Make a foundation
The sole (or base) should be oval or round with a hole for the cutter to pass through (done in advance). It should be offset relative to the center of the workpiece, taking into account the thickness of the stand, which is located on the side.
The size of the base is selected individually.
Install drill
Next, you will need to place the drill on the created base to mark its position. Using stops and clamps, secure it to the work area.
Attach to workbench
Having placed them exactly at right angles, fix the gusset and stand to the tabletop. Securely secure the tool body to the base. After installation, it is important to make sure that there are no backlashes or distortions on the created unit.
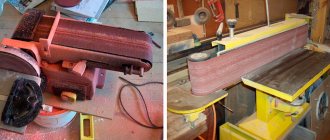
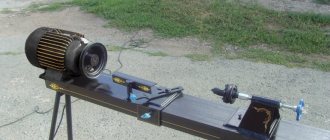
Wood lathe
In the process of making wooden products, it is difficult to do without a lathe. Of course, you can design it yourself . A flat wooden workbench is perfect for the bed. A screwdriver is used as a headstock and rotation drive. It is necessary to place the tool in a wooden bed made from a block in the shape of a screwdriver and secure it with a clamp. There is an option to secure the block with a clamp, and if you always use the machine, screw it with screws. You need to insert a tooth mandrel into the chuck. The tailstock is made from two bars with an adjusting screw, which is sharpened to a cone. It is installed opposite the fixed screwdriver so that the axis of the tool coincides with the axis of the tailstock adjusting screw. The back support structure is secured with a clamp. If you plan to process large parts, then the fastening must be made more reliable. The tool rest can also be made from a block, securing it to the workbench with a clamp. A simple lathe for the home workshop is ready.
Advantages and disadvantages of a router
The main advantages of a do-it-yourself router from a drill:
- if single operations are to be performed, there is no need to spend money on purchasing special equipment;
- to make the device at home, you will have to spend about half an hour;
- if necessary, you can quickly change the bit (attachment), which will be adapted for a specific task.
There are also disadvantages:
- the drill cannot gain a large number of revolutions, so working with dense materials will be problematic.
- the operator's work area is severely limited by the small size of the router;
- The drill engine is much weaker than that of a professional milling machine, and therefore it is not possible to work for a long time on a homemade machine with maximum power.
In addition, we must not forget that the drill gets very hot when used for a long time, so the tool must be given time to “rest.”
Electronic snowmobile
With the help of a screwdriver, they not only perform transport in motion, but also a real snowmobile. It is necessary to use an electric vehicle for this purpose, having carried out a number of appropriate upgrades. It is necessary to improve the electric vehicle frame to install the drive wheel on its surface. Instead of driven wheels, it is necessary to install skis, and replace the plastic steering wheel of the car with an iron bicycle steering wheel. The drive wheel is driven through a chain transmission from a screwdriver.
Assembling such a miracle technology will not take much time or money. For our client, the costs will be paid off by the joy of the baby, for whom a vehicle with an electric drive will be a real gift.
Features of working with a homemade milling device
It is important to pay attention to the speed of rotation of the shaft. The engine of a professional machine can reach 20,000 revolutions per minute. The drill's performance is much more modest - approximately 3000 rpm. Therefore, cutters designed for low speed operation may not be suitable. The rotation speed regulator must be set to the maximum position.
A similar situation is observed with engine power. This means that a home-made milling machine can only process soft wood or plastic workpieces.
For reference! The machining accuracy of a home machine will not be ideal, since a gear is used to transmit rotation.
During operation, slight play may be observed, which will affect vibration and beating. This affects the final result of the work.
The information provided is enough to understand how to make a wood router from a drill at home without much expense.
Other functional parts
Their list is as follows:
- Base plate. Absorbs elasticity waves.
- Drive board for vibration damping.
- Comb stops (combs). Needed to neutralize vertical vibrations of the workpiece.
- Static side stop. Guarantees the correct feeding of the part and the depth of its horizontal processing.
- Dust catcher.
Drive unit
It is better to make the opening for placing the drive round, so the machine will have less vibration during operation. The motor must not come into contact with the plate.
Installation of the drive in this plate is as follows:
It is better to create the drive board from PCB or fiberglass with a density of at least 1.5 cm.
Classification of units
There are three categories of milling cutters:
- Professional. Workpieces of different sizes and in large quantities are processed. For this, a serious range of cutting tools is used.
- Household. In terms of functionality, they are suitable only for home workshops.
- Manual.
Each classification has its own subtypes. So professional machines have the following varieties:
- Standard. Used to implement template operations. Their equipment allows you to perform many jobs and give the workpieces the required configuration. The cutting arsenal includes: cutters, drills of different diameters, and special knives.
- Copying. They perform artistic operations: applying complex images, placing samples on different surfaces, and designing ornaments. In this work, accuracy is guaranteed since the workpiece is fixed using the vacuum method.
- For vertical processing of parts (from top to bottom). Here grooves with the required width and depth are cut, and fastening components are prepared. The parts are cut to the required length.
- For horizontal work with workpieces. Here the spindle axis is horizontal in relation to the floor. There are cylindrical and end mills.
- Performing simultaneous processing on both sides. They are universal. Various profiles are processed here. Not a single production of furniture components is complete without these machines: stands, legs, support elements, etc.
- Equipped with CNC devices. An electronic complex based on a special microprocessor is integrated here. It contains a program that determines the algorithm of operations. Due to this, the accuracy, quality and dynamics of work, and the labor productivity of a CNC milling machine are significantly improved.
Household models are small in size and weight. They implement basic functions (planing, drilling, grinding, sawing). Their types:
- Desktop. Characterized by ease of operation and service.
- Manual. Used for working with small-sized parts. Small grooves are prepared on it, which are required for the articulation of separate components.